 User Manual
Welcome
Getting started
Administration
Projects
Taxonomies
Datasets
Ontologies
Enriching your data using ontologies
Advanced search
Bulk editing
Workflow
Reports
Versions
Free-floating resources
Accessibility
Hints and tips
Glossary
Querying data
API
Graphologi is an application to help you manage taxonomies, ontologies and sets of data using W3C standards. Graphologi has comprehensive support for SKOS, SKOS-XL and OWL 2, and uses RDF for the underlying data, which ensures that your data is compliant and interoperable.
There are many features in Graphologi to help you manage your taxonomies, ontologies and data:
To log in to Graphologi you will need to first register by signing up.
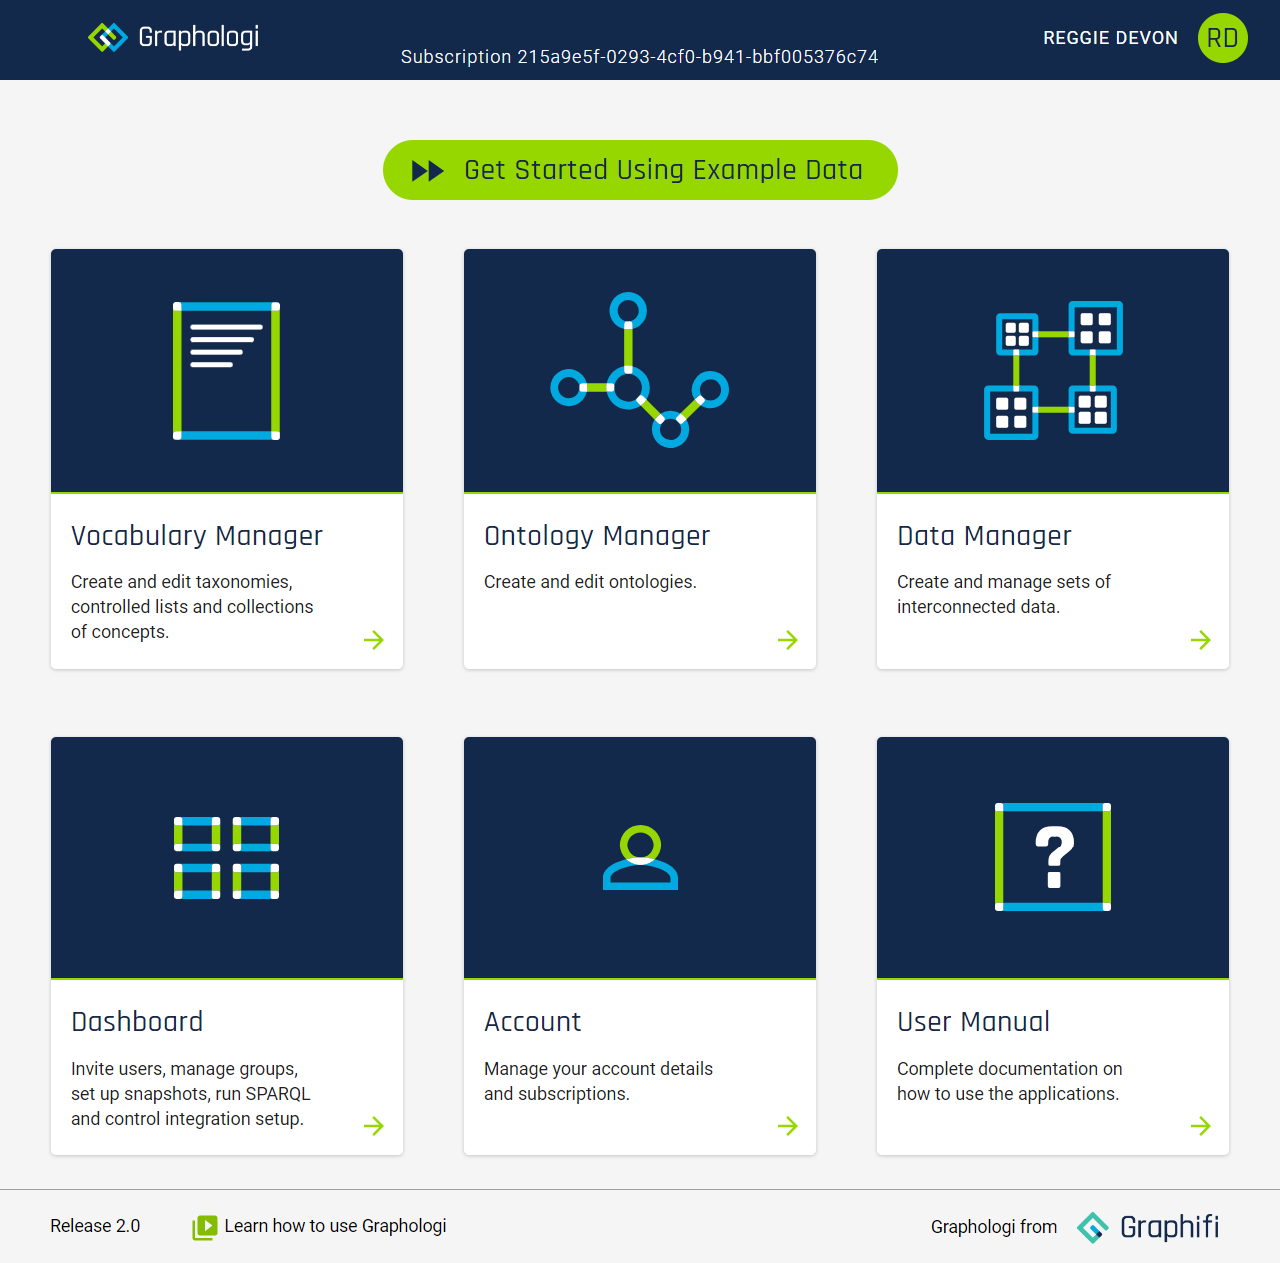
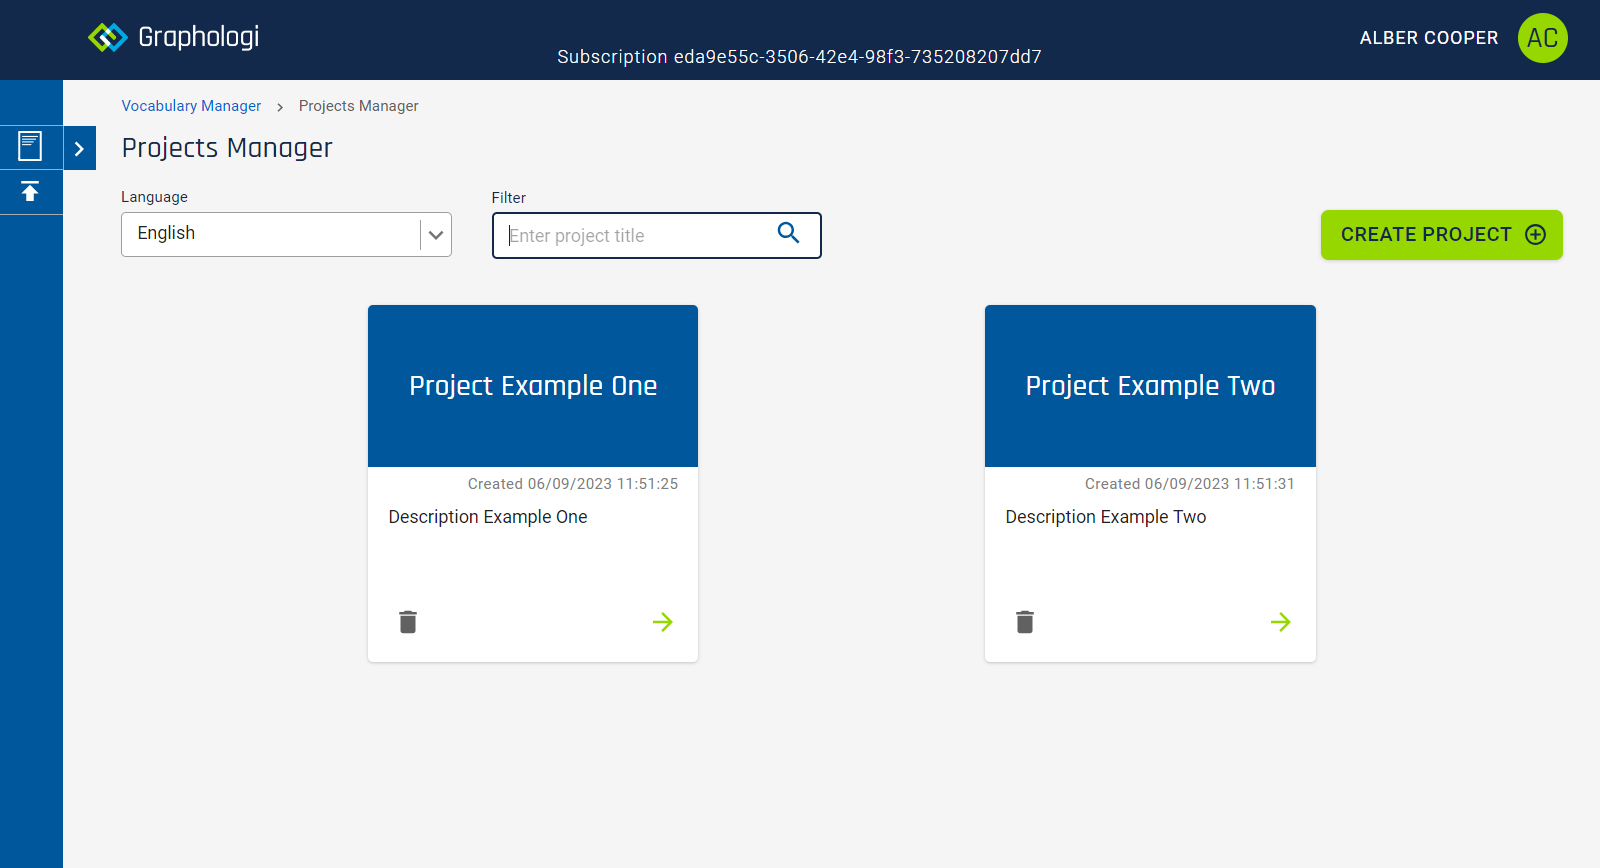
Once you are logged in you will see a set of applications that you can use, similar to the image below. What you see depends upon the permissions you have been given for the subscription. Permissions control access to different parts of the system and are controlled by administrators of a subscription.
To start using an area of the application click on the appropriate card.
Your feedback is vital to us so that we can fix issues and improve the application.
At all points in the application you will be able to submit feedback by clicking on the green user icon at the top right of the screen. You should see something similar to the following image.
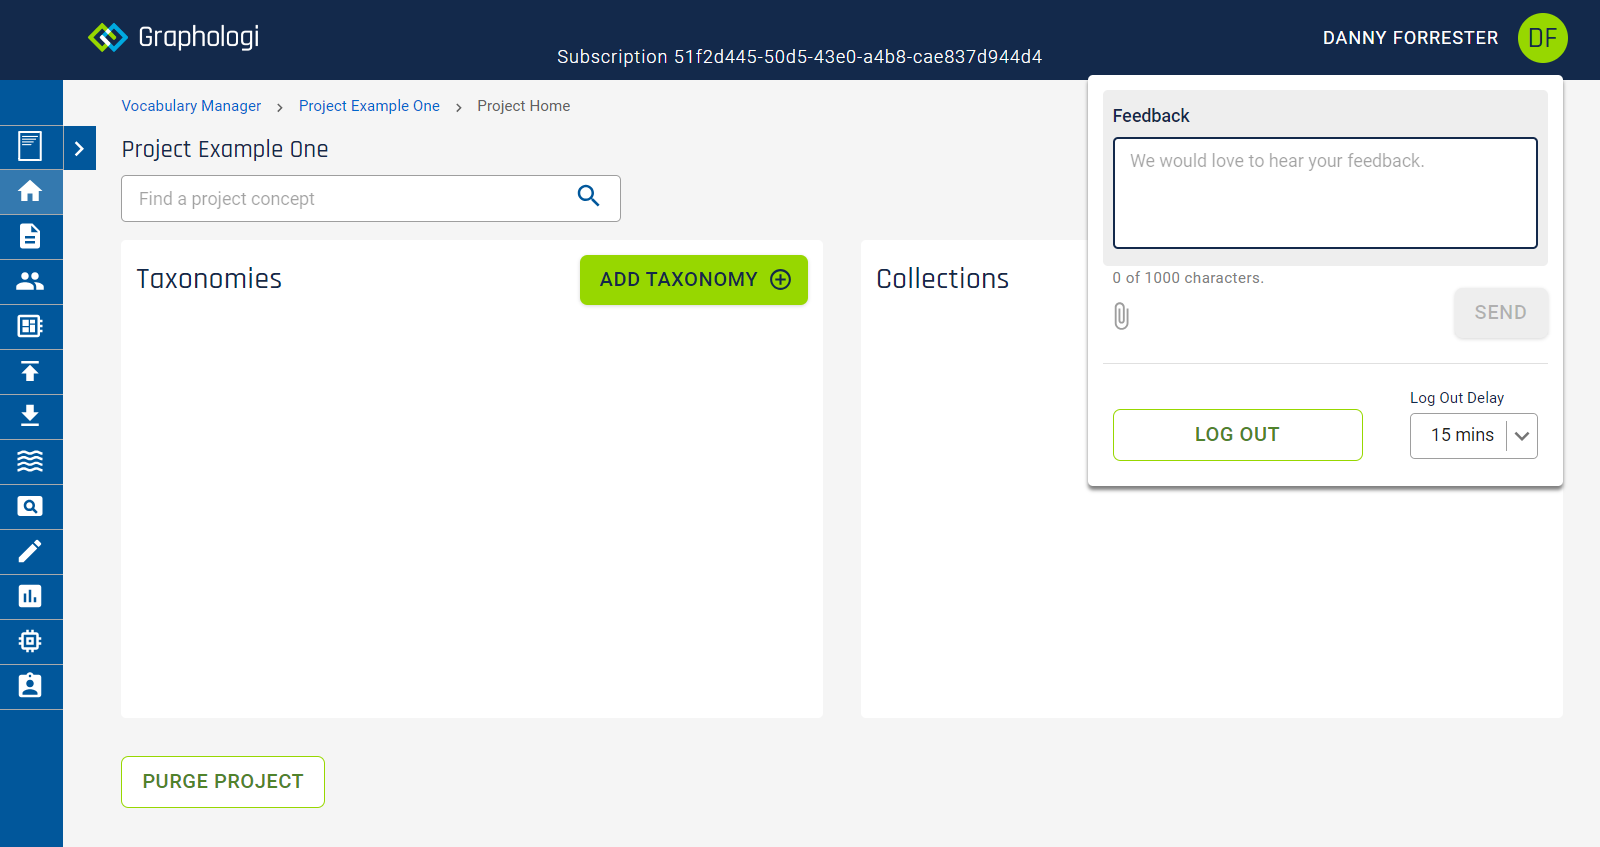
You can enter text and can also attach a screenshot if that helps.
Of course we still welcome feedback sent by other means such as email if that is more convenient.
Within Graphologi everything happens within the scope of a subscription. A subscription may be owned by a single individual, or a person may create one for an organisation. Different subscriptions permit different numbers of users.
A subscription is created by a single user. That user can then invite additional users up to the limit of the subscription. An invitation can be withdrawn at any time. Invited users are free to accept or reject an invitation and will be notified on logging in about any pending invites.
Each subscription allows an unlimited number of projects to be created.
When you log in one of two things may happen. If you have a subscription, or have accepted an invite and there are no pending invites, you will be taken directly to the dashboard.
However, if you have multiple subscriptions, or pending invites, you will see a screen where you can select which subscription you wish to work on.
If there are pending invites you have the option to accept or reject them. Simply click on your preferred choice. If you accept an invite there will be a short wait whilst that acceptance is processed, at which point the invite becomes available for selection.
You need to decide which subscription you will work on at any one time. Click on the subscription or invite that you wish to use.
You can change the active subscription within the application via the Account option during any point in a session.
When you select a subscription you will be taken to the applications page, which will look similar to the following image.
If you select this option then there is no active subscription and you are limited to access to your account and the user manual. You can select a subscription from within the Account option.
Subscription cancellation can be done in the Account area of the application.
A subscription will be terminated at the end of the billing period. For trial subscriptions of a month or less there is an automatic expiration and therefore no cancellation is necessary.
Note that cancellation of a subscription will remove all the data for that subscription at some point after the expiration period.
Account management (choose Account on the dashboard) allows you to manage subscriptions and invites as well as your personal details.
Subscriptions and invites work the same way as described in the section on Subscription management. The only difference is that here you can choose (or change) the active subscription that you want to work with.
In the My Details area of the application you can manage your personal details and password. You can also delete your account. Note that deleting your account will cancel all subscriptions and delete your data at some point shortly afterwards.
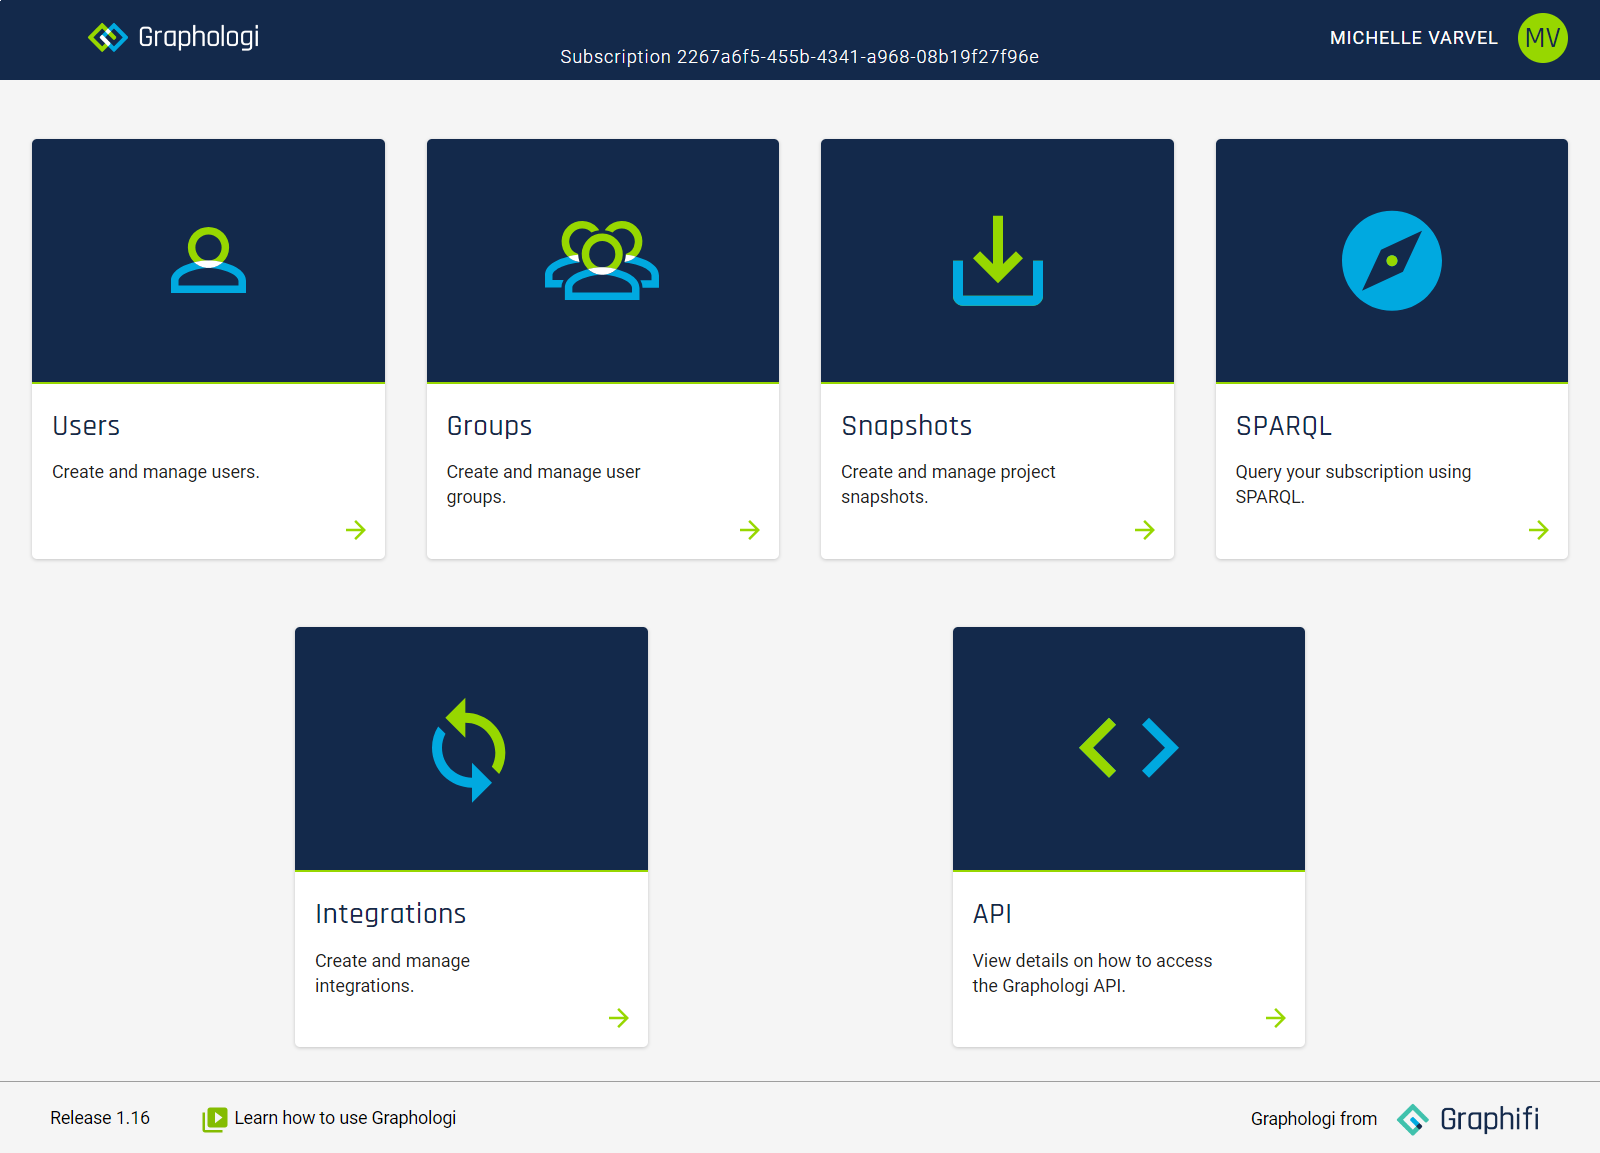
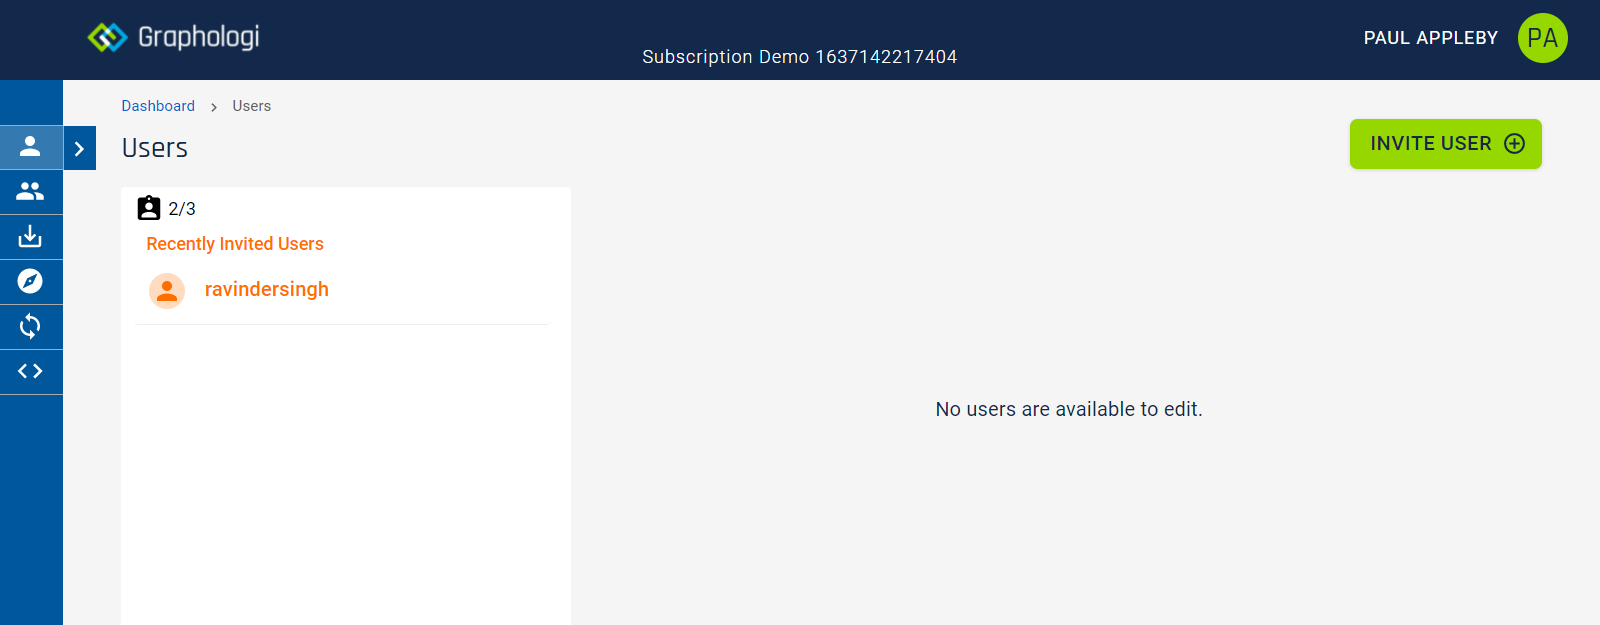
To manage users and groups within a subscription select the Dashboard option. This option will only be available if you have permissions. You should see a screen similar to the following image.
Managing users within a subscription essentially means managing invitations. To invite a user they must be registered on the system, which is something that the user has to do.
Groups are used to control access to application functions. Each group can be set up with a subset of the overall entitlements, allowing you to fine tune how you let users access the applications. A user can be assigned to zero or more groups.
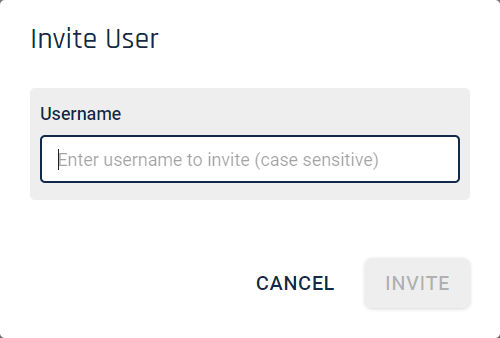
When a subscription is first created there will be no additional users. To add a user click . This should present a form as follows.
Enter the username of the user that you wish to invite and click . The screen should update to look similar to the following image.
You can now invite further users if required.
If you come back to this screen at a later point you will then see a screen similar to the following image.

You can now select a user and start to edit the groups that they belong to. Groups are used by projects to select subsets of users for a project. Each project can control its own list of groups.
If a user has still not answered the invitation it will say 'Pending' against their name. If they have answered it will say either 'Accepted' or 'Rejected'. You can withdraw an invitation at any time by clicking the ![]() icon on the right of the screen. Note that this will not take effect until the next time a user logs in.
icon on the right of the screen. Note that this will not take effect until the next time a user logs in.
By default four groups are made available for each subscription - Administrators, Editors, Reviewers and Viewers. You will see a screen similar to the following image.
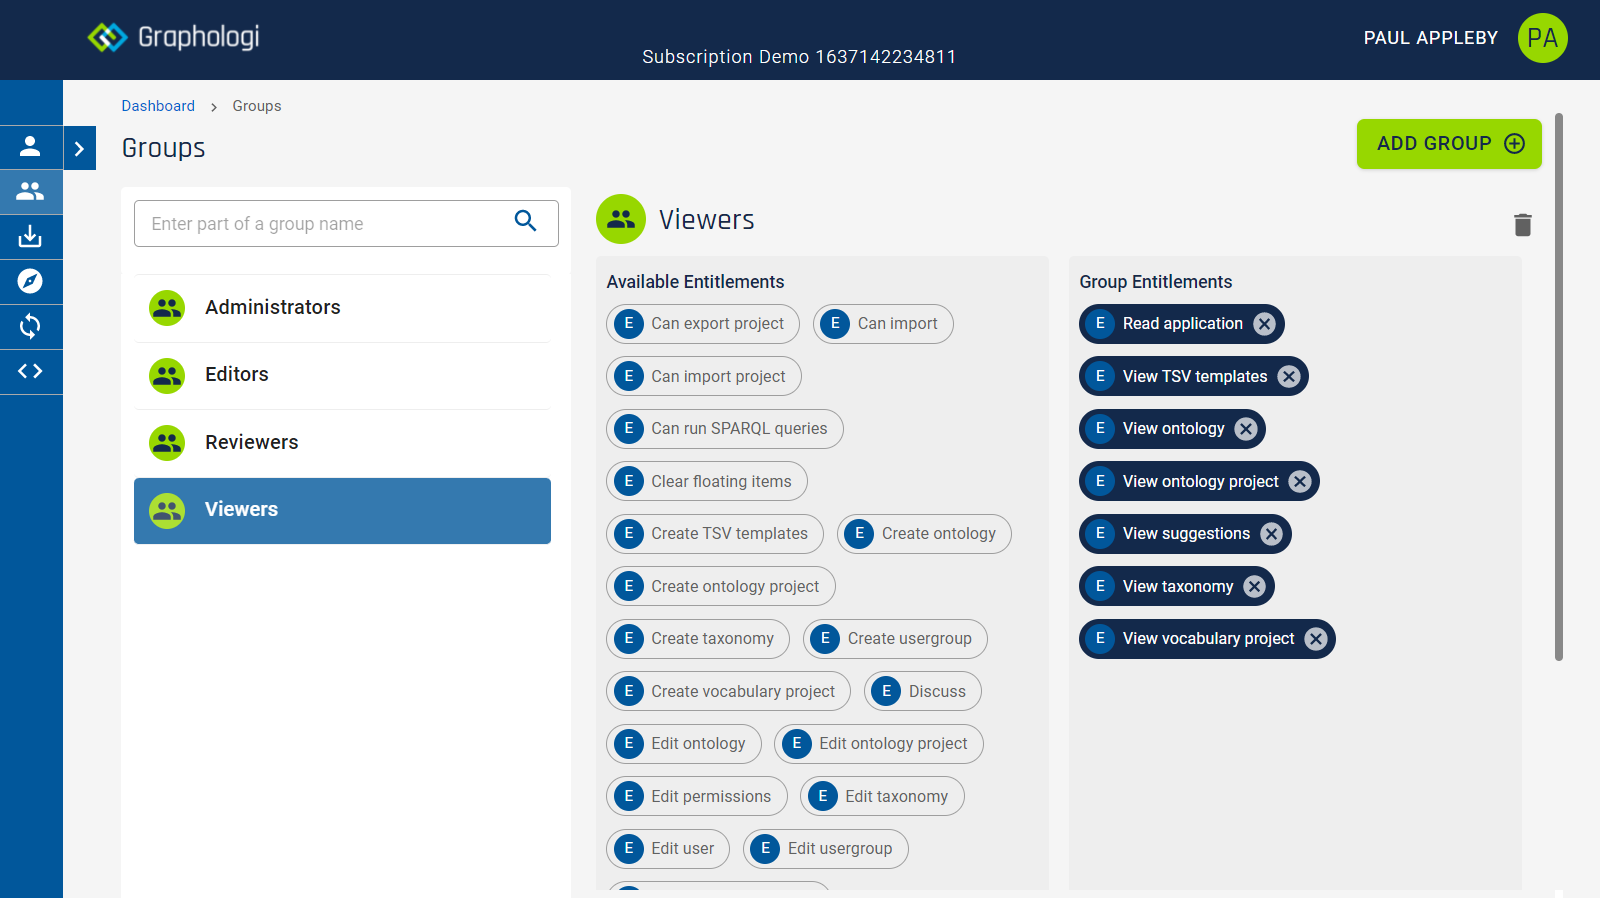
The default groups have preset entitlements. Administrators can do everything and this group cannot be changed. A subscription owner is always an administrator. The Editors, Reviewers and Viewers groups can be deleted if desired.
You can create as many additional groups as you require. A group will generally perform a 'role' within the system and be given a set of entitlements to perform that role. To add a group click . You will see a form similar to the following image.
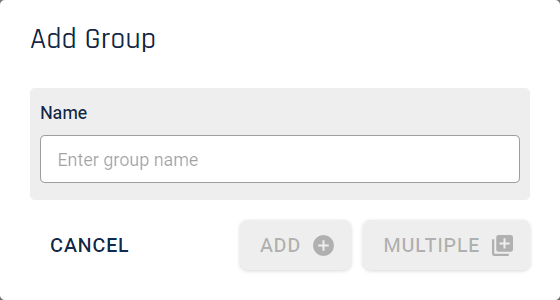
Enter a name for the group and click . If you want to create a bunch of groups in one go click , which will add the group but keep the form open to allow another to be added.
Ultimately you will probably want to use any data managed in Graphologi in another system. One option that Graphologi provides to achieve this is webhooks. Webhooks allow data to be pushed from Graphologi to an endpoint on a target system.
When thinking about integration it is worth considering whether a 'push' or 'pull' is the best approach. Pulling data via the Graphologi API is another option. However, that requires careful consideration as to when to pull any data. For instance, if a taxonomist is performing a set of changes and a scheduled pull of the data happens, that pull may happen when only some of those changes are applied. Webhooks give control to a person to decide the right time to synchronise data.
Webhooks use public/private keys to ensure that the target system can validate that any data has been sent by Graphologi.
The number of integrations that can be set up is dependent upon the subscription.
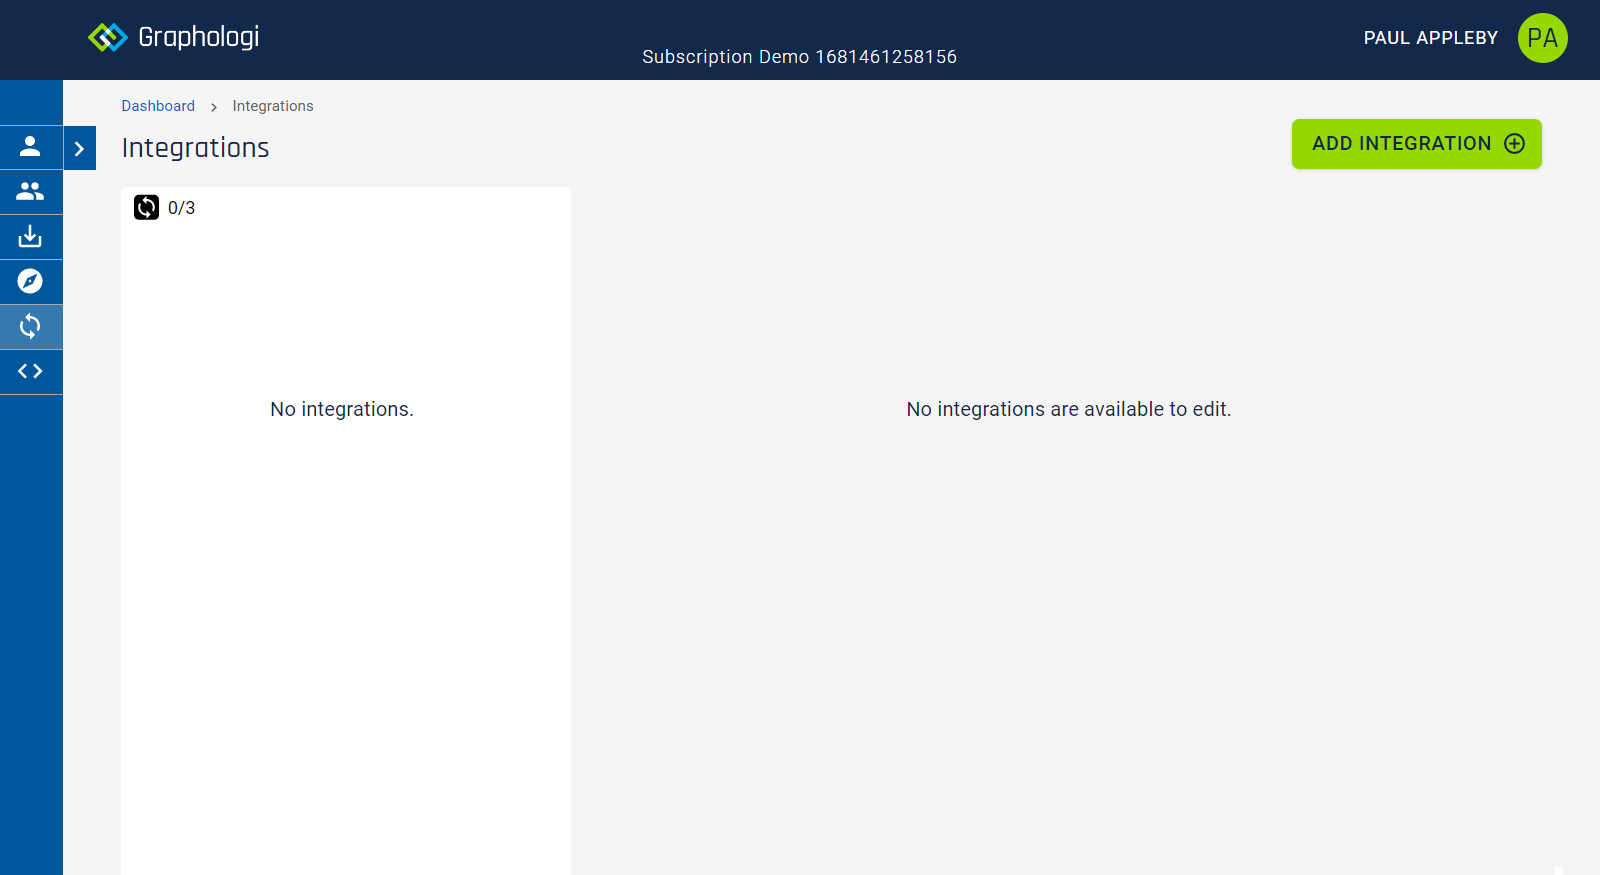
Integrations are set up via the dashboard. Click on the Integrations card as shown in the following image:
You will need the appropriate entitlement to access this part of the application, which is Manage integration.
Click on the button as shown in the following image.
This will display a dialog similar to the following image.
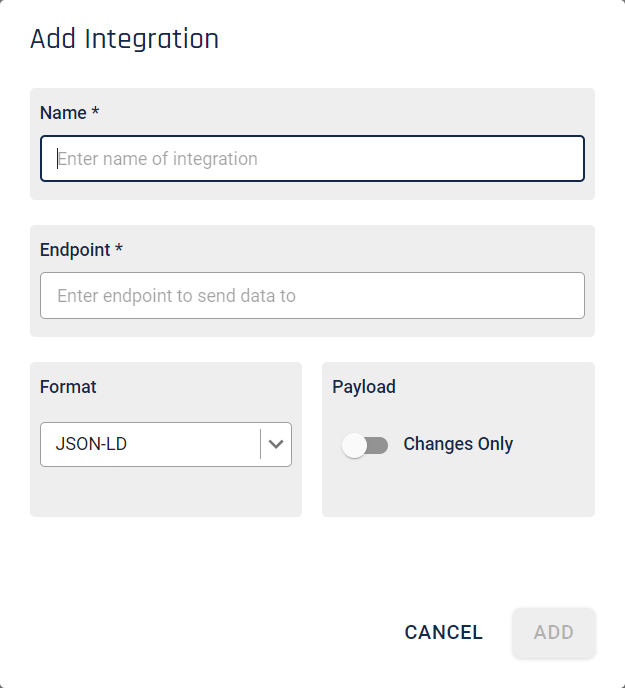
Enter a name for the integration, the target endpoint and the format to send to the target when synchronisation is done. If you do not know the full endpoint at this point you can always edit it later on.
When sending data there are two options - send entire taxonomies, collections and ontologies, or, send just the changes (delta) since the previous send. Which is the best option will depend upon how you want to process the data. For very large taxonomies and ontologies it may be more efficient to just send the delta. If you want to use the delta option select the 'Changes Only' option. Note that there is a 100MB limit for integration payloads.
Click .
You should see a screen similar to the following image. The Public Key field contains the key that you can use in the target system to validate requests.
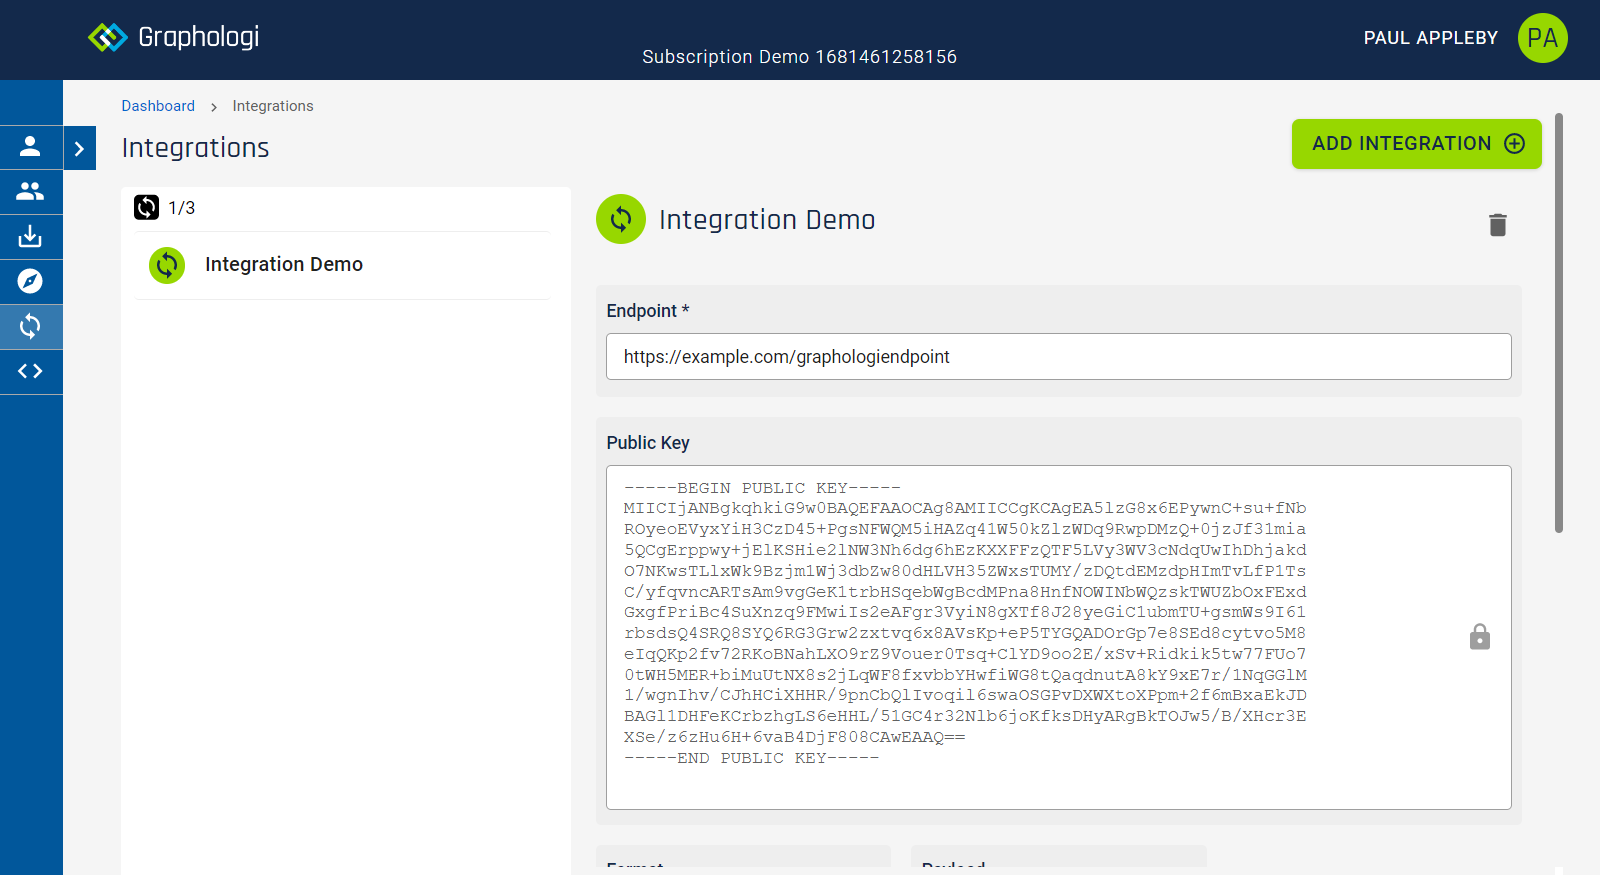
When data is synchronised a list of when the synchronisation was run will be available for each integration.
It takes just a few simple steps to be able to push data from Graphologi to EasyGraph once you have a dataset configured in EasyGraph.
Create an integration as above using a holding URL such as the following EasyGraph sandbox URL, filling in the relevant values for InstanceID and Dataset from your EasyGraph set up and using '12345' for what will be the UUID value for egSignatureKeyUUID
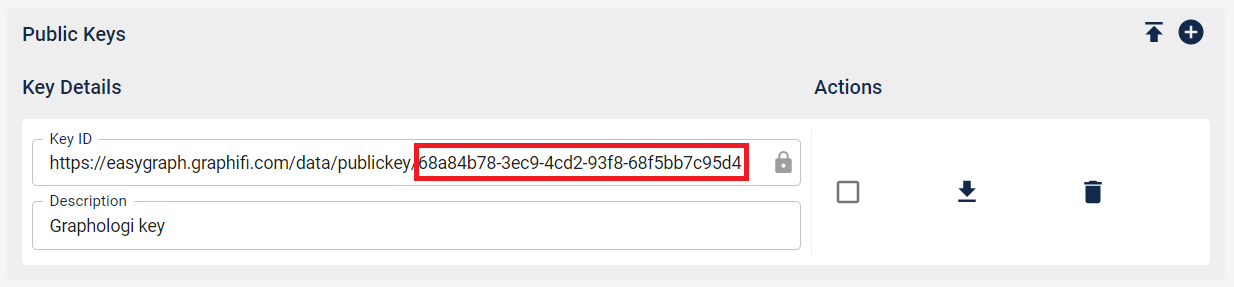
/{InstanceID}/{Dataset}/administration/data/import?profile=graphologi&egSignatureKeyUUID=12345Copy the public key generated by Graphologi and then in EasyGraph create a new key pair for the required user. Do this by clicking on the icon to upload a public key, as in the following image.

Give the key pair a sensible description and paste the key into the 'Public Key' field.
You then need to copy the UUID part of the 'Key ID' in EasyGraph as highlighted in red in the following example image:
Back in Graphologi in the endpoint field replace the holding value 12345 with the key UUID.
That's it. You should be ready to send data from Graphologi to EasyGraph.
Once your integrations are set up you are ready to try them out (if you have permissions). Synchronisation is done via the project page. Click on the ![]() icon to get started. You then need to select which integration you wish to use from the list on the left. Once you have selected an integration the display will change to show you which components of the project have changed since the last time this integration was run for this project, in a similar way to the following image.
icon to get started. You then need to select which integration you wish to use from the list on the left. Once you have selected an integration the display will change to show you which components of the project have changed since the last time this integration was run for this project, in a similar way to the following image.
Important! Note that imports will not be indicated as changes. This is also the case for integrations set for deltas. If you are doing imports and need to synchronise those, but, under normal circumstances, want to send just deltas, you can set up another integration to push the entire payload and use that after an import to ensure the imported data is sent. Of course, this may require additional logic at the target endpoint. Another option is just to load the imported taxonomy directly into the target system.
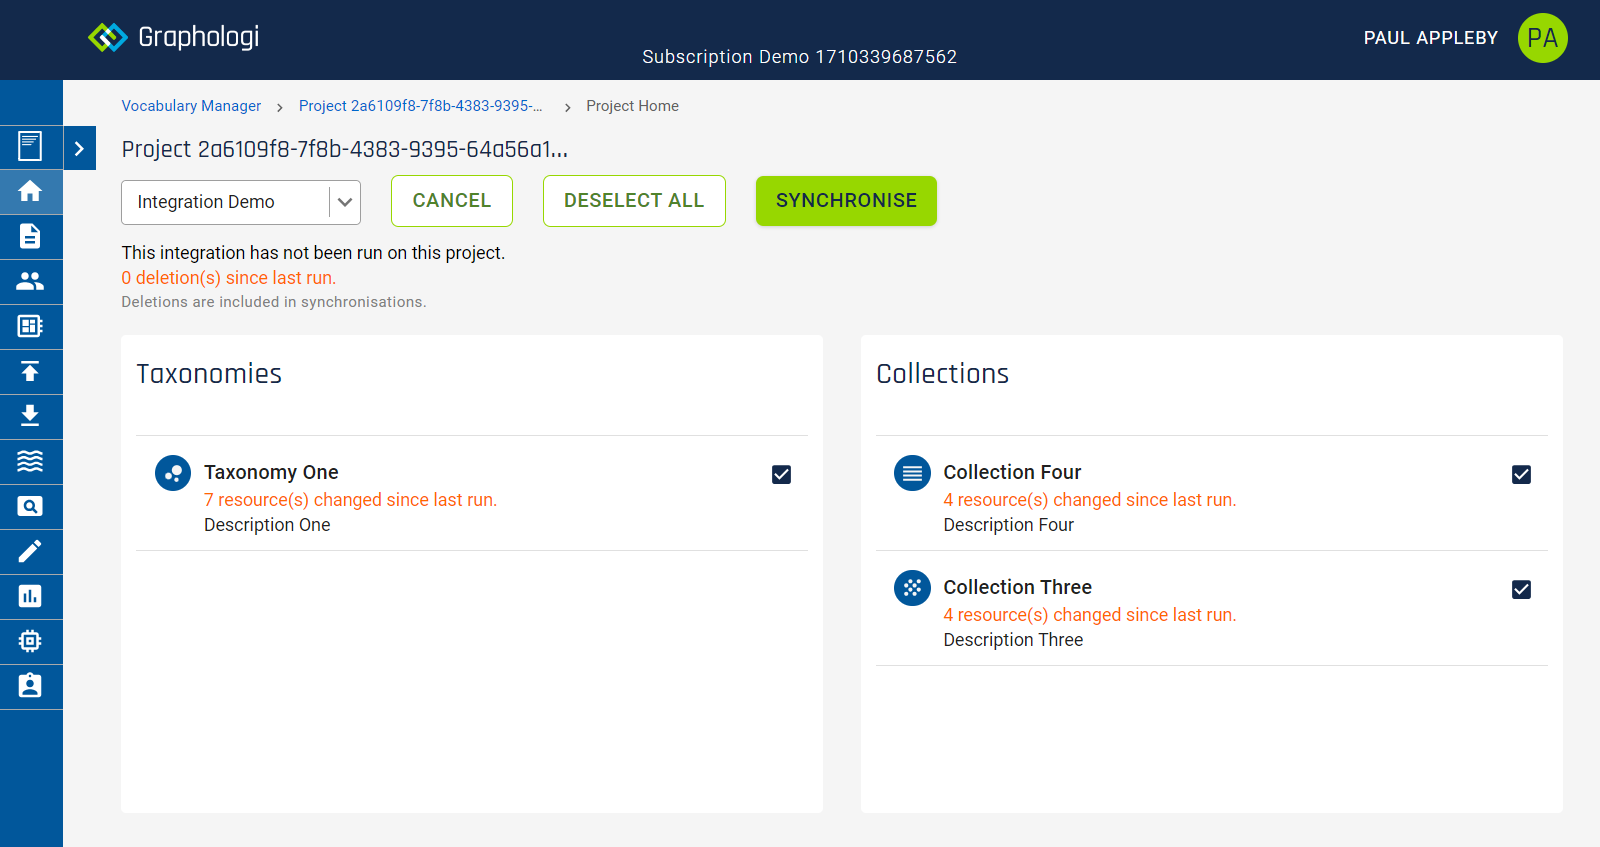
By default all components are selected for synchronisation. Deselect any that you do not want to send. You can deselect all components by clicking the button. Note that any deleted resources will automatically be sent.
Note that, if you do not send all components that have changed, there is a danger that the target system will not be fully coordinated (for example, if a concept is edited and used in multiple taxonomies). This is, of course, dependent upon the behaviour the target system implements.
Also, if concepts are removed from a concept scheme, or resources from a dataset, they will not be listed in any payload as the payloads only consider things that are part of a concept scheme or dataset.
You will need the appropriate entitlement to synchronise data, which is Synchronise data.
The payload that Graphologi sends will include the resources from the components that you choose to send and minimal information for deleted resources. Note that, in some circumstances, you may get notified of a deletion more than once.
An example is given below for a trivial taxonomy, where there is a deletion included. You can see that for a deletion there will be the id of the deleted resources as well as a deletionTime property, which is a milliseconds since epoch timestamp.
{
    "graph": [
    {
        "id": "https://ex.com/integration/First",
        "created": "2023-02-17T13:21:56.561Z",
        "prefLabel": {"en": "First"},
        "topConceptOf": ["https://ex.com/integration"],
        "inScheme": ["https://ex.com/integration"],
        "revisionNo": 1,
        "modified": "2023-02-17T13:21:56.908Z",
        "type": "Concept"
    },
    {
        "id": "https://ex.com/integration",
        "useXL": false,
        "created": "2023-02-17T13:21:50.943Z",
        "title": {"en": "Integration"},
        "modified": "2023-02-17T13:22:16.925Z",
        "hasTopConcept": ["https://ex.com/integration/First"],
        "type": "ConceptScheme",
        "useSlashIRI": true,
        "revisionNo": 5,
        "useUuidIRI": false
    },
    {
        "id": "https://ex.com/integration/Second",
        "deletionTime": 1676640220961
    }]
}
You should almost certainly validate that the requests are coming from Graphologi. Use the public key associated with an integration to do this. Below is a Javascript example for how to validate a payload using Crypto. You should set a window of a few seconds for the timestamp. Beyond this window you should reject the request. This should NOT be used in production and simply serves as an example.
async function validatePayload(headers, payload, publicKey) {
    // Expecting an authorization header with parameters:
    // Algorithm="RSA-SHA256";Timestamp="{epoch string}";Signature="{string}"
    const payloadString = headers["Content-Type"] === "application/ld+json" ?
        JSON.stringify(payload)
        :
        payload;
    const payloadHash = crypto.createHash('sha256').update(payloadString).digest('hex');
    const params = headers.Authorization.split(";").map(param => {
        const value = param.substring(param.indexOf("=") + 1);
        return value.substring(1, value.length - 1);
    });
    const timestamp = params[1];
    const signature = params[2];
    // Use timestamp and signature to verify payload string
    const payloadForVerification = timestamp + "\n" + payloadHash;
    const verify = crypto.createVerify('RSA-SHA256');
    verify.write(payloadForVerification);
    verify.end();
    const result = verify.verify(publicKey, signature, 'base64');
    return result;
}Sometimes mistakes happen, or things don't go quite as expected. Project snapshots are one way to recover from those mistakes. Snapshots make copies of projects at defined periods. They can be restored at any time, replacing the data that is in place.
You can set up snapshots for Vocabulary Manager, Ontology Manager and Data Manager projects. The number of projects that you can set up for snapshots is dependent upon your subscription type.
Snapshots are set up via the dashboard. Click on the Snapshots card as shown in the following image.
You will need the appropriate entitlement to access this part of the application, which is Manage snapshots.
Click on the button as shown in the following image.

This will display a dialog similar to the following image.
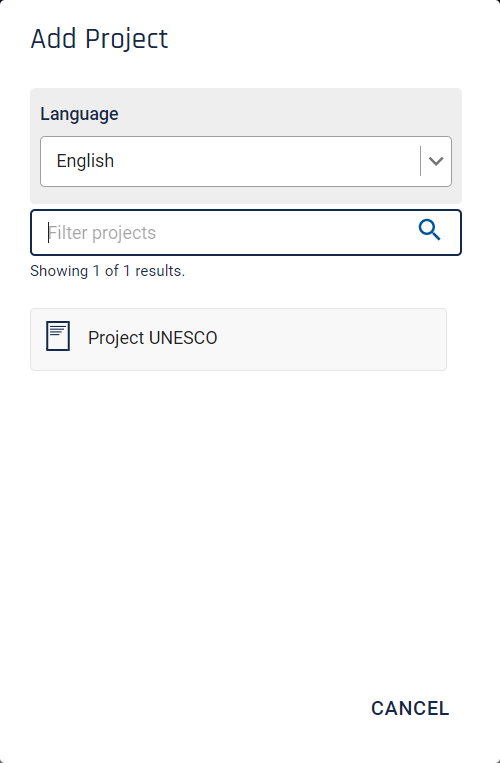
Select the project you wish to set up. You can start to type the name of the project to filter the list. As projects can have different default languages you can change the language you are searching in.
You should see a screen similar to the following image.
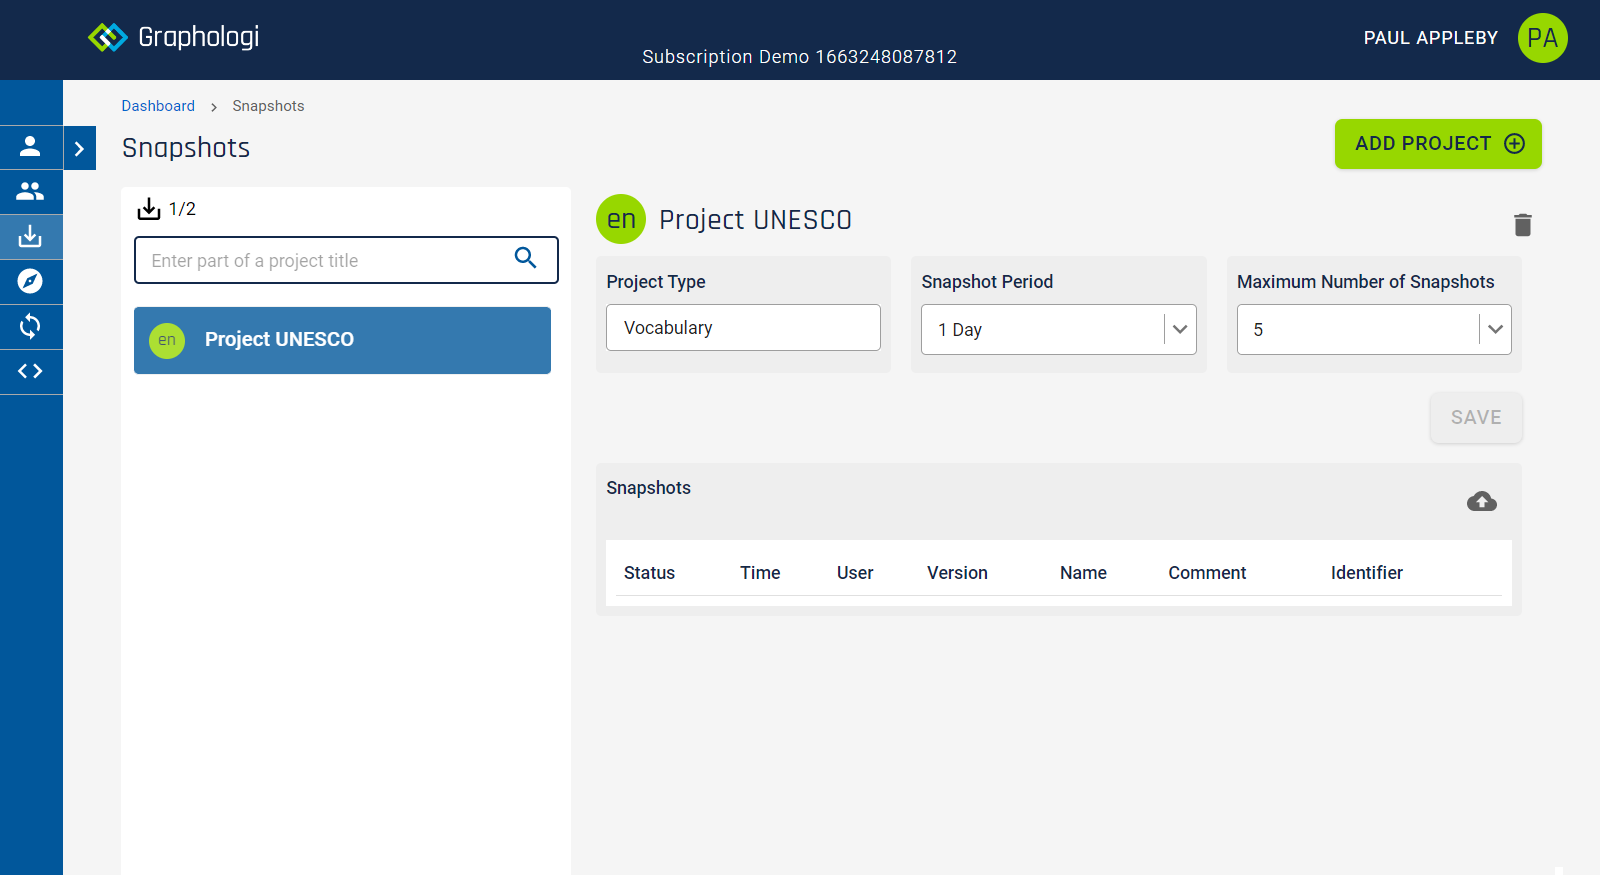
You can set the automatic snapshot period and the maximum number of snapshots to retain. Note that the snapshot period is approximate. Also, when the system starts up (i.e. after an update for instance) a snapshot will be taken soon after regardless of the period.
You can manually trigger a snapshot by clicking on the ![]() icon. This may be a sensible thing to do if you are about to make major changes to a project, such as importing.
icon. This may be a sensible thing to do if you are about to make major changes to a project, such as importing.
When you click on the snapshot icon a dialog will appear as in the following image:
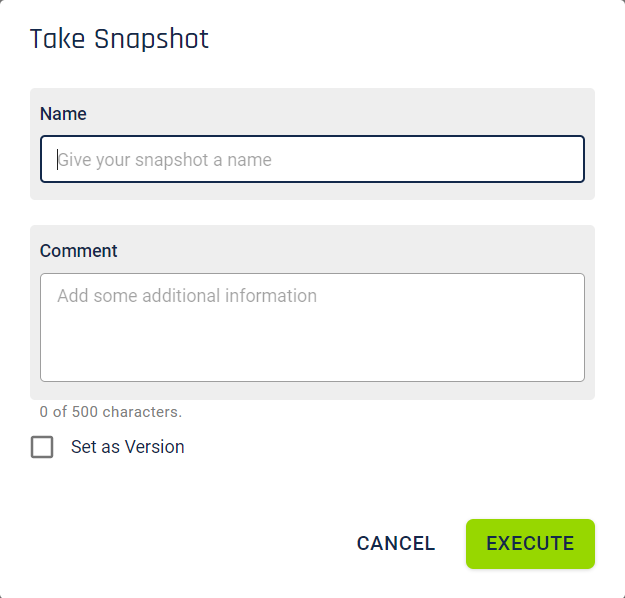
You can optionally enter a name and comment for the snapshot. If you wish the snapshot to also be created as a project version check 'Set as Version'.
To actually generate the snapshot click on the button. It will take a small amount of time to process.
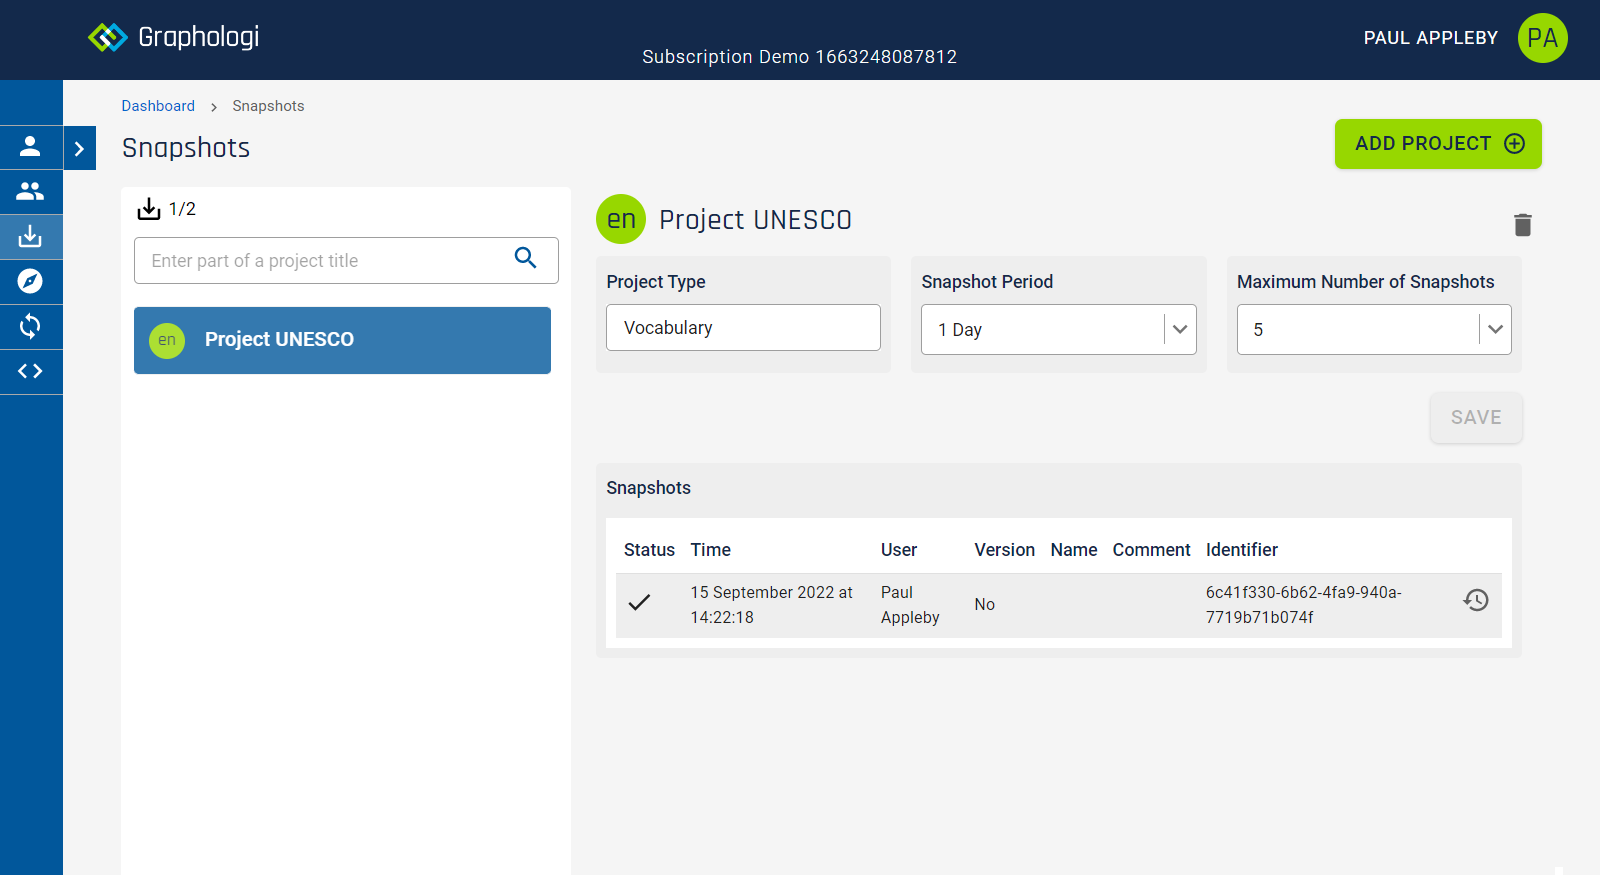
Snapshots will appear in the list in a similar way to the following image.
To restore a project into the existing project click on the ![]() icon on the right of the snapshot that you wish to use for the restore.
icon on the right of the snapshot that you wish to use for the restore.
Once you confirm the action it will take a small amount of time to restore the data. The project will be locked whilst this happens.
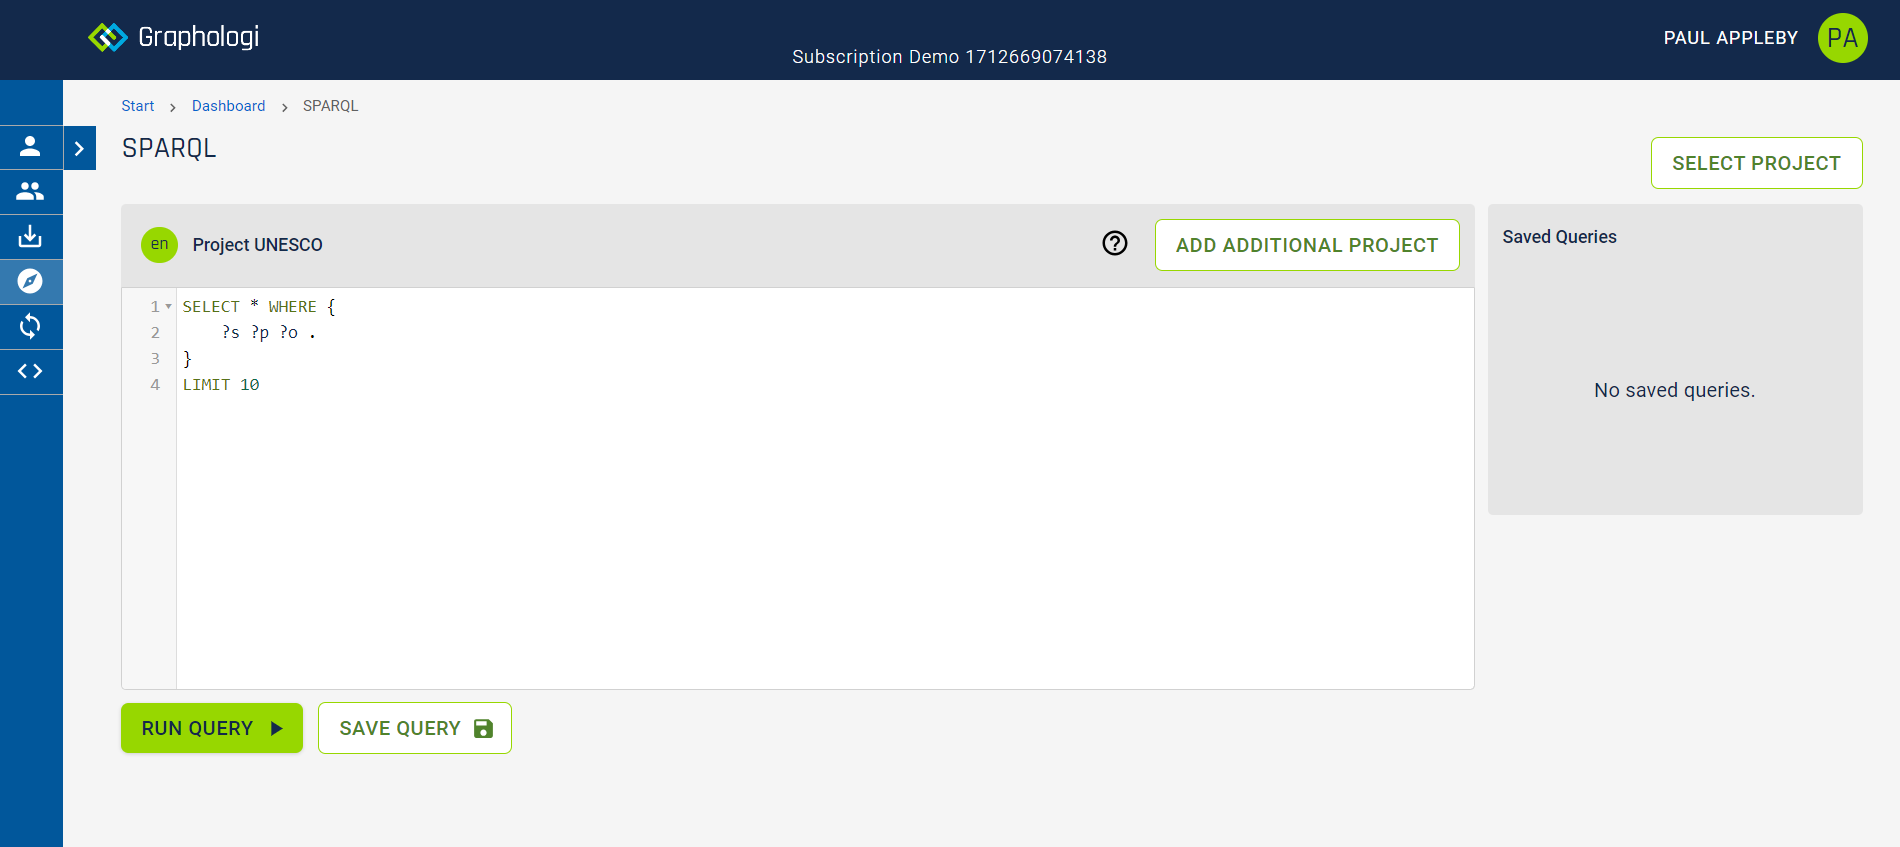
It is possible to query the data in your subscription using SPARQL. This can be accessed via the dashboard. Click on the SPARQL card as shown in the following image:
You will need the appropriate entitlement to access this part of the application, which is Can run SPARQL queries. Note that this entitlement gives access to all the data in a subscription.
You will automatically be asked to select which project you want to use as the base project. As projects can have different default languages you can change the language you are searching in. You can select from taxonomy, ontology or data projects.
Once a project is selected Graphologi will load class and property information from that project for autocompletion in the query editor. For very large projects this may take a little time so you can skip this by clicking the button.
Once this is complete you should see a screen similar to the following image.
Note that saved queries are only available in Premium subscriptions and above.
To manage saved queries you need the Manage saved query entitlement. To just view saved queries and run them you need the entitlement View saved query.
You can use SELECT, ASK and DESCRIBE queries. Enter your query and then click the button. The results will be displayed in the bottom section of the screen. It is also possible to preview how query results will look in a report by selecting the ![]() icon.
icon.
You can save a query by clicking the Save Query button. This will display a dialog similar to the following image:
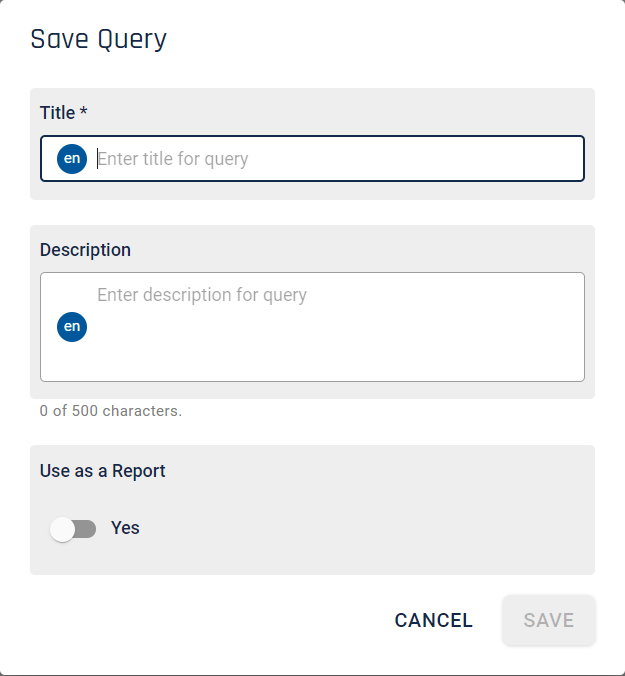
Enter a title for the query and, if required, a description. You can also select whether the query should be made available for reporting. See the section Reports for more details on reports.
To retrieve a particular saved query select it from the drop-down list on the right of the screen. This will display the detail in a similar way to the following image.

The details of the query can be edited if desired, including updating the query itself by clicking on the button.
If you change the query in the editor but want to set it back to the value in the saved query click the Reset button.
The value in the 'IRI' field is that needed to run saved queries in the API.
To give more flexibility to queries you can parameterise them. This allows for user input, making the queries more like functions. Using parameters makes queries more reusable, potentially reducing the number of queries you might need to manage.
Parameters allow you to replace variable bindings in queries (which is done on a string basis), with values entered by users.
To add a parameter click on the ![]() icon in the 'Parameters' panel (which you can only do if any changes to the query have been saved). This will display a dialog similar to the following image:
icon in the 'Parameters' panel (which you can only do if any changes to the query have been saved). This will display a dialog similar to the following image:
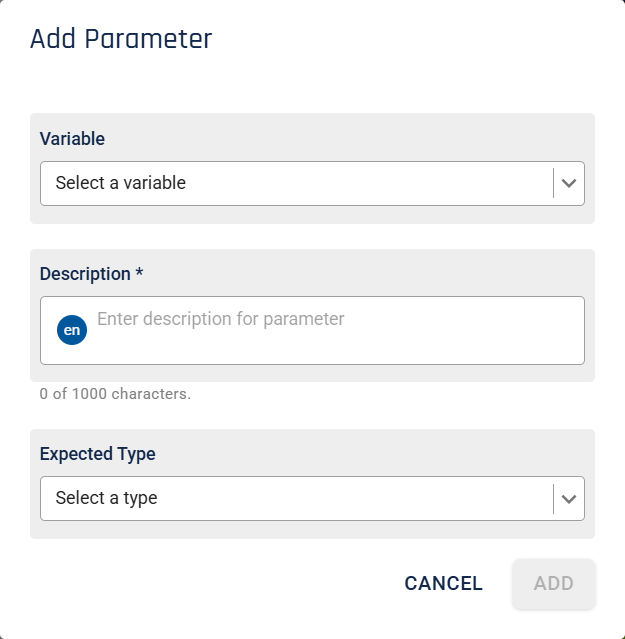
Select the variable that you want to replace. Note that variable names can only contain A-z, a-z, 0-9 and underscore. Note that it is left to the user to ensure that the variable being used will create a valid query once the value is replaced.
Enter a description that the user will see, so make it helpful and include instructions as to what you expect the user to do.
Select the expected type of input. The choices will depend upon the type of project. For example, for a taxonomy project, you will see 'Concept', 'Taxonomy', etc. You can also select 'User', or a text based input such as 'XSD string' or 'XSD date'. For certain selections, such as 'Concept' you will then be given a further, optional choice, which is constrain the search to a particular component, such as a taxonomy. Note that inputs to parameters, such as concepts, can only be from the project to which the query is in.
Once you are happy with your choices click the button. It will then look similar to the following image:
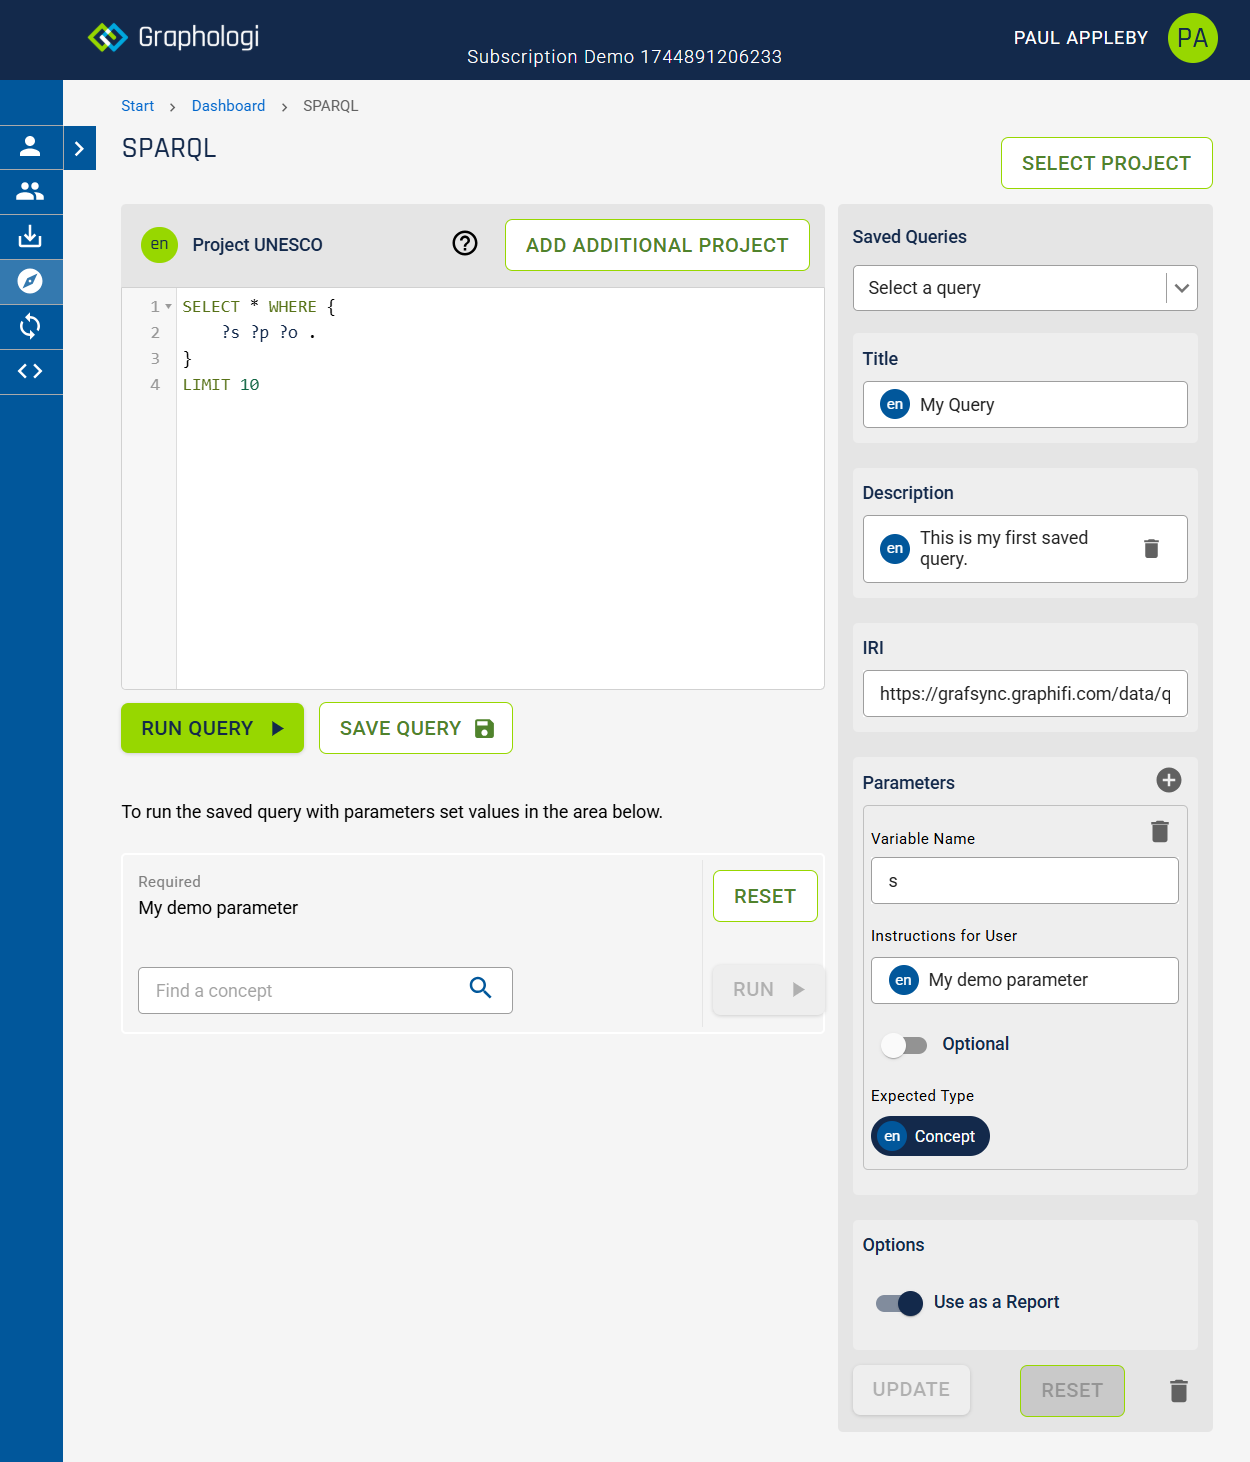
Once added you can still edit the description. You can also decide if the input should be optional.
Towards the left of the screen the parameters input section will be displayed. This reflects what it will look like to a user if the query is used as a report. You can try out and test your parameter inputs.
By default only the selected base project can be queried (including its history named graph). However, you may want to be able to query across additional projects. You can add additional projects using the button. A maximum of four additional projects can be added.
Once you add an additional project you will see a screen similar to the following image.
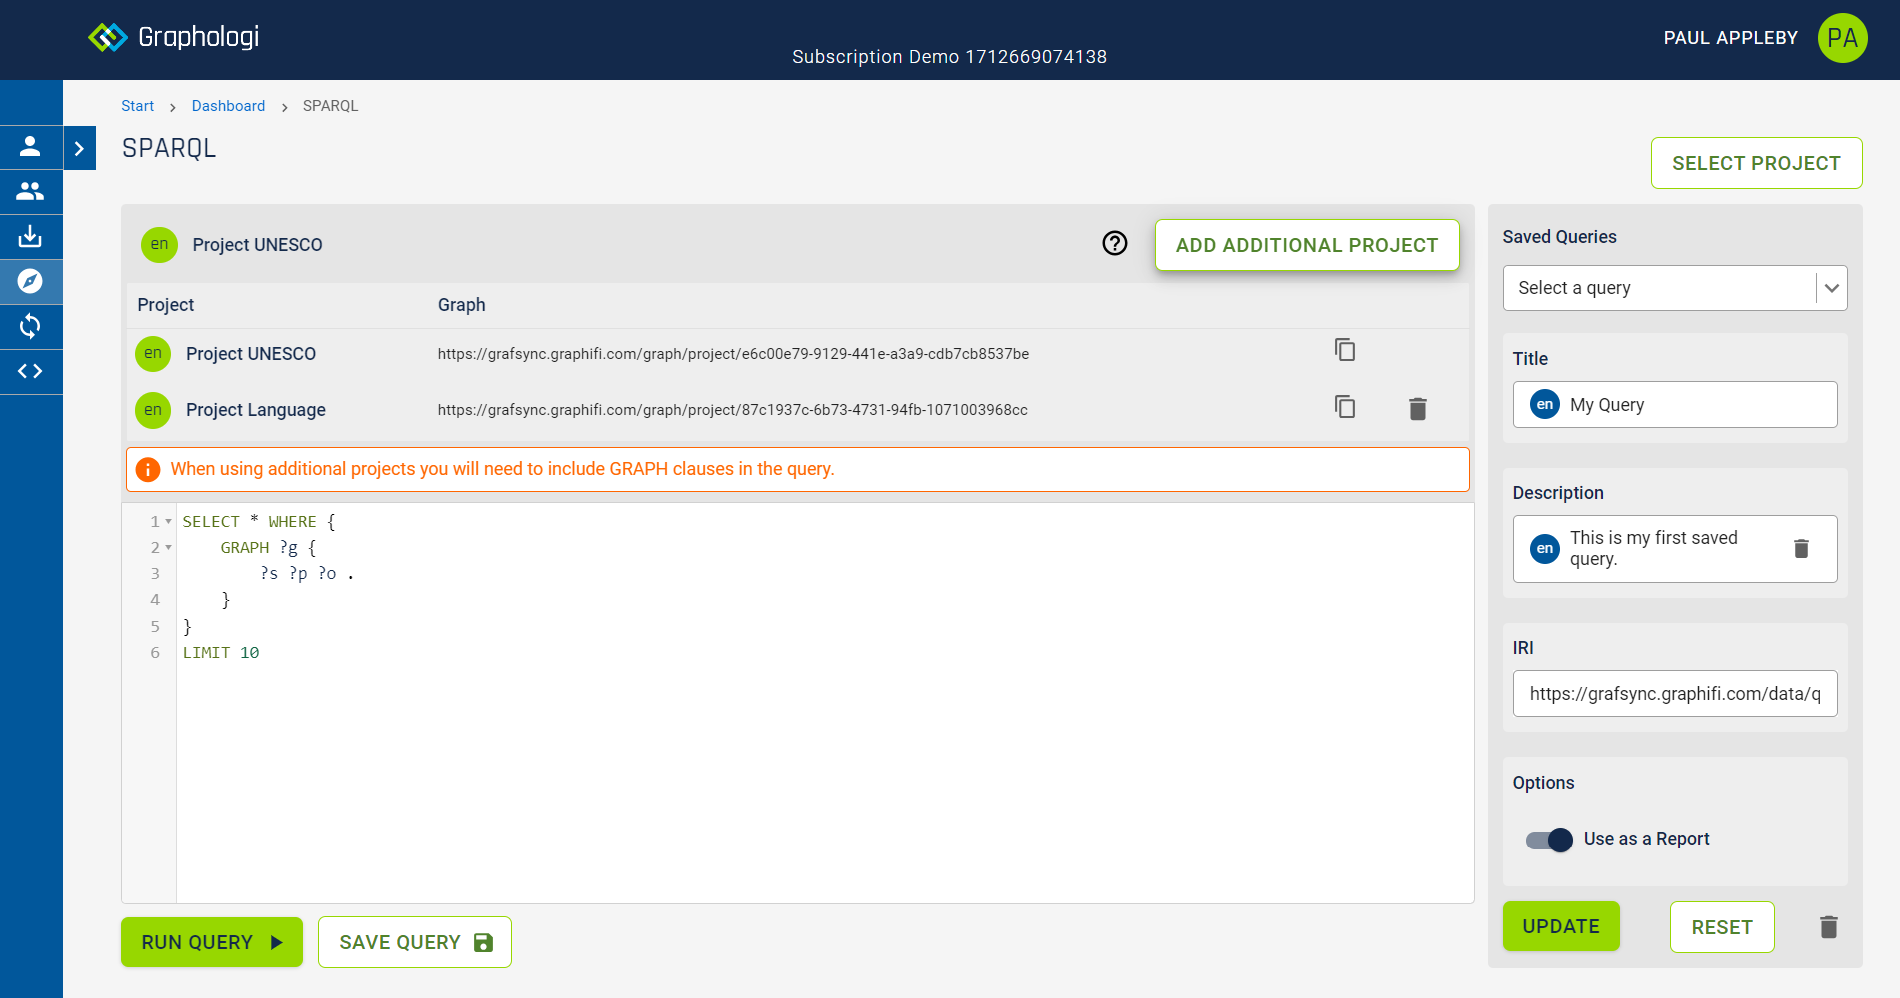
You can use the ![]() icon to copy the graph IRI to the clipboard.
icon to copy the graph IRI to the clipboard.
Note that, once additional projects are added, any SPARQL query will need to use GRAPH clauses.
You can update any saved query to include added projects.
Note that, for any query used as a report that includes additional projects, a user will only be able to run the report if they have permissions for all the projects listed.
You can manage subscription level settings via the dashboard. Click on the Settings card as shown in the following image:
This will then display the setings page similar to the following image.
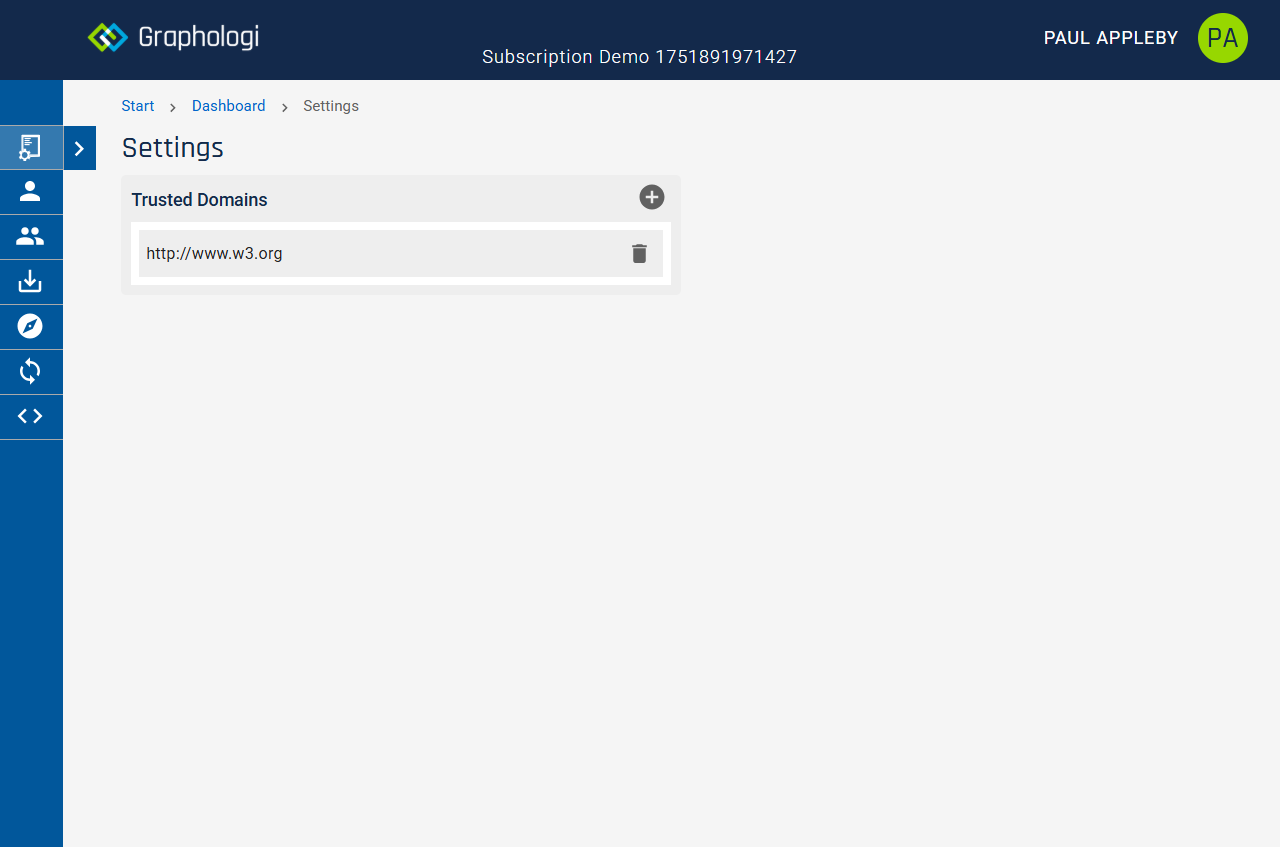
You will need the appropriate entitlement to access this part of the application, which is Manage settings.
Trusted domains are used by owl:import, which allows for modular ontology management. However, owl:import pulls files from the web, which means that trust issues come into consideration. Therefore, for a file to be downloaded and imported with owl:import, the domain must be listed as trusted.
To add a domain click on the ![]() icon in the 'Trusted Domains' panel. This will display a dialog similar to the following image:
icon in the 'Trusted Domains' panel. This will display a dialog similar to the following image:
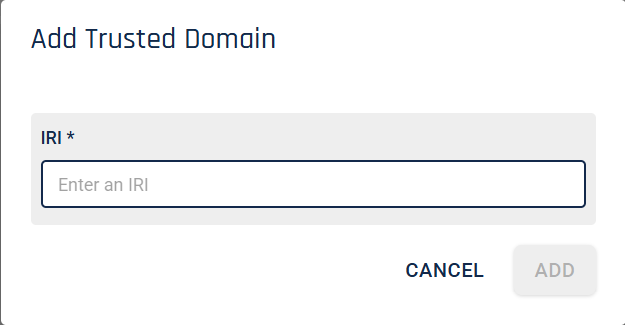
Enter the domain you want to allow and then click the button. It will be added to the list of trusted domains.
When you export data out of Graphologi certain serialisations use prefixes to shorten IRIs. This can reduce file size and improve readability.
Graphologi will process any prefixes used when importing files and they will then be used on exports. You can also add additional prefixes. This facility can be accessed via the dashboard. Click on the API card as shown in the following image:
You will then see a screen displaying a set of information about various aspects of the subscription. Most of the detail relates to making API calls.
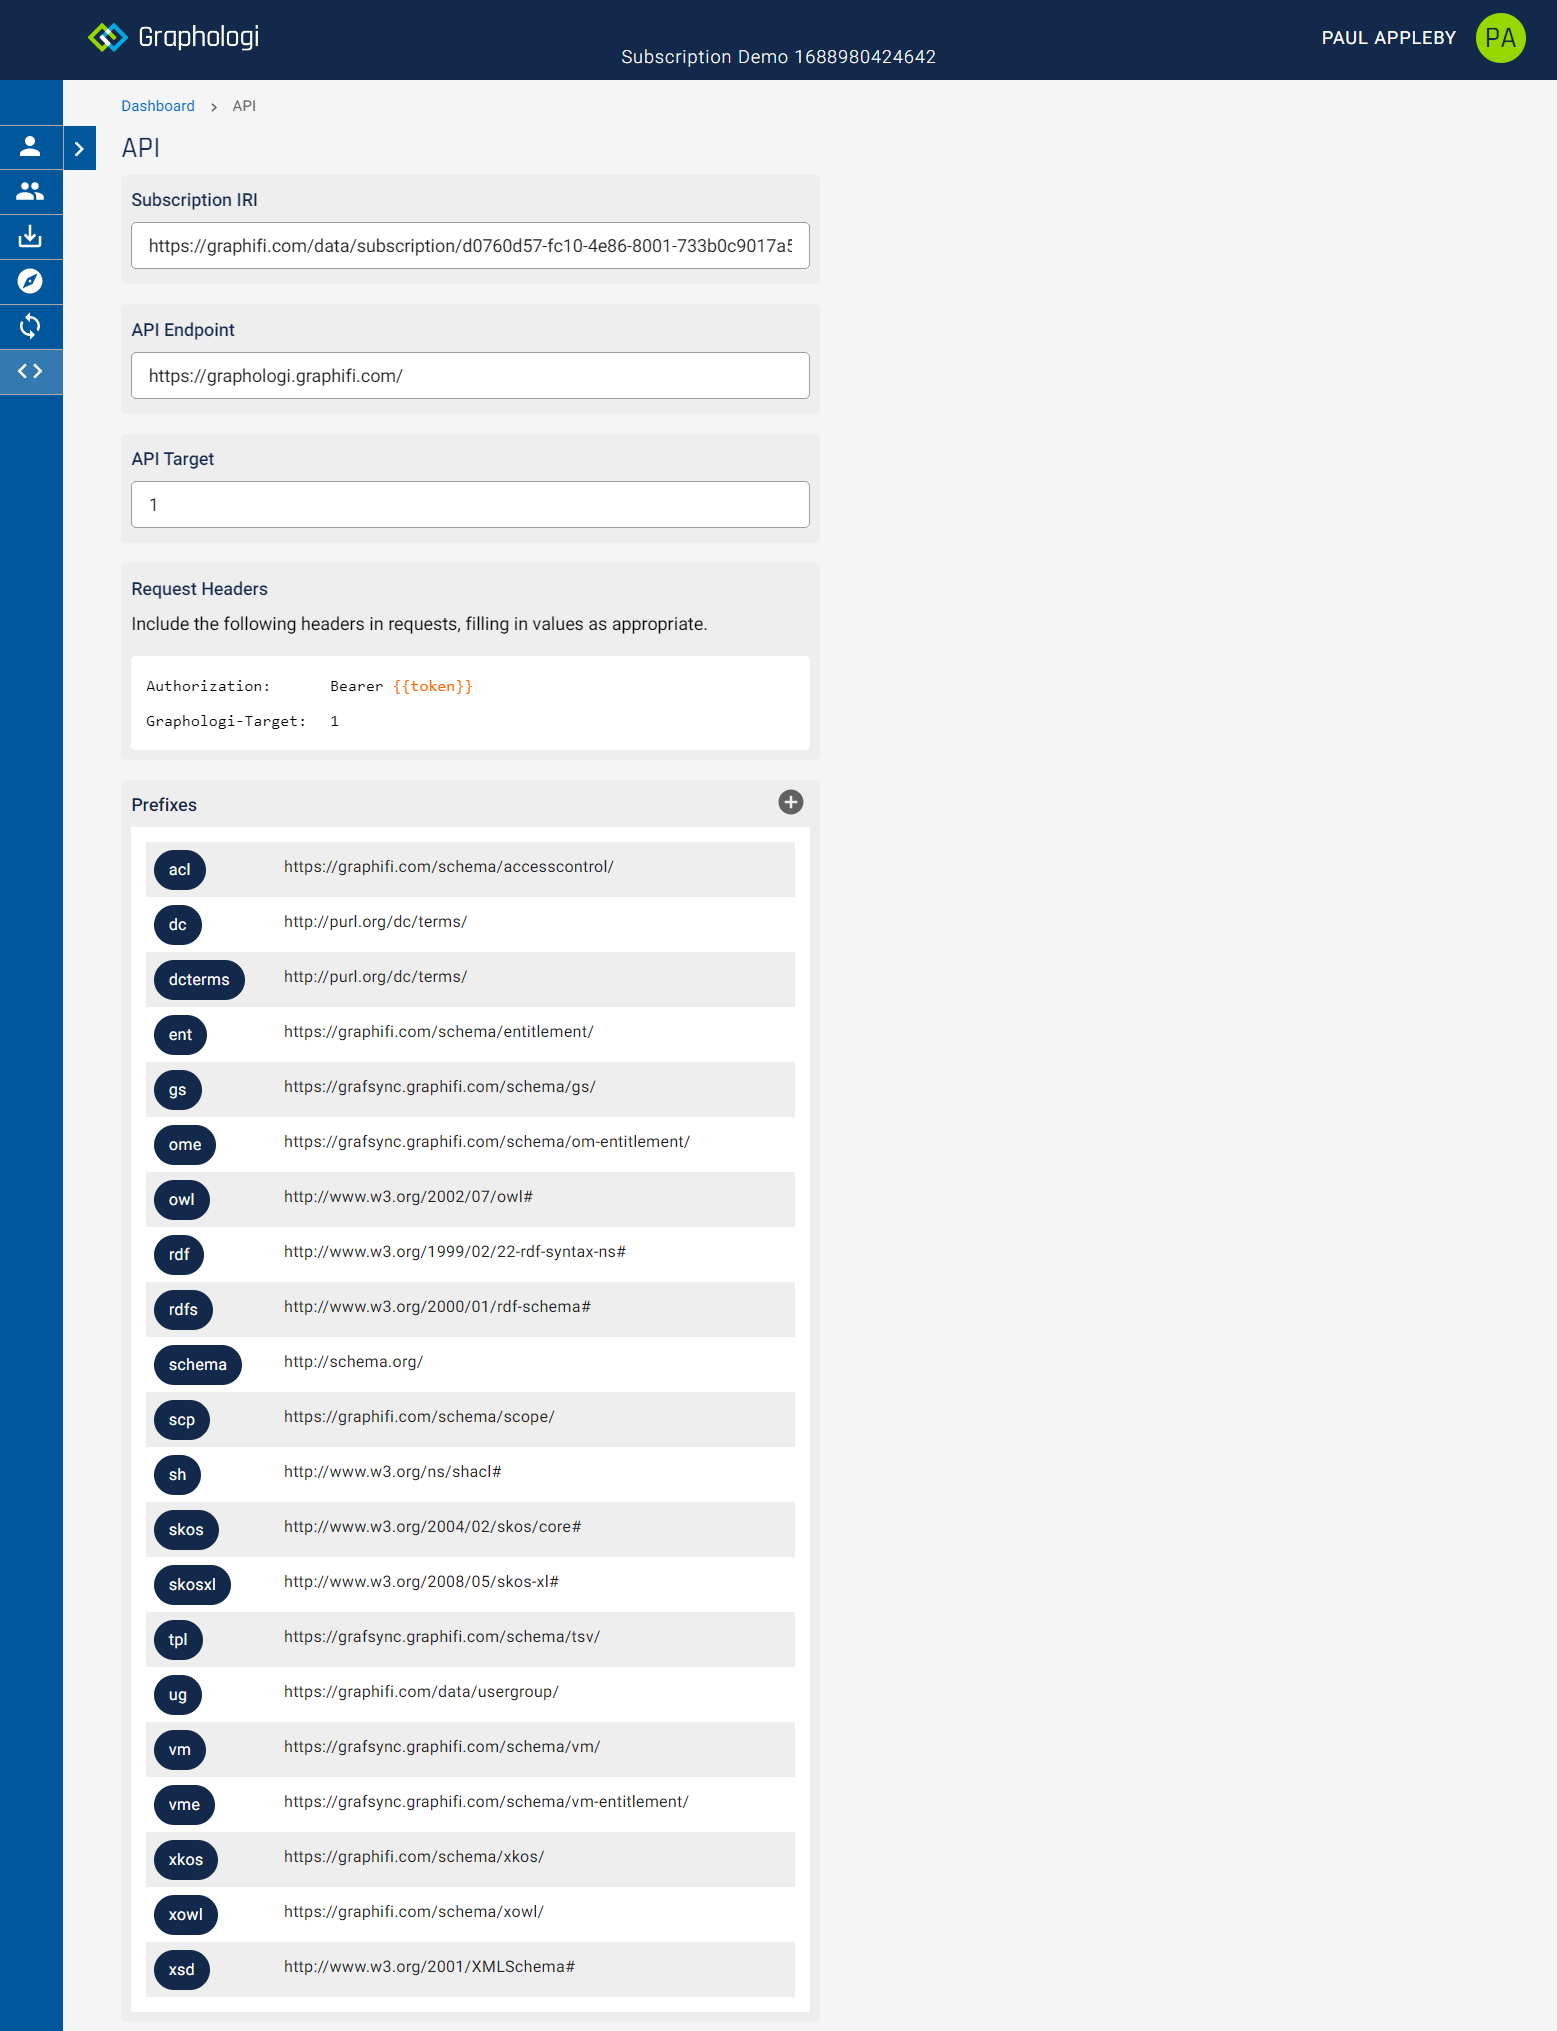
To access this part of the application you need the relevant permission, which is Manage integrations.
The 'Prefixes' panel will list existing prefixes and their associated IRIs. To add another prefix click on the ![]() icon. This will display a dialog box as shown below.
icon. This will display a dialog box as shown below.
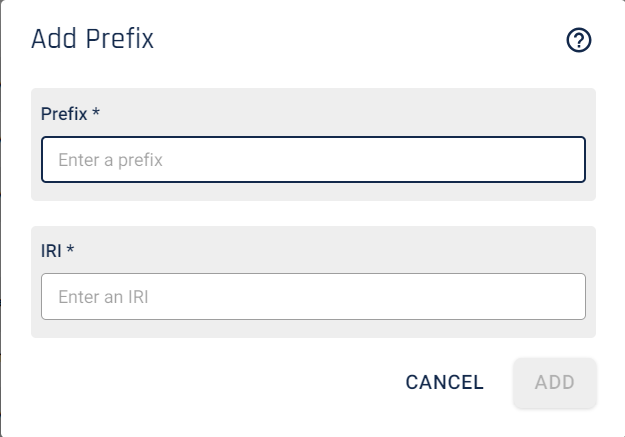
Enter a prefix and an IRI. The prefix can only contain the characters a-z, A-Z, digits and hyphens and can be at most twenty characters long. Click the button to add the prefix to the list.
Important note: It is not possible to remove a prefix once added so please be careful to ensure that any prefix and IRI you enter are correct before adding.
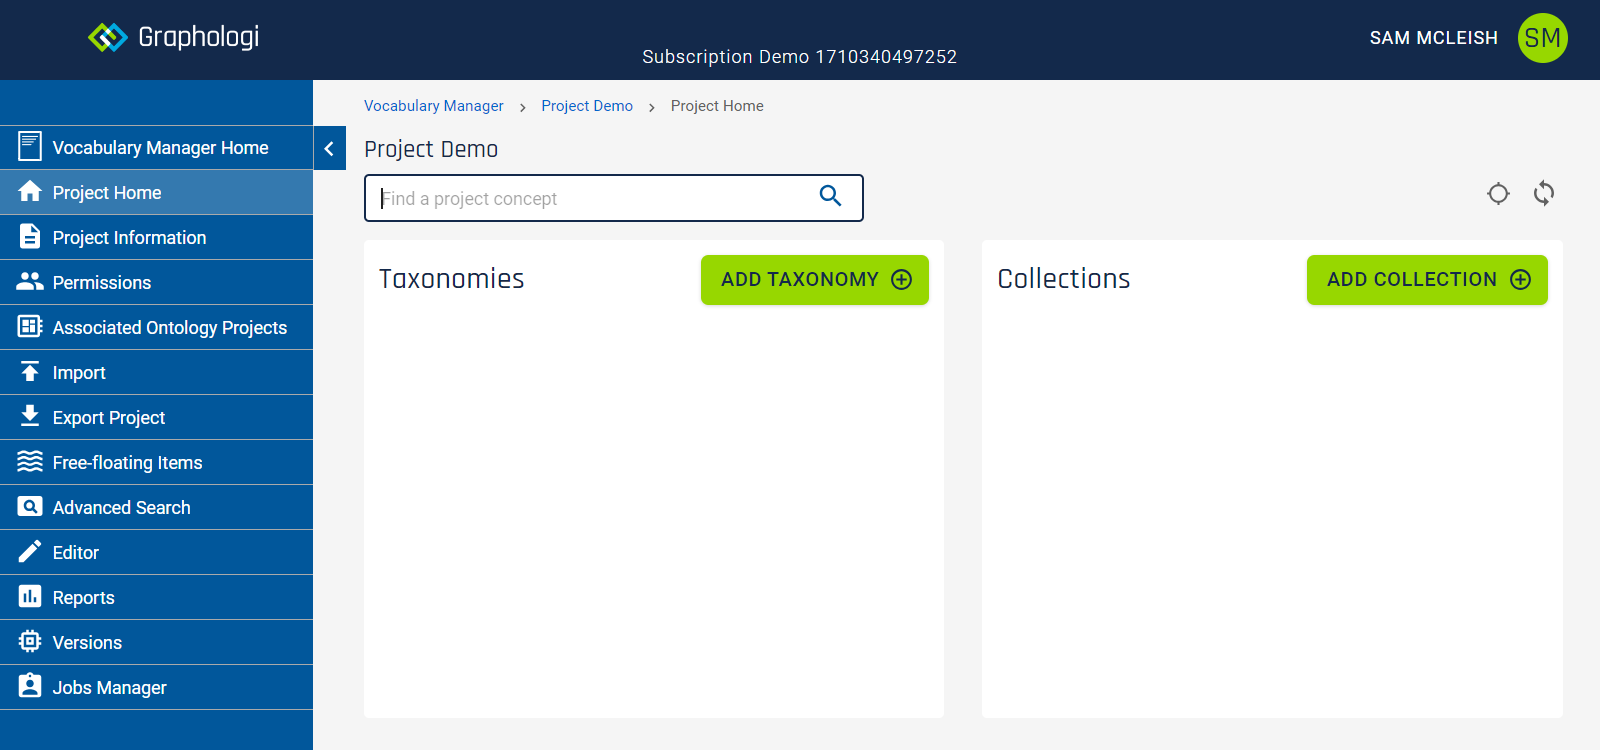
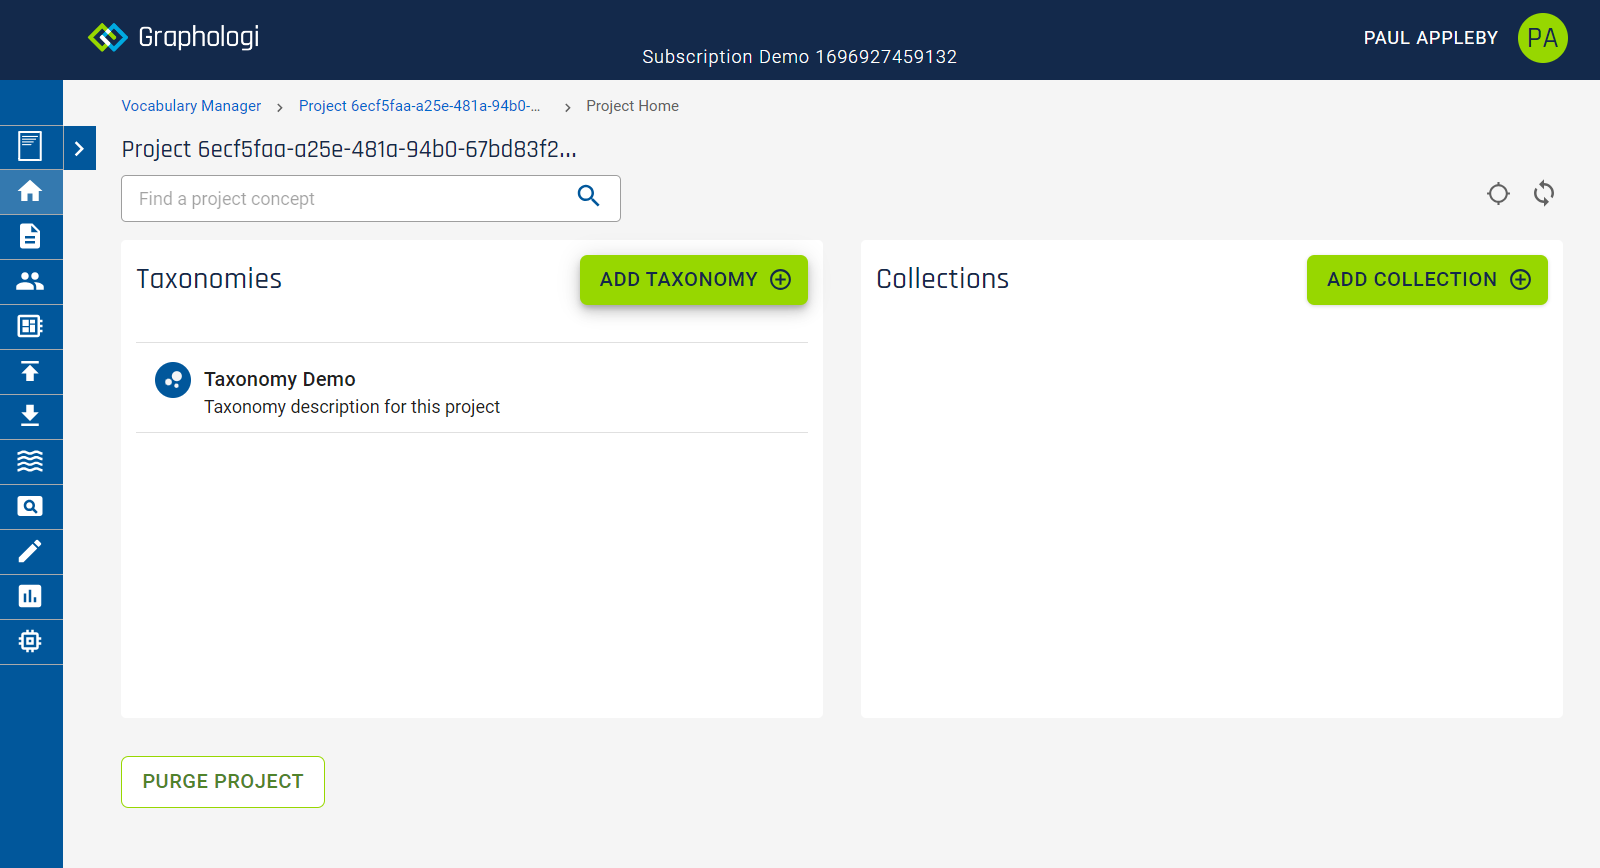
Projects within Graphologi are the basis of managing data (within your knowledge graph). It is also the level at which you define the user groups that can work on your data.
A project also manages 'components'. With Vocabulary Manager, for instance, the components that make up a project are taxonomies (SKOS concept schemes), collections (SKOS ordered collections) and, optionally, labels (SKOS-XL labels). (We do not get into the detail of exactly what a taxonomy is compared to a thesaurus, etc - we simply use taxonomy as a term in its loosest sense, and you may see the phrase 'concept scheme' used too.)
When you are in the Vocabulary Manager you should be seeing a screen similar to the image below. Projects in the Ontology Manager and Data Manager have a similar look.
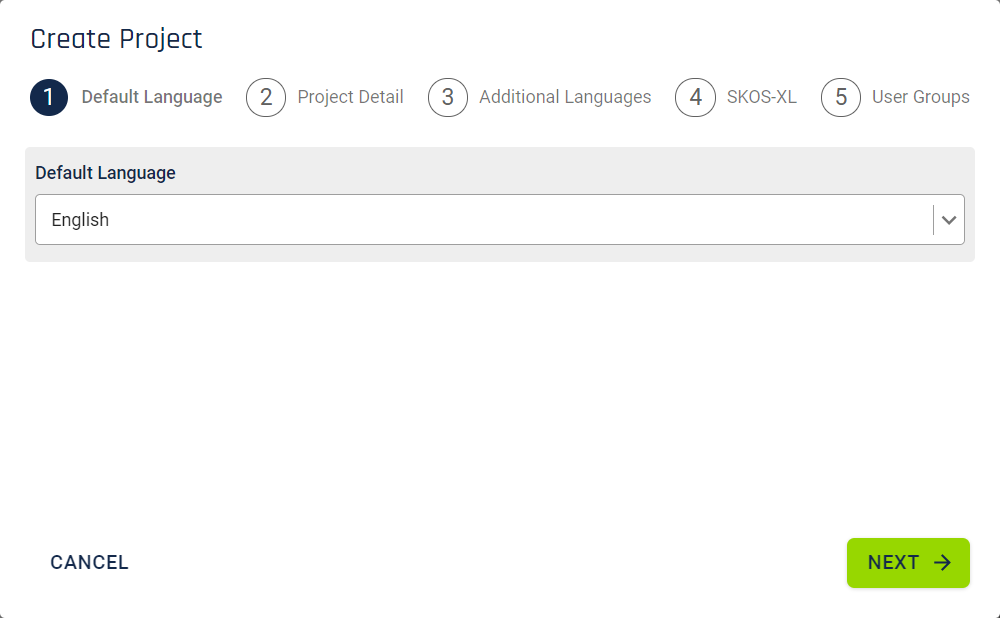
Creating projects is very similar whether it is a Vocabulary Manager, Ontology Manager or Data Manager project. You will be guided through a set of steps to set up the project. The steps as described in the following sections are for the Vocabulary Manager as it has one additional step (SKOS-XL). To get started click on
The application will be configured with a set of available languages. The first step in creating a project is to select the default language. The selected value will control certain aspects of the Vocabulary Manager in terms of expectations for things such as labels for concepts.
Graphologi supports right-to-left languages and the display and input of information will be adjusted accordingly for languages that are right-to-left.
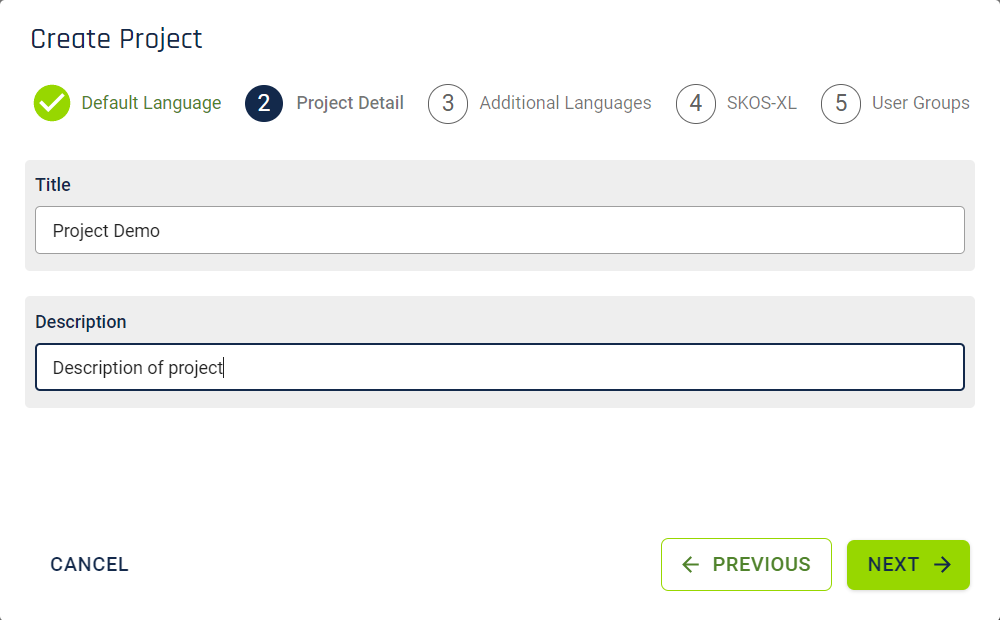
The next step is to enter a project title and, if required, a project description. The language for these will be the default language selected in the previous step.
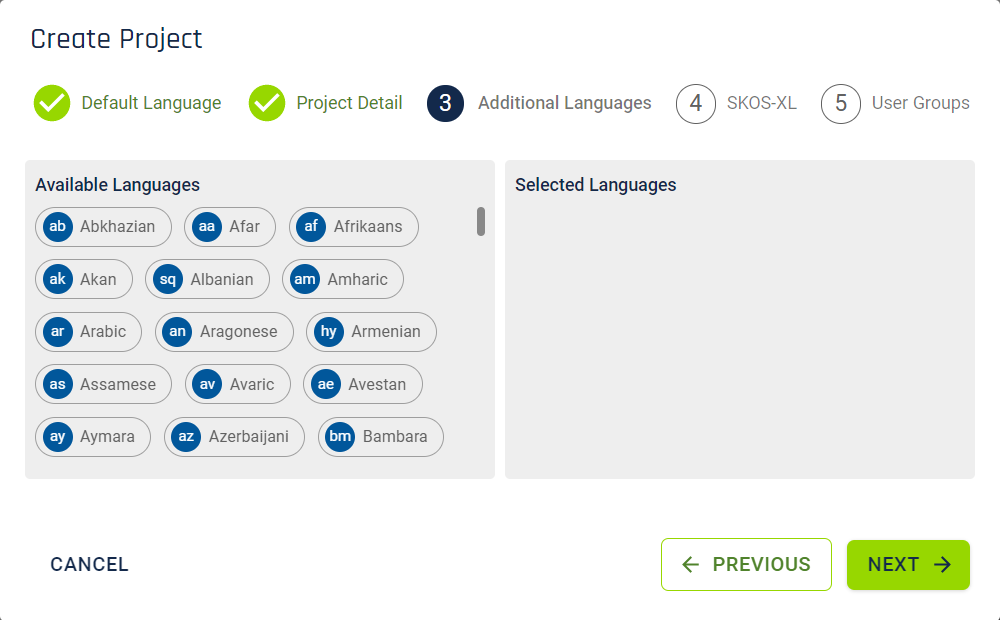
A project can have as many additional languages as required. These can be chosen from the overall set of languages the application is configured for. Additional languages will be used for things such as preferred labels or notes, where the Vocabulary Manager will allow you to enter data in any of the selected additional languages.
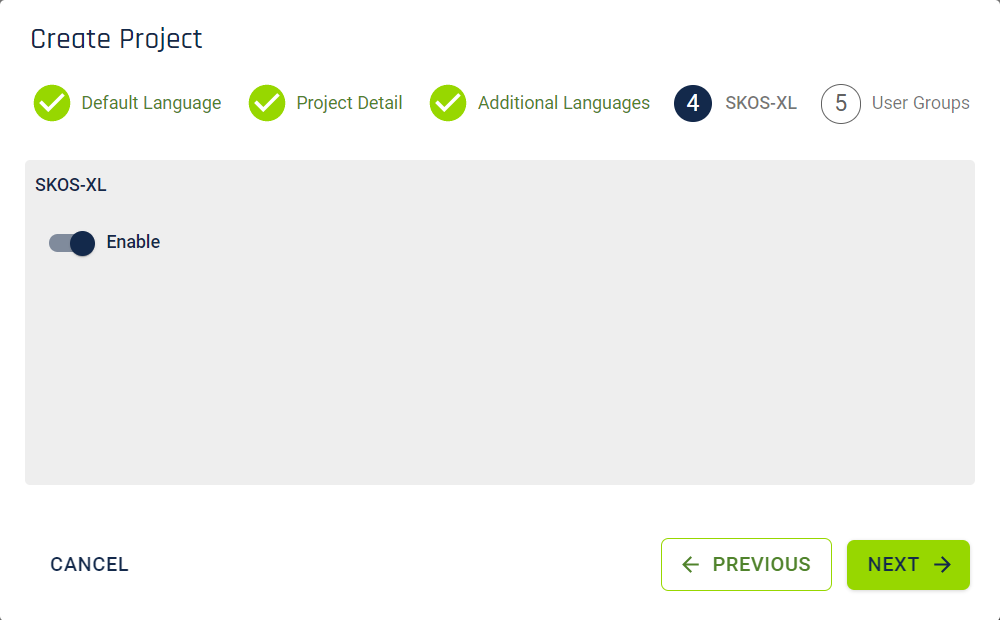
Vocabulary Manager works with SKOS-XL out of the box. SKOS-XL extends the standard SKOS vocabulary to provide the ability to define labels as first class resources, which then allows more information to be stated for each label. All versions include this functionality. To enable it simply toggle the SKOS-XL option as in the image below:
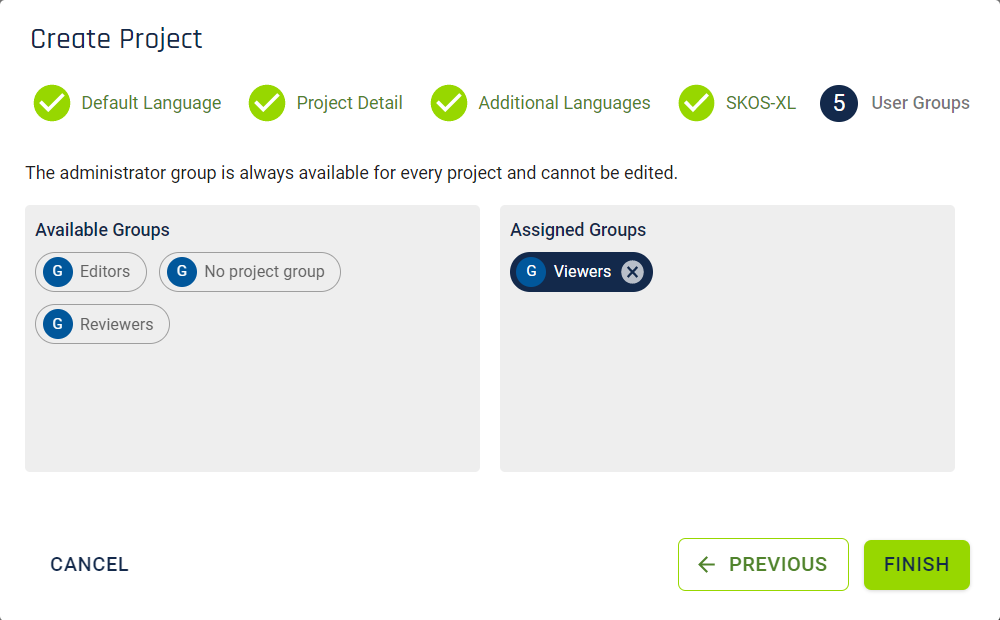
The final step is to select the user groups for a project. By default these will be the groups that you are in. Select as many as you need for the project. Note that user groups may span more than one project and this is something to keep in mind if you wish to use ontology features within a taxonomy or data project.
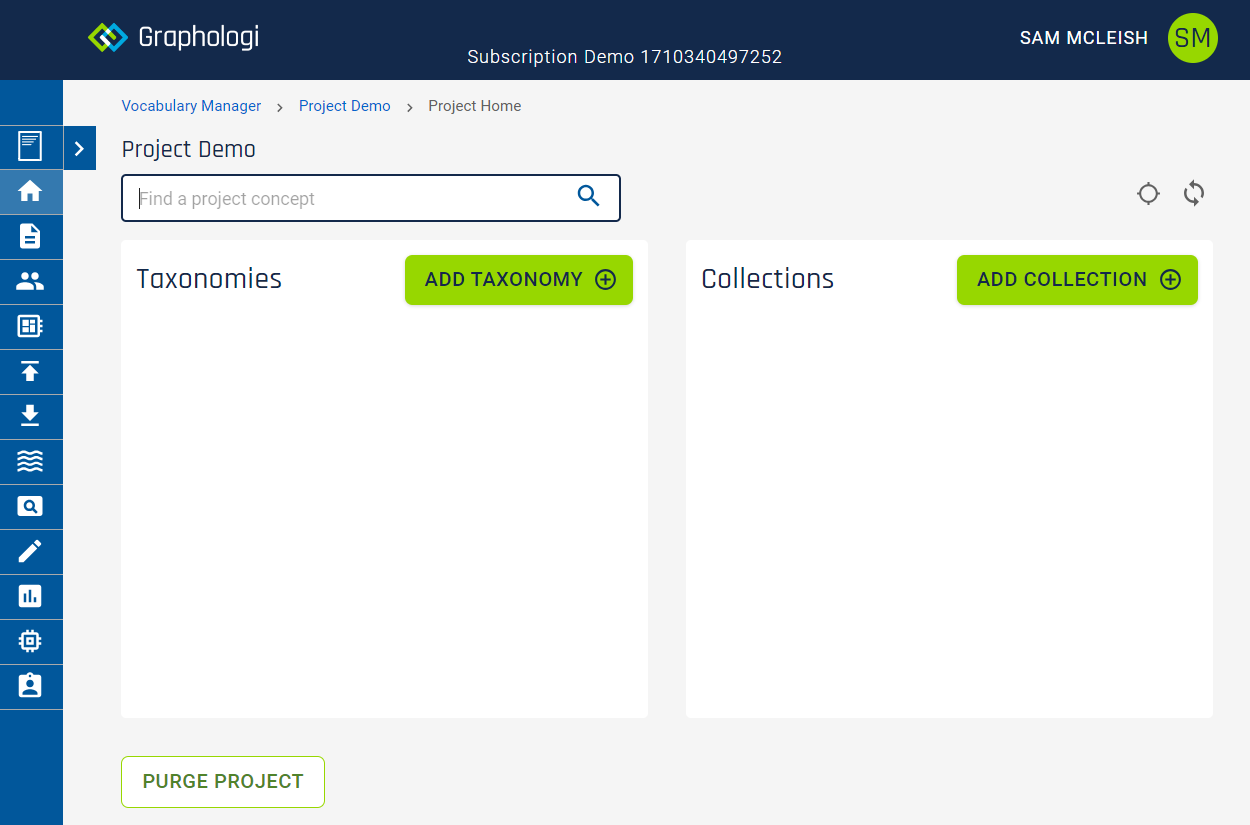
When the final step is done you should see your new project presented in a similar manner to that in the following image.
Once a project exists you may need to update its set up. You can do this by using the sidebar options on the left of the screen. The sidebar is collapsed by default but can be expanded by clicking on ![]() . This will display the options in expanded form, which will look similar to the following:
. This will display the options in expanded form, which will look similar to the following:
This allows you to edit the basic project details. It will look similar to the following image.
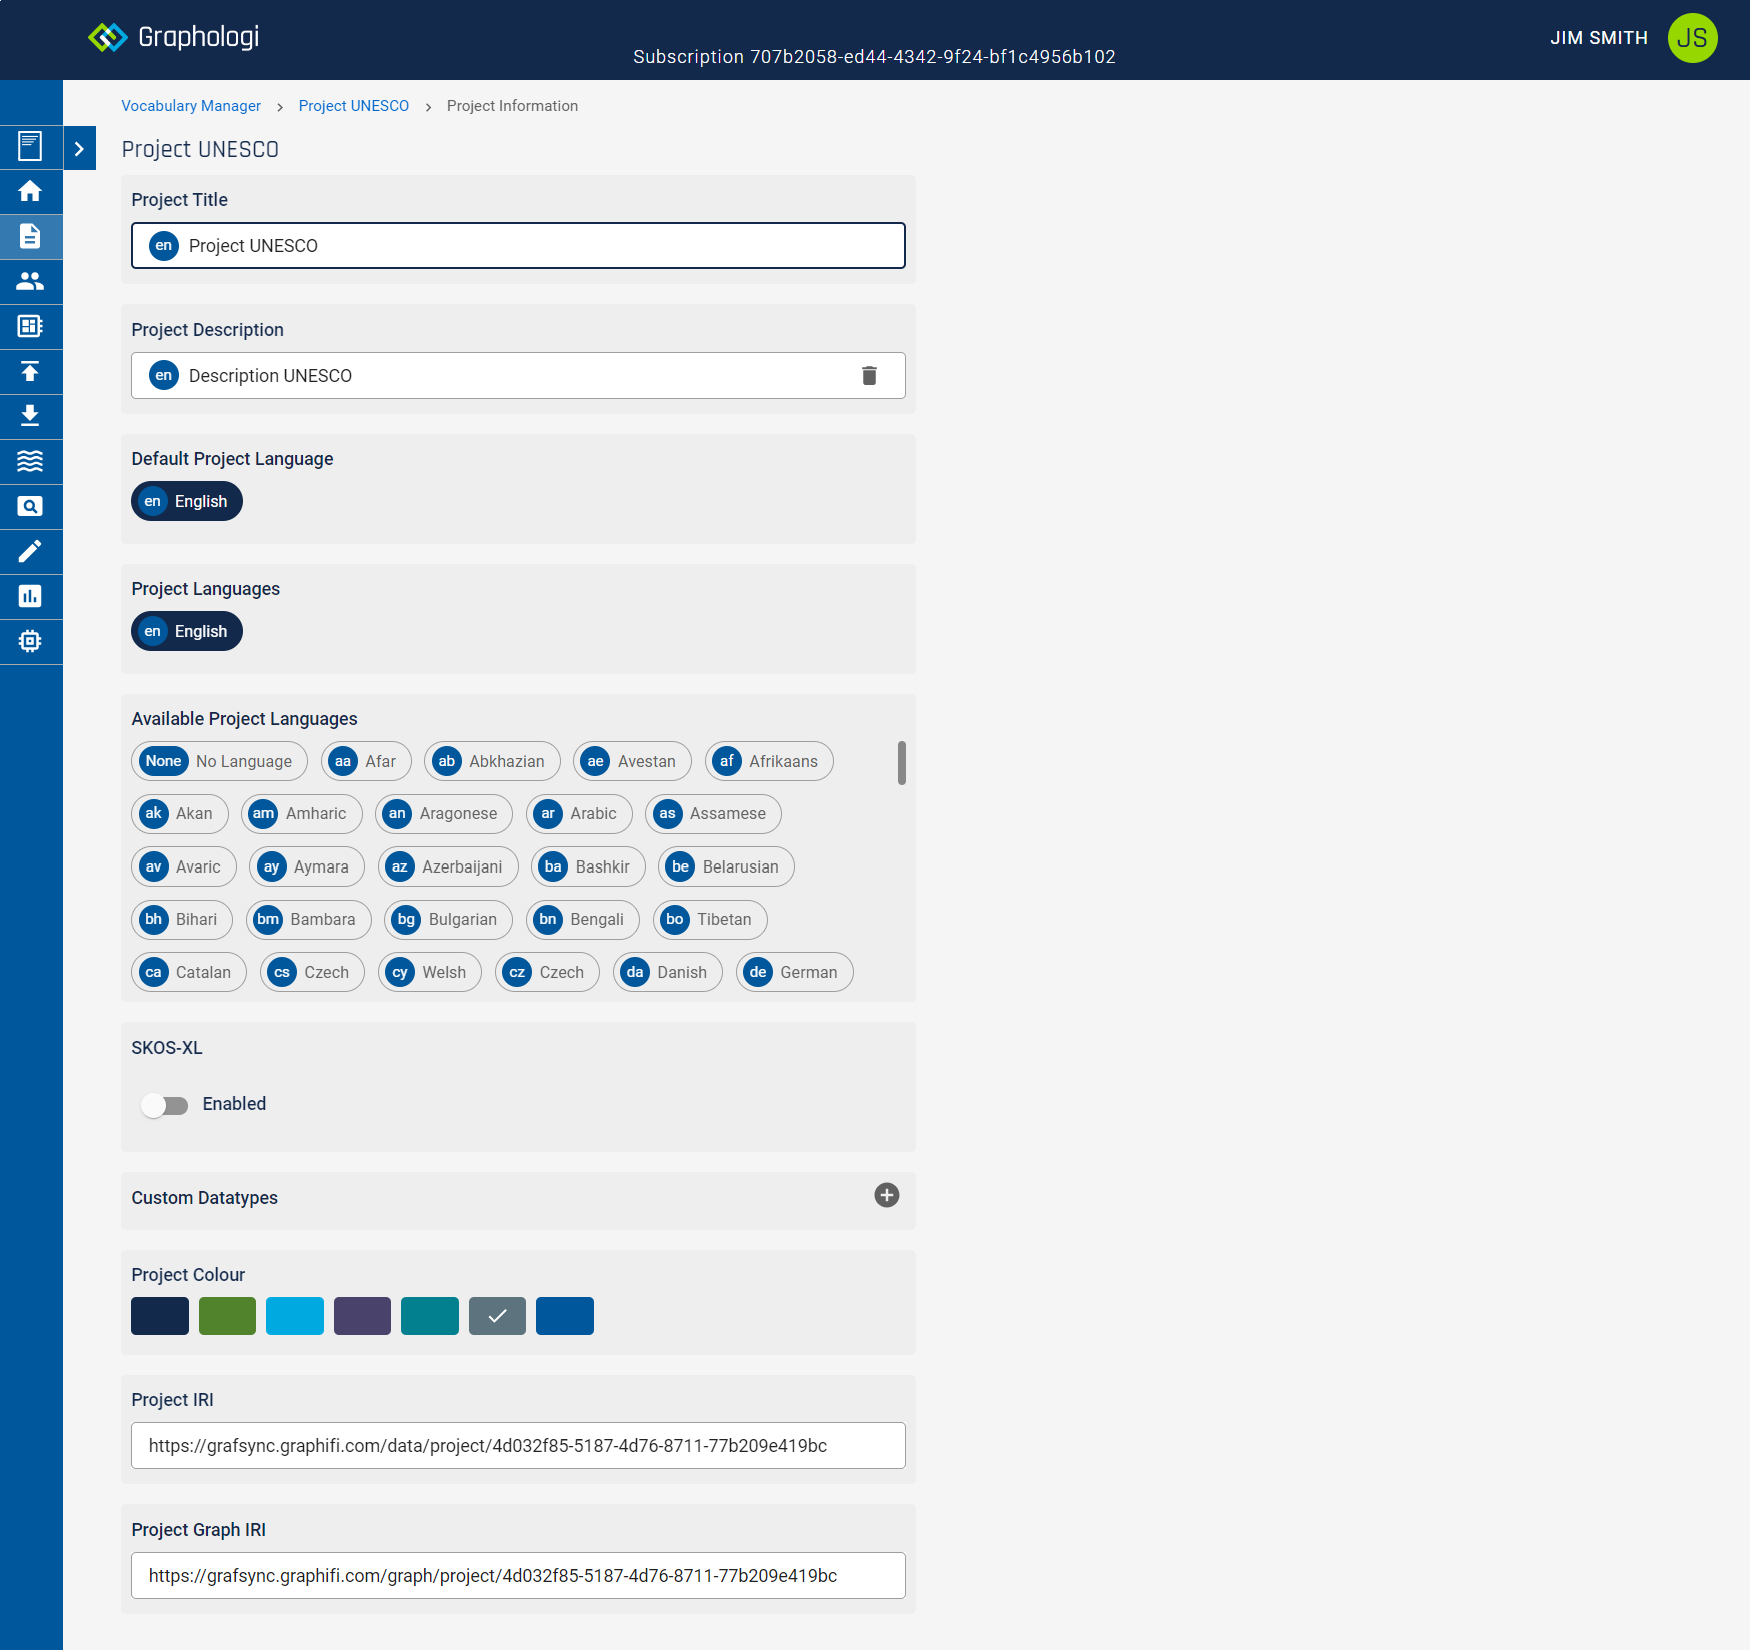
You can do the following on this screen:
Permissions allows you to change the user groups that have access to a project. Unassigned groups are those available to select, whilst assigned groups are those allocated to a project. You can move groups between these two as neeeded.
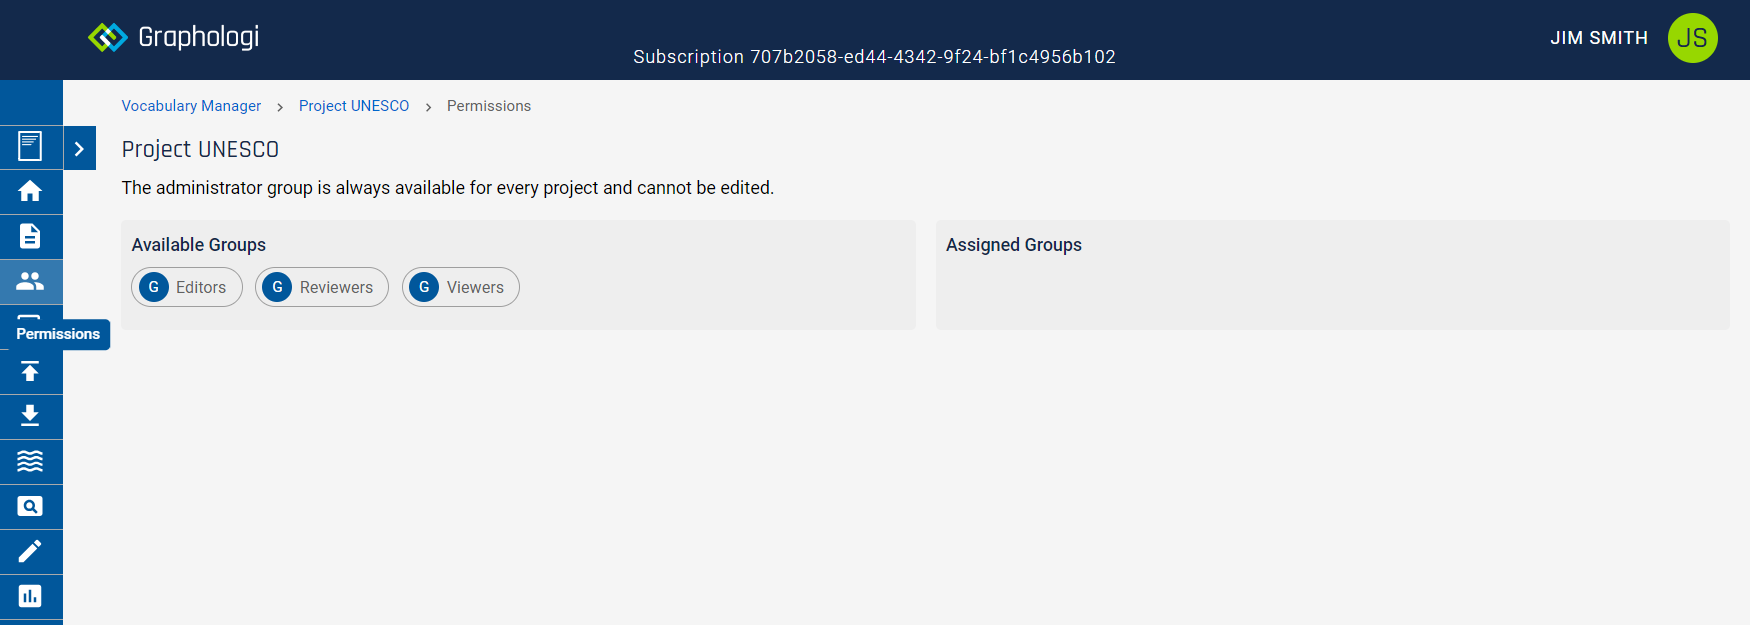
Note that the administrator group is always associated with a project.
Please note that this option is for adding data to an existing project. If you want to import an entire project please see the relevant section of the manual.
Once a project exists you may want to import data into it. In the Vocabulary Manager you can import SKOS concept schemes and in the Ontology Manager you can import OWL ontologies. In Data Manager you can import any data that isn't SKOS taxonomies or OWL ontologies. Files for import must be in one of RDF/XML, RDF Turtle, N-Triples, JSON-LD, TSV (Tab Separated Values) or CSV (Comma Separated Values) formats. The maximum size of file that can be imported will depend upon the type of subscription. For ontologies .owl files can also be imported. Also, for ontologies, there is special import support for OBO ontologies.
When you select the Import option you will see a screen similar to the following image.
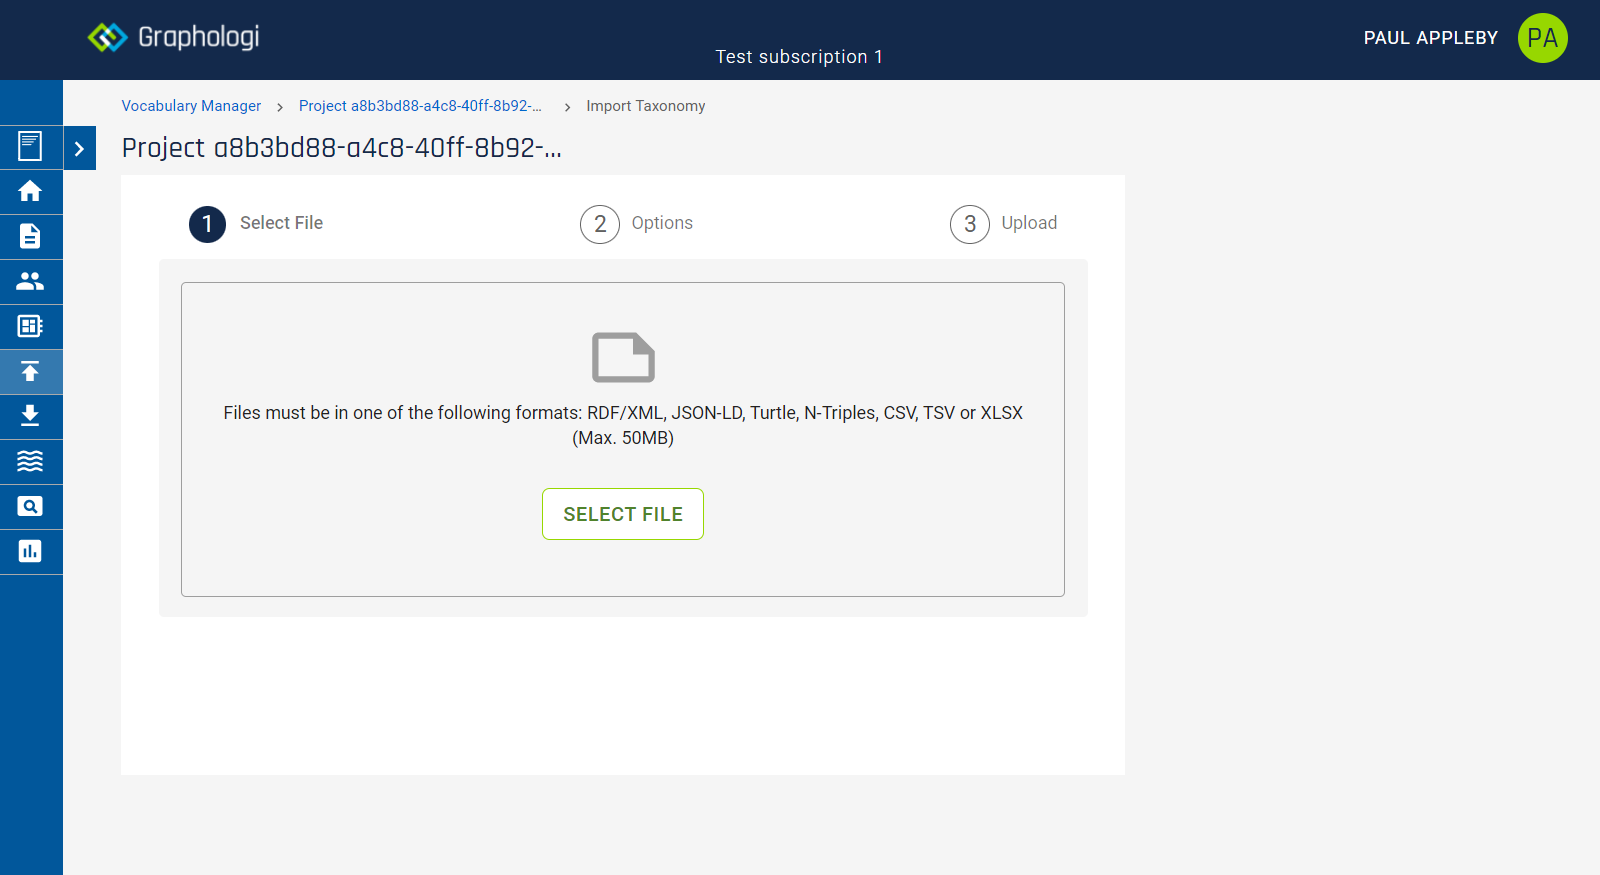
Select a file and click .
If you are importing an RDF format you will then see import options as in the following image.
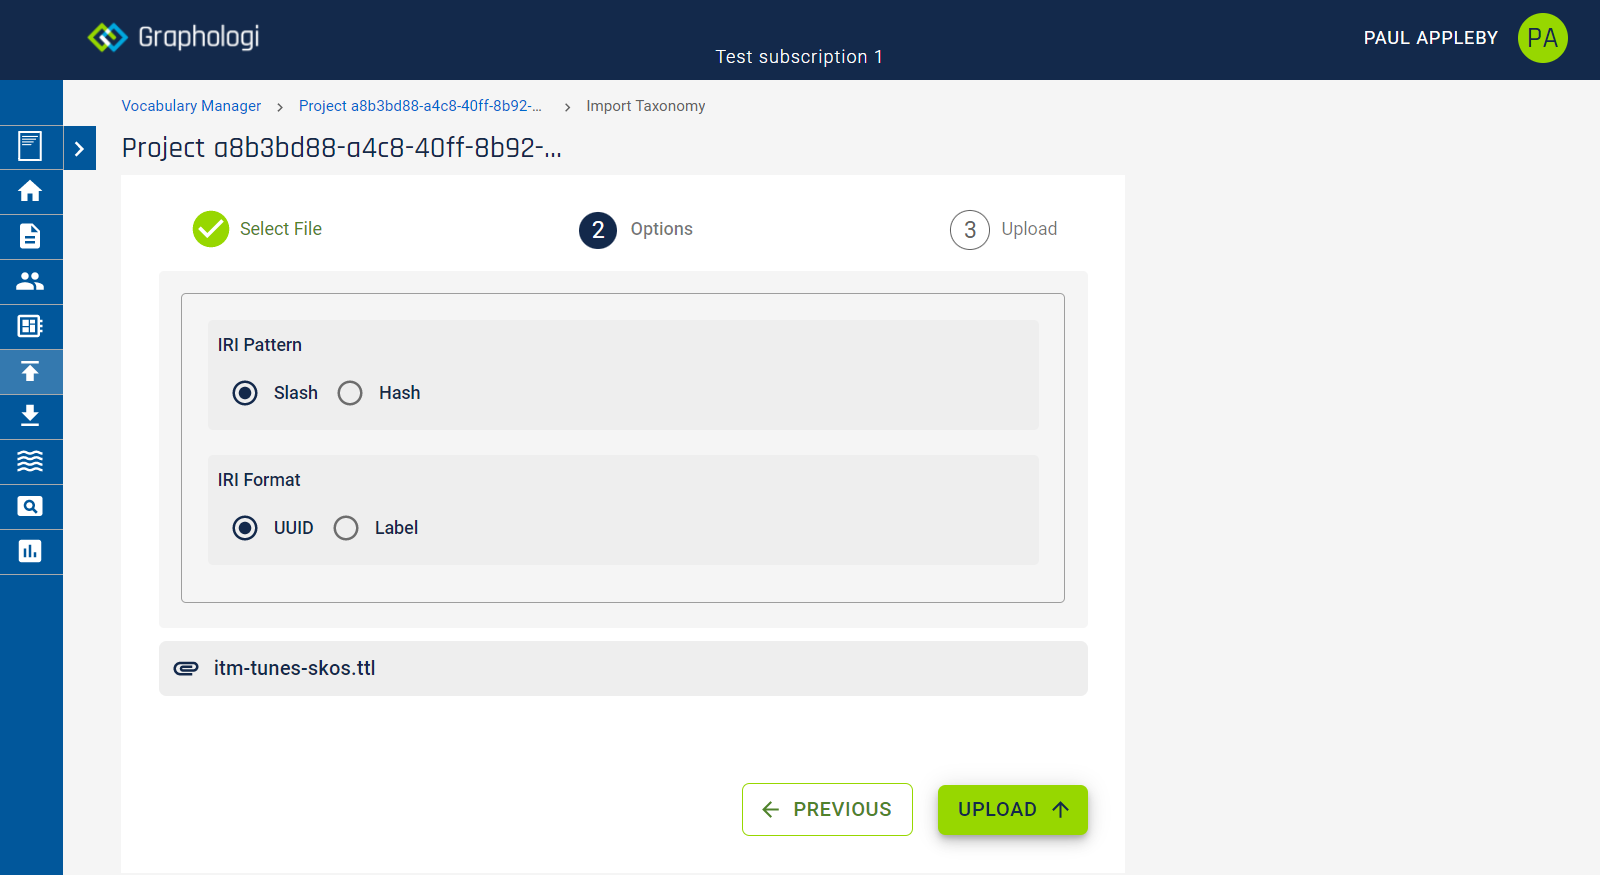
The options control whether the imported taxonomy/ontology/dataset will use slash or hash IRIs and whether IRIs generated by the system use UUIDs or labels.
If importing an ontology you will get additional options for handling minor errors, the approach for handling documents and how to handle missing files in owl:import statements. These do the following:
If importing data in Data Manager you will get an option to add the data to an existing dataset, or to ignore this and import as a new dataset.
This is available for taxonomy projects and data projects. If you are importing a spreadsheet (an XLSX file), a TSV, or a CSV file, you will see a screen similar to the following image.
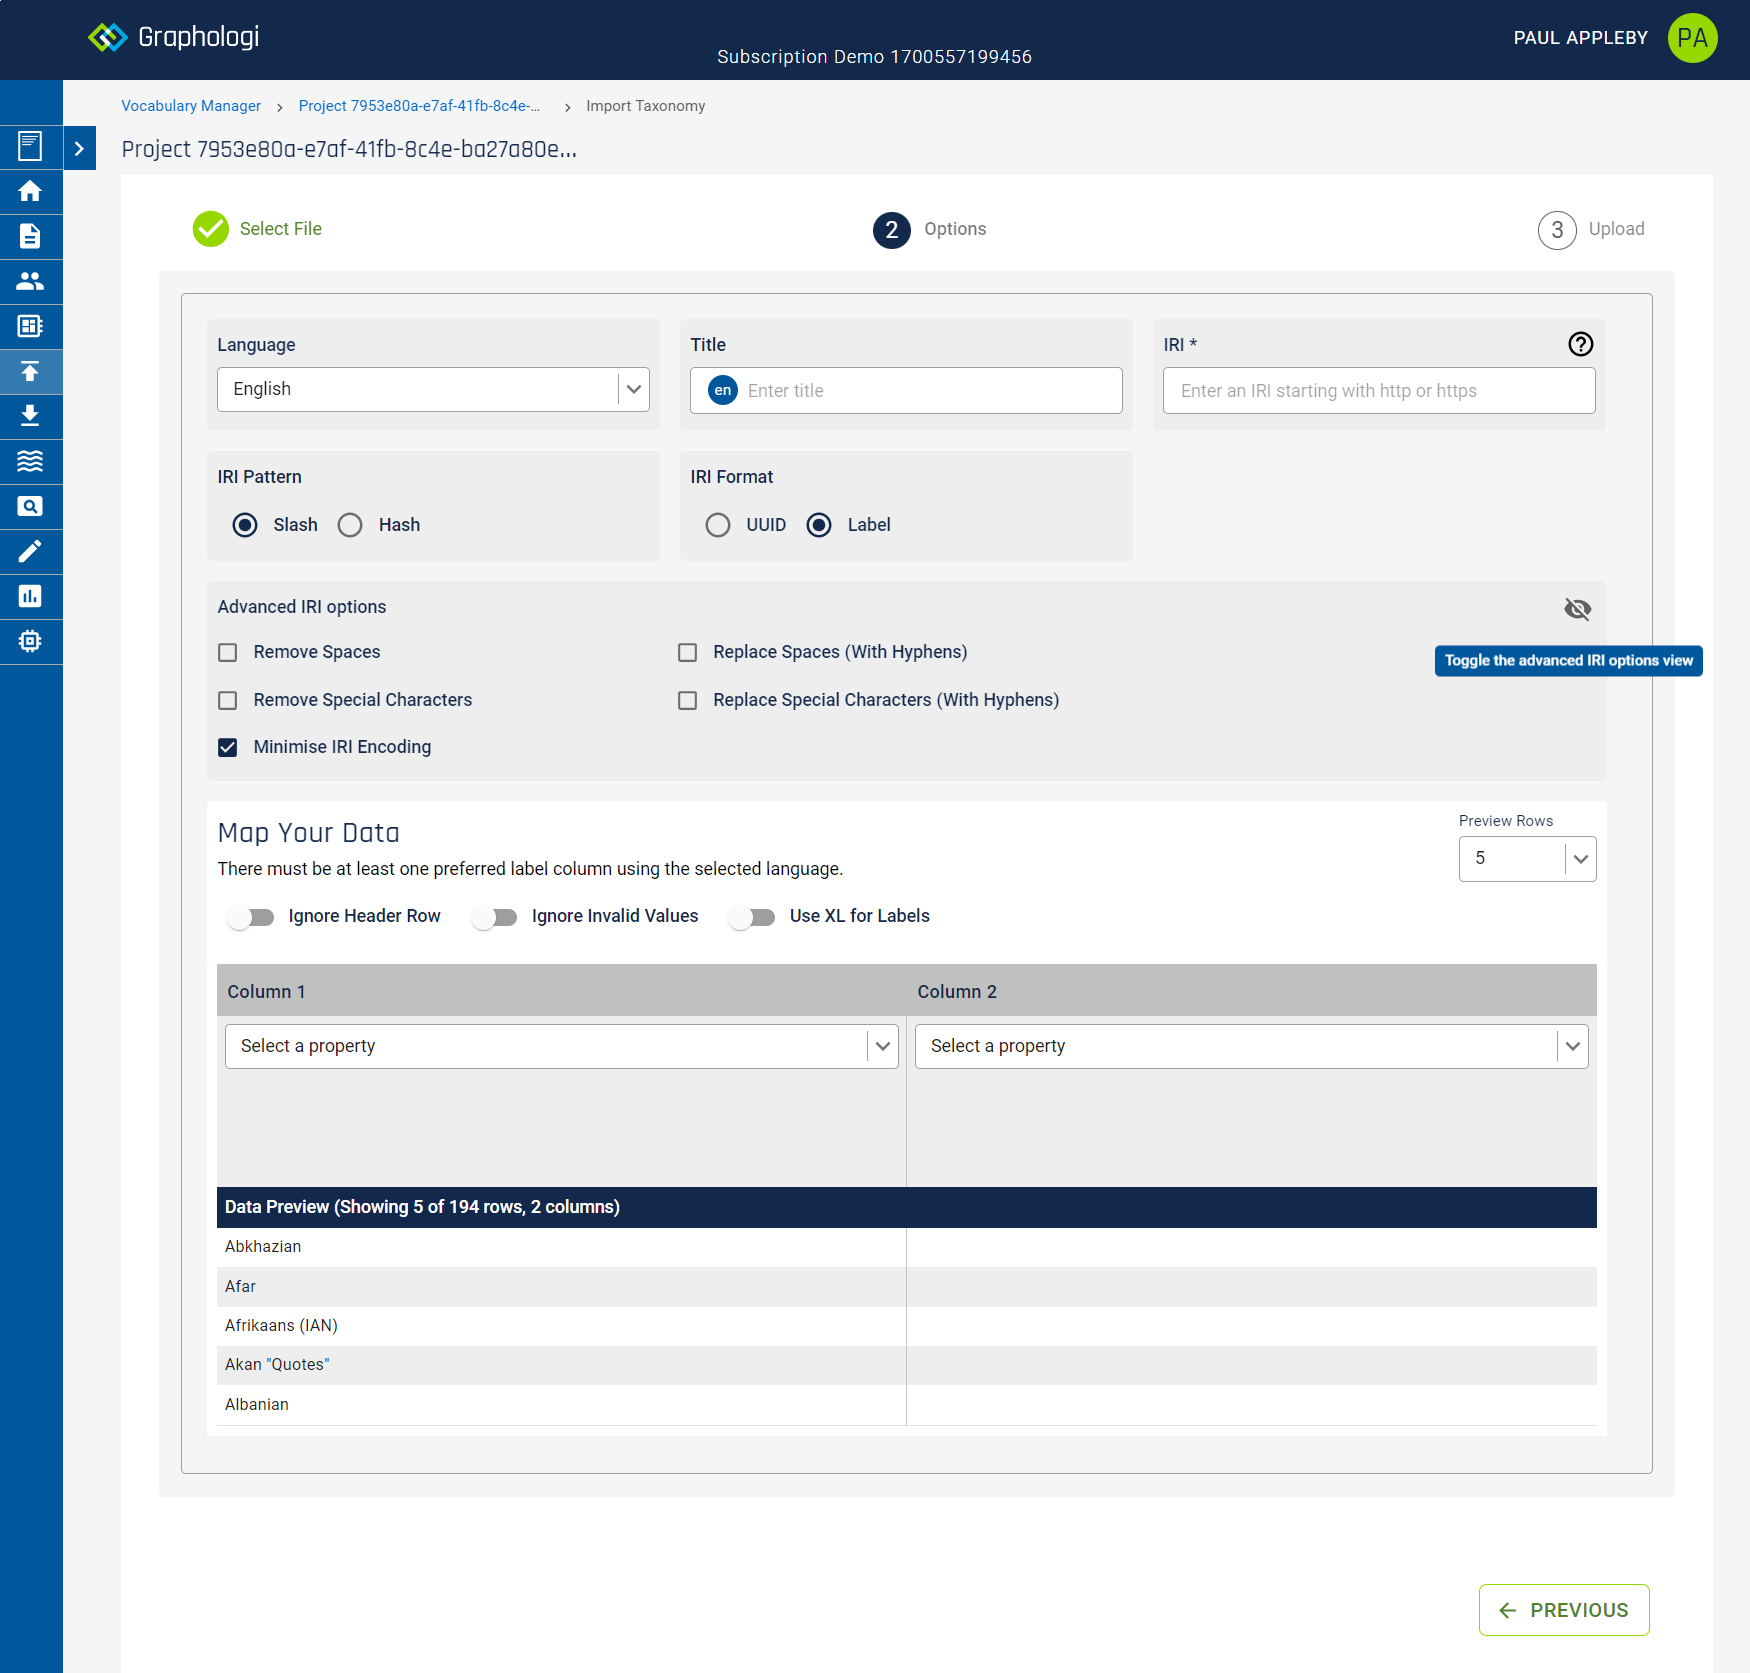
You need to select the base language of the text within the file. In general it would be expected that this is the same as the default project language. It is used as the basis for computing the hierarchy of the data. If your data does not have labels in the default project language that will still work, but when displayed in Graphologi the concepts will indicate that no label is available for the default.
You can optionally enter a title for the taxonomy or dataset.
You must also enter a base IRI for the taxonomy or dataset (e.g. 'https://example.com/vehicle'). This will form the first part of the IRIs that Graphologi will generate for your taxonomy or dataset.
In the same manner as creating a new taxonomy or dataset, you can choose whether to use slash or hash IRIs and whether UUIDs or labels will be used for IRIs.
Further to that, you can set advanced IRI options for the taxonomy by clicking on the ![]() icon. These options are the same as when creating a taxonomy. The additional SKOS-XL label options are activated for taxonomy projects if you choose to import labels as SKOS-XL labels.
icon. These options are the same as when creating a taxonomy. The additional SKOS-XL label options are activated for taxonomy projects if you choose to import labels as SKOS-XL labels.
The next step is to map the data in your file. If you have a header row in your file select 'Ignore Header Row'. If it is a taxonomy project and your project is SKOS-XL enabled you will also have the choice to generate labels as SKOS-XL. This will apply to any preferred, alternative or hidden labels.
By default the first five rows or your data are displayed for preview. You can increase this by changing the value on the right of the screen.
Graphologi expects files in a certain encoding - UTF8 with a byte-order mark (BOM). Depending upon the file your are trying to import the BOM may not be present. If the preview text looks a little scrambled this generally indicates that the encoding isn't quite right. In this case try the 'Adjust Encoding' option.
Note that the limits for import are 100 columns with the number of rows depending upon the subscription type. Also, you cannot import files that have non-text content.
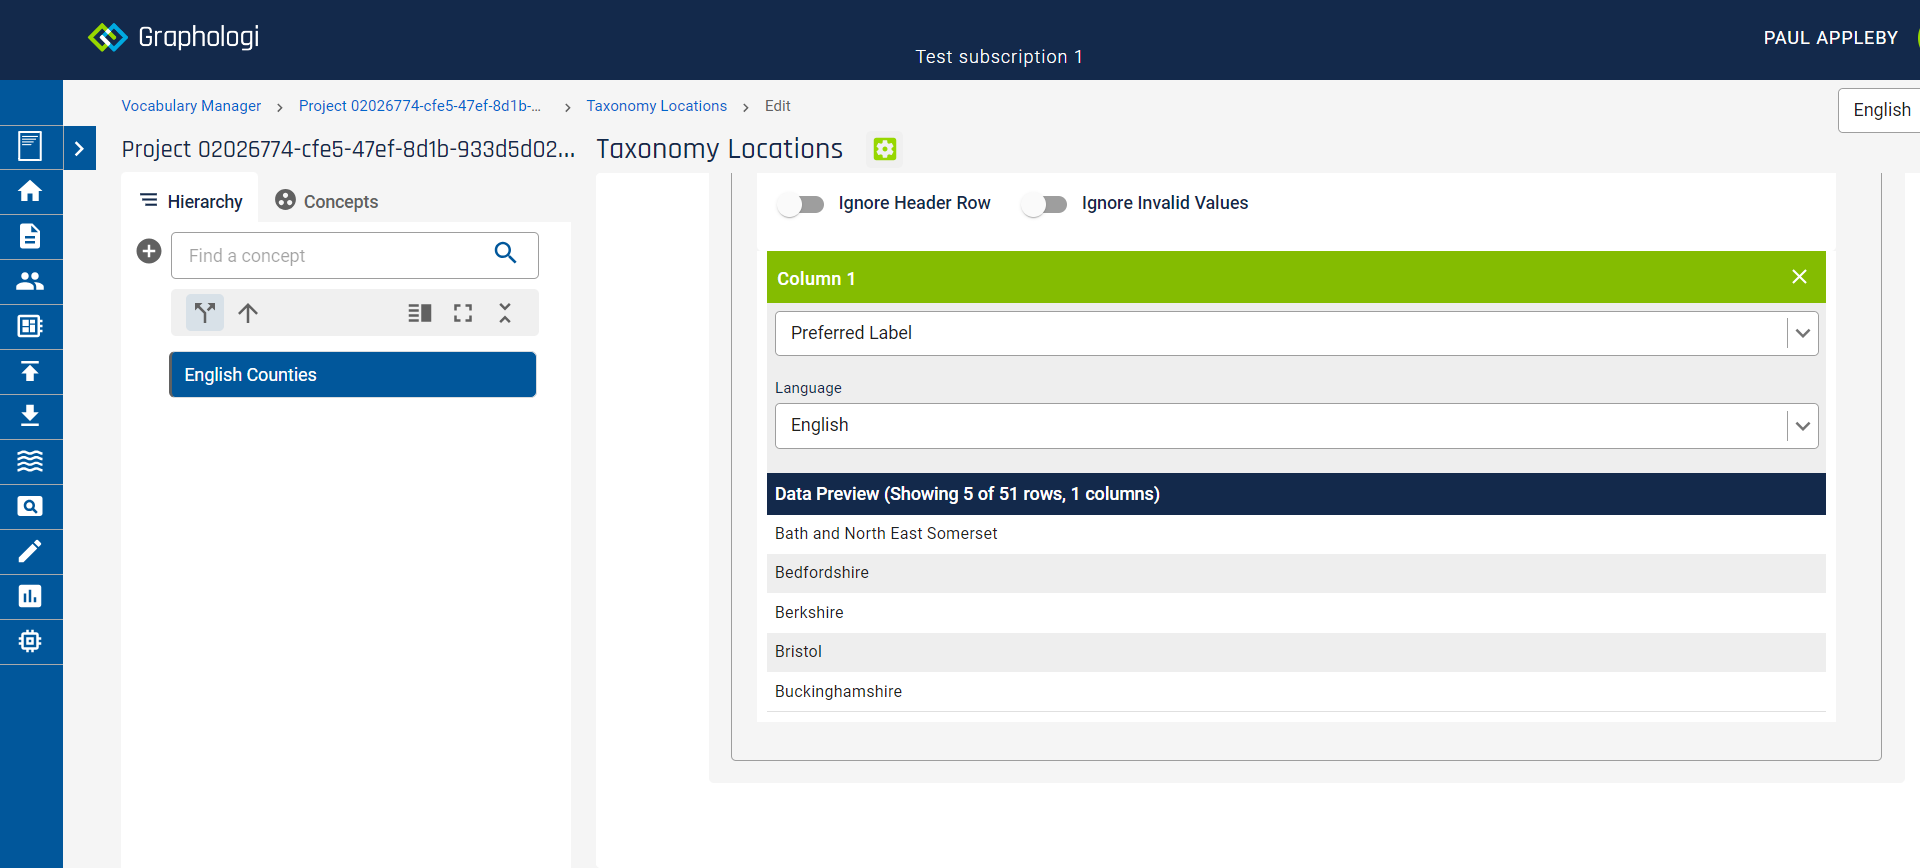
The next step is to map the columns in the file to properties in Graphologi. You only need to map the columns that you want to import. For taxonomy projects there must be at least one column that is a preferred label in the language as selected above. For data projects there must be a column that is the label.
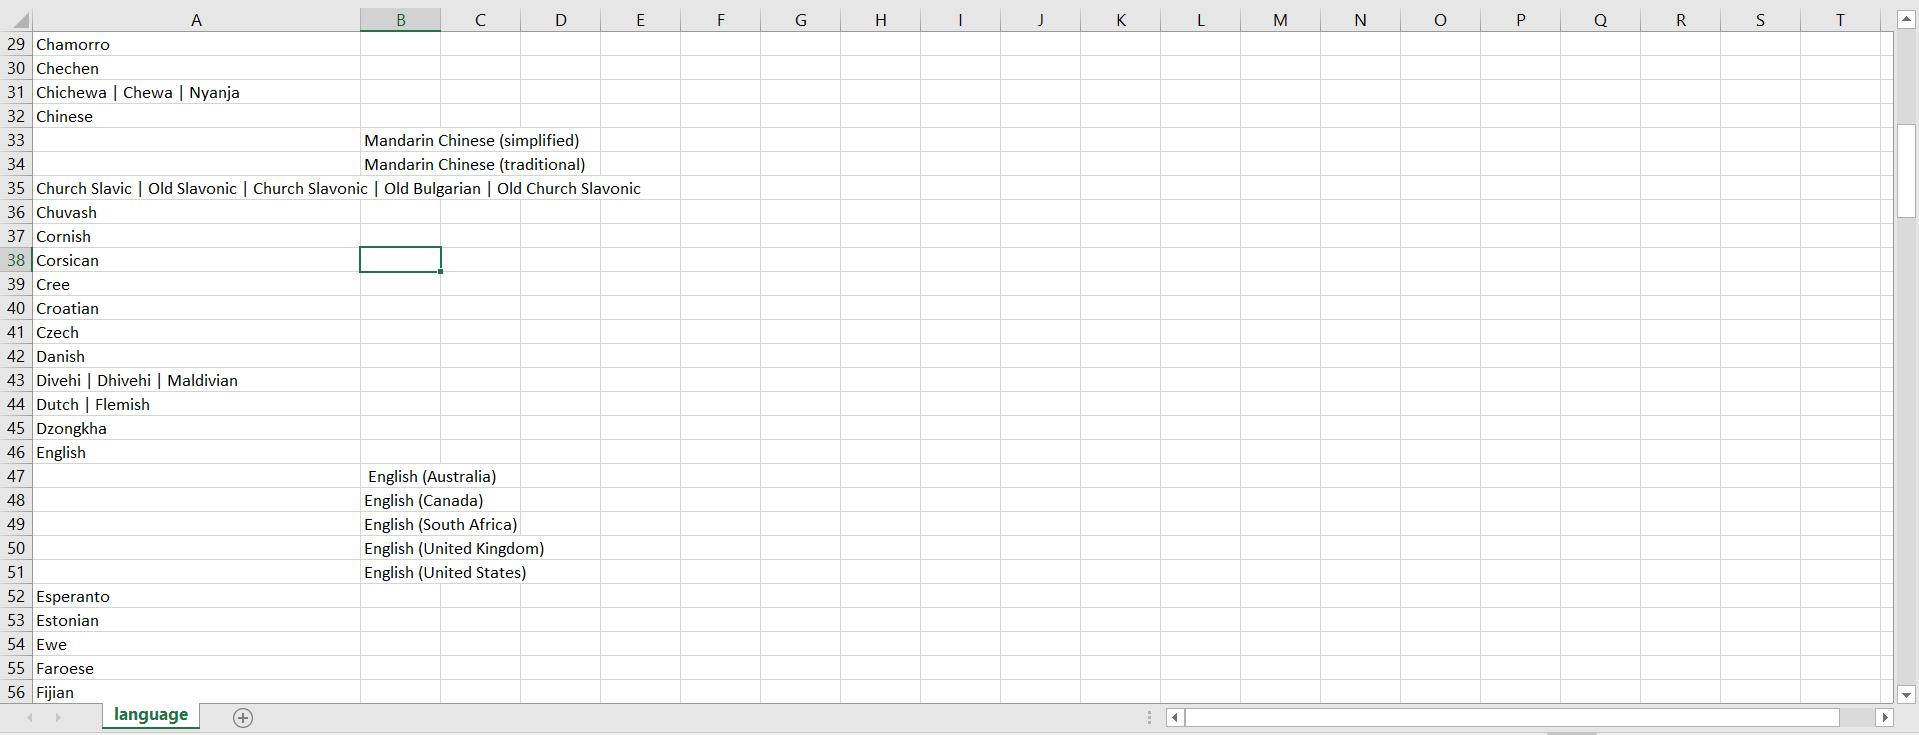
For taxonomy hierarchy the columns would generally be next to each other in the file, as in the following example.
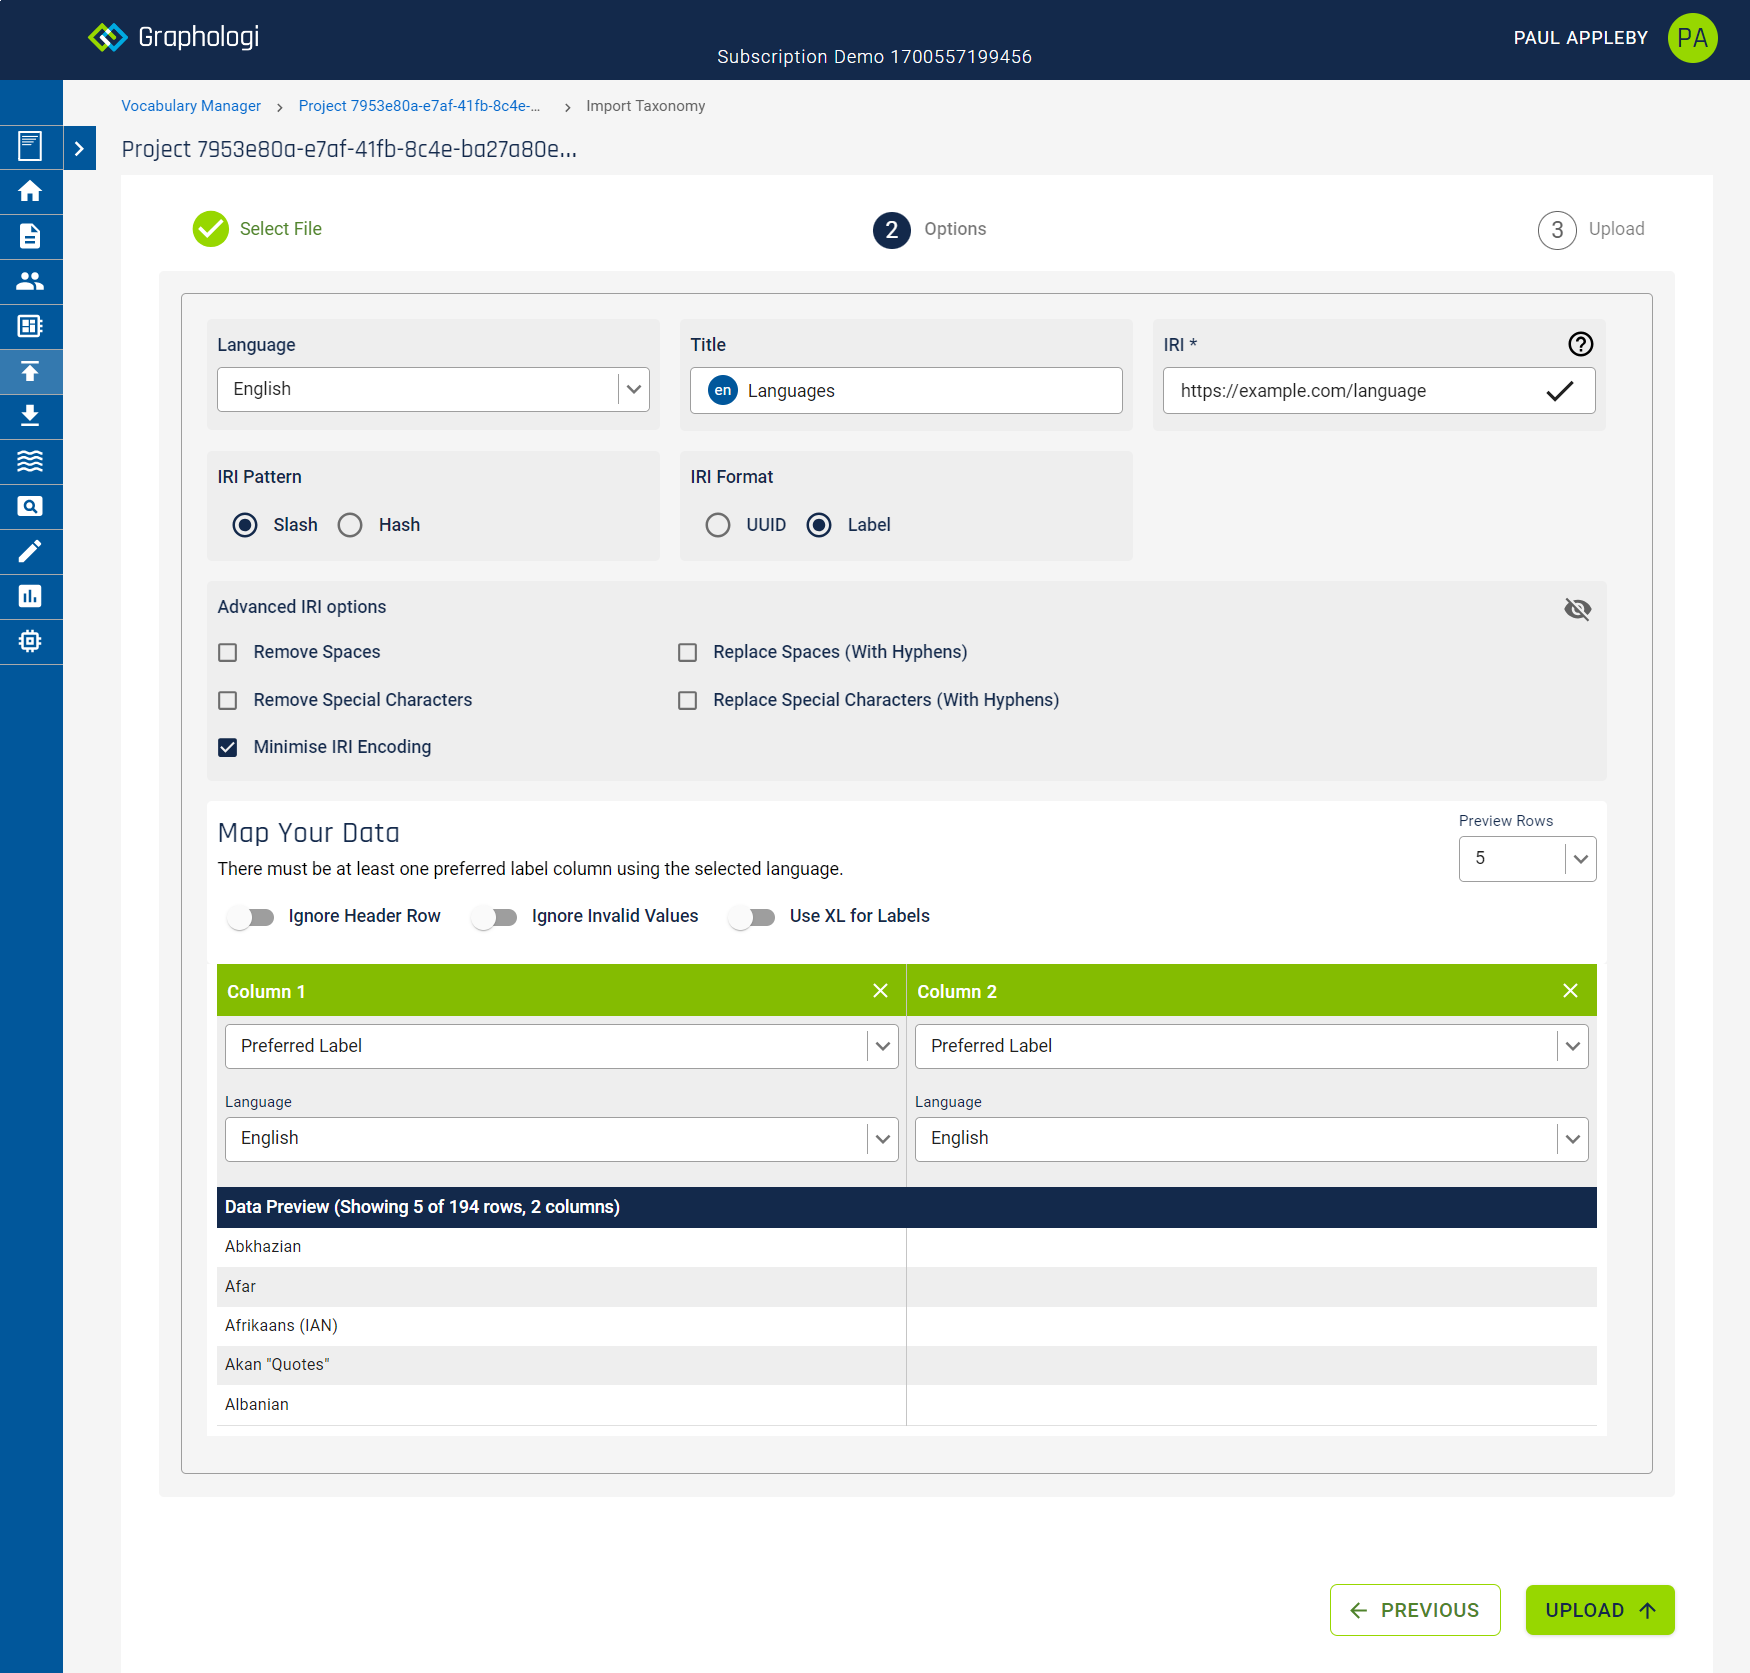
Select all the columns that make up the hierarchy (assuming you want to import all the levels). So, for the example above, select both columns as Preferred Label and set the language as English. This is shown in the following image.
Continue to map other columns for other properties.
The following are points to keep in mind:
Once you have chosen the options click . The import will start. The process may take some time and the screen should update as various steps are completed. These include uploading the file, validating it and then normalising the data, which is a step to ensure consistency within the data.
On successful completion you should see a button, which, on clicking, will display the project home page.
If errors occur on import you will need to fix the data before attempting to import again.
For SKOS notation, where the notation is a language string, the value will be converted to a non-language form. Graphologi does not support language tagged notations as it is highly unusual to do this.
XML literals will also be converted into strings.
When importing SKOS definitions, examples and notes as separate resources, they must have an IRI. Blank nodes will be rejected. Currently notes as resources can only be imported via RDF import.
This screen allows you to export an entire project. It is available in Vocabulary Manager, Ontology Manager and Data Manager.
Click on the ![]() icon on the left. This will display a screen similar to the following image.
icon on the left. This will display a screen similar to the following image.
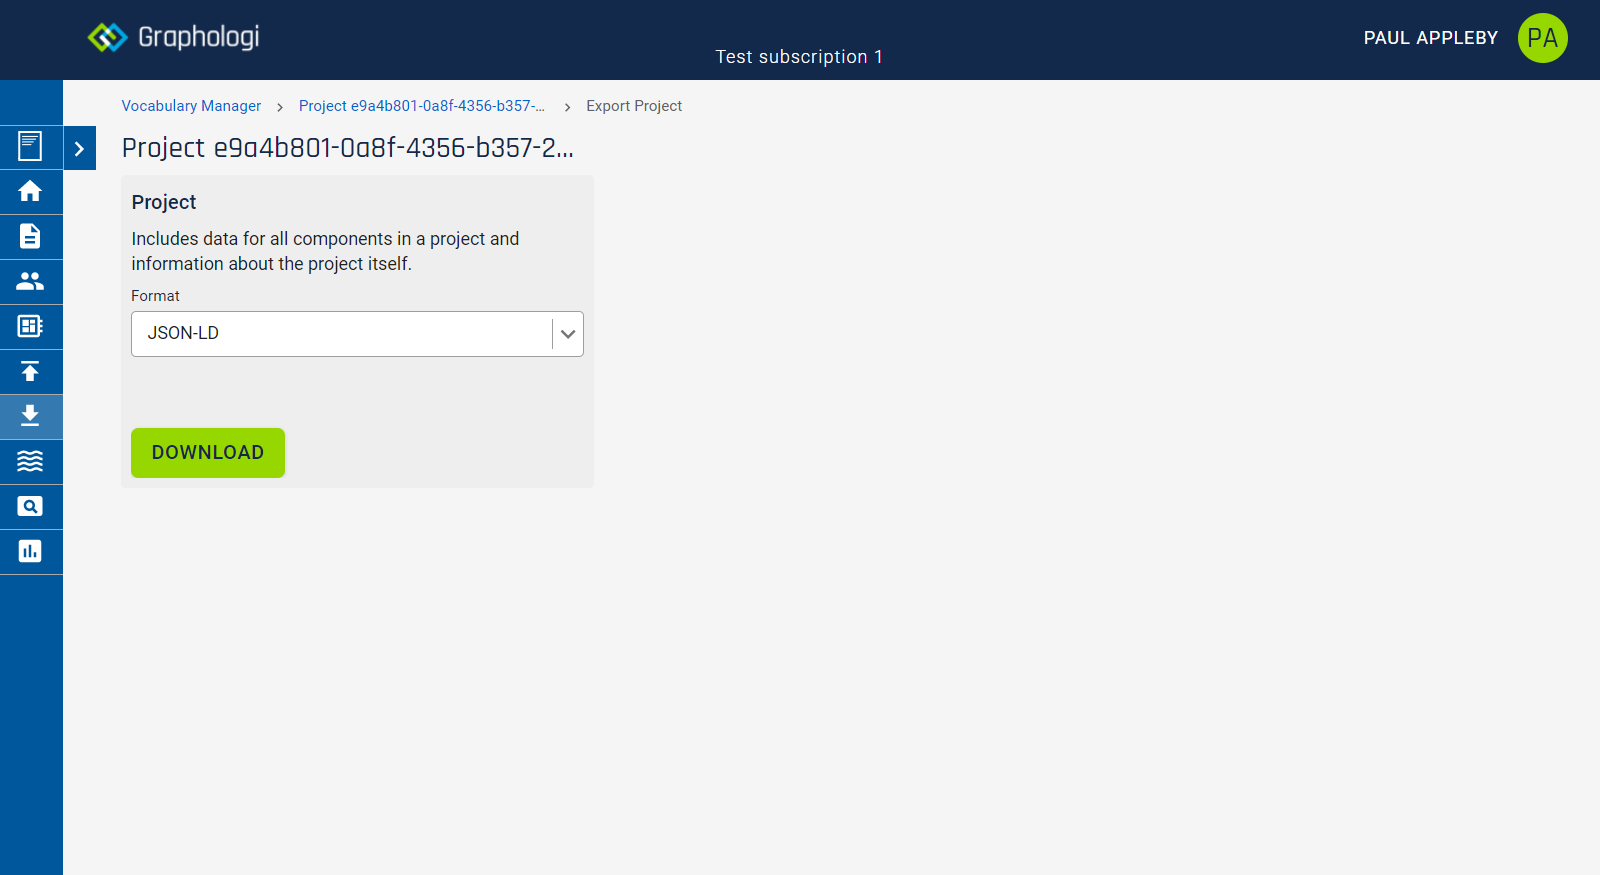
'Project' export includes some system properties used by Graphologi to manage the ontology. This might include information that is useful to you, such as revision numbers.
For ontology projects you also have an option for a clean export, without any Graphologi specific data. For this select 'Clean Project'.
You can select from JSON-LD, RDF/XML or Turtle formats for the exported data.
This option allows you to re-import a project that has been exported from Graphologi.
Click on the ![]() icon on the left of the screen. This will display a screen similar to the following image.
icon on the left of the screen. This will display a screen similar to the following image.
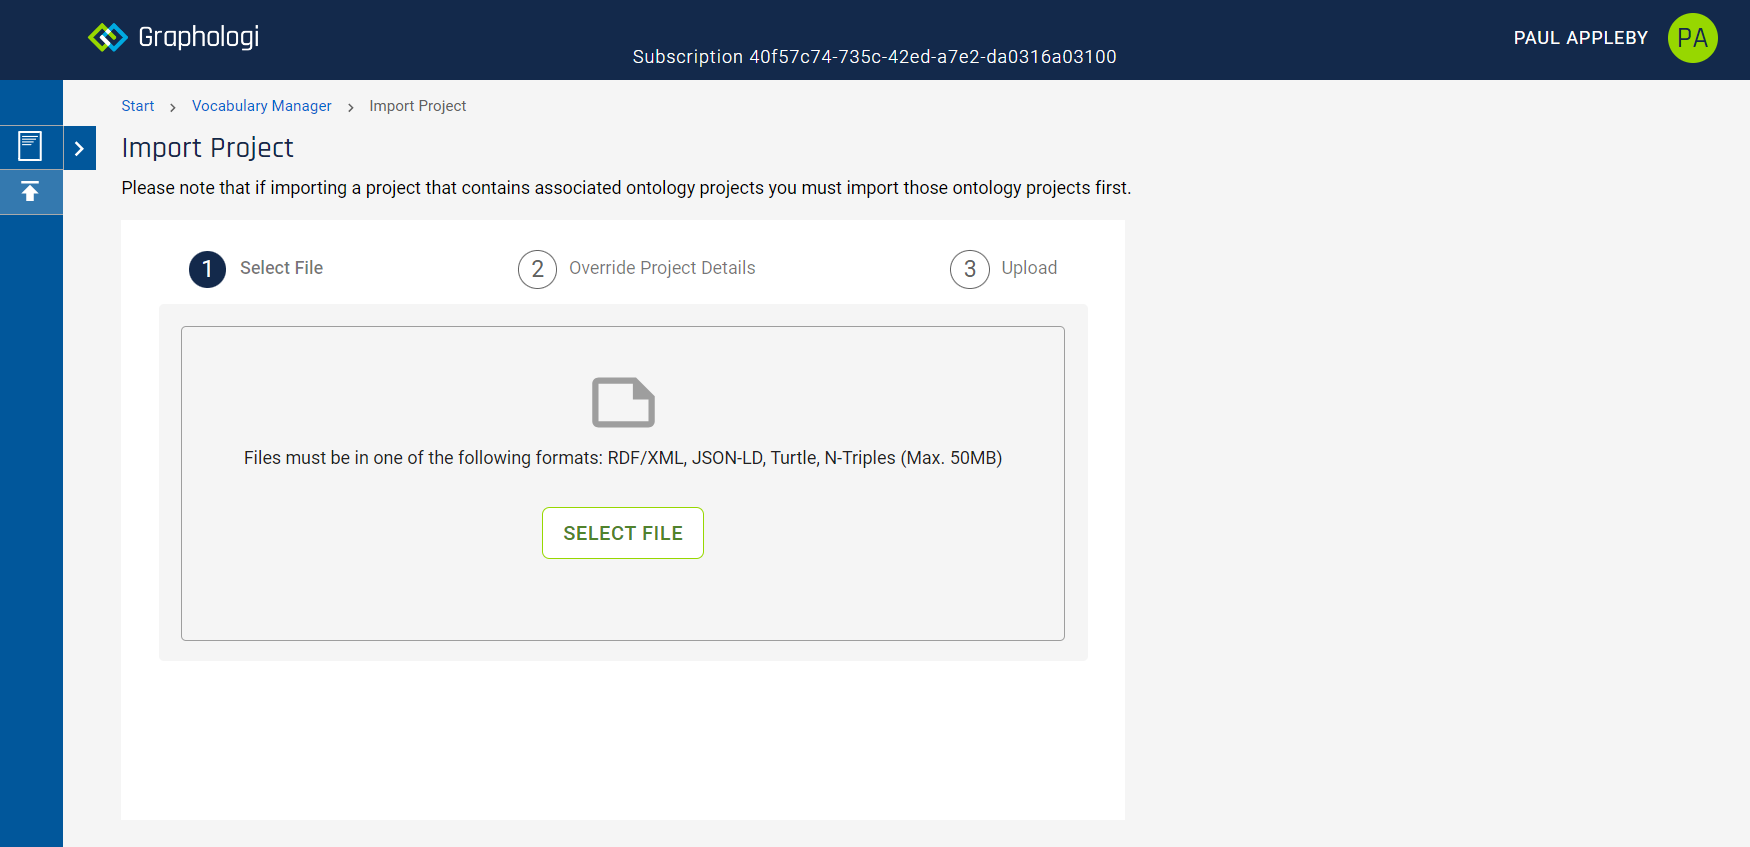
Note that the project type being imported has to be correct for the application. That is, only projects exported from Vocabulary Manager can be imported and the same applies to Ontology Manager and Data Manager. If a taxonomy project or data project has associated ontology projects they must either already exist or the associated projects must be imported first. If there are multiple ontology projects containing referenced ontologies this can cause ambiguity and Graphologi might not be able to work out which to associate. If this is the case you will need to exclude projects from association. This can be done on the ontology details screen.
Select a file and click . You then get the chance to override the project title and description if wanted (note that all existing titles and descriptions in all languages will be replaced). This will look like the following image:
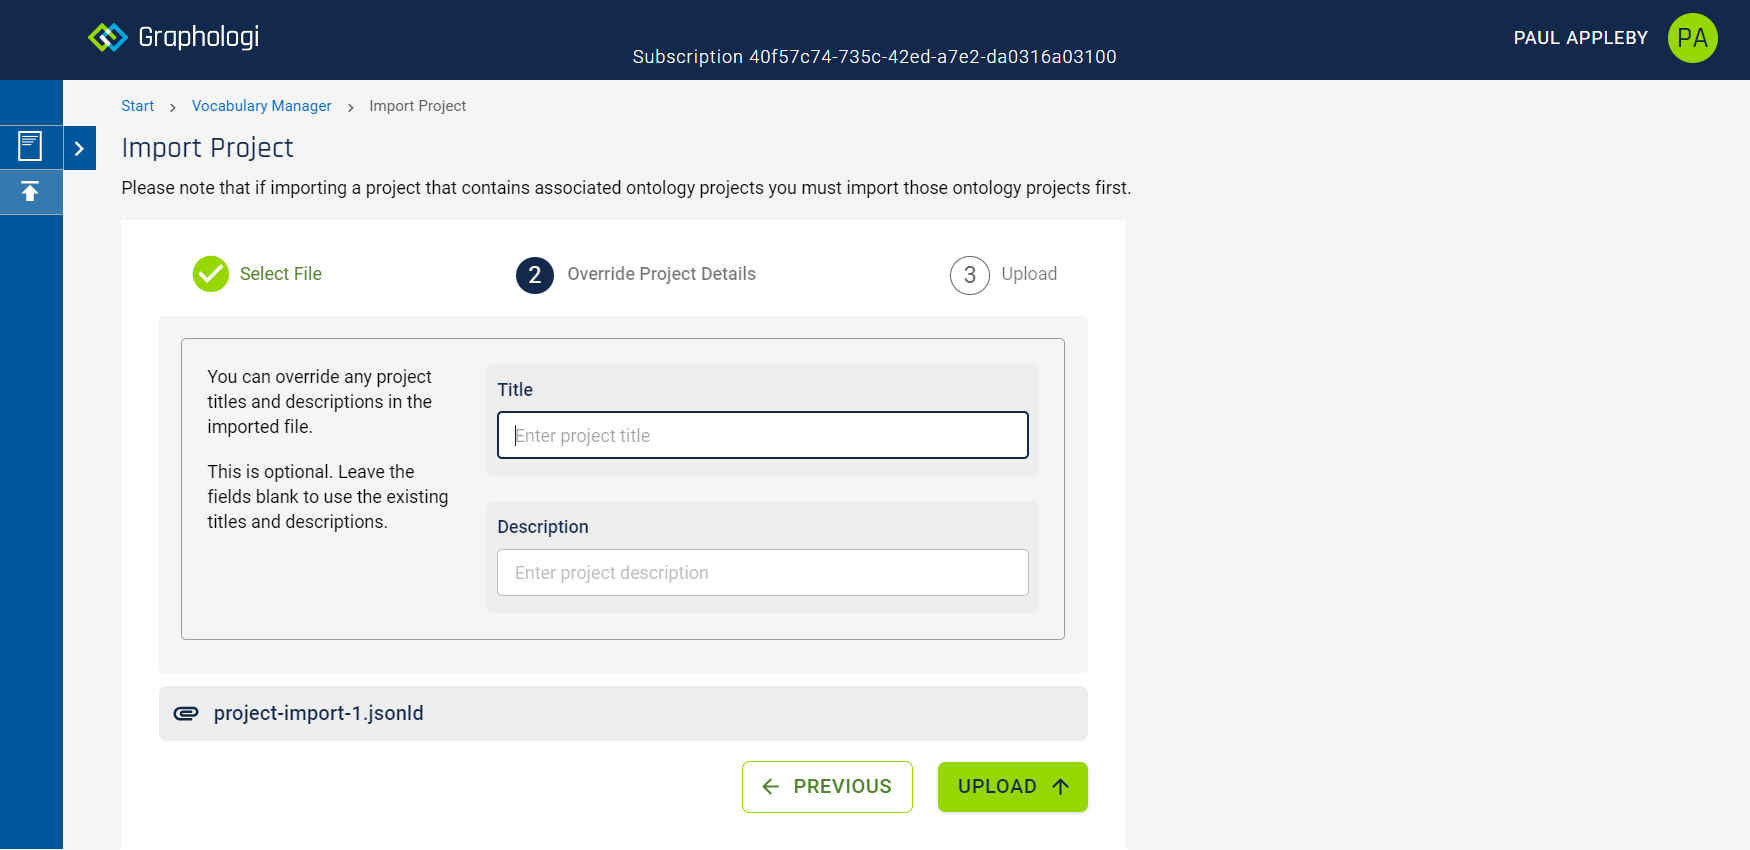
Then click . The import will start. The process may take some time and the screen should update as various steps are completed. These include uploading the file, validating it and then normalising the data, which is a step to ensure consistency within the data.
On successful completion you should see a button, which, on clicking, will display the projects page.
If errors occur on import you will need to fix the data before attempting to import again.
Note that, for project import, the imported project is assigned the admin group only.
If you need to find a resource within a project using its IRI you can do so from the project home page. Click on the ![]() icon on the right of the project screen. This will display a dialog similar to the following image.
icon on the right of the project screen. This will display a dialog similar to the following image.
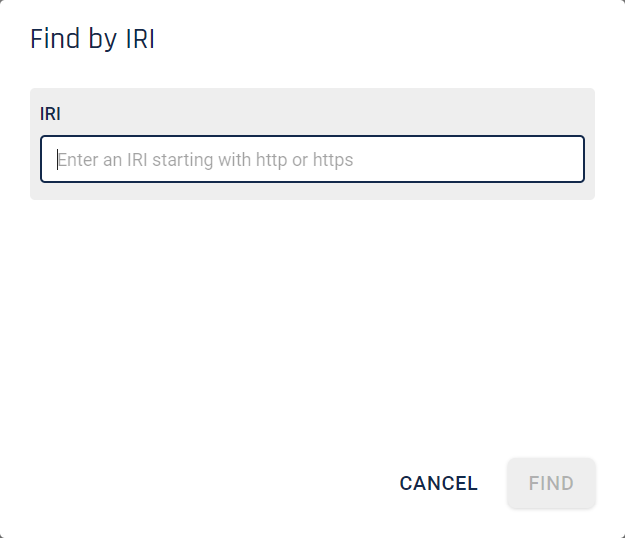
Enter an IRI and click the Find button.
If a resource is found you will see a result similar to the following image:

You can click on the chip to go to the resource.
The Vocabulary Manager gives you the ability to create taxonomies and thesauri compliant with the SKOS and SKOS-XL W3 standards. If you also wish to use the Ontology Manager then you can also further enhance your taxonomies with additional relationships and classes, creating an even more semantically rich knowledge graph.
A taxonomy in Vocabulary Manager can consist of any number of concepts in a hierarchy with as many levels as you need.
Multiple languages are supported. The languages available to a taxonomy are controlled by the project setup.
When creating a new taxonomy you will be presented with a dialog box as below:
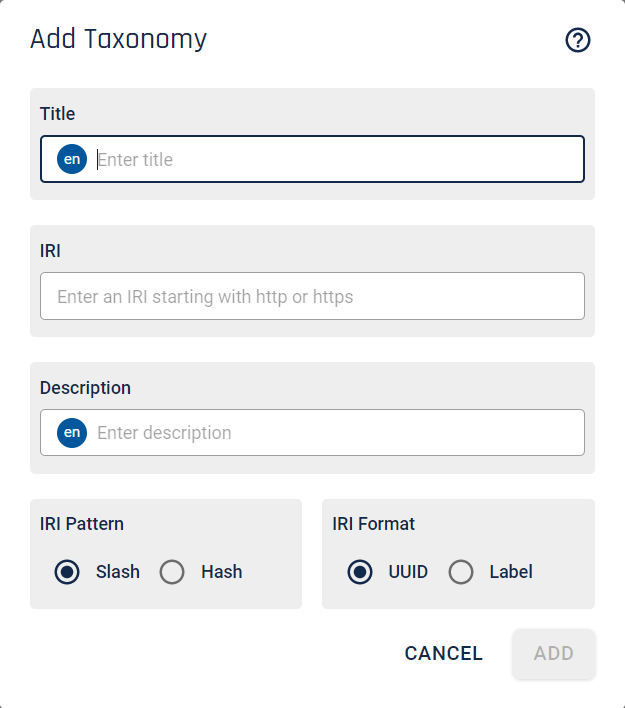
A new taxonomy requires various pieces of data to be completed. Enter a title for your taxonomy. The language for the title will be the default project language. Languages in Vocabulary Manager are generally indicated as follows,  with a circle containing a BCP-47 language code.
A taxonomy needs an IRI (Internationalised Resource Identifier). For those not familiar with IRIs they are essentially the same as URIs, which are similar to URLs. IRIs can contain characters from Unicode that are not available to use in URIs. Note that codepoints in the RTL ranges currently need to be escaped.
The IRI for a taxonomy must be unique within all the data stored in a project. If the IRI you have entered is unique you will see a confirmatory tick.
IRIs for taxonomies tend to be in one of two forms - called slash or hash. Slash IRIs are those such as http://example.com/cars/bugattichiron whilst hash IRIs are those such as http://example.com/cars#bugattichiron. Whichever you pick this will generally mean the taxonomy IRI would be one of the following forms: http://example.com/cars or http://example.com/cars/ or http://example.com/cars#. There is no right or wrong decision whichever option you choose.
Each IRI for a concept or label will be generated by the application. However, the form of those IRIs can be controlled in part by selecting either UUID or label forms. Both have their own benefits. UUIDs are free from any language implications and can also remain applicable if, say, the preferred label needs to change. However, label forms tend to be more readable, at least in the default language. The examples above are of the label form.
Once a taxonomy is created there are further IRI options available. See the section Taxonomy detail for more information.
Finally, you can optionally add a description for your taxonomy.
Click to add the taxonomy. You will see your taxonomy added to the list similarly to the image below:
When a taxonomy is no longer needed you can delete it. This is not always quite as simple as it sounds from a data perspective. If a taxonomy is simply a hierarchy it is obvious what needs to be deleted. However, if there are multiple taxonomies and collections in a project then concepts can be used in multiple places.
To delete a taxonomy click on the ![]() icon for it as in the image below.
icon for it as in the image below.

You will be presented with the following dialog.
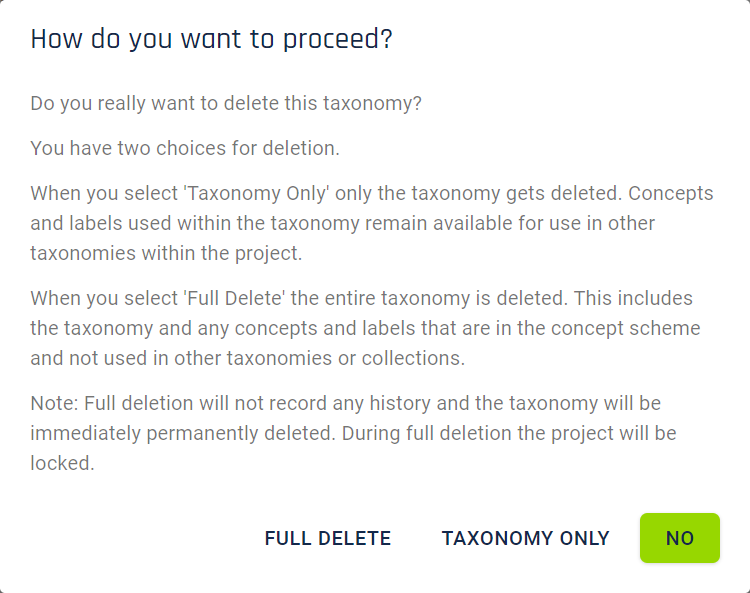
The 'Full Delete' option will delete the concept scheme resource and any concepts and labels that are not used by another taxonomy or collection. If a resource is the object of any skos:member relationship it will not be deleted (so please be aware of importing data that contains this relationship where it is used other than in a collection).
The 'Taxonomy Only' option will only delete the concept scheme resource. Any concepts and labels that are not used by another taxonomy or collection will become floating resources.
Whilst deletion is happening the project will be locked to stop other activity by other users. This is necessary due to the possible interconnections between data. For very large taxonomies this process may take some time.
When you first create a taxonomy and start to edit it you will be presented with a screen as below:
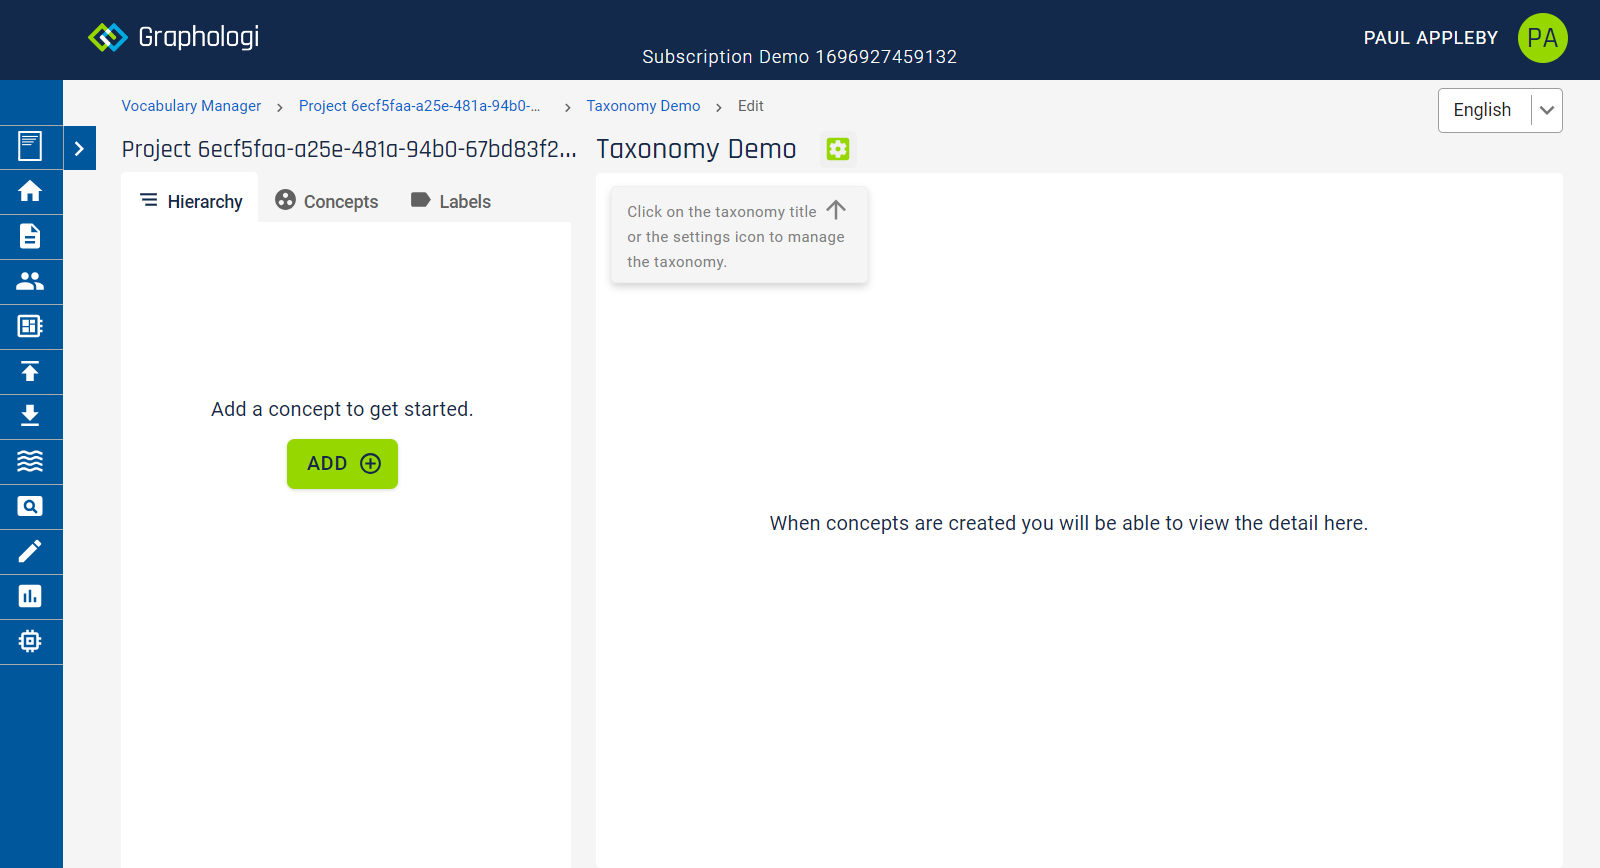
Let us start by explaining the various parts of the screen.
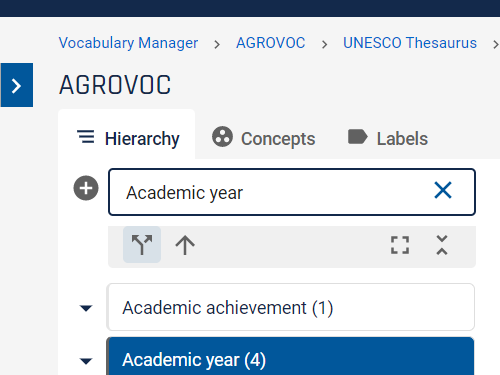
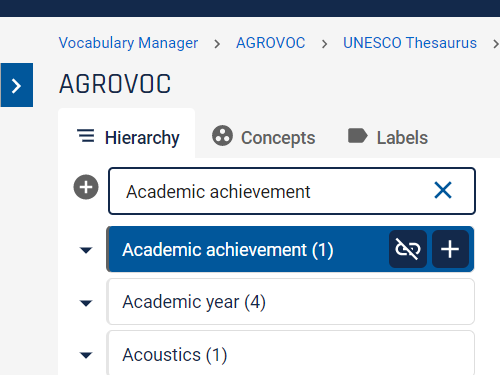
Hierarchy shows the concepts in the taxonomy in a tree view. Note that multiple levels of hierarchy is optional and your taxonomy may be a flat list of concepts. For a complex taxonomy the tree may get very deep. As an example, the following image shows concepts from the UNESCO thesaurus - a large, hierarchical taxonomy.
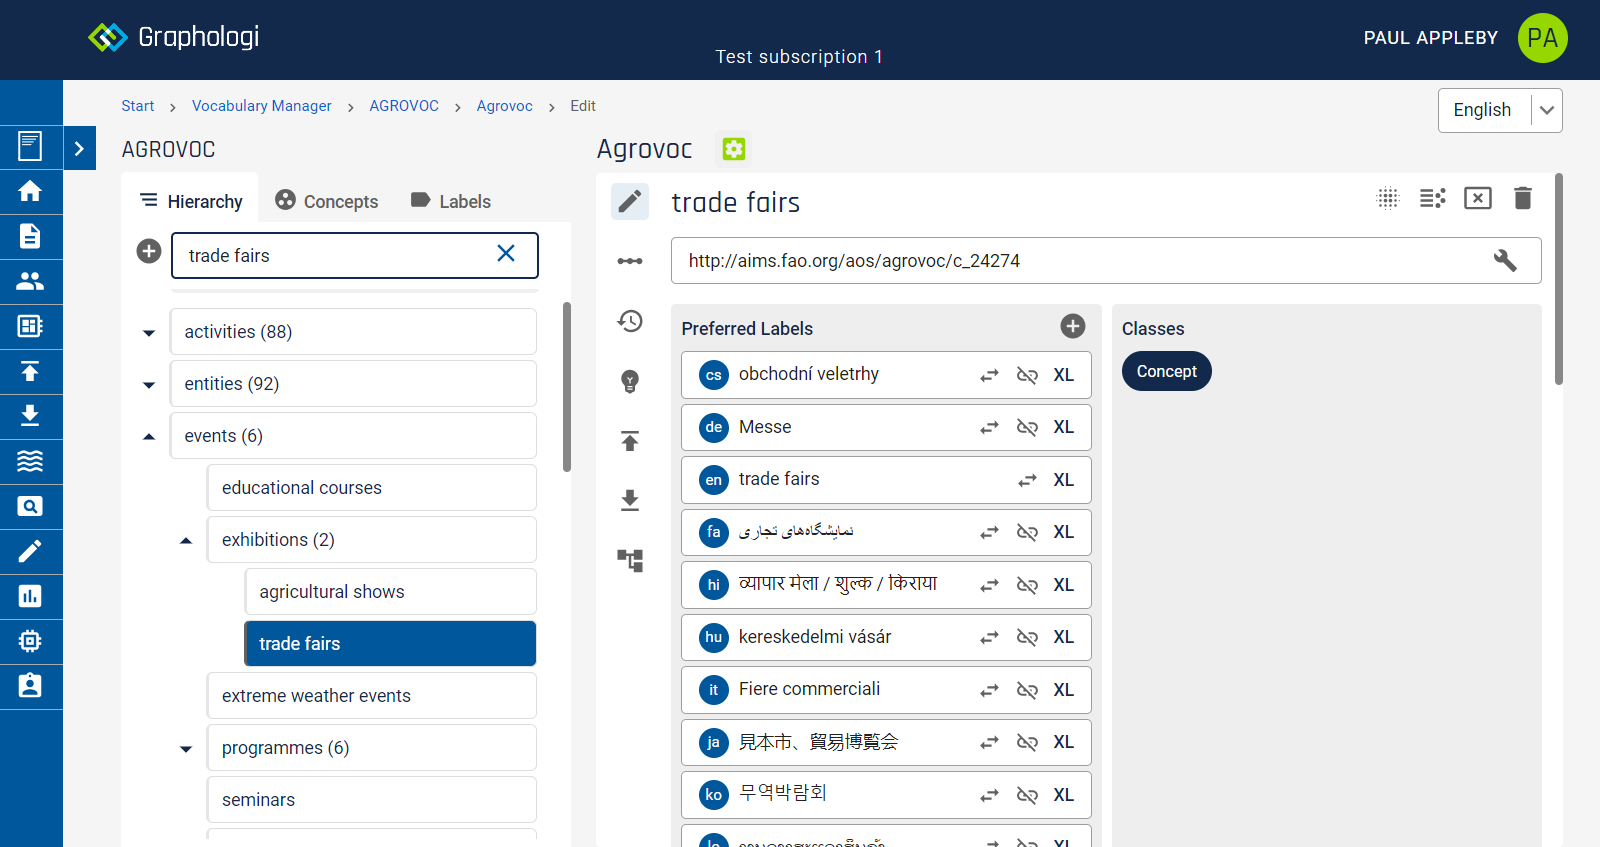
The number of narrower (child) concepts is shown in parentheses. For example, in the image above 'programmes' has six narrower concepts.
As taxonomies get deep in terms of levels it can be difficult to remember the context of the broader concepts. To aid with understanding the context a summary of the hierarchy is displayed when you hover over any concept that is below a top concept.
It may also be useful to adjust the display panels and there are various options to do this, which are accessed at the top of the hierarchy.
If you have expanded the hierarchy in multiple places and want to collapse it, you can do this by clicking on the ![]() icon.
icon.
For deep taxonomies you may want to use more screen space to display the hierarchy. The width can be altered by clicking on the ![]() icon. You can adjust the width up to three levels, after which the next click will return it to normal width.
icon. You can adjust the width up to three levels, after which the next click will return it to normal width.
Sometimes it is easier to work with just the hierarchy in view to simplify the display. To do this click on the ![]() icon. To return to the normal view click the icon again.
icon. To return to the normal view click the icon again.
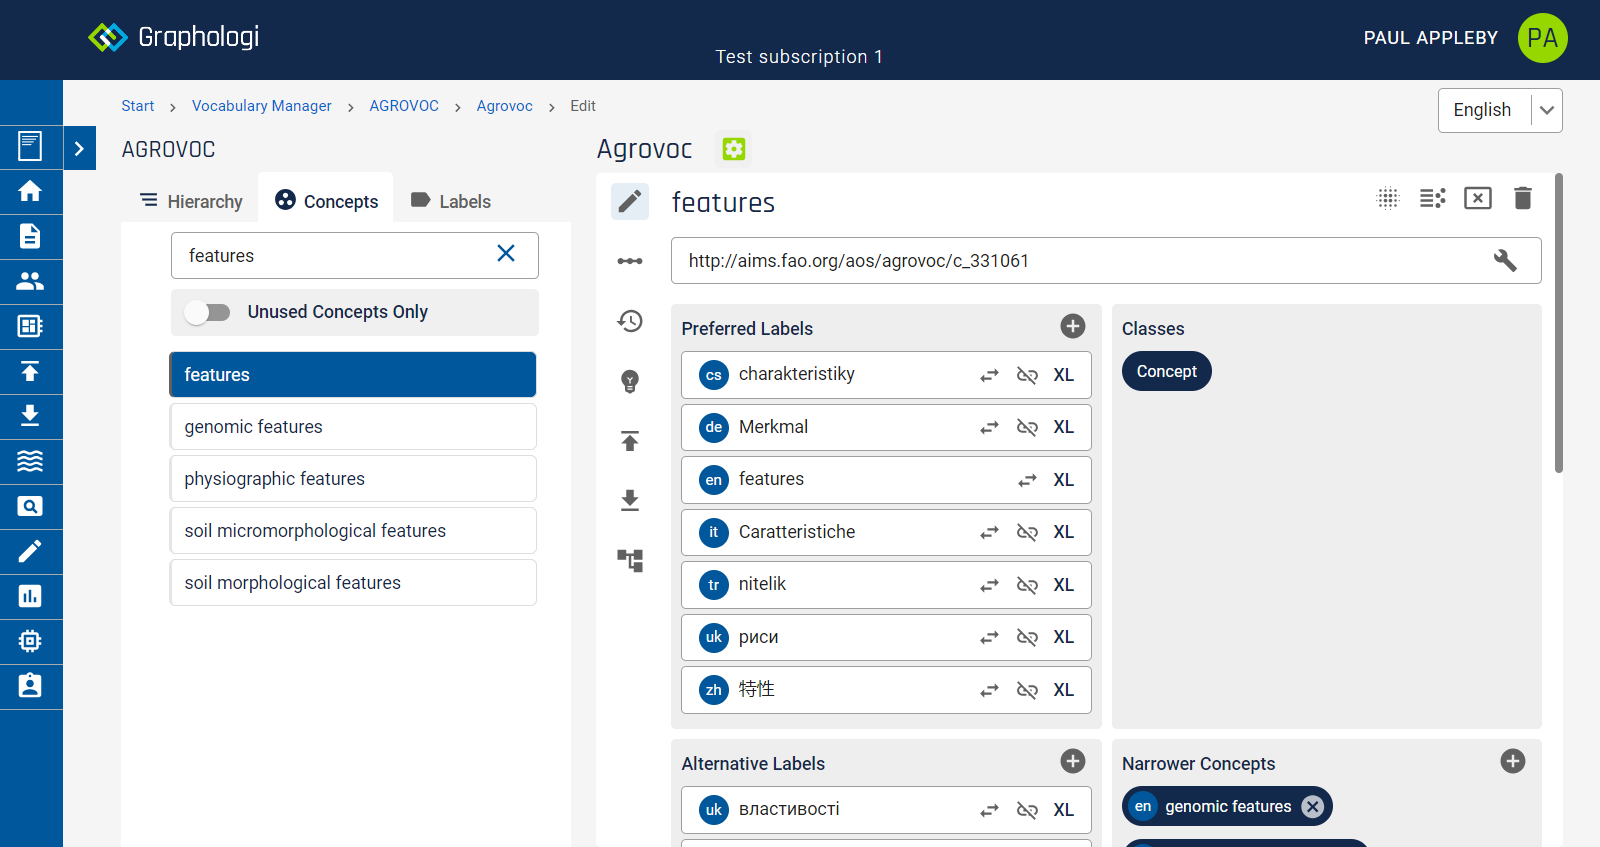
Concepts shows a filtered set of the concepts in the taxonomy. This view can be very useful if you just want to look at particular concepts that have labels that match a string of text, or simply want to quickly look at some concepts.
As concepts can be removed from the hierarchy of a taxonomy this potentially leaves them disconnected from that hierarchy. That is, the concepts are still in a concept scheme but not 'positioned' as such. You can still find and view these concepts. However, if you want to explicitly see which concepts are not positioned you can select the 'Unconnected Concepts Only' option.
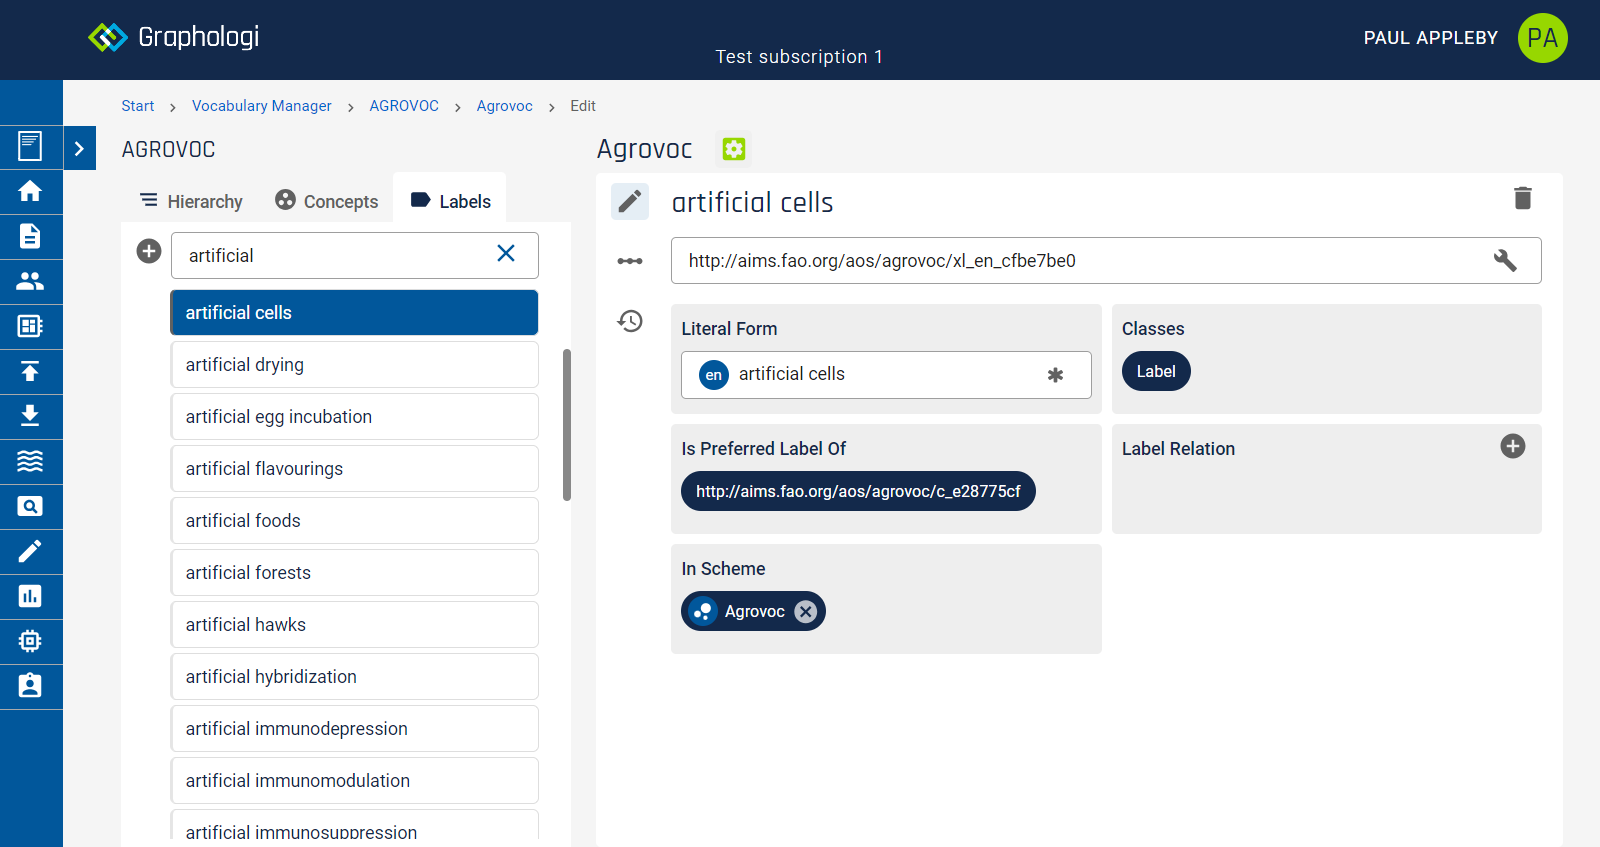
Labels is the list of SKOS-XL labels available within your taxonomy. The number of labels can get extremely large. For instance, the Agrovoc project has over seven hundred thousand labels across dozens of languages. Below is an example image of labels. Labels are language specific and the language filter allows you to select which language you want to choose from.
For projects using multiple languages it can be useful to switch the viewing language. This can be done using the language selector at the top right of the screen.
This controls various aspects of the editor. The hierarchy will reflect the language, as will the search and for certain dialog boxes the language will default to the viewing language.
If text in the viewing language is not available the view will try and use the default project language. Where the viewing language is not available the screen will highlight items in orange to indicate this information is not available.
IRIs should be persistent if at all possible. Changing IRIs can cause problems because they are unique identifiers for resources and changing a unique identifier can break any connection to it. You should do whatever you can to avoid needing to change IRIs.
However, it may be that you do need to change an IRI, possibly because a legacy IRI has been imported, or that the IRI generated by Graphologi isn't exactly as you would like.
You can change the IRI of both concepts and SKOS-XL labels. The approach is the same for either. Click the ![]() on the right hand side of the screen. This will display a dialog box as in the following image.
on the right hand side of the screen. This will display a dialog box as in the following image.
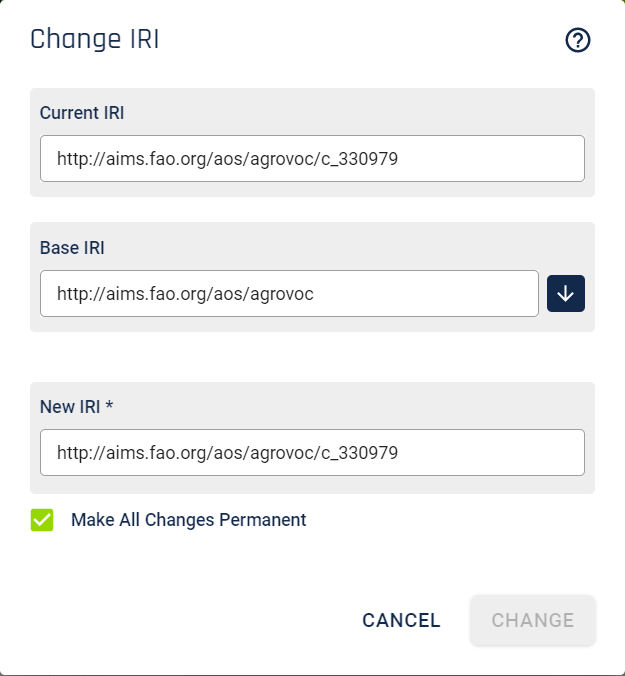
Update the IRI in the 'New IRI' field to that value that you want. This must not clash with any existing IRI that the system has and a check will be run.
Most IRIs will probably use the base IRI of the taxonomy. To copy this value click the ![]() and then add the additional part of the IRI for the concept or label.
and then add the additional part of the IRI for the concept or label.
There are two approaches to applying changes to IRIs within Graphologi. The original method simply recorded a change and in many parts of the application automatically displayed or exported the change even though the underlying IRI for the resource did not physically change (meaning that SPARQL queries and some API calls did not 'see' the new IRIs easily). This option is still available. However, the default is now to apply the change permanently. The 'Make All Changes Permanent' option is selected by default. If you leave this checked then the system will physically update this IRI and any other IRIs not permanently changed. This operation is a batch operation and so the project will be locked whilst this happens.
When applying IRIs permanently there are several points to keep in mind:
You can view any old IRIs in the 'IRI History' panel of the concept.
By default it is only possible to make links within a single project. However, it may be desirable to allow connections to other projects.
For details on how to link projects please see: Viewing and managing information about a taxonomy.
When there are linked projects it then becomes possible to use them for the SKOS match properties and ontology relationships. An additional tab will be available on certain dialogs with the title 'Linked projects', similar to the image below.
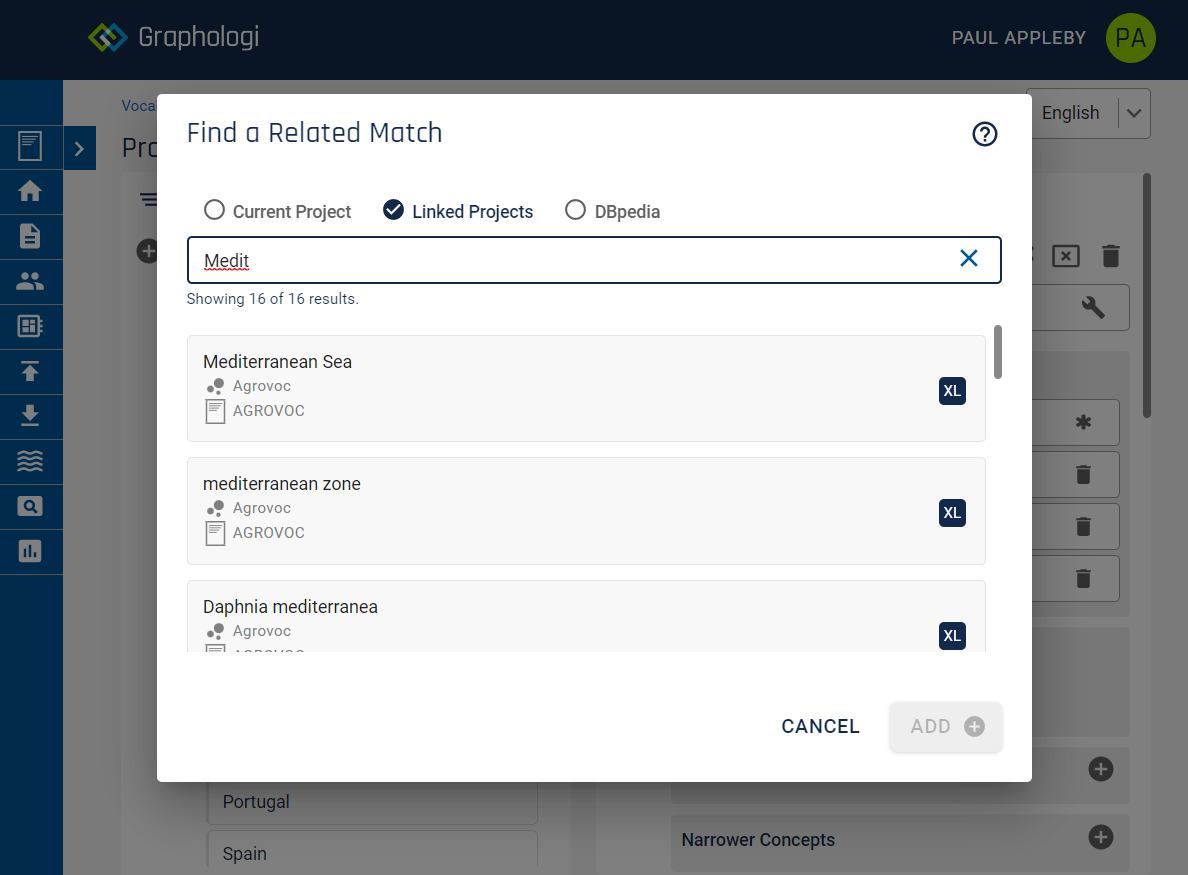
There are certain important constraints to keep in mind when using linked projects:
There are many useful linked data sources available on the web. One of the most popular is DBpedia, which contains a wealth of information. It is possible to make connections to DBpedia (English version) within Graphologi by selecting the DBpedia option for a taxonomy. For details on how to do this see: Viewing and managing information about a taxonomy.
When this option is selected it then becomes possible to use DBpedia for the SKOS match properties and ontology relationships. An additional tab will be available on certain dialogs with the title 'DBpedia', similar to the image below.
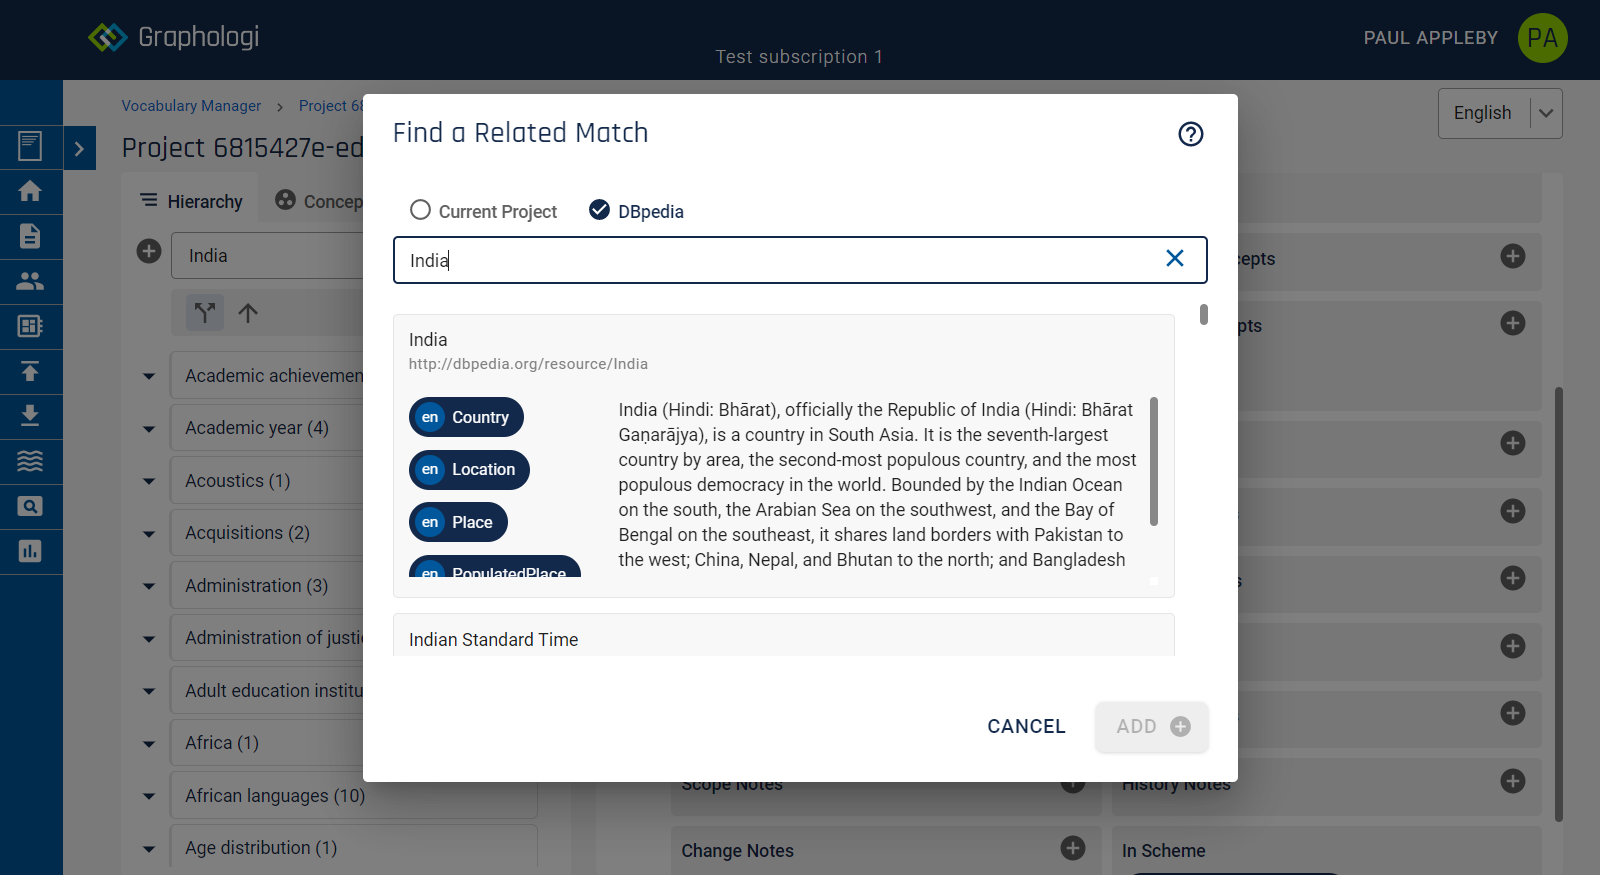
Please note that DBpedia search is not range aware.
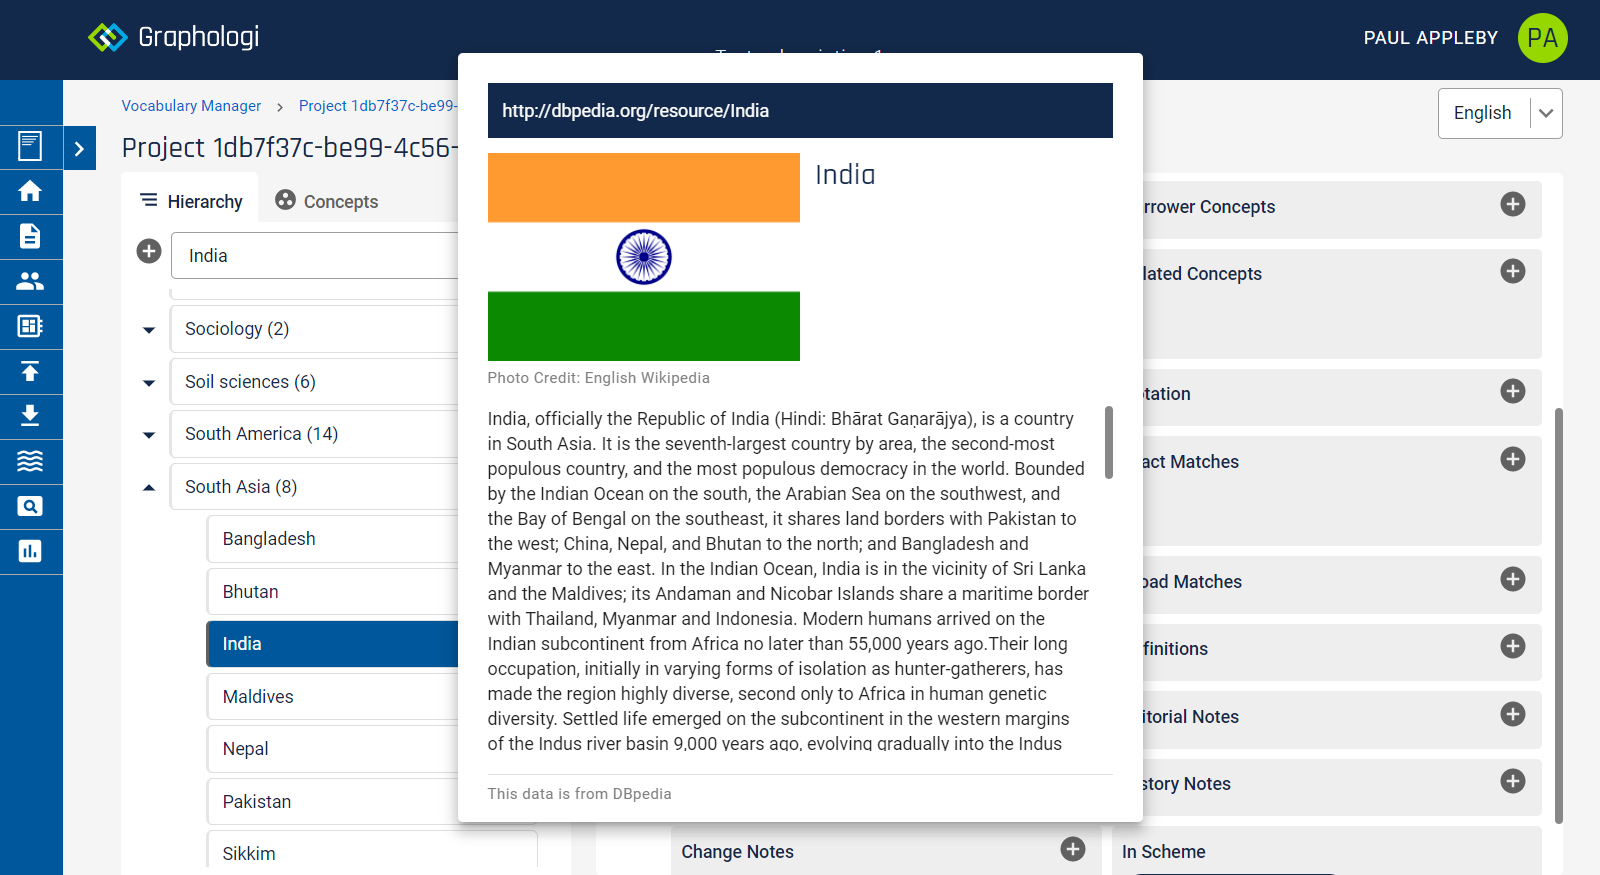
Once you have made connections to DBpedia resources you can see more information about them by clicking on the chip. This will display a dialog similar to the following image:
When you click on the down arrow next to the taxonomy title the management view will be available in a similar way to the following image.
The various tabs allow you to do the following:
You can edit the title and description of the taxonomy. You can add additional titles and descriptions in any of the project languages. The title in the default language cannot be removed.
Note the IRI of the taxonomy, the slash/hash pattern option and the IRI format option are fixed once a taxonomy is created and cannot be edited.
Depending upon the project setup you may see additional options as in the following image:
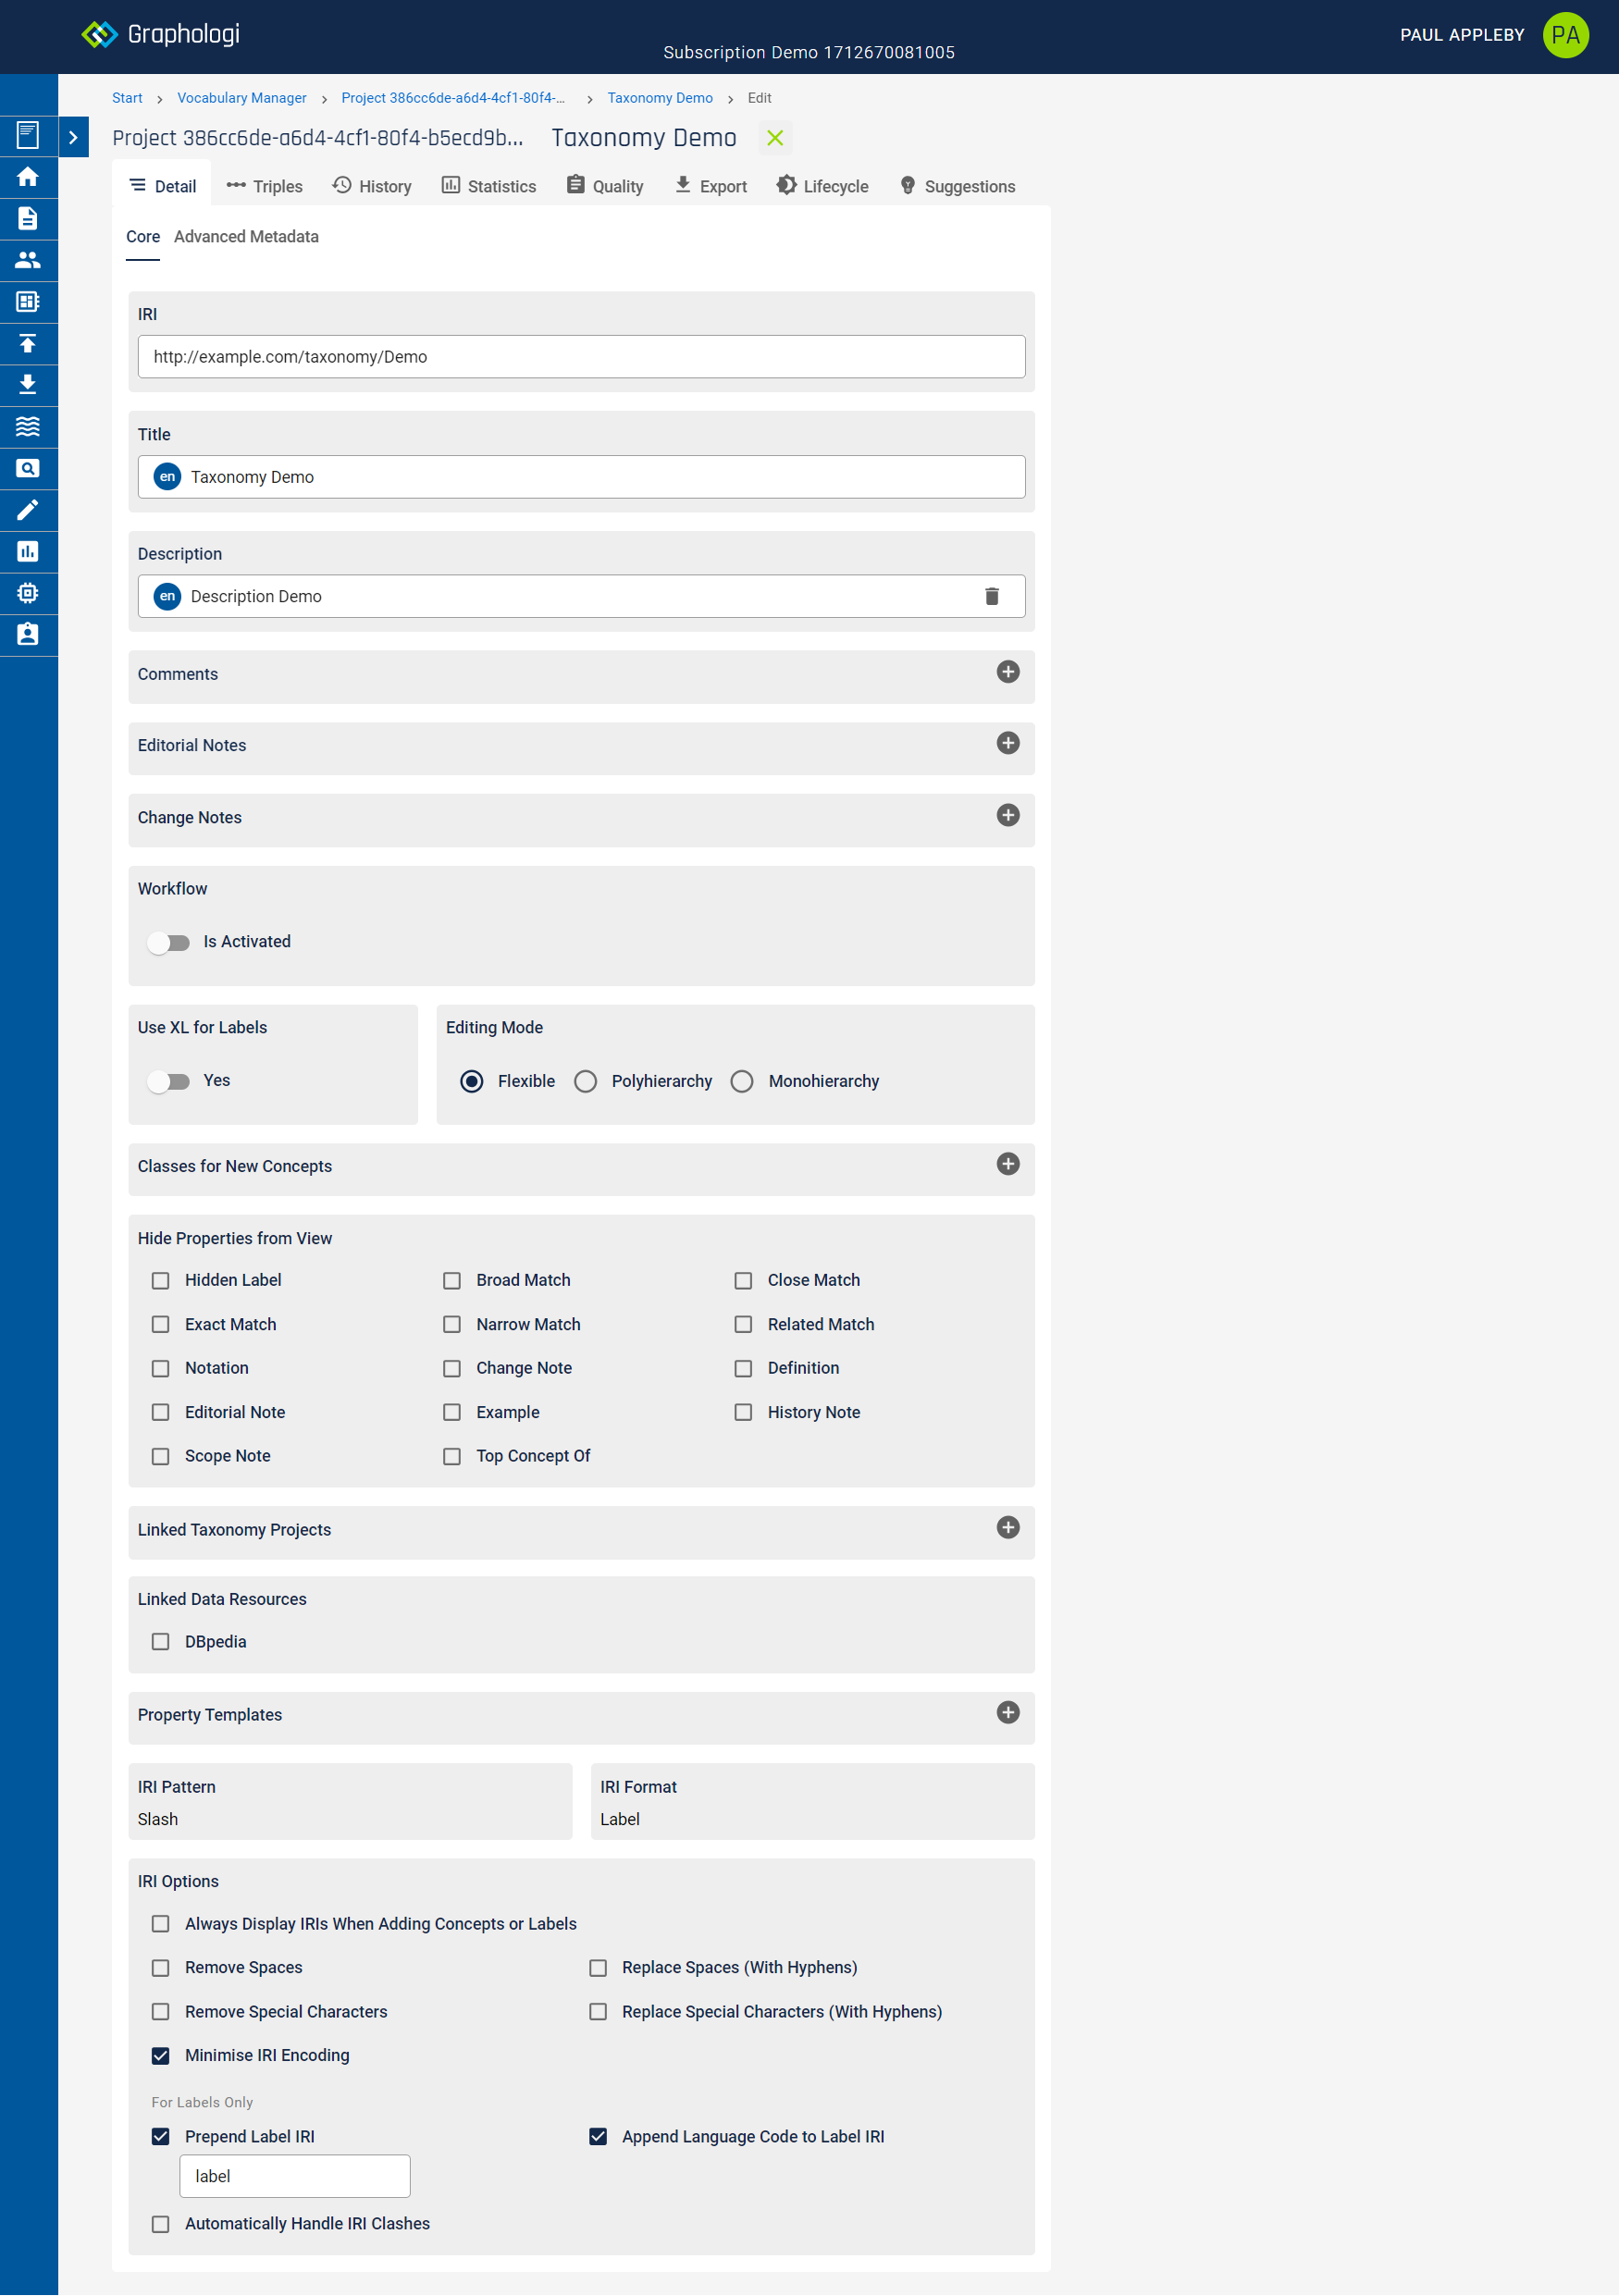
If workflow is available for your subscription you will see an option to activate for the taxonomy.
If SKOS-XL is enabled there will be an option to use XL labels as the default for new concepts.
If there are associated ontology projects you can set the default classes for new concepts (including those created via suggestions) by clicking on the ![]() icon in the 'Classes for New Concepts' panel. Start typing the name of the class you want to add. A list of matching classes will be displayed. You can only select from classes that are associated.
icon in the 'Classes for New Concepts' panel. Start typing the name of the class you want to add. A list of matching classes will be displayed. You can only select from classes that are associated.
If there are associated ontology projects you can override the default sorting for the hierarchy. To do this click on the ![]() icon in the 'Use Custom Property for Sorting' panel. Select the property you wish to use. You can select to 'Treat as Numeric' if applicable for the property by toggling that option. For example, without the numeric option '34' would come before '4', whilst the opposite is true if numeric is selected. Most property types will be usable but it is up to you to select an appropriate property for ordering given the possible values.
icon in the 'Use Custom Property for Sorting' panel. Select the property you wish to use. You can select to 'Treat as Numeric' if applicable for the property by toggling that option. For example, without the numeric option '34' would come before '4', whilst the opposite is true if numeric is selected. Most property types will be usable but it is up to you to select an appropriate property for ordering given the possible values.
By default all the SKOS properties are displayed for a concept. This can sometimes cause unnecessary screen clutter if the properties are not used for a taxonomy. If you want to hide certain properties from the view you can do this in the 'Hide Properties from View' panel by selecting those that you do not want to be visible. Note that this option is also available for collections.
By default it is only possible to make relationships within a project. However, in some circumstances it is useful to be able to make connections to other projects. You can add a linked project by clicking on the ![]() icon in the 'Linked Taxonomy Projects' panel.
icon in the 'Linked Taxonomy Projects' panel.
You may want to create links to an external repository. Currently you can link to DBpedia, which is like a semantic version of Wikipedia. To allow links to DBpedia check that option.
Graphologi will set the default IRI options for a taxonomy when you create it. However, sometimes you may want more control over the creation of IRIs.
In the 'IRI Options' panel you can adjust the following for label based IRIs:
If SKOS-XL is enabled then further options are available:
The default behaviours for SKOS-XL labels are there to try and avoid unnecessary IRI clashes. For instance, if the default SKOS-XL label behaviour was not in place then a concept and its label would potentially generate the same IRI. If you turn off the prepend or append options, clashes will be more likely.
You can tell Graphologi to handle IRI clashes for SKOS-XL labels automatically by checking the appropriate option. This will append a random sequence of characters to the generated IRI to ensure it is unique. Using this option still allows a user to edit the IRI if they want to.
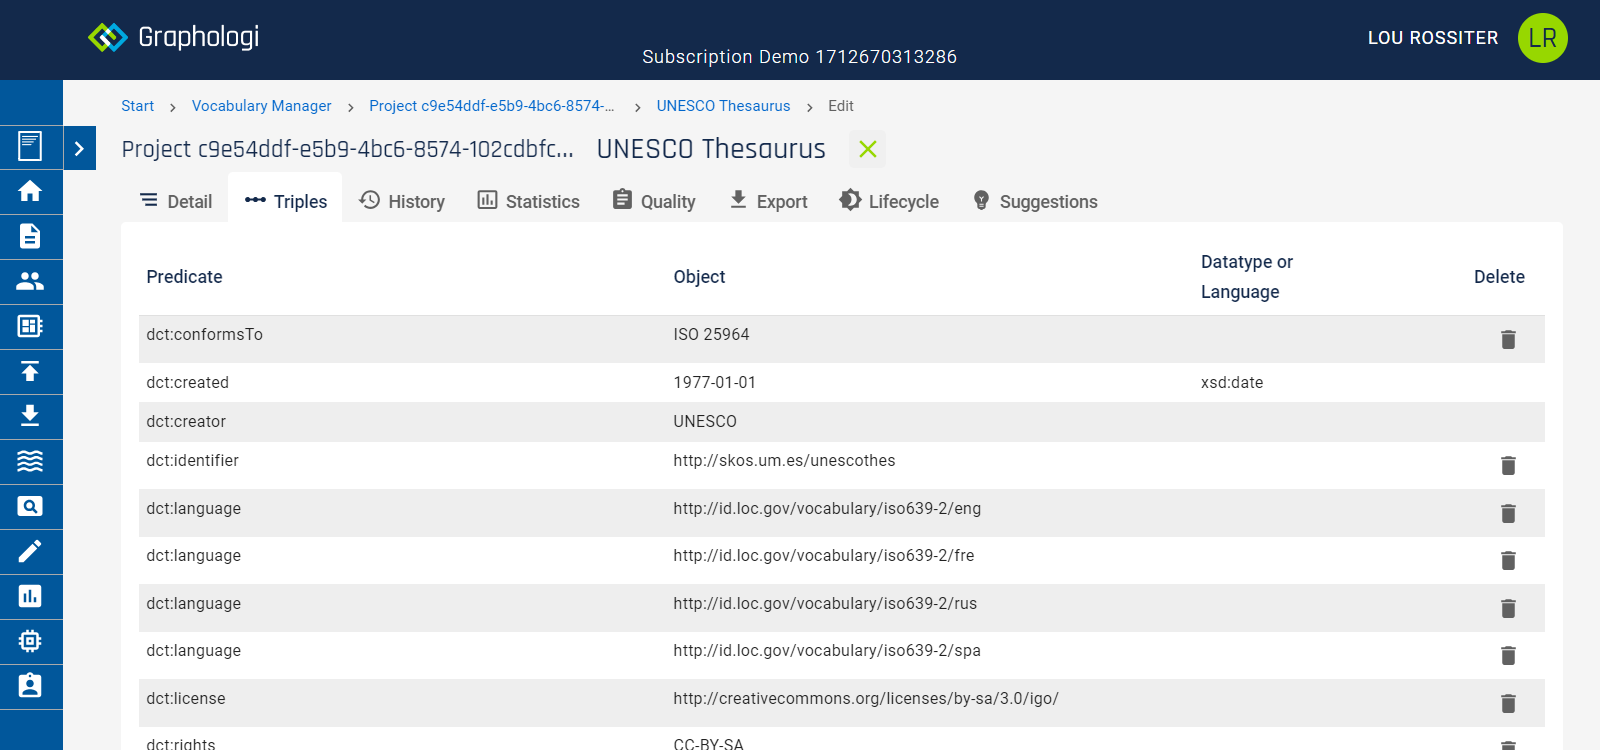
Display all of the triples that exist for the resource. Note that for imported data there may be additional data that shows up here that is not editable in the application. If there is data which is not editable there will be a ![]() icon for each row, allowing you to remove those triples.
icon for each row, allowing you to remove those triples.
This allows you to view all changes made to the taxonomy (concept scheme). (Note that history for each concept can also be viewed separately in the detail view for a concept.)
Within this view you can control the scope of history to show only changes to the concept scheme resource itself, or for all changes to resources related to the concept scheme.
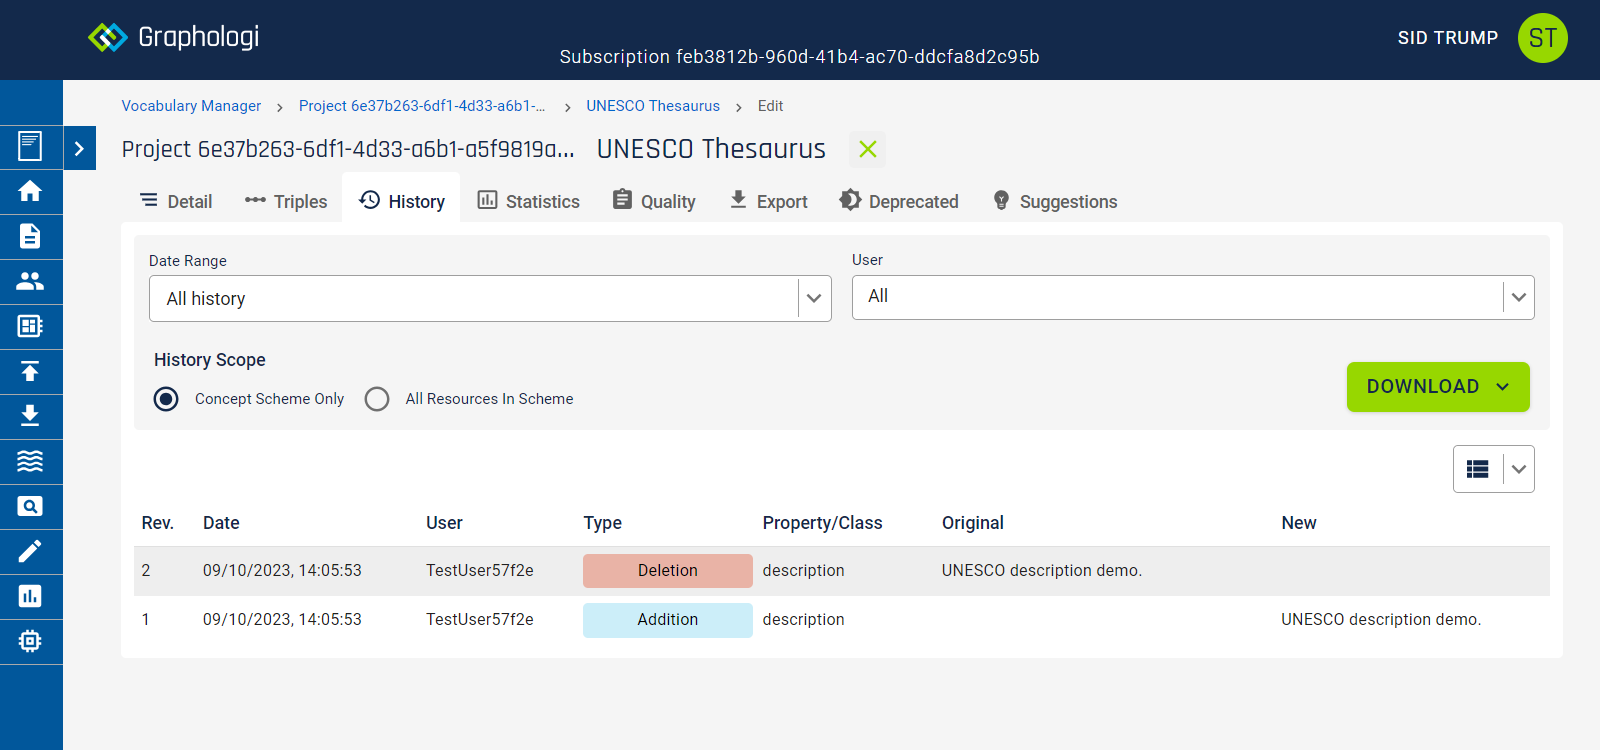
You can refine the details of what is shown by a date range and by a user. To filter by date simply select the start and end dates that you wish to see using the 'Date Range' filter. To view history only for a particular user select that user.
The history view contains a lot of detail, which can make it difficult to view easily on smaller screens. You can reduce the number of columns displayed by clicking on the ![]() icon and selecting those columns that you wish to view.
icon and selecting those columns that you wish to view.
History can also be downloaded in either TSV or JSON format by clicking on the button and selecting the required format. The filters on date range and user also apply to any downloads.
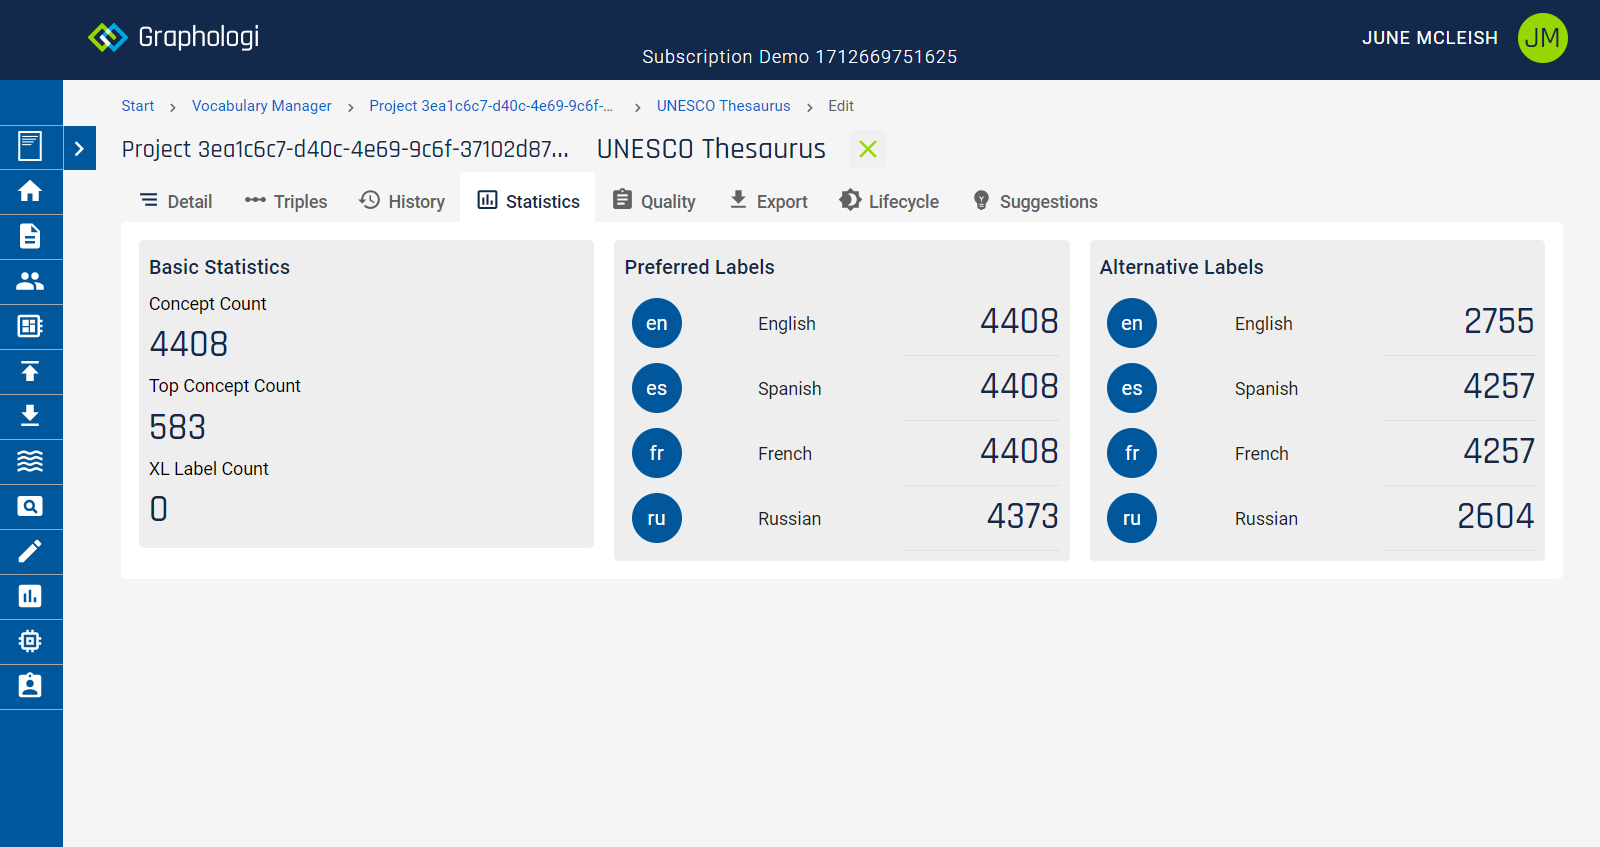
This displays concept and SKOS-XL label counts and individual language counts for preferred and alternative labels. A typical example output is shown below.
This runs a set of checks that cover various aspects that are generally accepted as SKOS mandated guidelines for taxonomies, plus some further checks. Note that, in general, Graphologi will not permit actions that cause quality violations. However, the quality checks are there as a fallback to reinforce that.
Where there are quality issues they will be presented similarly to the following image.

It is possible to disable individual quality checks by clicking on the ![]() icon.
icon.
If you are using templates to enrich your taxonomies and those templates include constraints, such as cardinality constraints or regular expression matching, then you may want to run validation to check that concepts are compliant with any applicable templates. Running validation checks all concepts that are in the scheme (taxonomy).
Note that validation is only applied to concepts and SKOS-XL labels.
Note that template patterns are validated using Javascript regexes when editing, whilst validation uses SPARQL based checking. For the most part these will give the same results. However, you should check that any regular expression is compatible with both Javascript and SPARQL.
Please note that this option is for exporting a particular component of a project. If you want to export an entire project please see the relevant section of the manual.
There are two different methods available for exporting data - export as RDF, or generate a grid-like output in either CSV, TSV (tab-separated values), HTML or XLSX. By default you are shown the 'Download Data' option, which is for exporting RDF.
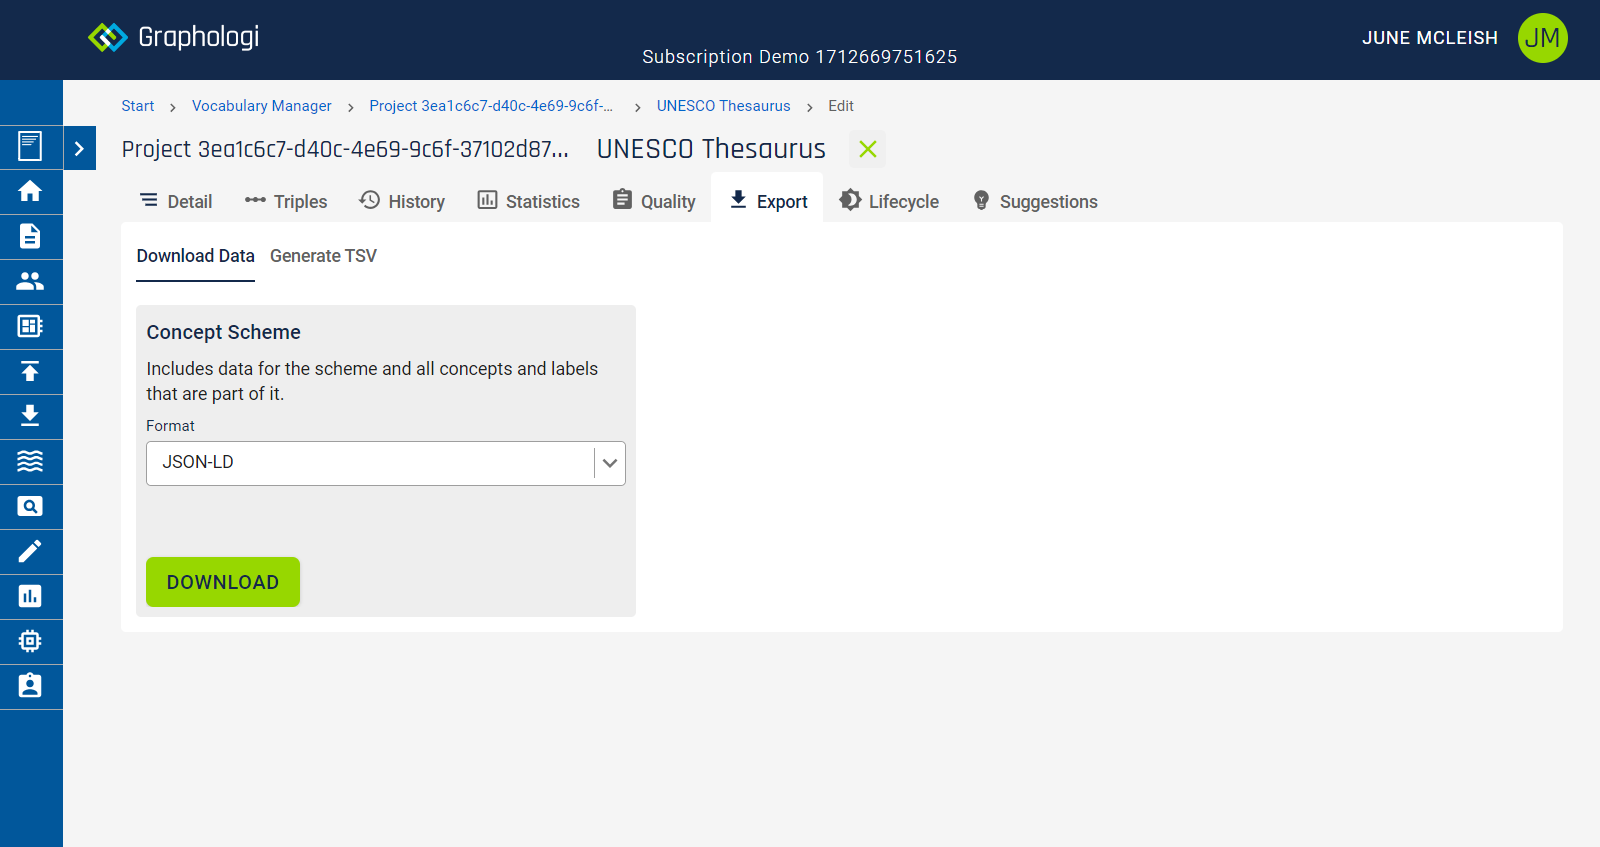
'Concept Scheme' is a full RDF download of the data for the concept scheme (taxonomy). If the project has SKOS-XL enabled you will be able to select whether to include XL labels. If the taxonomy has annotations activated you will be able to select whether to include them. Simply select the RDF format in which you require your data and click the button.
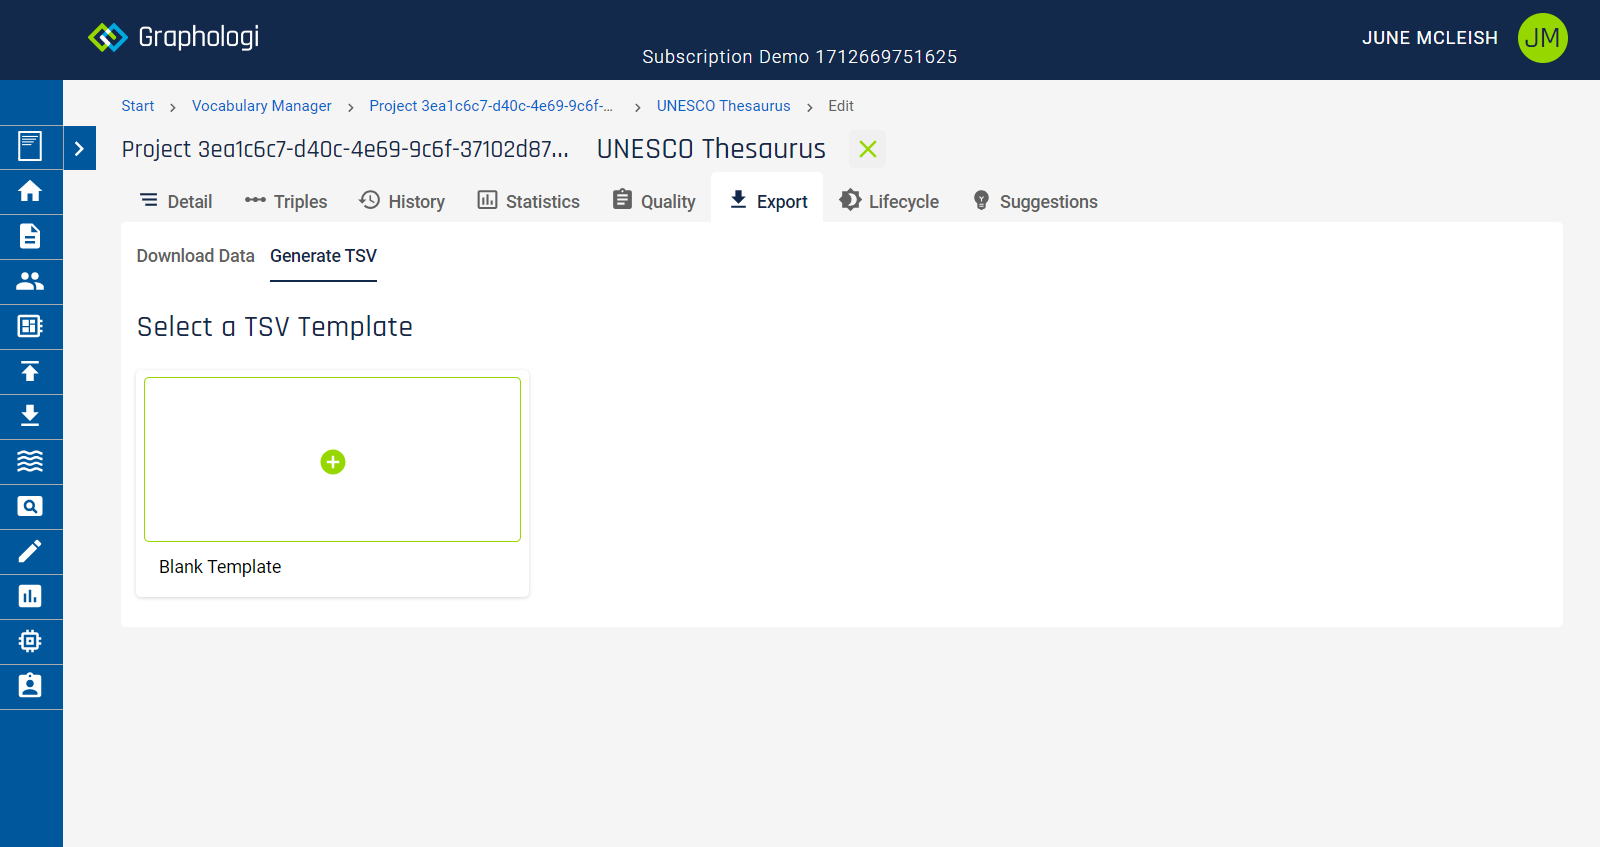
The 'Generate CSV/HTML/TSV/XLSX' option allows you to completely customise the output by selecting which columns you want and in which order. You can also, if required, add a header row. As export is something you may want to do more than once you can also save a configuration as a template to use again at a later date.
When you first go into this option you will see the template selection screen. Click on the blank template to begin.
You can now start to add columns for your export. Select the property you want in the column. The special value 'Hierarchy' will include the hierarchy of the taxonomy. Note that although this only displays as one column (to avoid the display getting too complicated) in the actual output multiple columns will be generated to reflect the actual levels in the taxonomy. If the property is language based you can select the language you want for that column. For example, you may want to add a preferred label column in English and another in French.
If you want to include a header row select the 'Include Header Row' option.
If you want references to other resources to be output using their labels instead of their IRIs select the 'Output References as Labels' option. Note that this only applies to resources within the same project.
If you have custom sorting set up and you want to use that sorting in the export select the 'Use Custom Sorting' option.
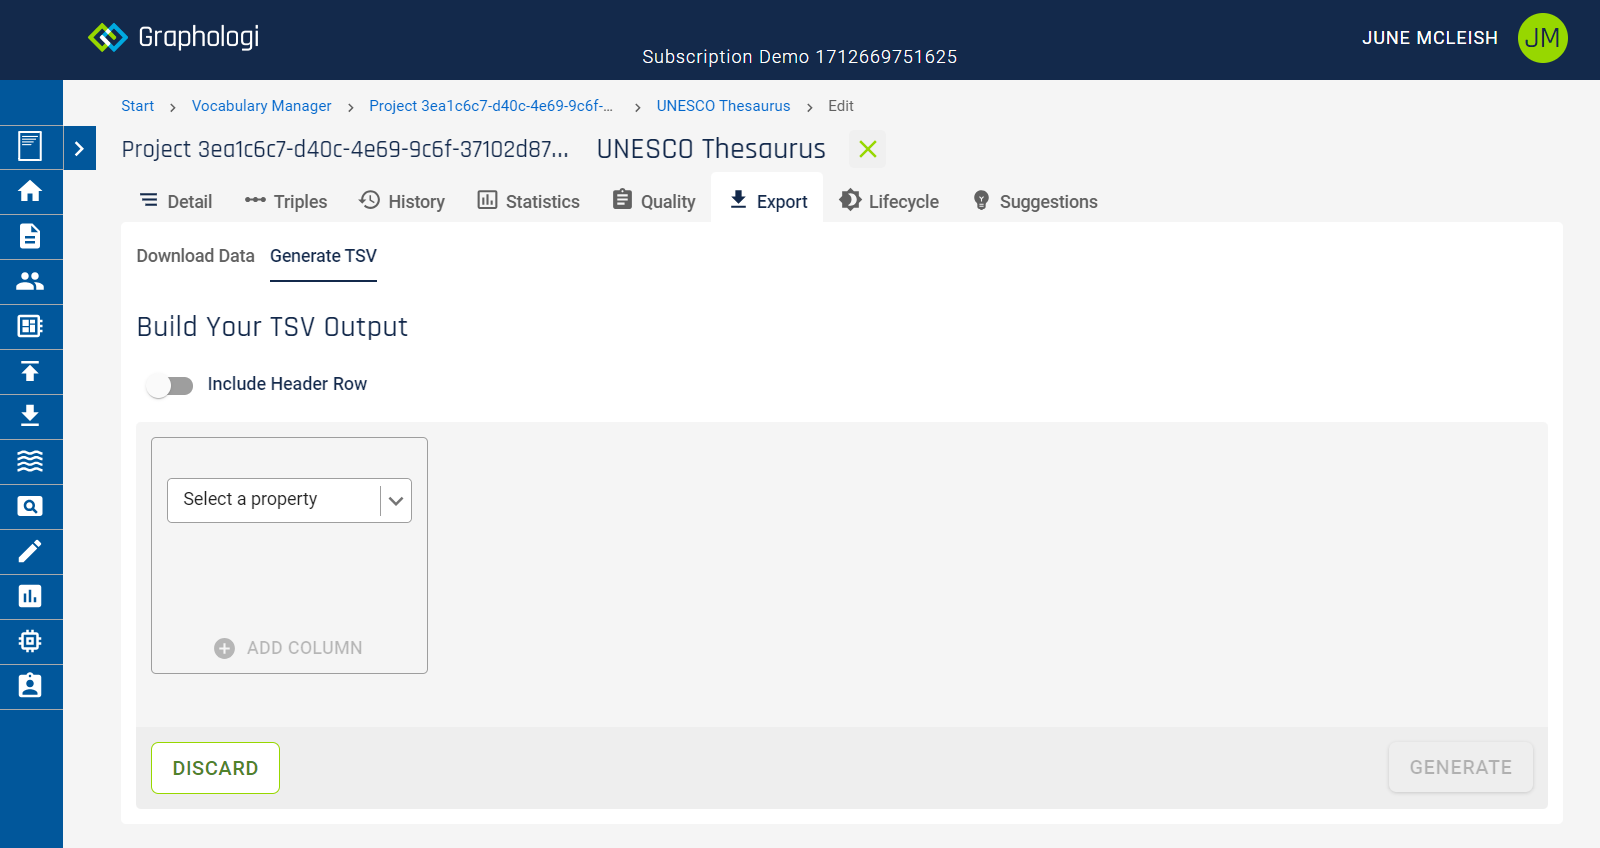
Once you have added a few columns your screen will look similar to the following.
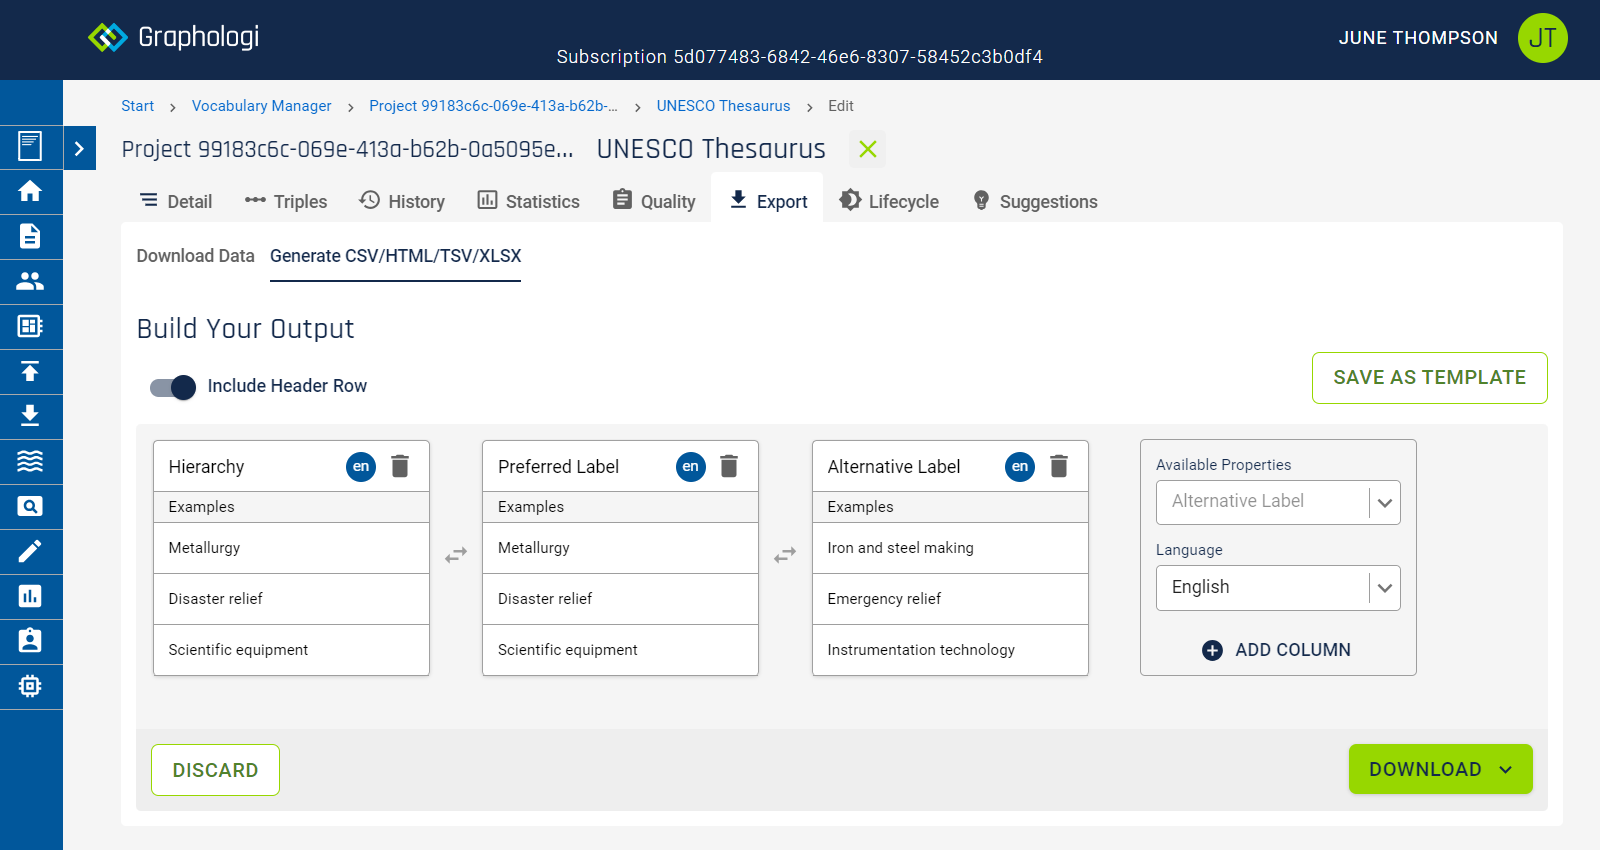
Where possible the display will give you examples from the actual data to help show you what will be in the output.
If you need to change the order of the columns you can drag them around or, to switch any two columns, click on the ![]() icon.
icon.
When you are happy with your setup click the button and select the required output option to create and download your file. Note for very large amounts of data this may take a little time.
To save your setup click on the Save as Template button. You can give your template a name. The template will then be displayed on the template selection screen.
To throw away any setup and go back to the template screen click on the Discard button.
What appears on the Lifecycle tab will depend upon whether workflow is activated or not. The 'Deprecated' tab will always appear. If workflow is activated additional tabs will be displayed. See Viewing concepts, labels or resources with particular statuses for more details.
The 'Deprecated' tab displays a list of all deprecated concepts, which you can filter by label name and language. Note that links to concepts will show in orange. You can click on the concept to go to the detailed view for it.

Within Vocabulary Manager concepts play a central role. A concept is a SKOS Concept and all of the SKOS properties for a concept are supported, along with SKOS-XL as well.
When viewing a concept you will see a screen similar to that below (where the example is from the UNESCO thesaurus).
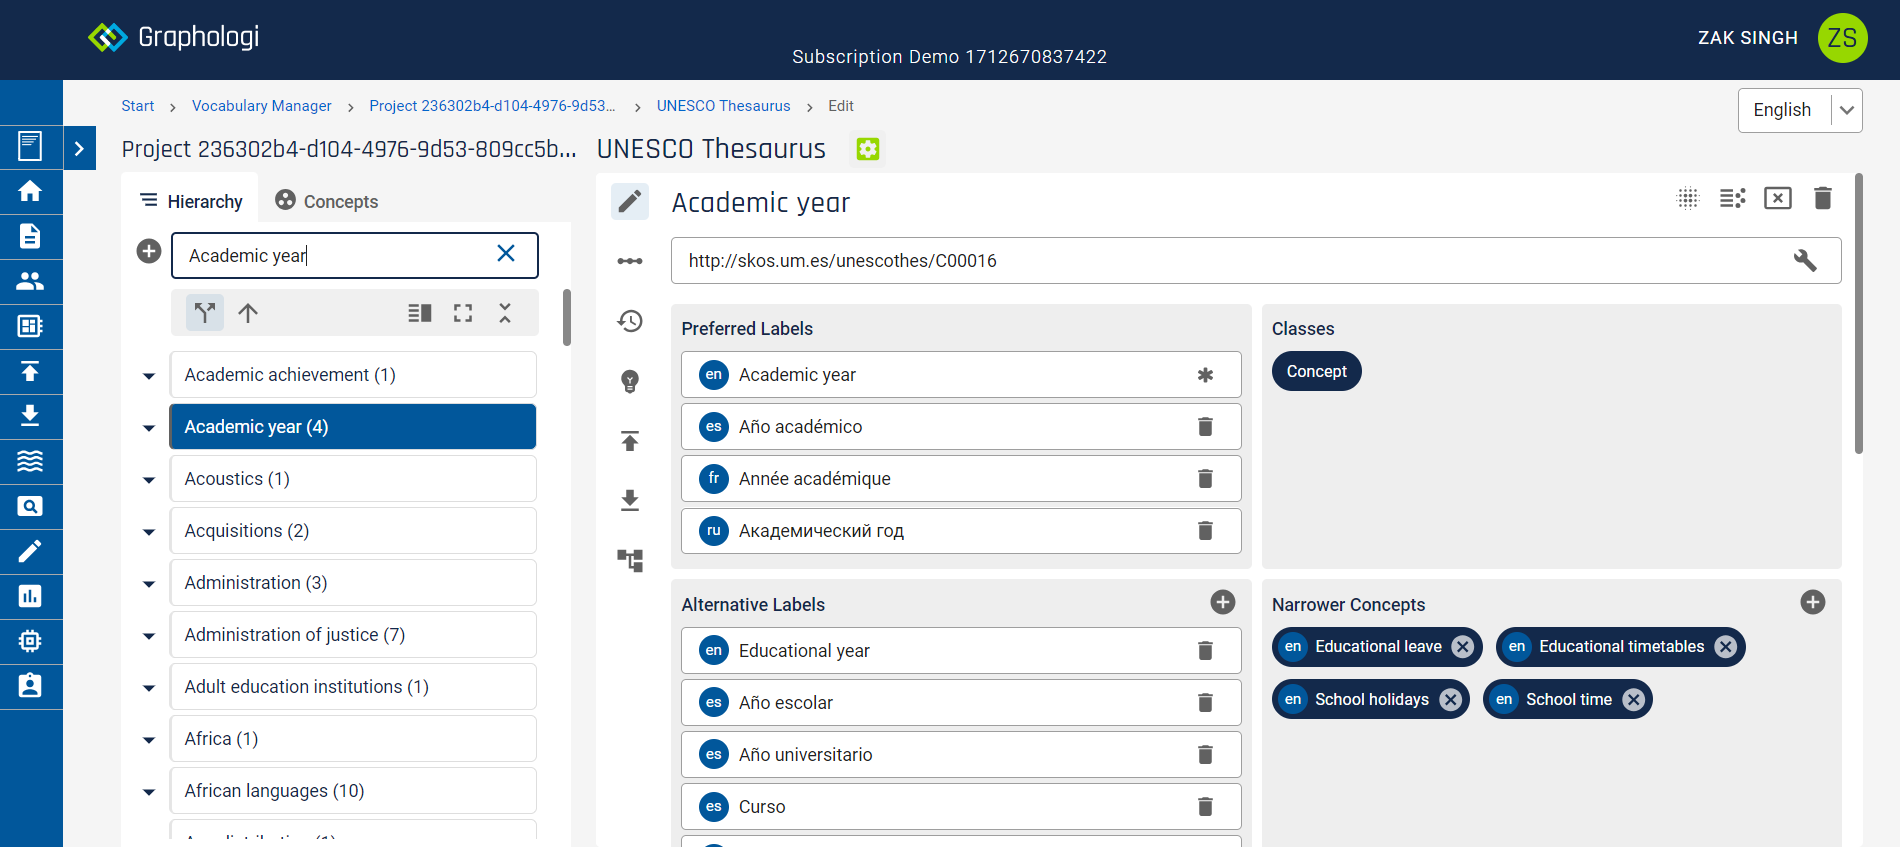
There are a few notable things to point out.
To add a top level concept click on the ![]() icon on the left of the screen (or use the keyboard shortcut Alt+N). This will display the following dialog box:
icon on the left of the screen (or use the keyboard shortcut Alt+N). This will display the following dialog box:
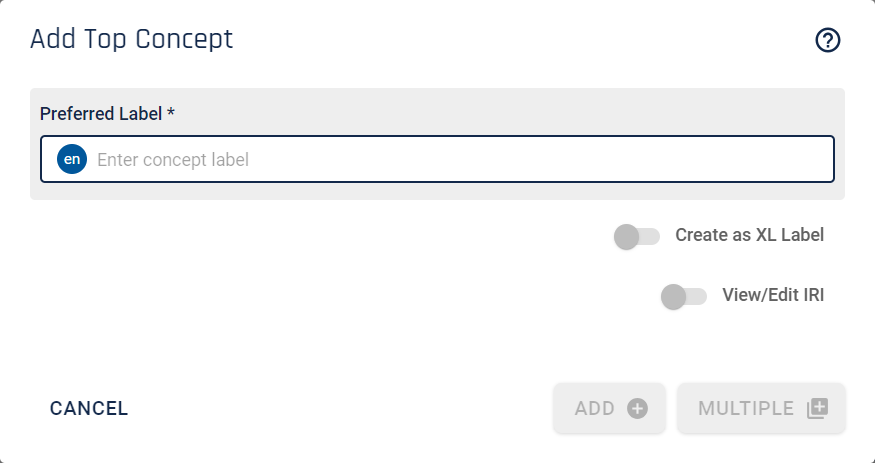
Enter a preferred label. The language for the label will be the default project language. You can add additional labels in other languages, if configured, once the concept is created.
The preferred label must be unique within the concept scheme (taxonomy). You will see a prompt if it is not.
If SKOS-XL is enabled for the project you can select the option to create the label as a SKOS-XL label. Additionally, if your entered label matches an existing unused SKOS-XL label you will be prompted as to whether you wish to use that unused label rather than create a new label.
If you wish to edit the automatically generated IRI for a concept (and its SKOS-XL label if appropriate) you can do so by selecting the 'View/Edit IRI' option (it may already be selected if set at the taxonomy level). The edited IRI must be unique within the project. Graphologi will not allow you to proceed until a unique IRI is entered.
To add the concept click . If you are entering a large amount of concepts you can click (or use the keyboard shortcut Ctrl+Enter), which will add the concept and keep the dialog box open ready for you to add another concept.
If you have selected to create or use a SKOS-XL label for your concept this will appear in a different way to a standard label, as in the example image below:
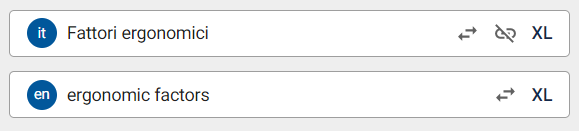
You can click on the label to jump to its detailed view page.
If you wish to convert the SKOS-XL label to a normal SKOS label click on the ![]() icon. This will replace the SKOS-XL label with a label property, but does not delete the SKOS-XL label. If you wish to remove the label for the concept click on the
icon. This will replace the SKOS-XL label with a label property, but does not delete the SKOS-XL label. If you wish to remove the label for the concept click on the ![]() icon, which again does not delete the label but merely removes it from the concept.
icon, which again does not delete the label but merely removes it from the concept.
The approach is similar to above but, as you type, suggested concepts will appear similarly to the following image. If you have multiple taxonomies in your project you will have access to the concepts in the other taxonomies when adding a top concept. Further, you will also be able to make use of any free-floating concepts within the project.
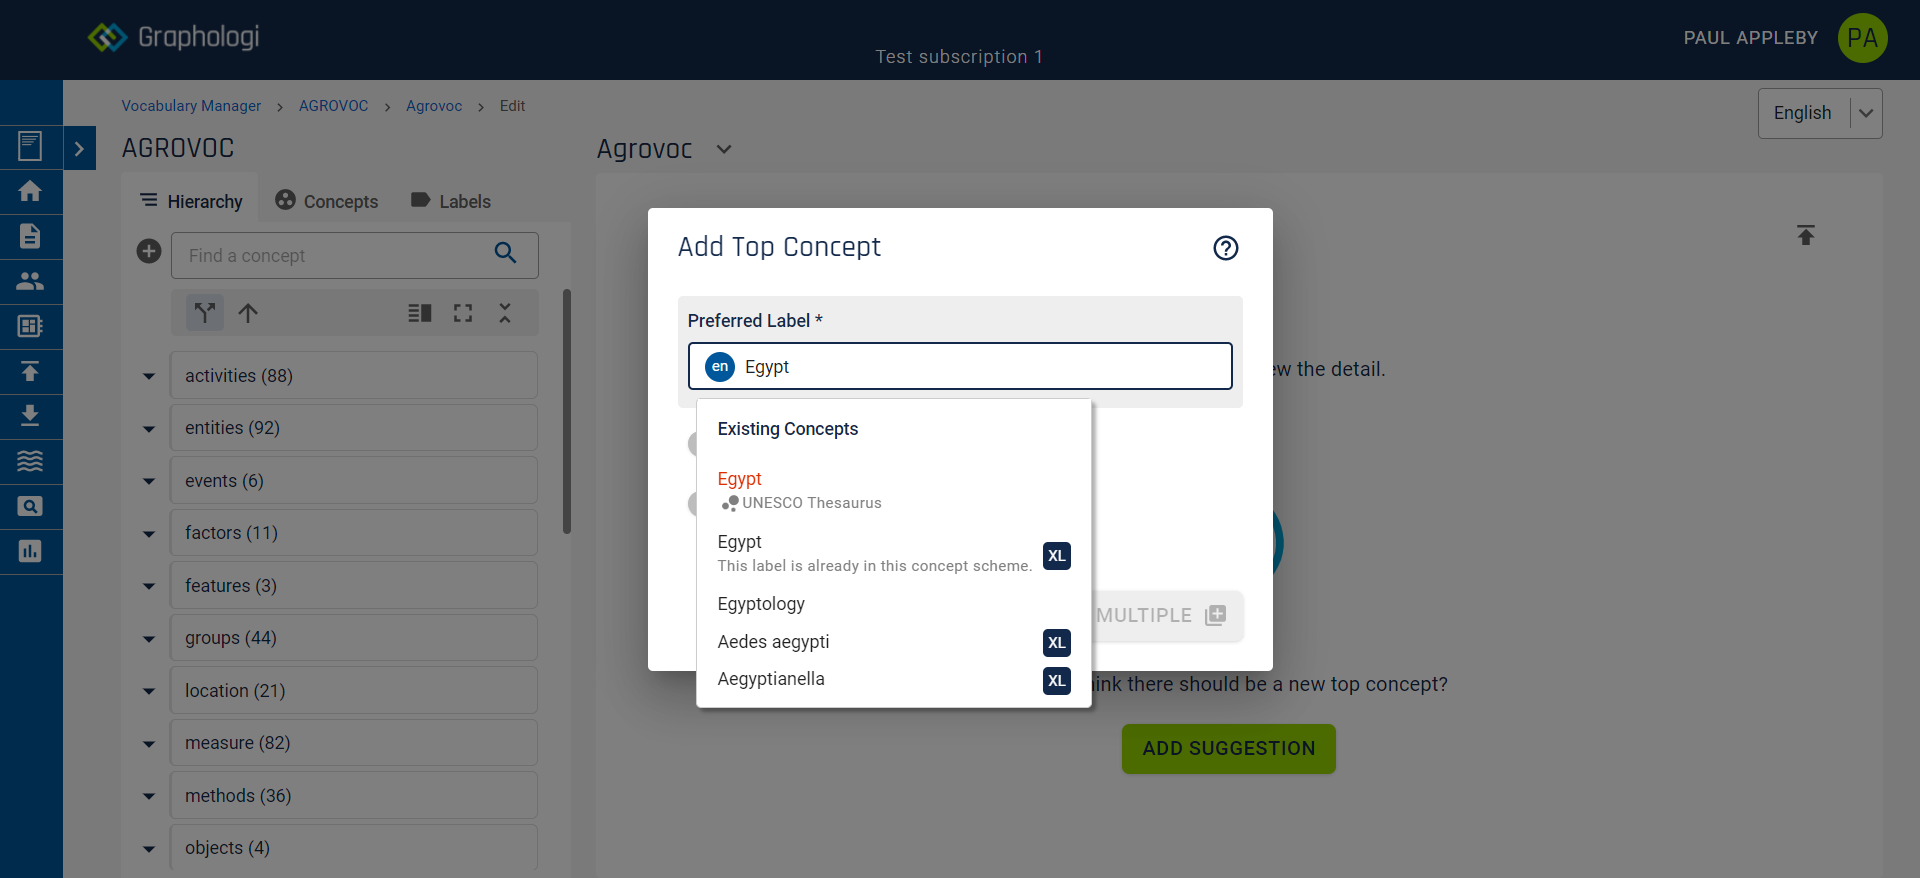
If you wish to use an existing concept click on it. You may already see that some concepts have been detected as conflicting and these will be highlighted red.
Even though suggestions may appear you can ignore them and create a new concept. There is the choice to reuse an existing concept (by clicking on it) or create a new concept by clicking .
Sometimes it is useful to merge a concept onto another concept, especially for an obsolete concept. Merging a concept allows you to merge the SKOS properties of that concept. Note that merging additional ontology properties is not currently supported. To merge a concept click on the ![]() icon on the right-hande side of the screen. This will display a dialog similar to the following image.
icon on the right-hande side of the screen. This will display a dialog similar to the following image.
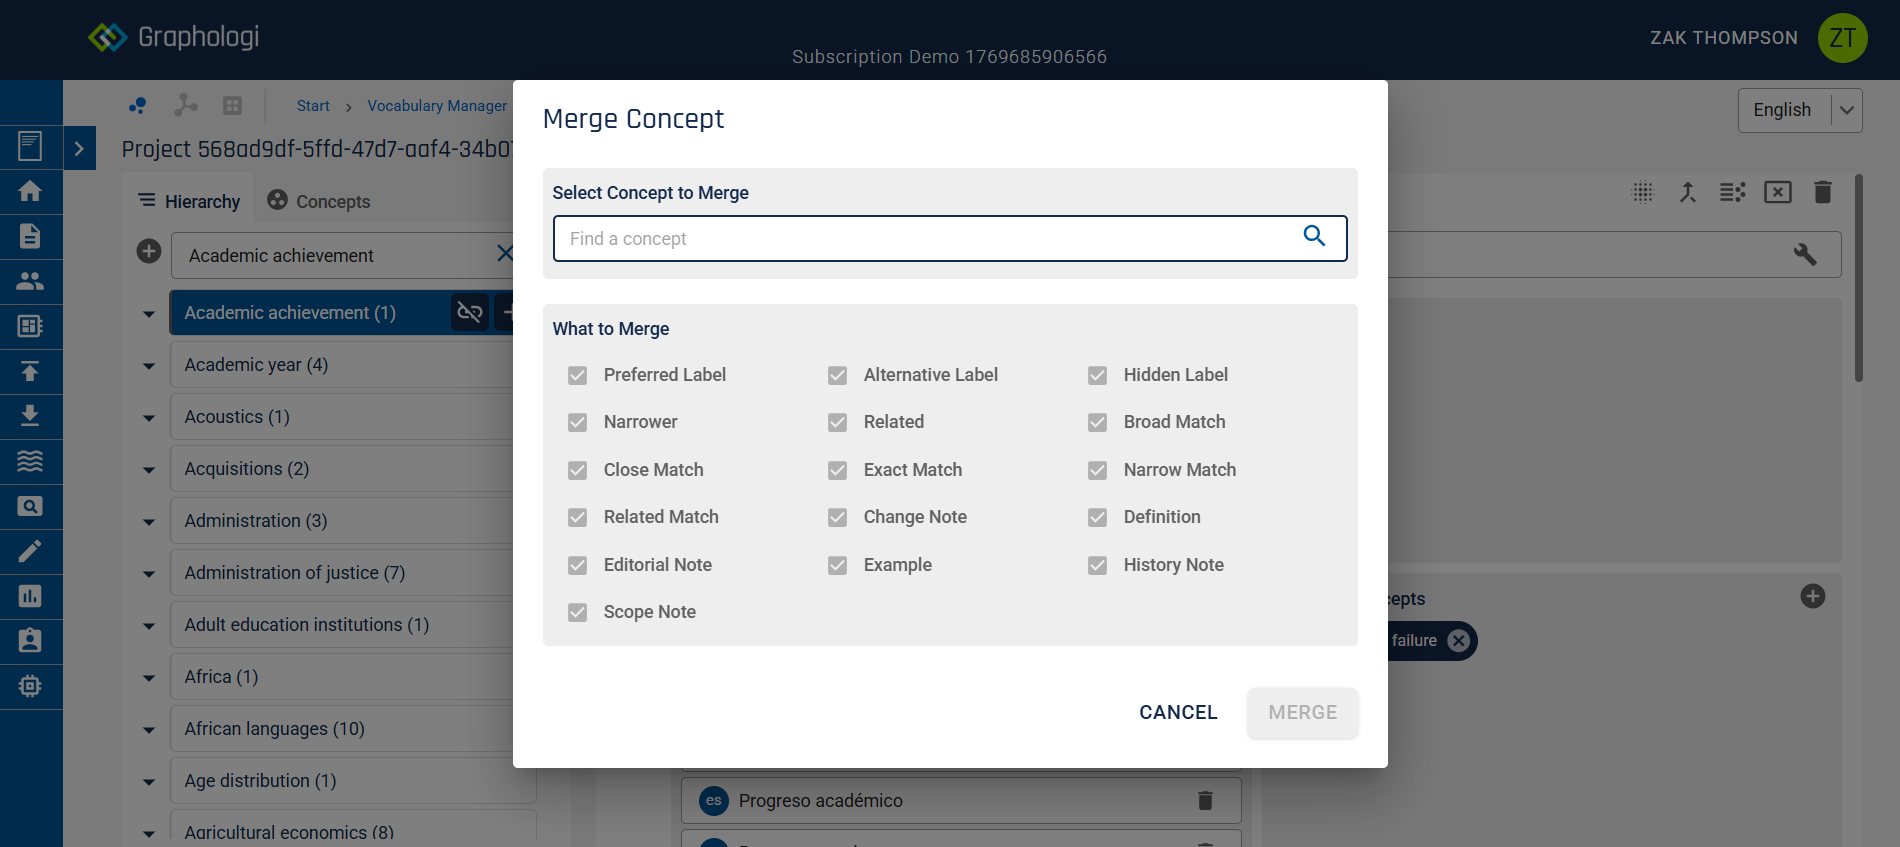
You can then enter the name of the concept you wish to merge. By default all properties are selected for merging. You can deselect those you do not want to merge.
Note that, if merging XL labels, then new resources are created for those labels. Where label based IRIs are in use a UUID will be appended to the computed IRI for the new XL label if required to ensure that the IRI is unique. Similary, for definitions, examples and notes that are separate resources to the concept new resources will be created for those too.
Where a concept is reused from another taxonomy (concept scheme) it will be added to the current taxonomy. This will mean that the concept is in two concept schemes. The 'In Scheme' panel will show multiple concept schemes.
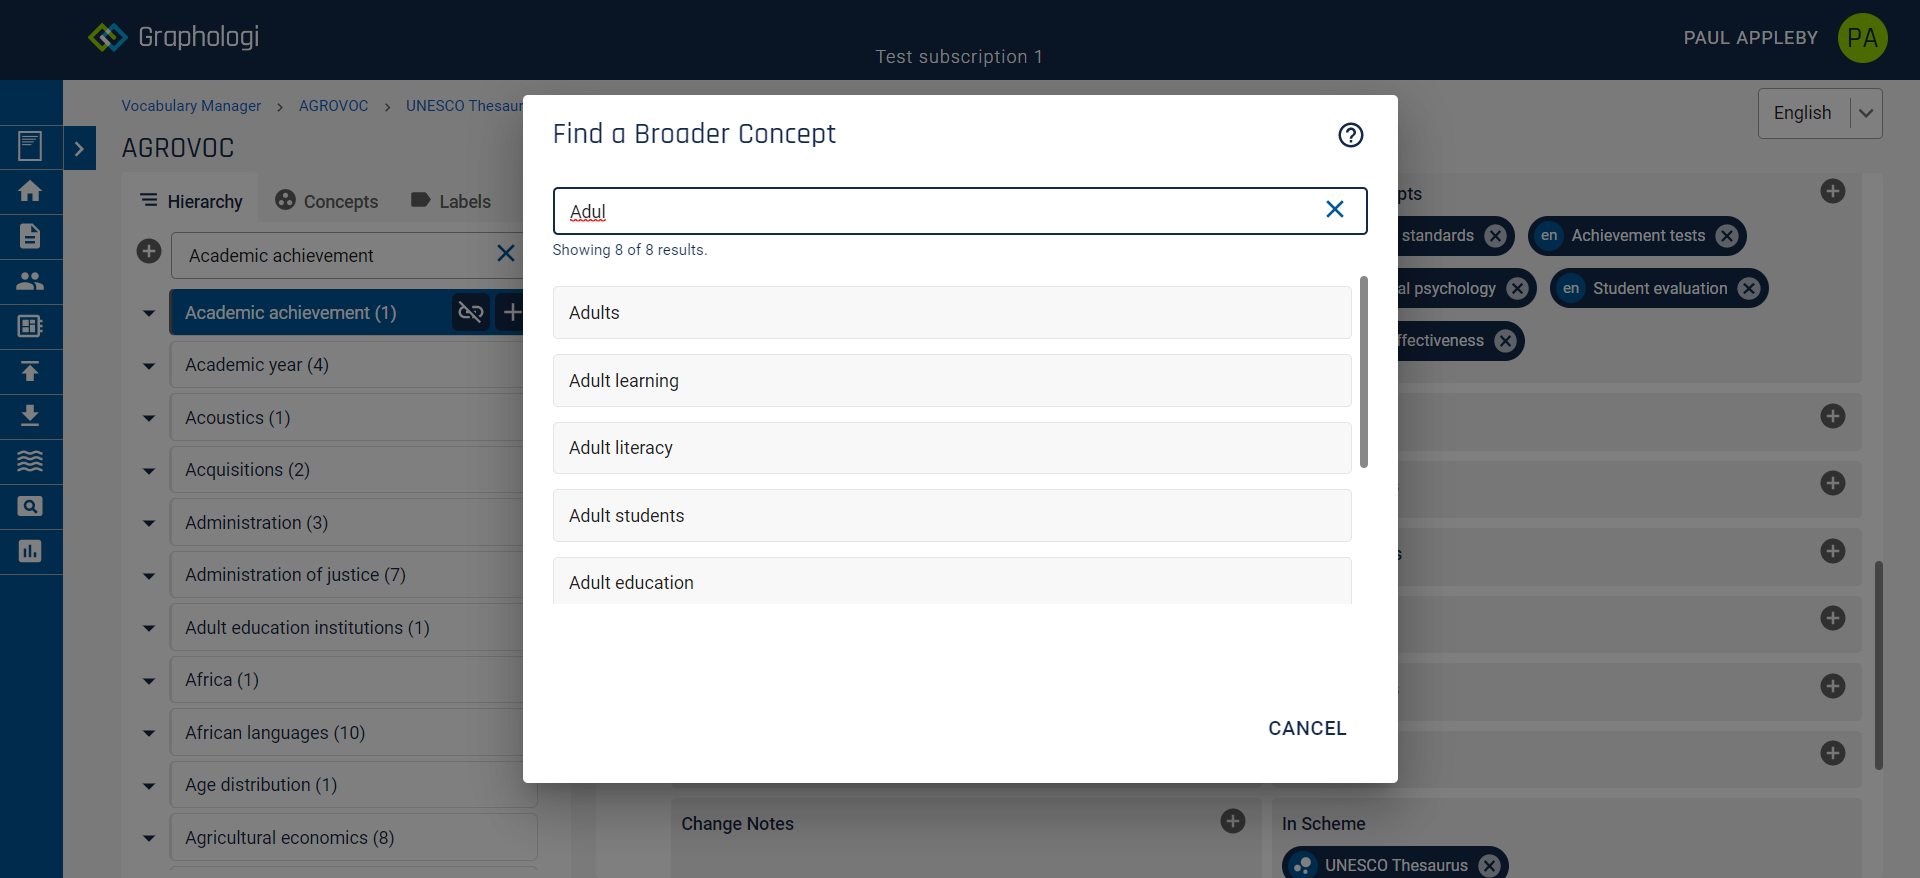
It also means that a concept is potentially narrower to multiple concepts across multiple concept schemes. This is perfectly fine. However, it is possible that you include a concept from another scheme that itself has narrower concepts. These will not be added to the current concept scheme, but will be displayed with a grey background. For example, in the screenshot below 'Adult education institutions' has been added to the current concept scheme but its narrower concept has not been added to the scheme (i.e. no skos:inScheme property is created for it).
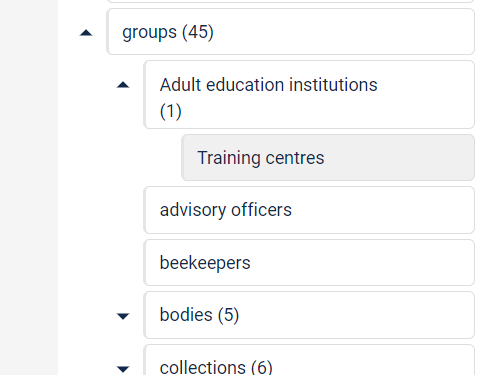
It is possible to add these free-floating concepts to the scheme. If you hover over the concept you will see an image similar to the following image.
Click on the ![]() icon to add it to the concept scheme.
icon to add it to the concept scheme.
It is also possible to add all concepts in the hierarchy to the concept scheme in a single operation. This can be done by clicking on the ![]() icon on the taxonomy home page, located towards the right-hand side of the screen.
icon on the taxonomy home page, located towards the right-hand side of the screen.
By default Graphologi is in polyhierarchy editing mode, allowing a concept to have multiple broader concepts. The mode can be changed to monohierarchy by clicking on the ![]() icon. The mode icons are on the left-hand side of the screen as in the following image.
icon. The mode icons are on the left-hand side of the screen as in the following image.
When in polyhierarchy mode adding narrower or broader relations creates an additional relationship. Any existing relationships will remain. In monohierarchy mode adding a broader relationship will replace any existing broader relationships.
It is also possible to set the editing mode for the taxonomy as a whole. This is done in the taxonomy detail view, as shown in the example image below. In that view you will see a panel called 'Editing Mode'. By default it is set to Flexible, meaning that the user can adjust the mode as described above. If the mode is set to Polyhierarchy or Monohierarchy then the mode is set for the entire taxonomy and the buttons above will not be available.
If in Monohierarchy mode an additional quality check is also run.
Adding a narrower concept can be done in one of three ways. The first is by hovering over the concept label in the hierarchy view. This will display icons for breaking the link to the parent concept and adding a new narrower concept as shown in the following image. Click on the ![]() icon. You will see the same dialog box as above.
icon. You will see the same dialog box as above.
Alternatively, you can drag existing concepts from the hierarchy on to relations on the right of the screen or within the hierarchy itself.
Finally, you can click on the ![]() icon in the 'Narrower' panel. This will allow you to search for concepts within the taxonomy. Click on the desired search result to add it.
icon in the 'Narrower' panel. This will allow you to search for concepts within the taxonomy. Click on the desired search result to add it.

In the same way as for top concepts, it is also possible to reuse existing concepts. The approach is the same.
To remove a concept, either at the top level or a lower level, click on the ![]() icon. You will be asked to confirm the action. A quick way to do this is to use Alt+click which bypasses the confirmation. Alternatively, for narrower concepts, you can click on the cross in a concept's label such as
icon. You will be asked to confirm the action. A quick way to do this is to use Alt+click which bypasses the confirmation. Alternatively, for narrower concepts, you can click on the cross in a concept's label such as ![]() in the 'Narrower' panel.
in the 'Narrower' panel.
Note that breaking the link does not delete the concept, even if not used anywhere else - it simply removes it as a narrower concept of the parent concept. The concept will still be available to use.
It may be that over time certain concepts become obsolete. However, if these concepts have been used then their identifiers - IRIs - may need retaining. Deprecating a concept allows you to indicate that a concept should no longer be updated or used without removing it from a concept scheme.
To deprecate a concept click on the ![]() icon on the right of the screen.
icon on the right of the screen.
Deprecated concepts can no longer be edited and new relationships to them can no longer be formed.
If you realise that a concept has been deprecated by mistake you can simply undeprecate it by clicking on the ![]() icon on the right of the screen.
icon on the right of the screen.
To delete a concept click on the ![]() icon on the right of the screen. Note that once a concept is deleted it cannot be reused.
icon on the right of the screen. Note that once a concept is deleted it cannot be reused.
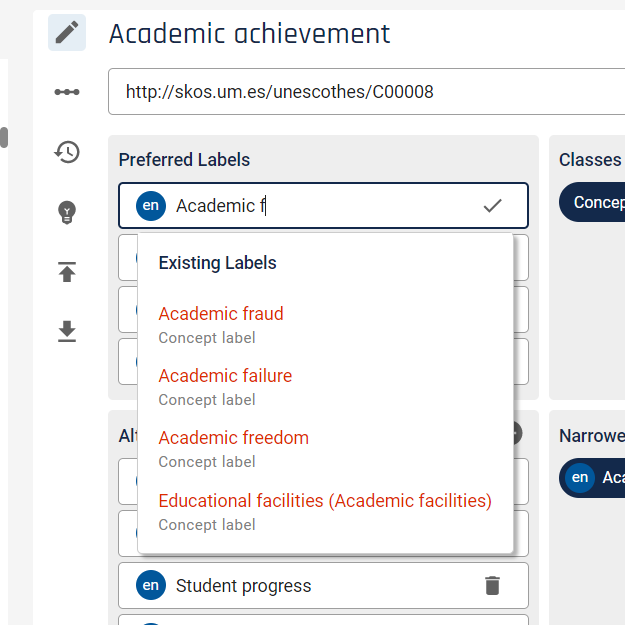
To change a label click into the text and start editing. You will be shown any matching labels as you type in a similar way to the following image. If your label is acceptable (that is, does not clash with other labels), a ![]() icon will be shown on the right of the field. Click to confirm the change.
icon will be shown on the right of the field. Click to confirm the change.
To abandon a change simply click away from the field.
To add additional labels click on the ![]() icon in the appropriate label panel.
icon in the appropriate label panel.
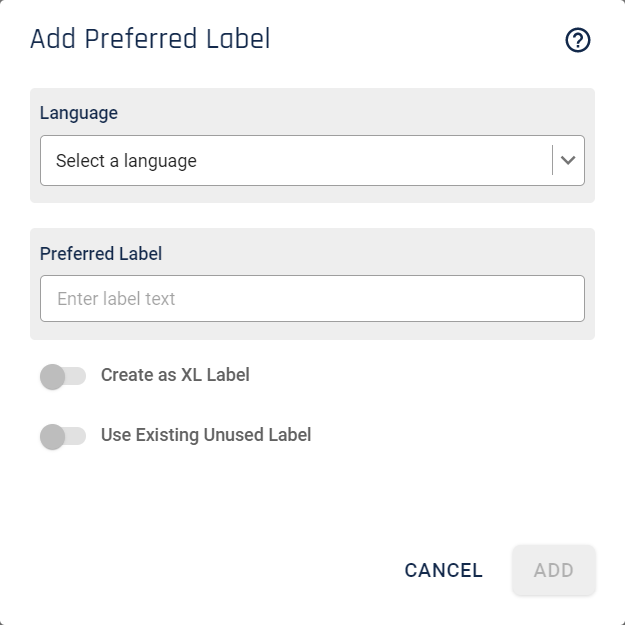
This will display a dialog box where you can select the language you want for the label and a field to type the label text. For preferred labels only languages that do not already have a label will be available to choose from as SKOS only permits one label per language for preferred labels.
Options for creating or reusing existing SKOS-XL labels are available in the same way as for adding concepts.
Labels must be unique within a concept for preferred, alternative and hidden labels. If you enter text that clashes with an existing label of one of these types you will see a warning.
Sometimes existing data might need to be reorganised. Graphologi provides you with some features that work specifically with alternative labels
The first feature is promotion of alternative labels to preferred labels. You can do this by simply dragging an alternative label into the 'Preferred Labels' panel. If a preferred label exists in the same language it will be demoted to an alternative label. Note that you cannot promote an alternative label where it will cause a clash with a preferred label on another concept.
The second feature is the ability to convert alternative labels into narrower concepts. This only applies to labels in the default project language as all concept creation within a taxonomy must have a preferred label in the default language in Graphologi. To do this simply drag the label into the 'Narrower' panel. As long as no other concept has a preferred label that matches the alternative label a concept will be created.
Finally, where multiple languages are used in a project, it is common to also have alternative labels in those languages. If, for instance, you have made a default language alternative label into a narrower concept you may want to put the translations on to that concept. Simply drag the label onto the concept and it will be added as an alternative label. In a later release the option as to whether it becomes a preferred or alternative label will be made available. For now, to promote them to preferred labels you will need to click through to the concept and promote them as mentioned above.
To add relationships click on the ![]() icon in the appropriate relationship panel.
icon in the appropriate relationship panel.
This will display a dialog box where you can start to type the name of the concept label that you wish to add. Potential matching labels from within the same taxonomy (concept scheme) will be displayed in a similar fashion to the image below. Click on the label that you wish to add.
These relationships are used to connect together concepts from different taxonomies (concept schemes).
To add matches click on the ![]() icon in the appropriate relationship panel. This will display a dialog box where you can start to type the name of the concept label that you wish to add. Potentially matching labels will be displayed. Click on the label that you wish to add.
icon in the appropriate relationship panel. This will display a dialog box where you can start to type the name of the concept label that you wish to add. Potentially matching labels will be displayed. Click on the label that you wish to add.
You can also type an IRI directly into the field, which allows you to make connections to resources outside of Graphologi.
Graphologi supports notes/definitions/examples in two different ways. The simplest and default approach is that these are managed as text (strings). However, you can also manage them as separate resources. This makes the underlying data more complex, but does have some advantages. As separate resources they carry information on their creation. This allows Graphologi to display them in (descending) date order. You can have both variants on a concept. To switch to using notes as resources toggle the 'Use Resources for Notes' option in the Detail tab in the taxonomy management panel. The IRIs for notes as resources will be generated automatically as the taxonomy IRI + UUID.
To add a definition, example or note, click on the ![]() icon in the appropriate panel.
icon in the appropriate panel.
This will display a dialog box where you can select the language and a field to enter the actual text. This will look similar to the image below.
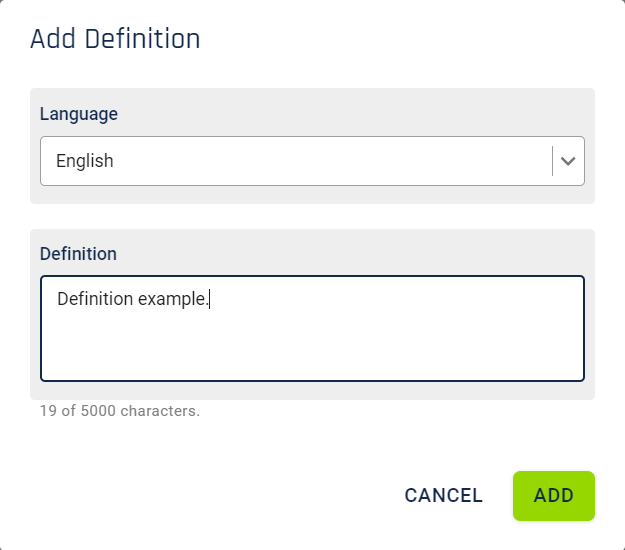
Note that you can enter multiple lines for these properties. Simply hit the Enter key to add a new line.
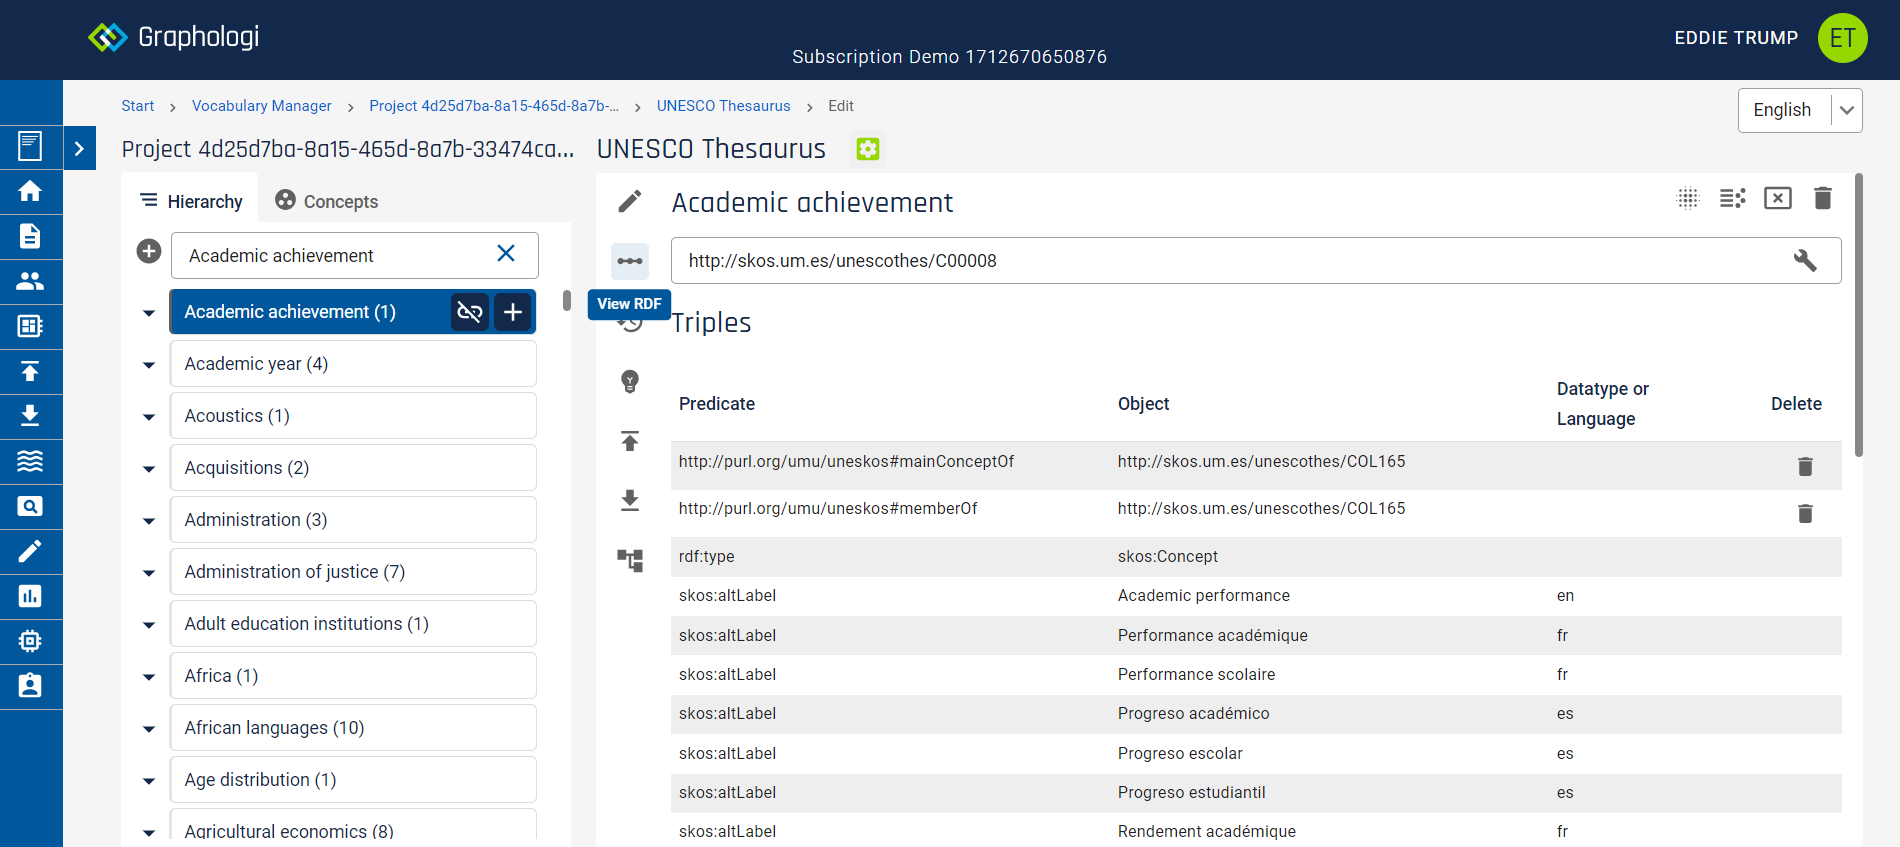
To view the underlying triples for a concept click on the ![]() icon. This will display a table of triples similar to the following image.
icon. This will display a table of triples similar to the following image.
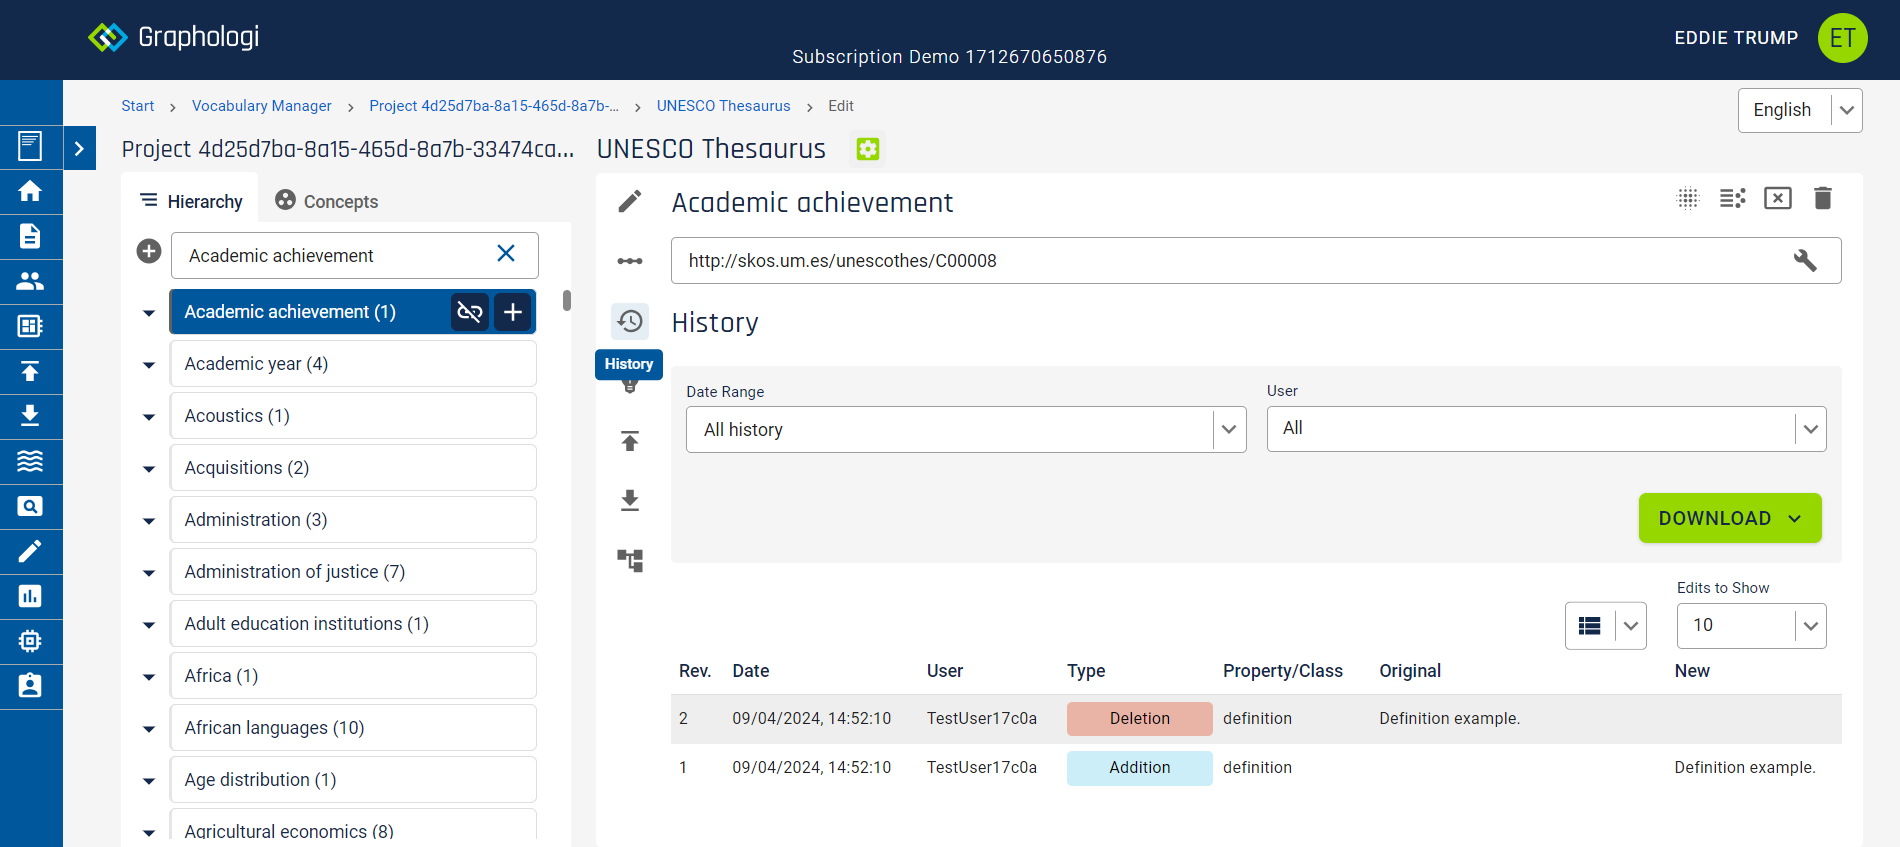
To view or download the details about the changes for a concept click on the ![]() icon. This will display a table of history similar to the following image. You can filter by a date range and/or by a particular user.
icon. This will display a table of history similar to the following image. You can filter by a date range and/or by a particular user.
To import a subtree (a subtree is a hierarchy of narrower concepts) click on the ![]() icon. This can be done at the top level of the taxonomy on the taxonomy home page, where the icon is on the right of the screen, or, for a concept, where the icon is displayed to the left of the concept details.
icon. This can be done at the top level of the taxonomy on the taxonomy home page, where the icon is on the right of the screen, or, for a concept, where the icon is displayed to the left of the concept details.
At the taxonomy level you also have the option to merge data based on IRIs in the taxonomy. To select this option click 'By IRI'.
Select a spreadsheet, TSV or CSV file and then click .
The base language of the text within the file will be assumed to be the same as the default project language. It is used as the basis for computing the hierarchy of the data.
The base IRI is assumed to be that of the taxonomy being imported in to. This will form the first part of the IRIs that Graphologi will generate for your taxonomy. This is not applicable for IRI merging.
The taxonomy being imported into will also be used as the basis for whether to use slash or hash IRIs and whether UUIDs or labels will be used for IRIs.
The next step is to map the data in your file. If you have a header row in your file select 'Ignore Header Row'. If your project is SKOS-XL enabled you will also have the choice to generate labels as SKOS-XL. This will apply to any preferred, alternative or hidden labels.
By default the first five rows or your data are displayed for preview. You can increase this by changing the value on the right of the screen. Note that the limit on the number of rows you can import depends upon the subscription type.
The next step is to map the columns in the file to properties in Graphologi. You only need to map the columns that you want to import. There must be at least one column that is a preferred label in the default language, or, if using IRI based import, a column indicating that it contains the IRIs ('Use IRI'). A simple example is given in the following screenshot:
You can map concepts to each other using the SKOS related property. If a project has associated ontology projects then it will be possible to map classes and properties from that association. This includes both object (relationship) properties and datatype properties. For those properties that are relationships you need to select the cross-reference. This can be either a preferred label or a particular column. There is also the option to cross-reference a preferred label in another taxonomy within the project, allowing you to make links across taxonomies. The labels for this must be in the default project language. Also, note that cross-referencing across taxonomies is range aware, meaning that, if a range is on the property, then for the relationship to be created the target concept must have an appropriate class.
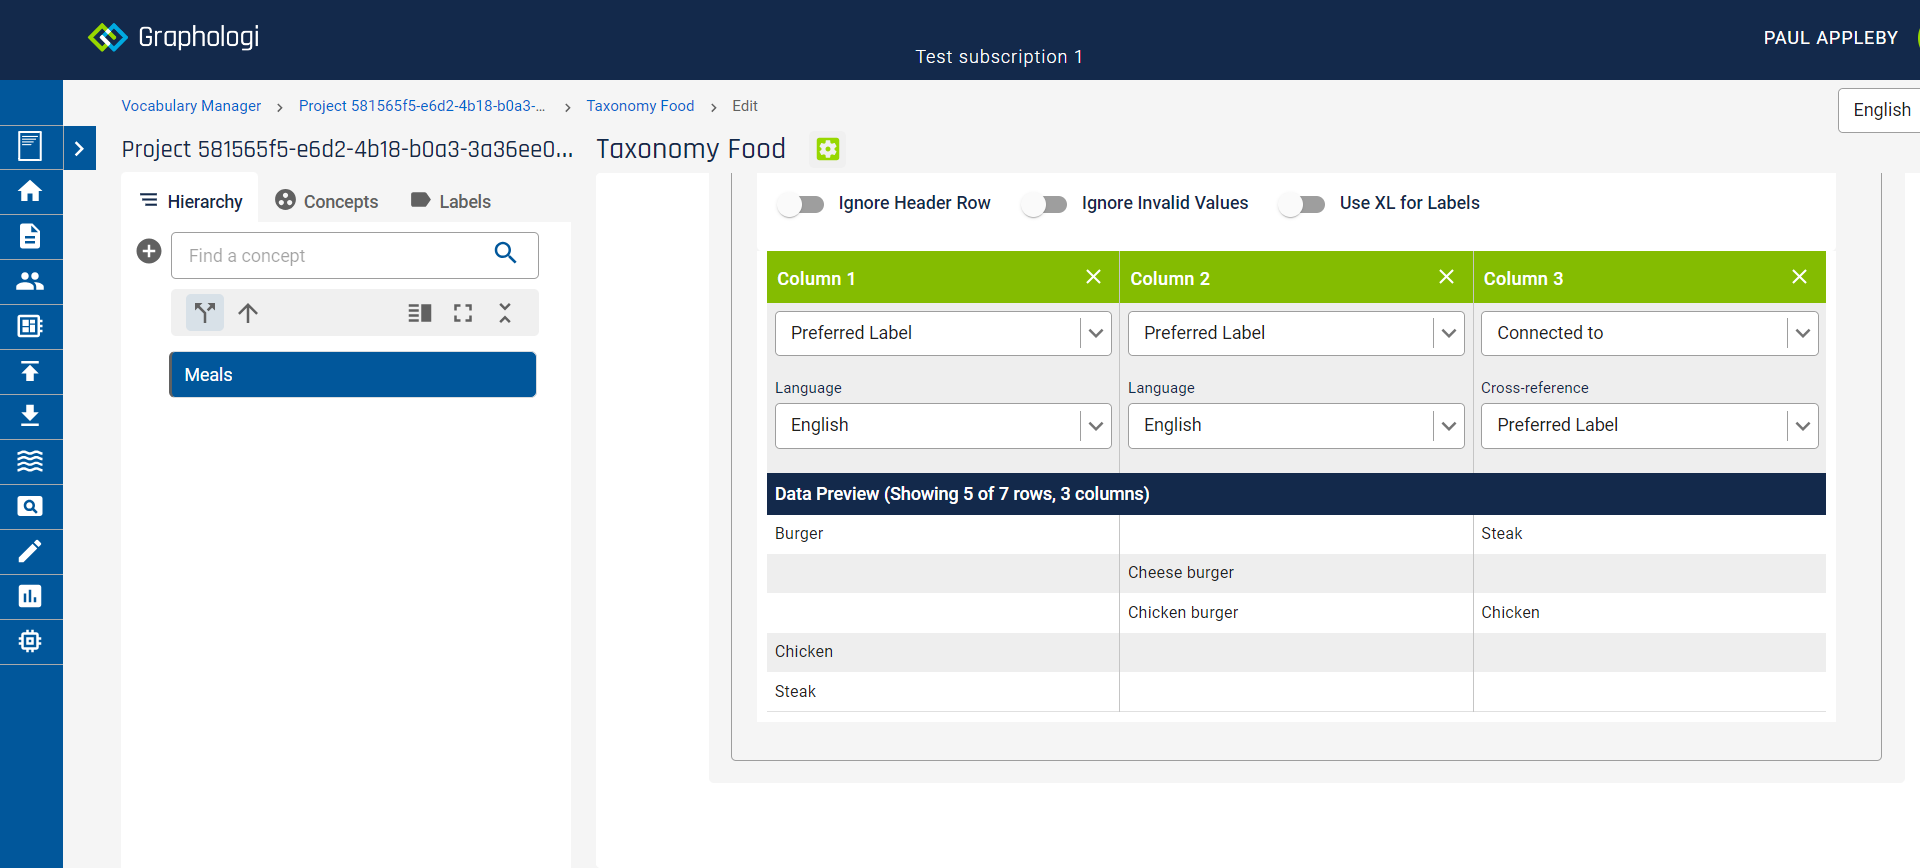
For example, if you have a column in your spreadsheet that you want to map to an associated 'Connected to' property and the values in that column are the preferred labels of the target concepts, select 'Preferred Label' as the cross-reference. In the example below column 3 is being mapped to the 'Connected to' property. The cross-reference is using preferred labels. In this example it means that 'Burger' would be connected to 'Steak' and 'Chicken burger' would be connected to 'Chicken'.
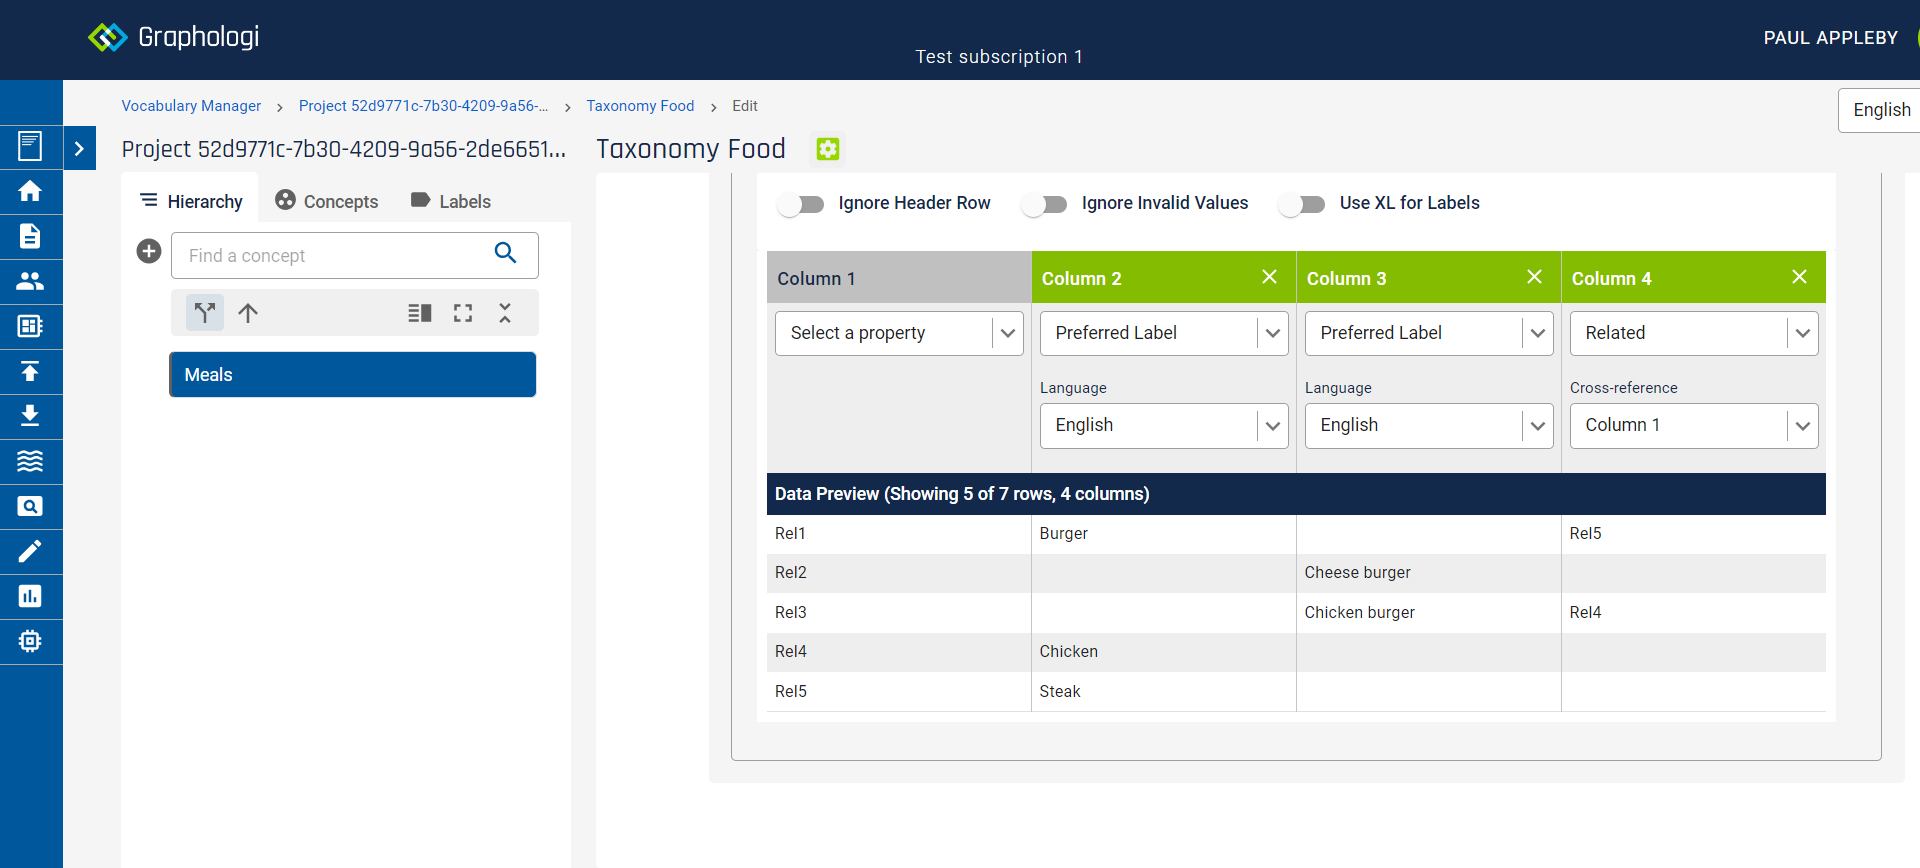
If a column contains values from another column such as unique identifiers select that column as the cross-reference. In the example below column 4 is being mapped to the SKOS related property. The cross-reference is using the unique values in column 1. In this example it means 'Burger' would be related to 'Steak' and 'Chicken burger' would be related to 'Chicken'.
Cross-reference columns do not have to be included in the import.
If a value in a cross-reference column does not exist in the spreadsheet Graphologi will try to find a matching value in the existing concepts of the taxonomy. This allows you to create relationships to concepts not in the spreadsheet.
Points to note:
The import is actually an append. If there are rows in the spreadsheet that match with existing concepts then any cells with values will be added to any existing values. No existing data is removed.
Once you have done the mapping click . The import will start. On successful completion you should see a button, which, on clicking, will update the screen. If errors occur on import you will need to fix the data before attempting to import again.
Import is case insensitive for preferred labels. That is, if 'car' is in the spreadsheet and an existing concept has the label 'Car' the existing concept will be used. It is also possible to import cyclical references if they exist in the data, which will be reported via quality checks.
For more details on importing spreadsheets see the section on Importing data into a project.
To export a concept or its subtree click on the ![]() icon. This will display options to download a concept, and if it has narrower concepts, its subtree. A subtree includes all the narrower concepts for a concept. There is also the option to export the subtree as a spreadsheet.
icon. This will display options to download a concept, and if it has narrower concepts, its subtree. A subtree includes all the narrower concepts for a concept. There is also the option to export the subtree as a spreadsheet.
If a project is SKOS-XL enabled you will be able to select whether to include XL labels. Simply select which download you require and the RDF format in which you require your data and click the button.
To view how a concept fits into the hierarchical structure of the project click on the ![]() icon. This displays the paths down to a concept as well as some statistics about the position of the concept. For polyhierarchical taxonomies this can be very useful to see the different locations of a concept.
icon. This displays the paths down to a concept as well as some statistics about the position of the concept. For polyhierarchical taxonomies this can be very useful to see the different locations of a concept.
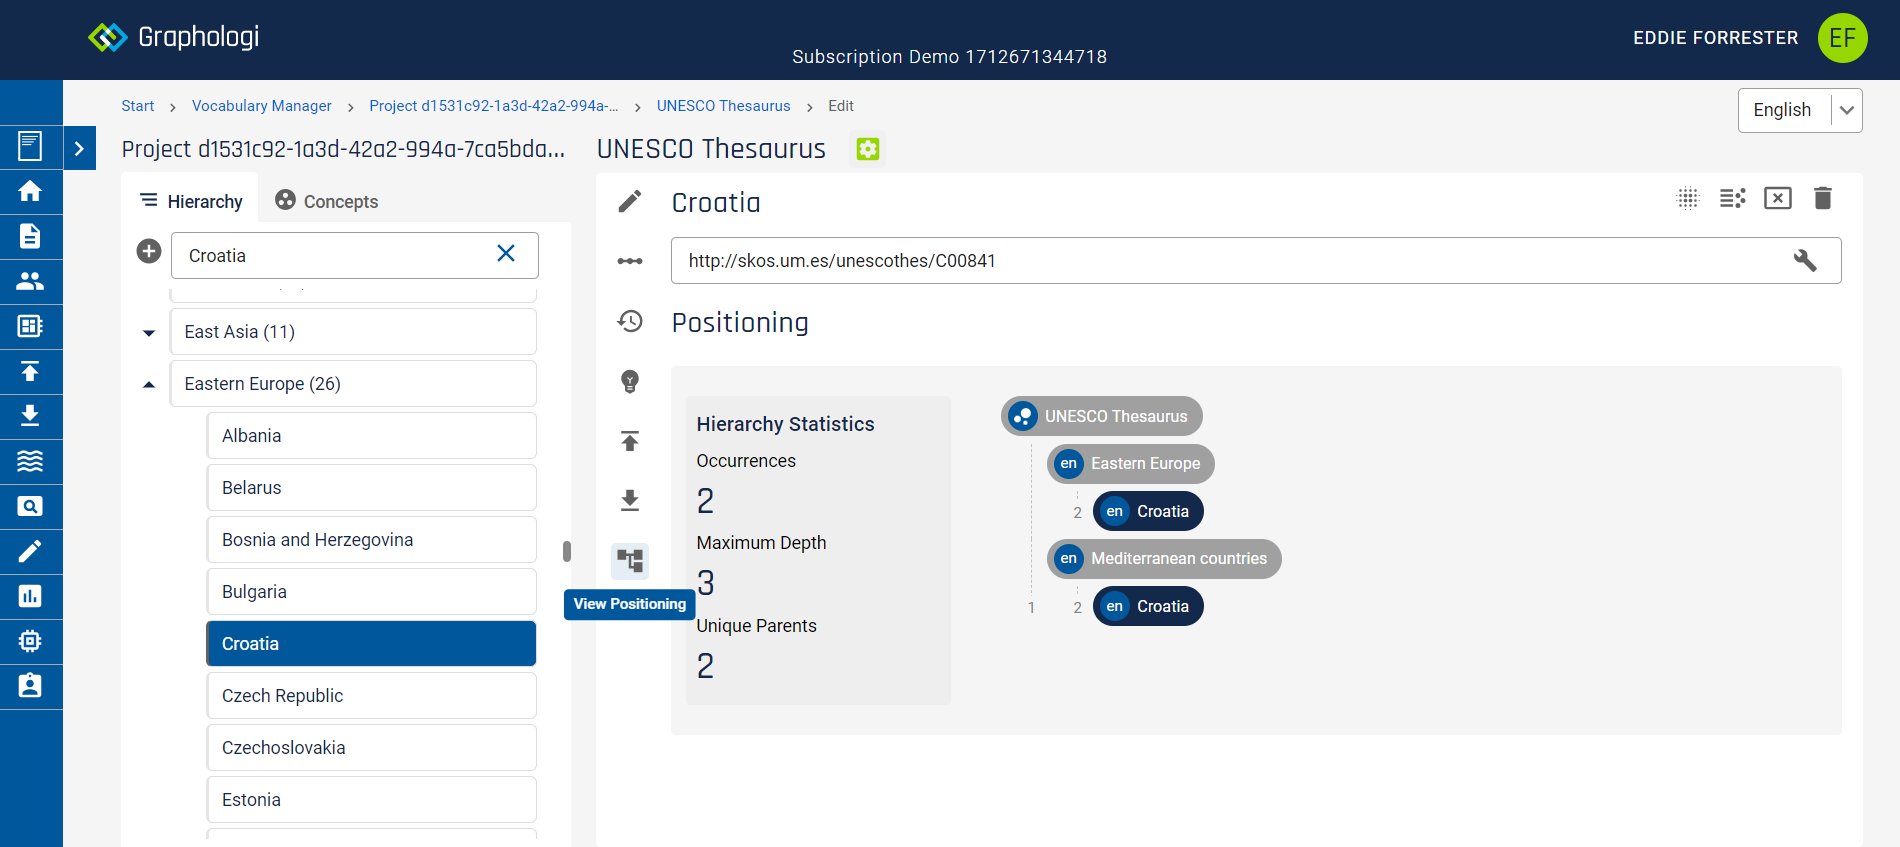
You can 'jump' to a particular location in the hierarchy on the left by clicking the corresponding chip in the positioning view.
There are situations where it is much simpler to see data in a visual manner. This is especially true when looking at connections across a graph, such as concepts related to other concepts. Graphologi provides a visualisation feature to help you understand how your data is connected.
Visualisation can be accessed for a concept by clicking on the ![]() icon. This should display something like the following image:
icon. This should display something like the following image:
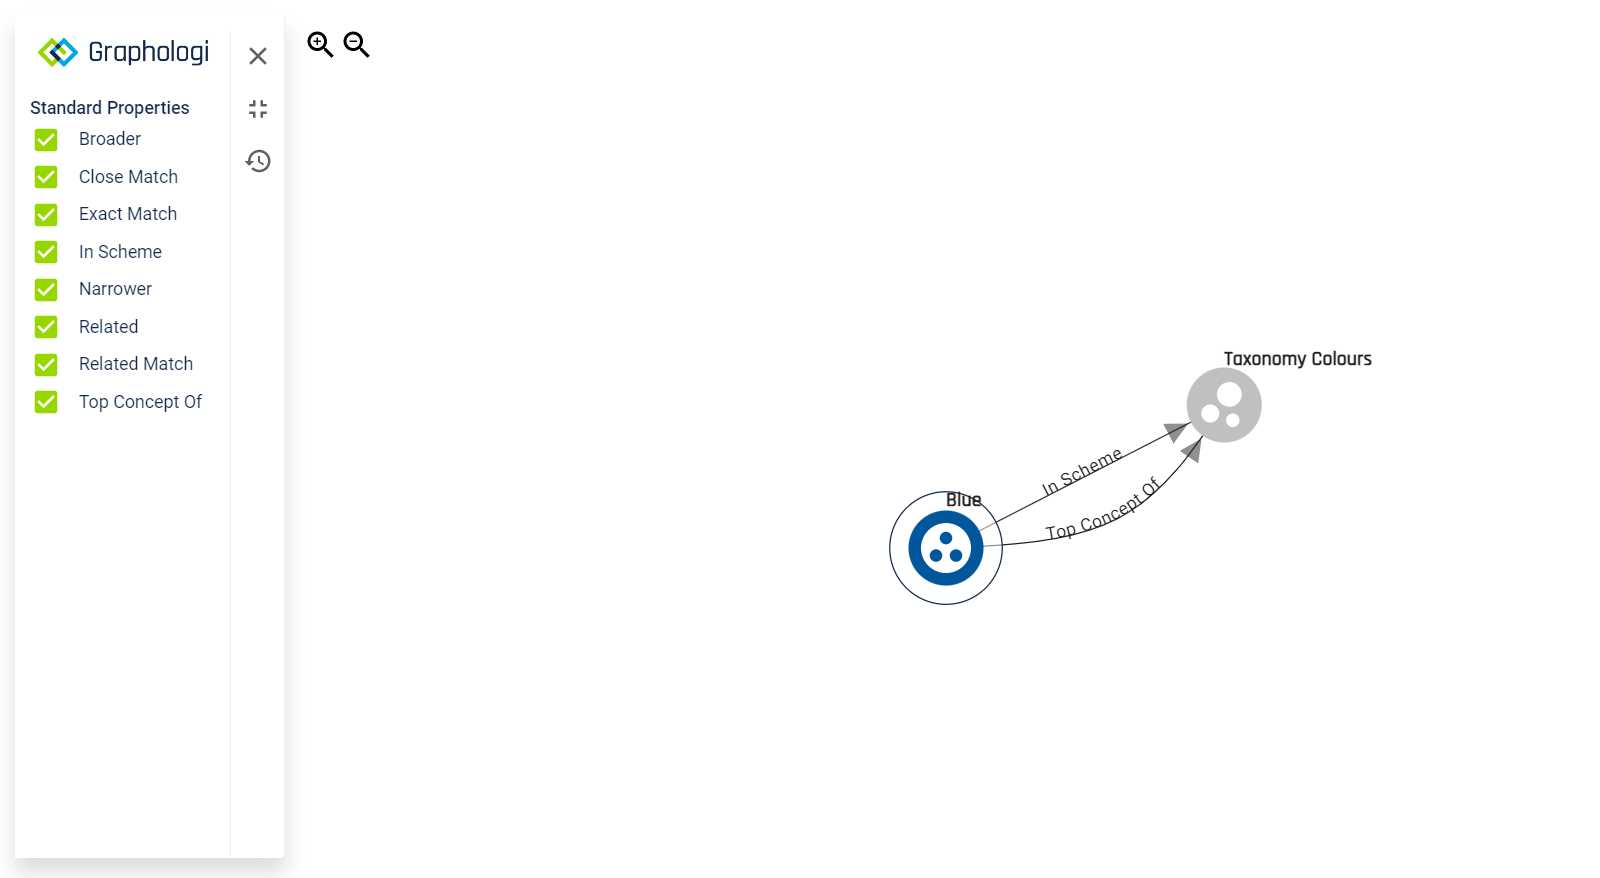
On the left are the SKOS properties (the connections) that will be displayed by default. You can deselect those that you are not interested in, which can help simplify the image when there are many relationships. If there are additional relationships other than SKOS, such as those from an ontology, those will be displayed below the SKOS properties similarly to the following image:
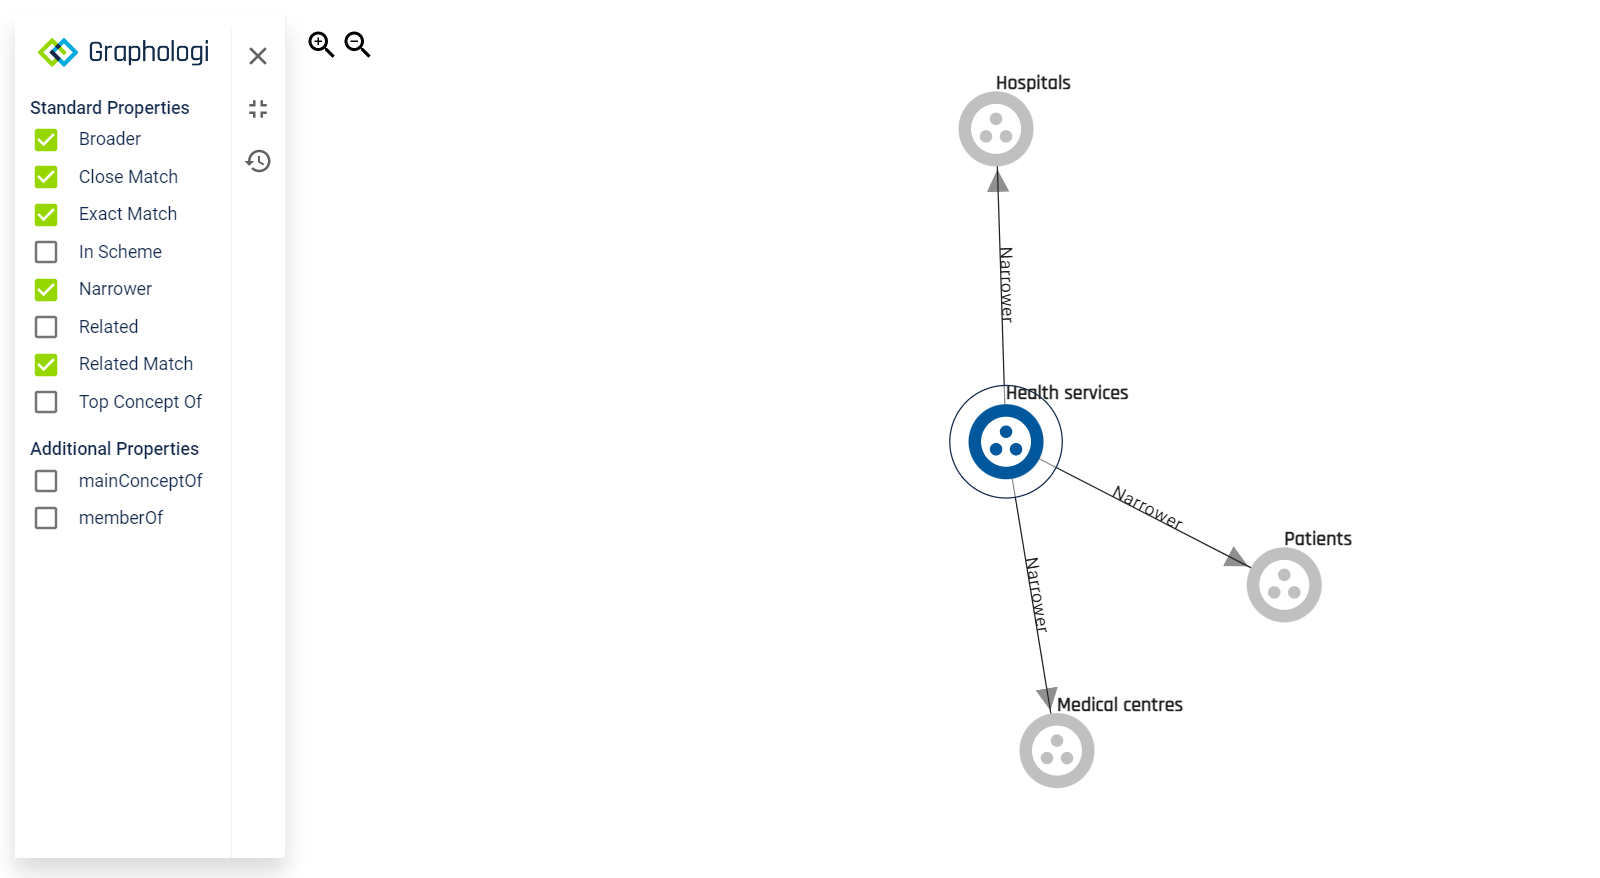
You can zoom in to the visualisation by clicking on the ![]() icon and zoom out by clicking on the
icon and zoom out by clicking on the ![]() icon. Zoom in has four further levels from the default. Zoom out has just one level from the default. You can also drag the image around.
icon. Zoom in has four further levels from the default. Zoom out has just one level from the default. You can also drag the image around.
To hide the properties panel click on the ![]() icon. Click on it again to show the panel.
icon. Click on it again to show the panel.
To reset the visualisation click on the ![]() icon.
icon.
To expand the visualisation to include more concepts click on a concept that you would like to include. You can click it again to exclude it. The layout of the visualisation will manage itself to a certain degree. However, for complex data you may want to adjust it yourself. You can do this by dragging concept icons around.
To add inbound links to a node use Ctrl+Click.
Note that there is a limit of 100 connections per relationship. Beyond this you will be notified that this is the case.
Vocabulary Manager provides support for SKOS-XL. A concept is a SKOS Concept and concepts have labels. Labels may be direct properties on a concept such as a preferred label. However this restricts the ability to state information about the label, such as its origin, the date it was added or its relationship to other labels. SKOS-XL labels are first class resources in their own right which means that additional information can be stated about them. However, out of the box SKOS-XL itself does not provide much in the way of relations to do this. It only has skos:labelRelation as a generic relationship. Currently Vocabulary Manager does not support this because its generic semantics makes it of little use.
To get full use of SKOS-XL labels will generally mean using the Ontology Manager functionality. The Ontology Manager allows relationships to be created that can then be used on SKOS-XL labels.
To view the labels for a taxonomy click on the Labels tab. This will display a list of labels with an initial filter applied. Click on a label to view its detail. An example of how this will look is given in the following image.
A project may contain many labels. For example, Agrovoc has over 700,000 labels in multiple languages. This generally makes it impracticable to display all labels for a project. Therefore, a filter box is provided where you can type a few letters for labels you are looking for. You can also select the language. Hit enter after typing some text to apply the filter.
To add a label click on the ![]() icon on the left of the screen (or use the keyboard shortcut Alt+N). This will display the following dialog box:
icon on the left of the screen (or use the keyboard shortcut Alt+N). This will display the following dialog box:
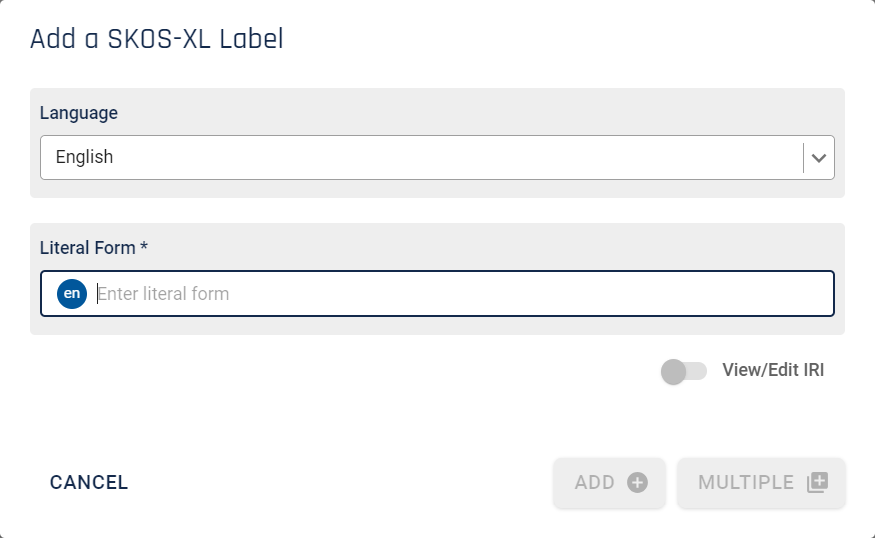
Select a language for the label and enter the text for the label. A label only has one 'literal form' (skos:literalForm).
If you wish to edit the automatically generated IRI for a label you can do so by selecting the 'View/Edit IRI' option (it may already be selected if set at the taxonomy level). The edited IRI must be unique within the project. Graphologi will not allow you to proceed until a unique IRI is entered.
To add the label click . If you are entering a large amount of labels you can click (or use the keyboard shortcut Ctrl+Enter), which will add the label and keep the dialog box open ready for you to add another label.
To delete a label click on the ![]() icon on the right of the screen.
icon on the right of the screen.
To change the literal form of a label click into the text and start editing. You will be shown any similar labels as you type in a similar way to the image below, and, if your label is acceptable, a ![]() icon will be shown on the right of the field. Click to confirm the change.
icon will be shown on the right of the field. Click to confirm the change.
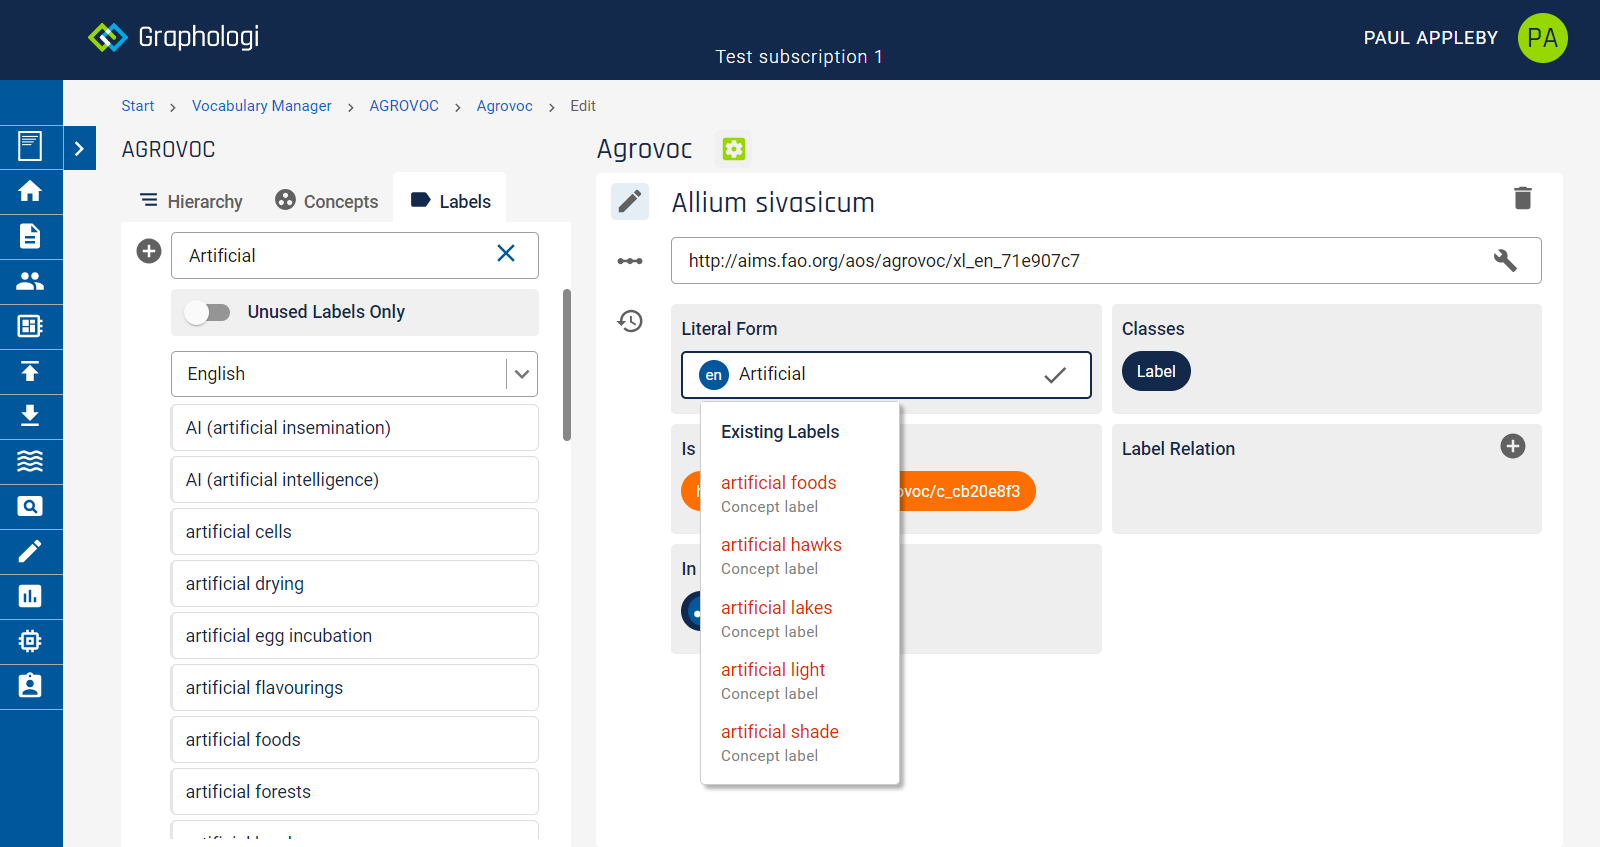
To abandon a change simply click away from the field.
It is possible that a label used on a concept is not in any concept scheme, even if the concept to which it is related is. If this is the case you will see something similar to the following image.
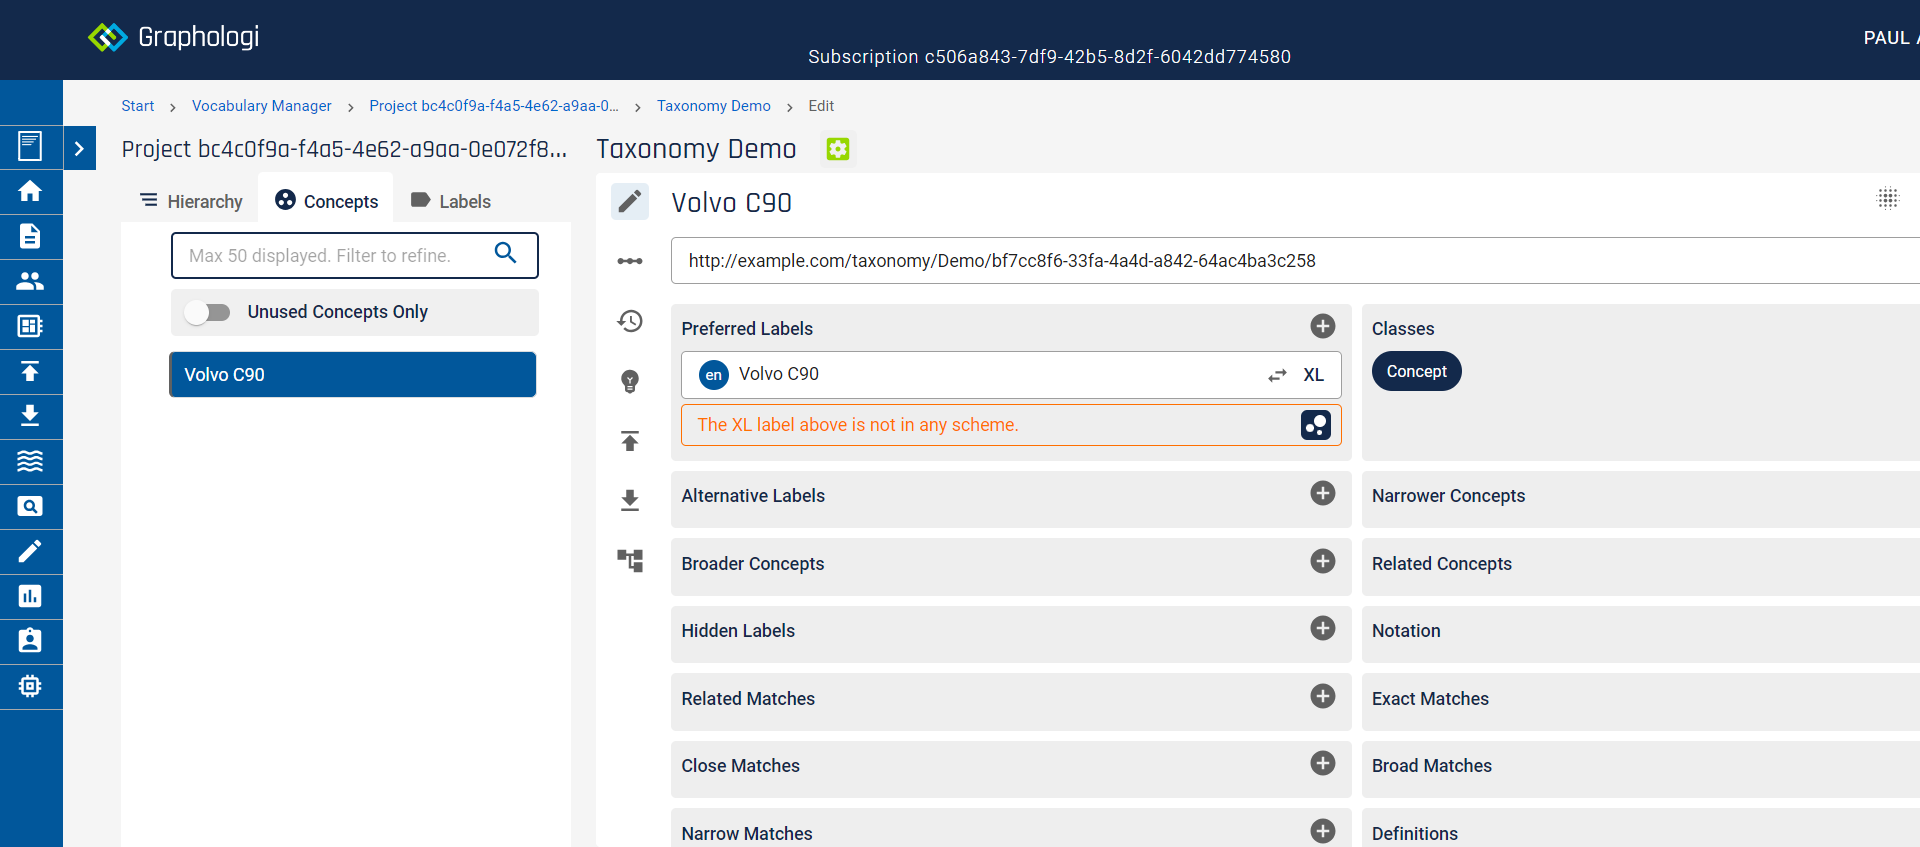
To add the label into the current concept scheme click the ![]() icon.
icon.
Similarly to a concept you can also view the underlying label triples or its history of changes by clicking on the appropriate icon.
Collections in Vocabulary Manager give you the ability to create ordered or unordered collections of concepts compliant with the SKOS standard.
A collection in Vocabulary Manager can consist of any number of concepts from any of the taxonomies available within the same project as the collection.
When creating a new ordered collection you will be presented with a dialog box as below:
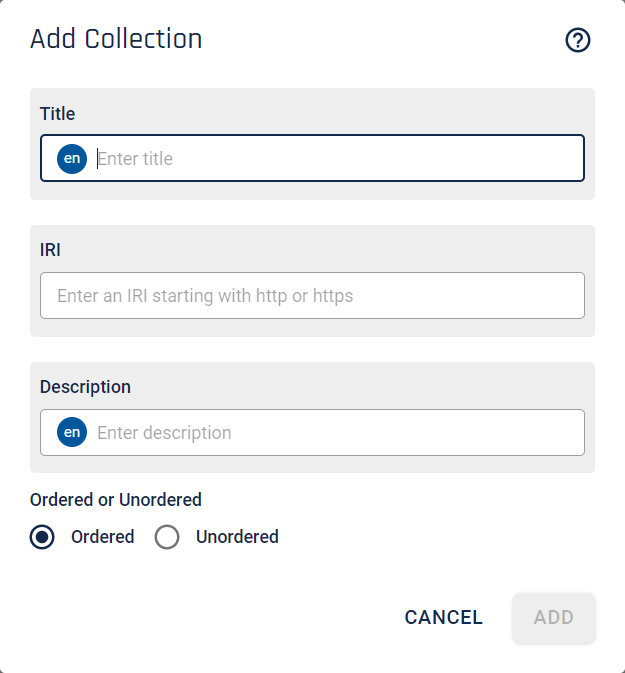
A new collection requires various pieces of data to be completed. Enter a title for your collection. The language for the title will be the default project language. Languages in Vocabulary Manager are generally indicated as follows, with a circle containing a BCP-47 language code.
A collection needs an IRI (Internationalised Resource Identifier). For those not familiar with IRIs they are essentially the same as URIs, which are similar to URLs. IRIs can contain characters from Unicode that are not available to use in URIs. Note that codepoints in the RTL ranges currently need to be escaped.
The IRI for a collection must be unique within all the data stored in a project. If the IRI you have entered is unique you will see a confirmatory tick.
You can choose whether the collection is ordered or unordered.
Finally, you can optionally add a description for your collection.
Click to create the collection. You will see your collection added to the list similarly to the following image.
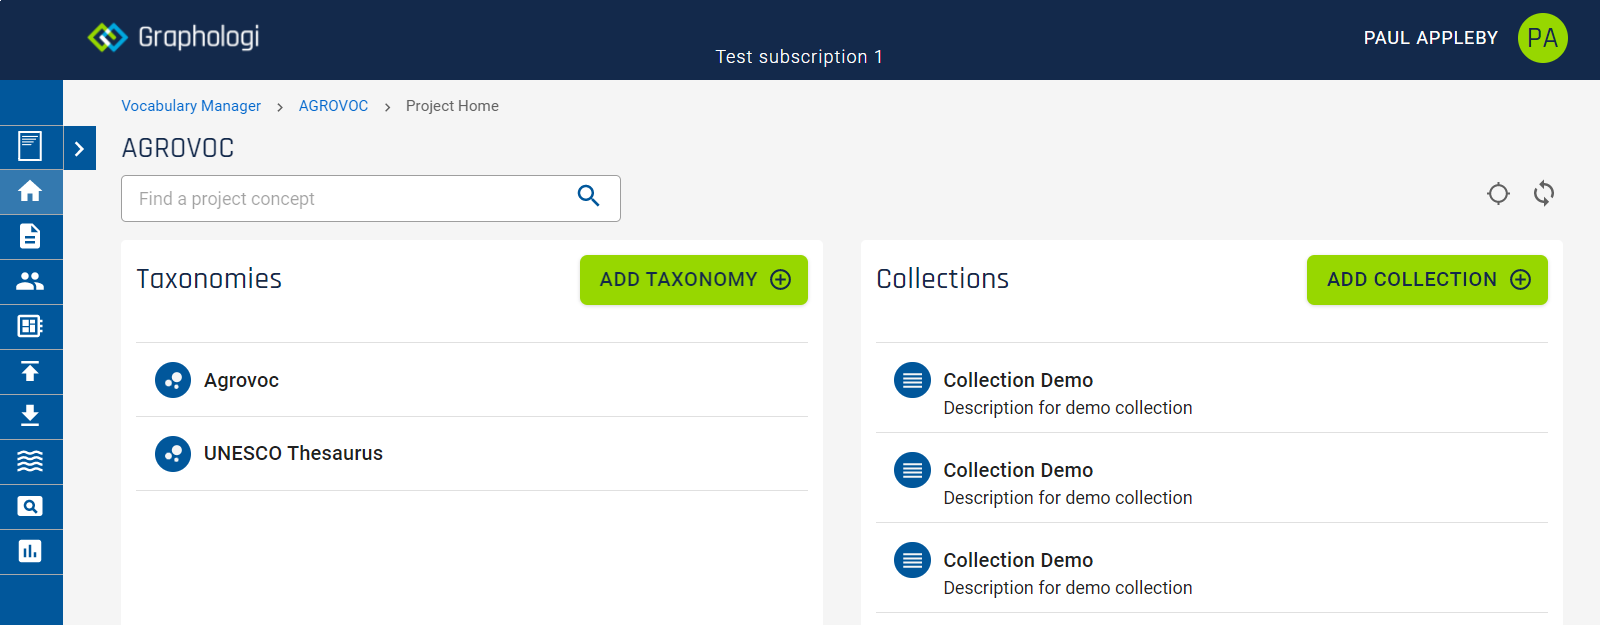
When you first create a collection and start to edit it you will be presented with a screen as below:
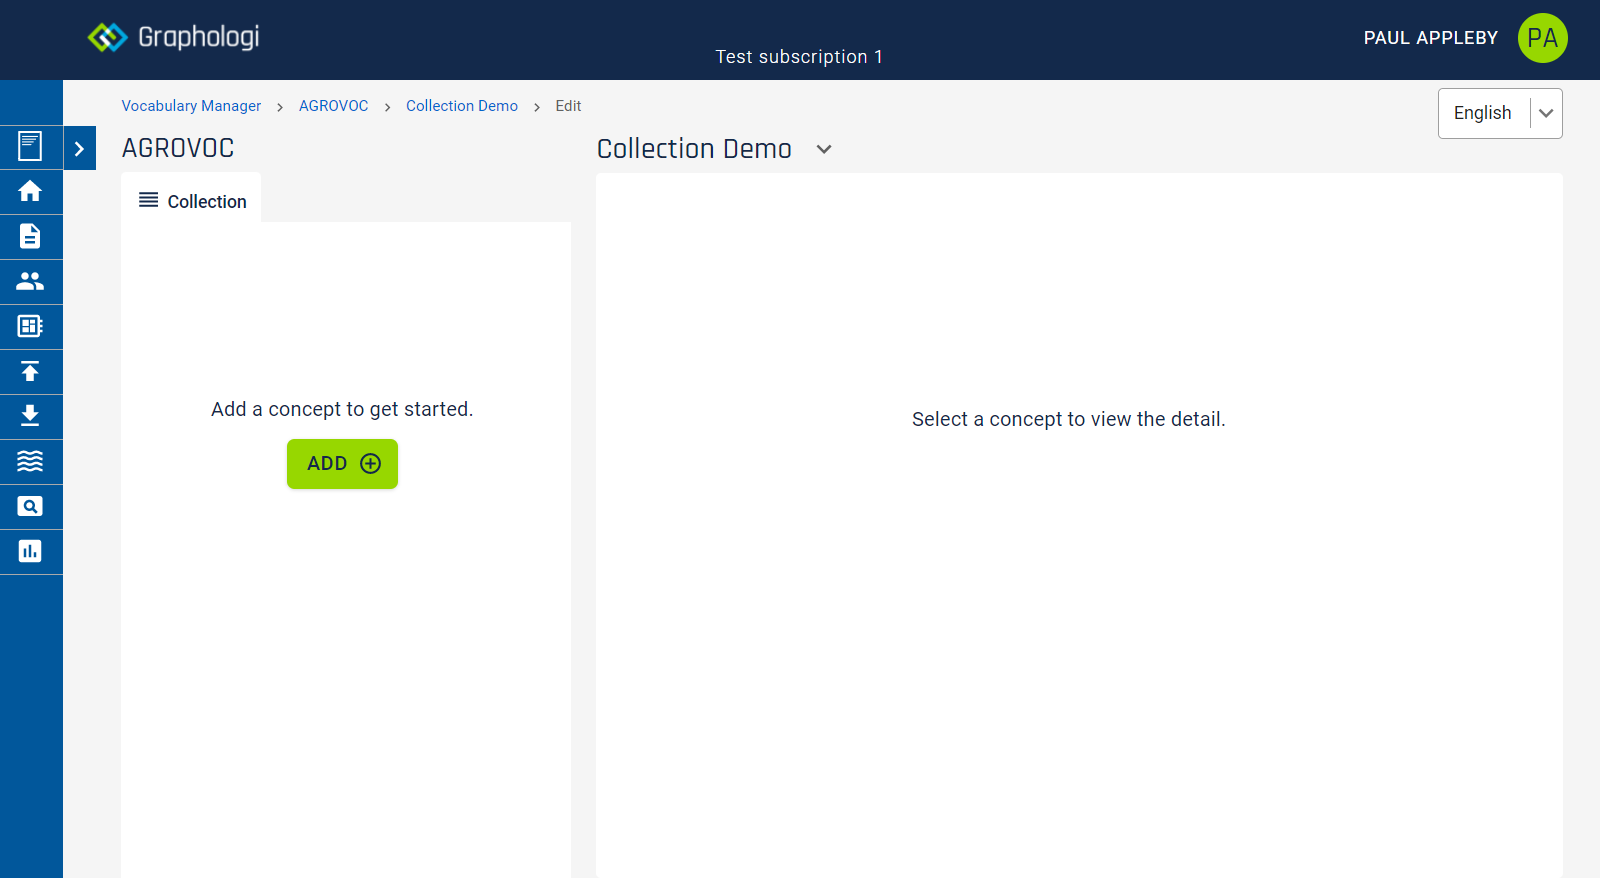
The Collection tab, on the left of the screen, shows the concepts in the collection in a flat ordered view.
When you click on the down arrow next to the collection title the management view will be available in a similar way to taxonomies.
To add a concept to a collection click on the ![]() icon on the left of the screen (or use the keyboard shortcut Alt+Ctrl+F). This will display a dialog box similar to the following image. Start typing text to search for concepts. As they are found the dialog will display them similarly to the image below.
icon on the left of the screen (or use the keyboard shortcut Alt+Ctrl+F). This will display a dialog box similar to the following image. Start typing text to search for concepts. As they are found the dialog will display them similarly to the image below.
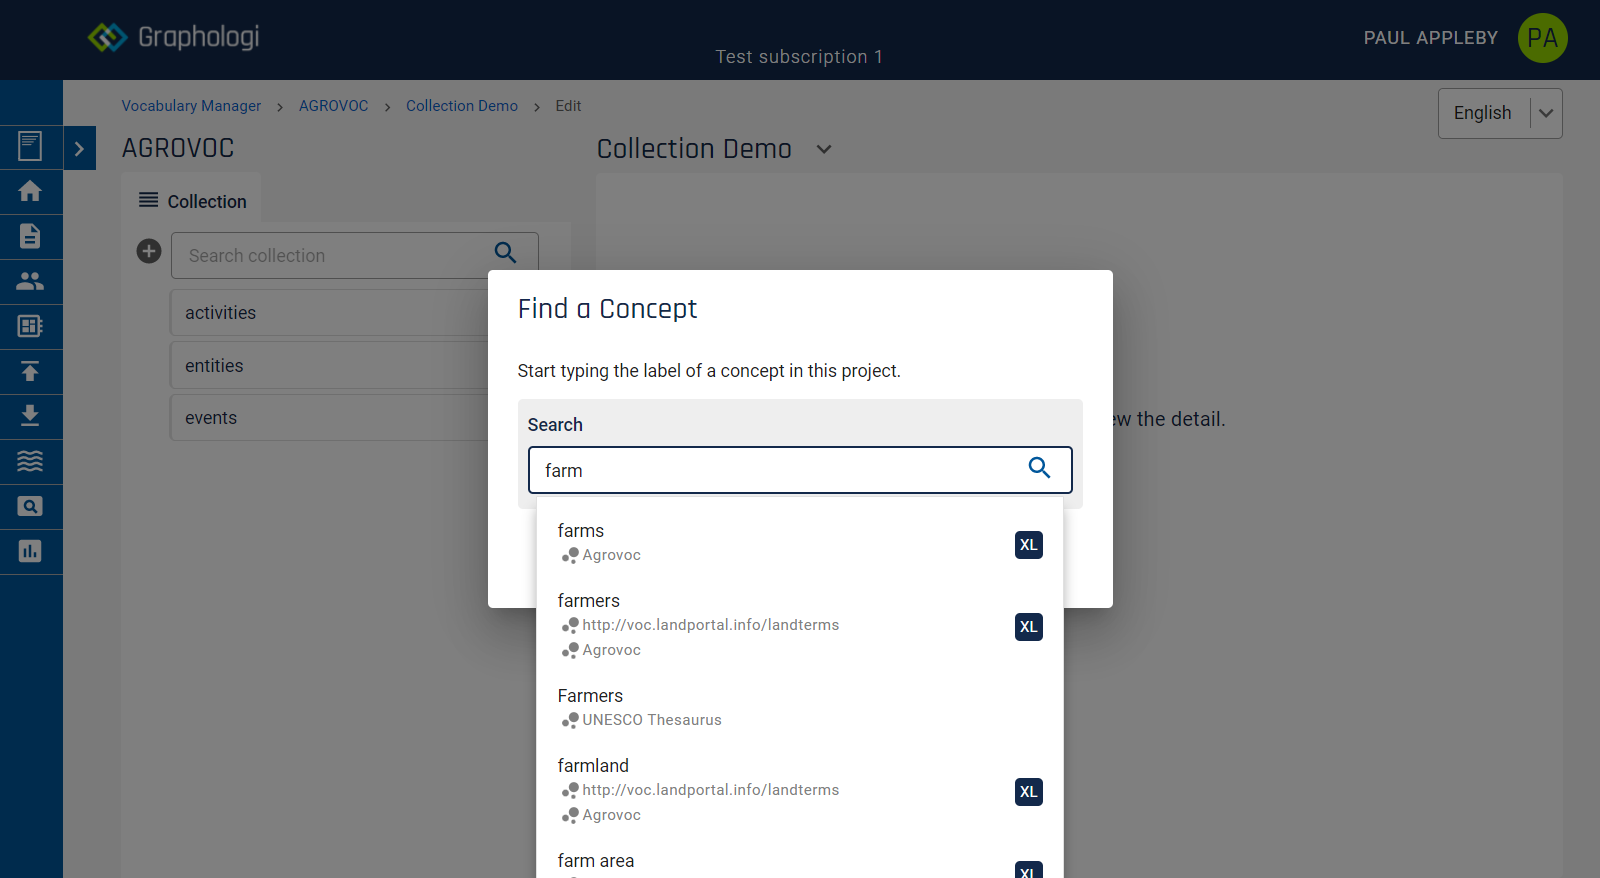
Select the concept that you want to add. The concept will be added to the end of the collection.
To add a concept to a collection when in the taxonomy editor, click on the ![]() icon on the right of the screen. This will display the following dialog box, from which you can select the collection to add the concept to.
icon on the right of the screen. This will display the following dialog box, from which you can select the collection to add the concept to.
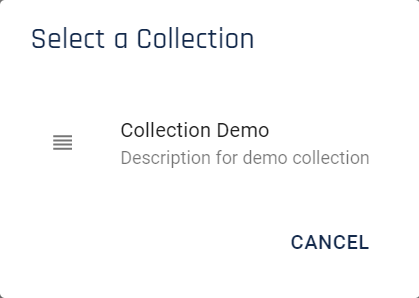
The concept will be added to the end of the collection.
If the collection is ordered you can reorder the concepts within it. To move a concept drag it from its position in the list on the left to the new desired location.
To remove a concept click on the ![]() icon.
icon.
When a concept is in a collection you will see a collection link in the detailed view for the concept. This shows each collection and the position of the concept in that collection in a similar way to the following image.
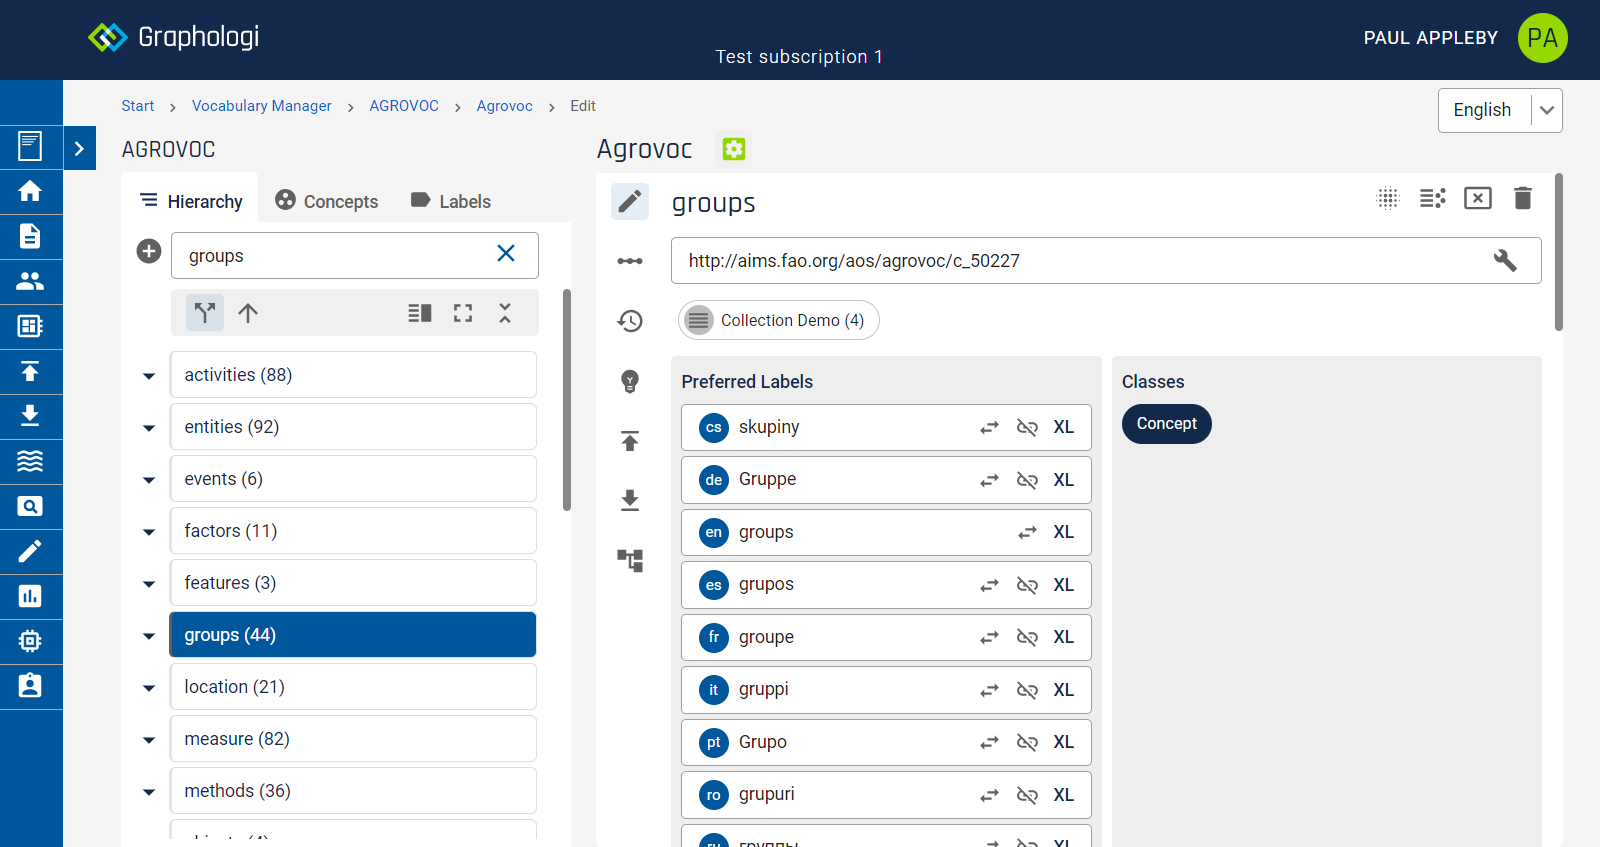
Note that when in the collection view concept data is view only. Only within the context of a particular taxonomy can the data be edited.
The ability to make suggestions for a taxonomy can be an important part of its lifecycle and governance. To support that the Vocabulary Manager provides the means for users on a project to contribute via creating suggestions and commenting on them. This can be very useful for subject matter experts who do not need day-to-day access to taxonomies but might need to contribute to them. Indeed, the Reviewer role in Graphologi is configured for exactly the situation where other than viewing the user can only make suggestions.
Suggestions can form part of an overall workflow process and it is possible view the assignment of suggestions in the Jobs Manager, along other workflow items. Take a look at the Workflow section for more information. A list of applicable permissions for both workflow and suggestions can be found at Permissions.
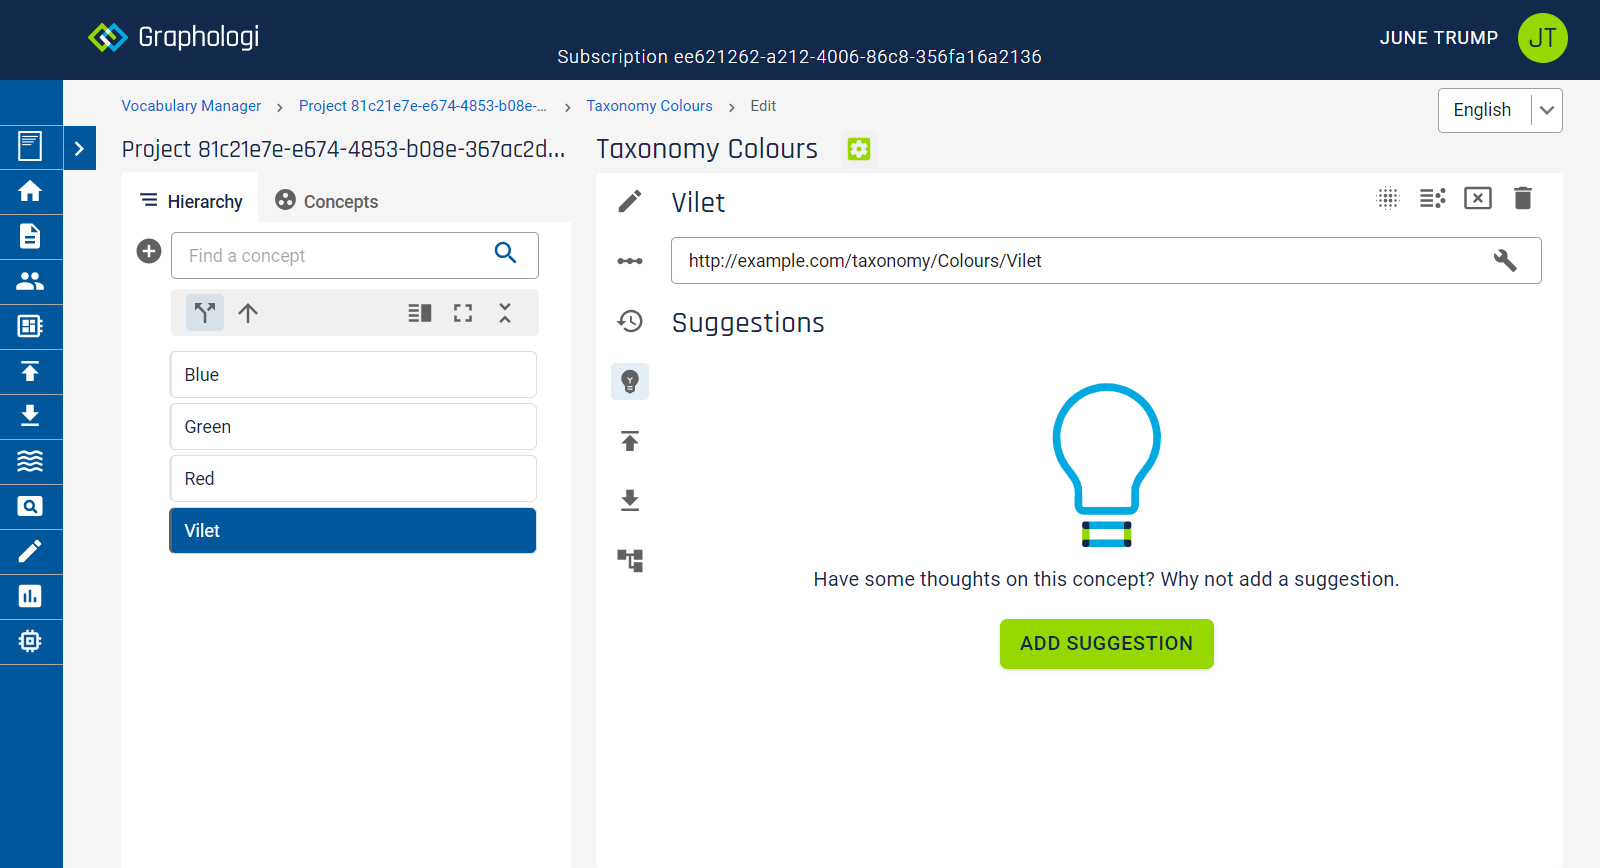
Various types of suggestion can be made:
To add a suggestion click . You will be presented with a dialog box similar to the following image.
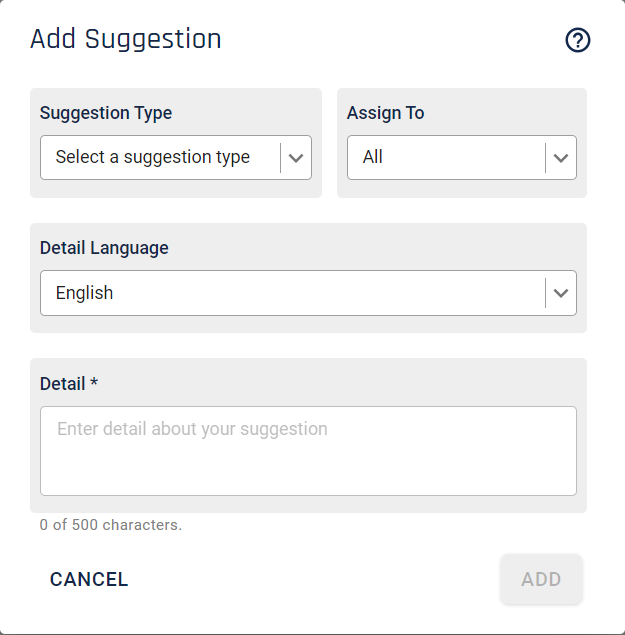
Select the type of suggestion you want. The options will be similar to the following image if making a suggestion on a concept. For the taxonomy home page only new concepts can be suggested.
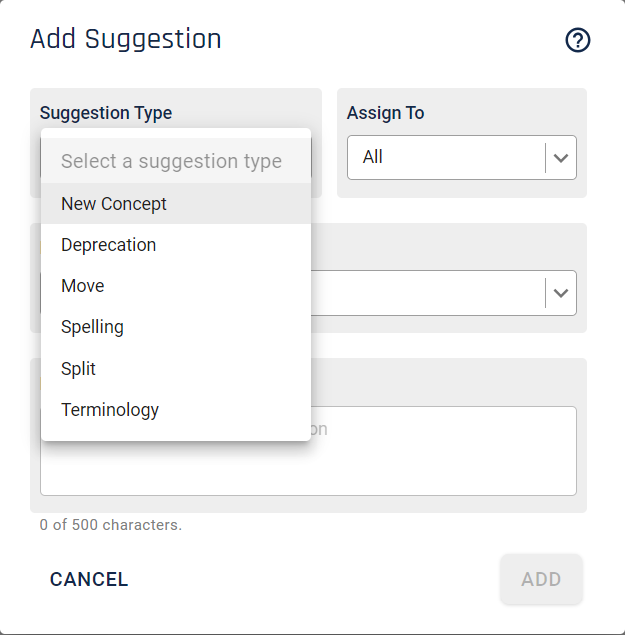
If you want to assign a suggestion to a particular user you can select the user from the 'Assign To' panel. It is possible to assign or reassign later on if that is preferred. Note that assignment is only available in Premium and above subscriptions.
To add the suggestion click the button, or the button if you wish to notify the assigned user. In the latter case the user will be sent an email with a link to the concept the suggestion is for.
When a suggestion is first made it is in the 'open' workflow state. On concepts you can see how many open suggestions a concept has on the suggestion icon, as in the following image.
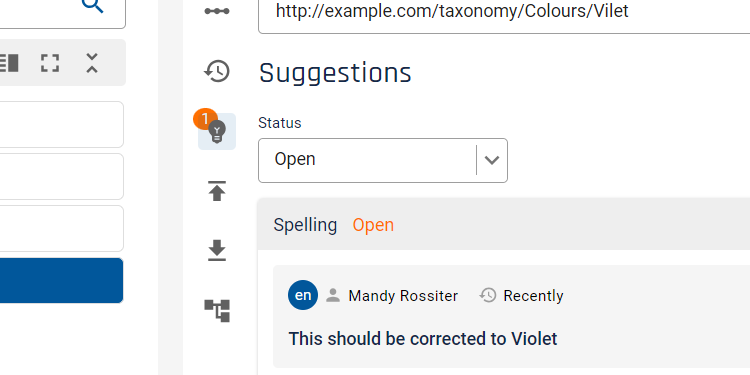
By default only open suggestions are displayed. You can view suggestions with other statuses by selecting the appropriate status from the drop-down menu.
Users with permissions will be able to add comments and those with permissions will be able to accept or reject suggestions. Suggestions are always available to be displayed, even after acceptance or rejection, allowing you to review past decisions. By default the 'Reviewer' role has been configured to allow a user to only view most data but to make suggestions and add comments to suggestions.
It is a good idea to action suggestions quickly. If other edits are being made to the taxonomy it may make a suggestion redundant or unable to be applied. Graphologi will warn you if this is the case.
When a user accepts or rejects a suggestion they have the opportunity to add a note justifying the decision, as shown in the following image.
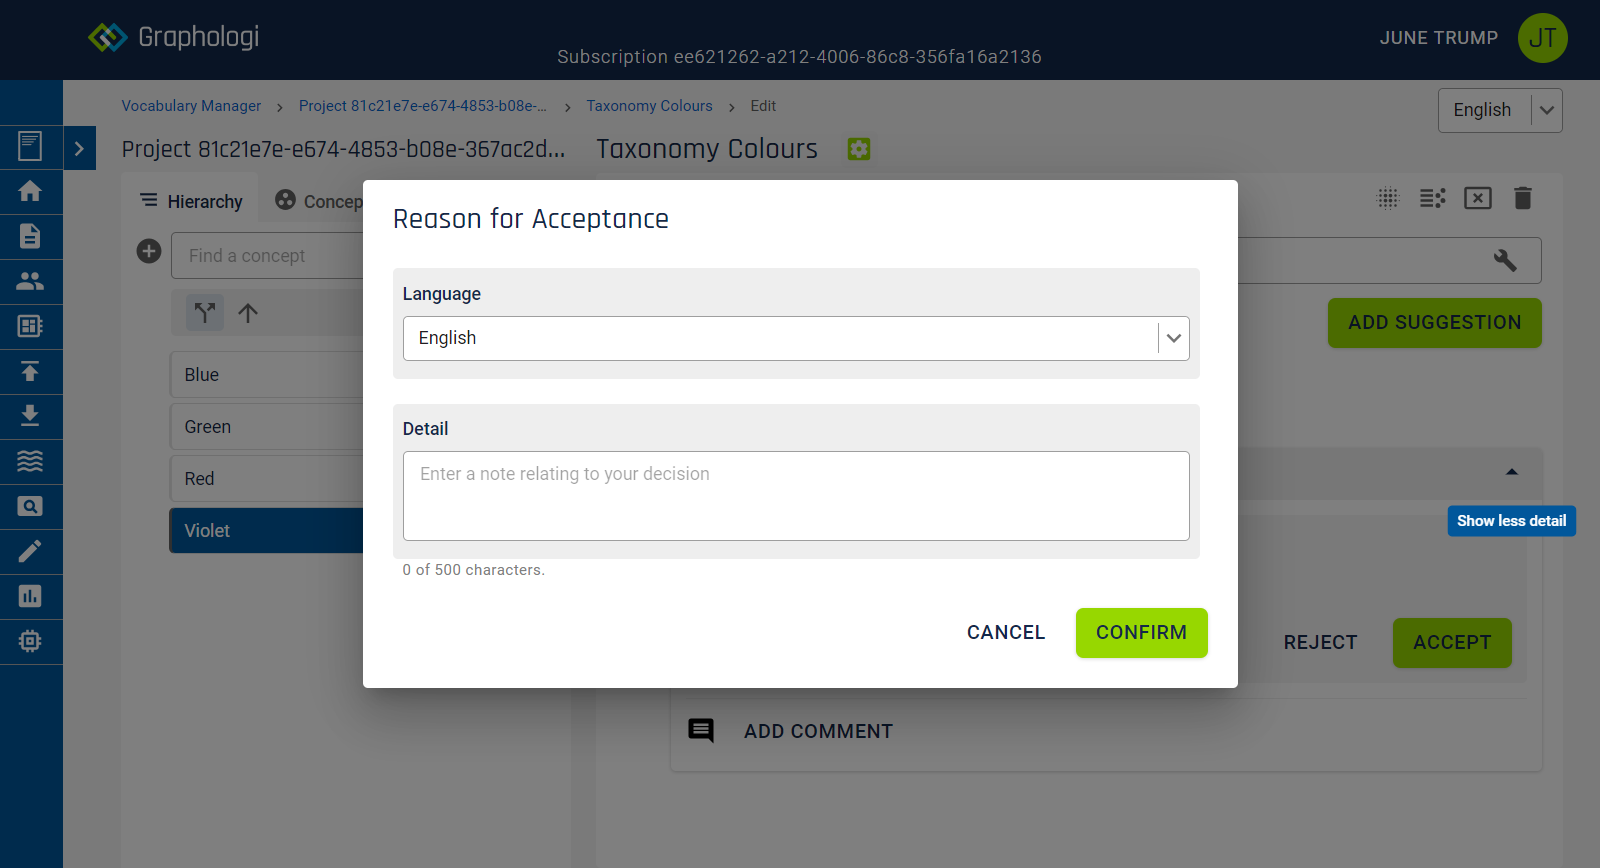
If you don't want to add a note you can skip this step. At this point, if the project is XL enabled and the suggestion is for a new concept, it is also possible to decide whether the concept should be added using an XL label or a plain label. Note that, if workflow is activated, any new concept will be created with a draft status.
Further, if the suggestion is for a new concept, or a label using an XL label, and you want to edit the automatically computed IRIs that will be used, you will have the option to do so.
If a note is added you can see it by expanding the suggestion which will show something similar to the following image.
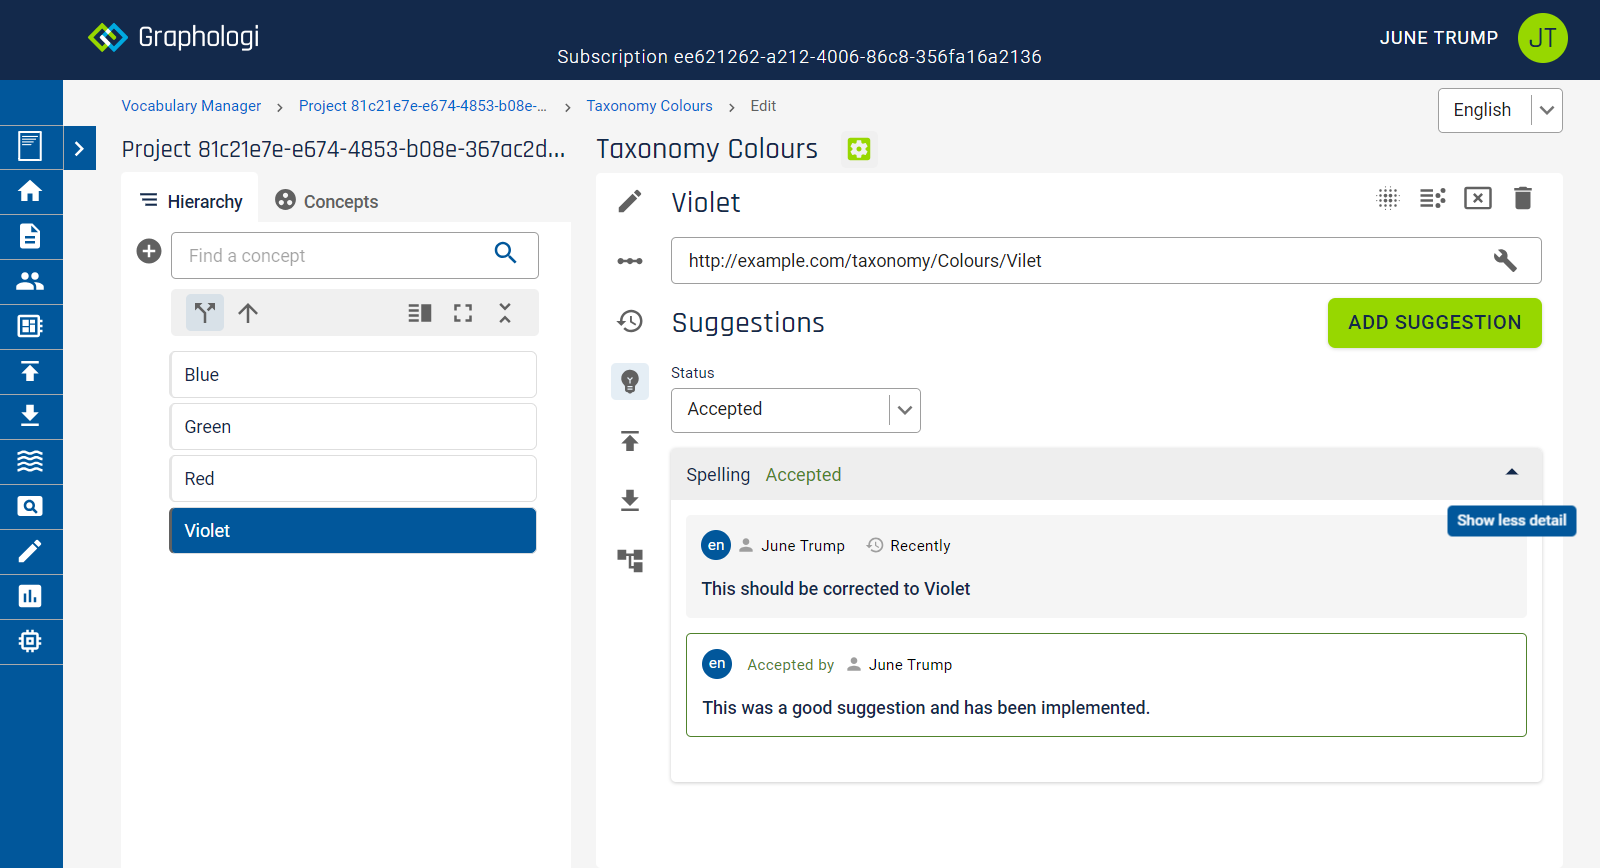
It is possible that, in the time between a suggestion being made and the suggestion being actioned, the taxonomy may have changed. Graphologi makes a series of checks at various points to make sure that suggestions are still valid.
Many suggestion types will also be displayed 'inline' for a concept. This makes the suggestions more prominent and makes for easy decision making. They will look similar to the following image. Note that preferred and alternative label suggestions will appear in the corresponding panels. Suggestions for new child concepts will appear in the 'Narrower Concepts' panel.
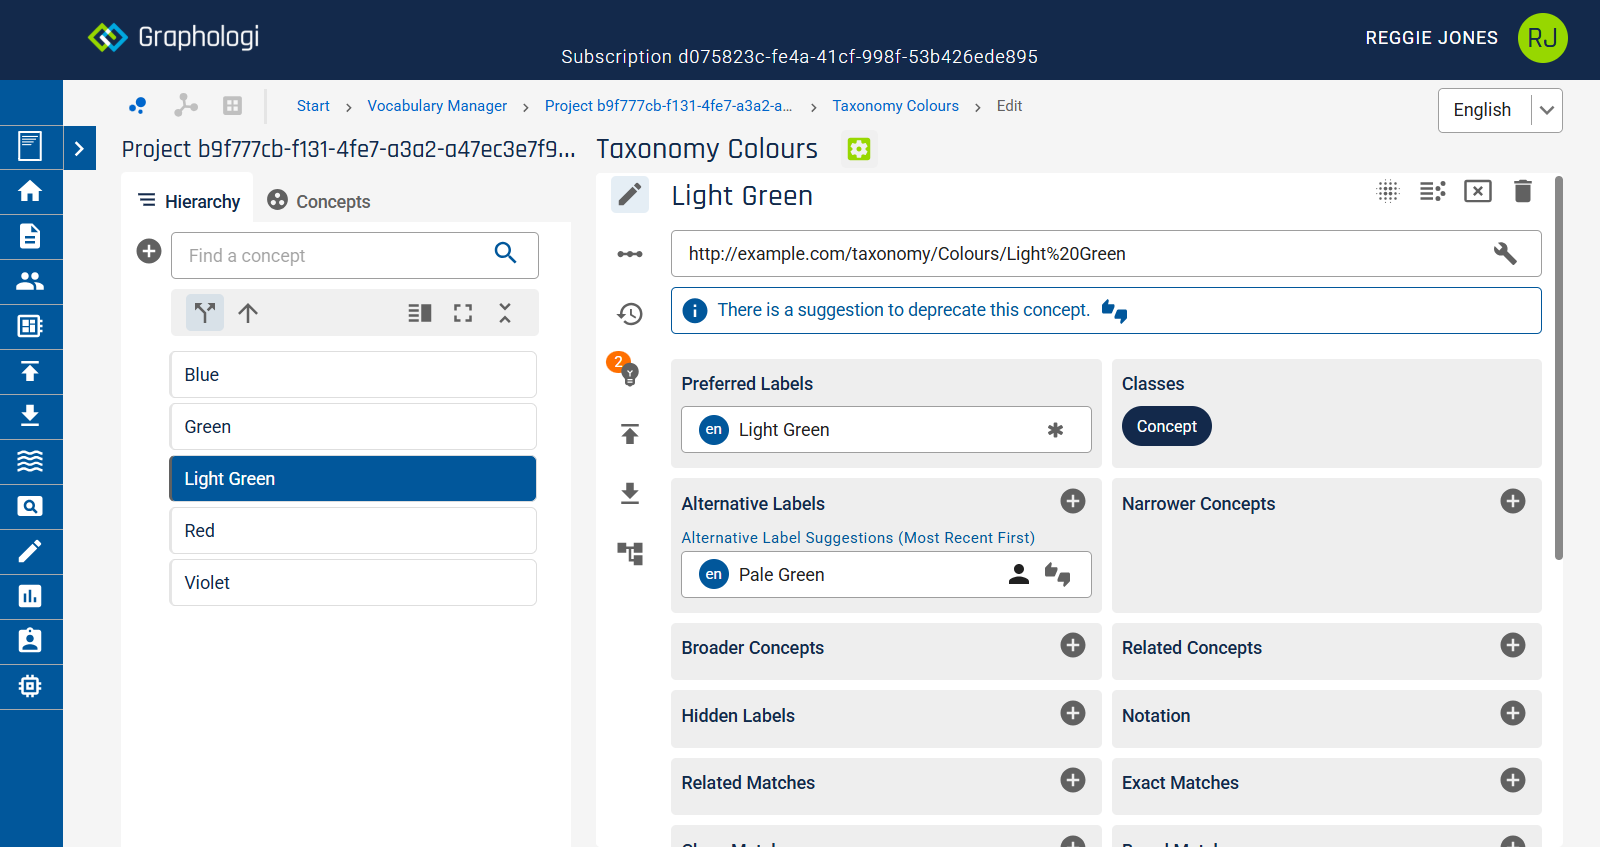
You can also accept or reject suggestions from the inline view by clicking on the ![]() icon.
icon.
If you are on the taxonomy home page you can suggest a new top level concept. On acceptance this will automatically create the concept.
This suggestion type allows you to propose the addition of a new concept as a narrower concept to that on which the suggestion is made. On acceptance this will automatically create the concept.
This suggestion type allows you to propose the addition of a new preferred label for the concept on which the suggestion is made. As only one label is allowed per language the choice of languages will be restricted to those not used on the concept. If there is only one project language you will not see this option. On acceptance this will automatically create the label.
This suggestion type allows you to propose the addition of a new alternative label for the concept on which the suggestion is made. On acceptance this will automatically create the label.
A concept may be better positioned in a different location in the hierarchy. This suggestion type allows you to propose a new broader parent as in the following image. Note that the following is what you would see when suggesting a move on a top level concept as there are no broader concepts to choose from.
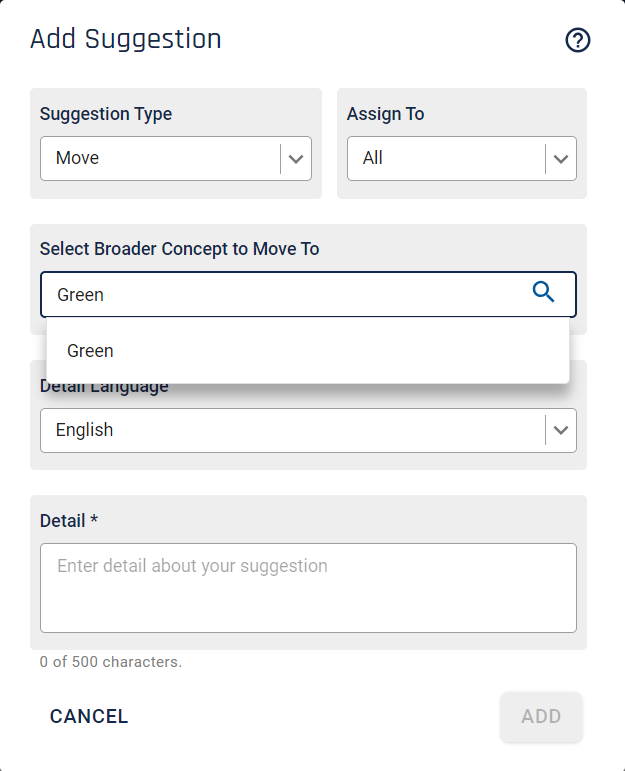
Note that, if the suggested new broader parent is in multiple locations in the hierarchy, the move would result in the moved concept being narrower to that concept in all locations. If you attempt to move a concept that has existing broader relationships you will be asked to select which broader parent it should be moved from.
On acceptance this will automatically move the concept.
A concept may be in an incorrect location in the hierarchy. This suggestion type allows a user to propose the removal from that location. This is equivalent to removing a concept from the hierarchy by clicking on the ![]() icon. If you attempt to remove a concept that has multiple broader relationships you will be asked to select which broader parent it should be removed from.
icon. If you attempt to remove a concept that has multiple broader relationships you will be asked to select which broader parent it should be removed from.
On acceptance this will automatically remove the concept.
If a concept has reached the end of its useful life a suggestion to deprecate it can be made. On acceptance of this type of suggestion Graphologi will actually deprecate the concept. This is equivalent to deprecating a concept by clicking on the ![]() icon.
icon.
On acceptance this will automatically deprecate the concept.
These suggestion types are free text suggestions, where the action is left to the taxonomist to apply.
Spelling suggestions are hopefully self-explanatory. They should be used to suggest corrections to labels.
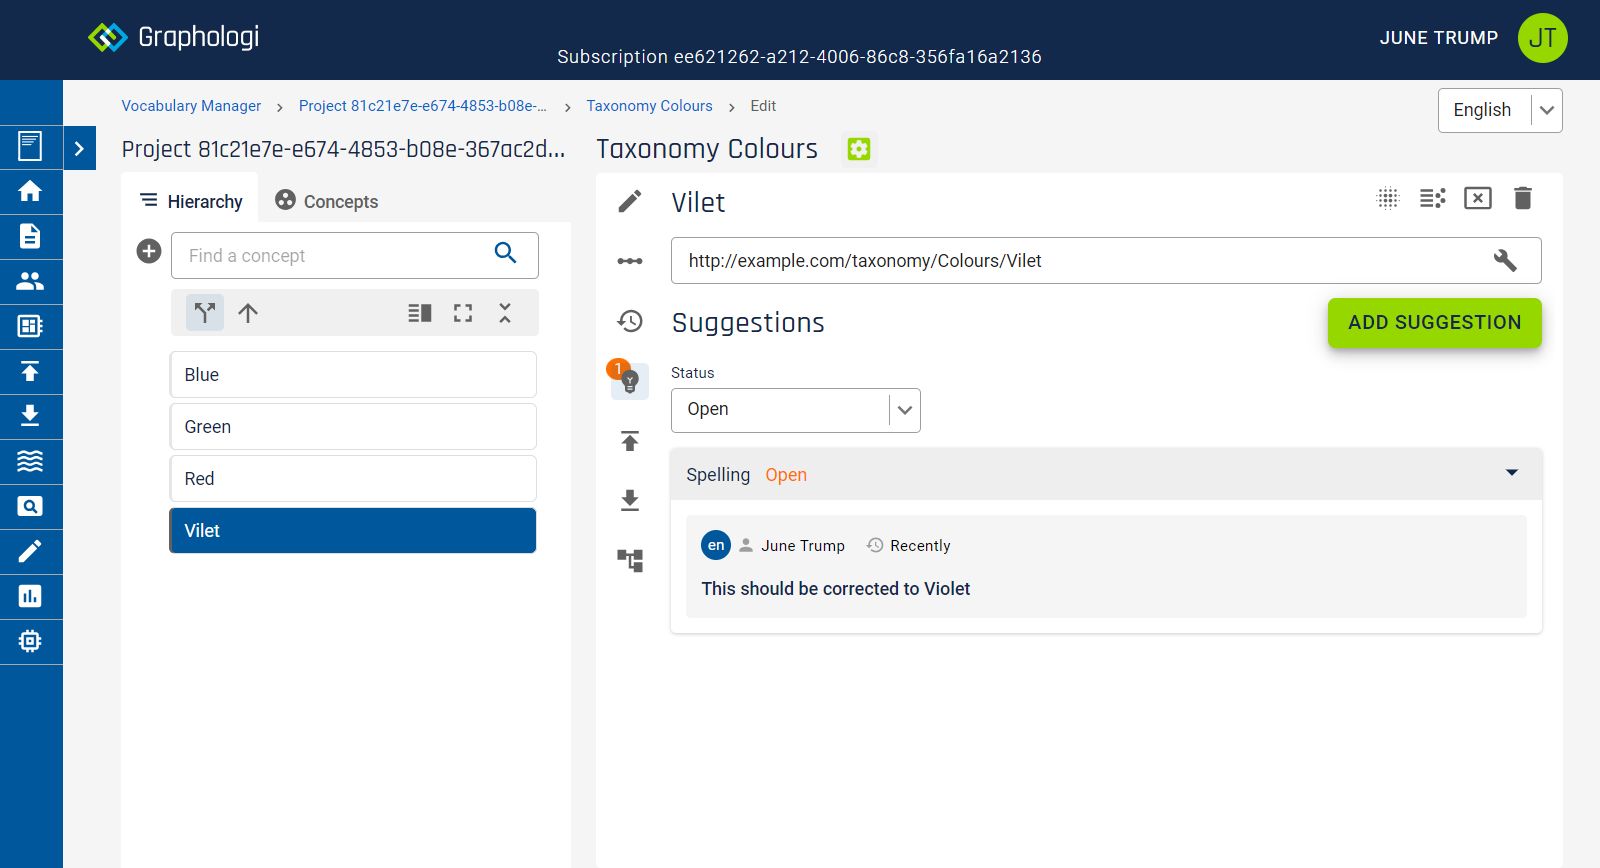
An example of a terminology suggestion might be something like `Change “Sexual Equality between Men and Women” to "gender equity"`.
A split, for example, might be something like `"Social Problems and Offences” should be split into "social issues", and "social crimes"`.
The Data Manager gives you the ability to create datasets of resources. If you also wish to use the Ontology Manager then you can also further enhance your datasets with additional relationships and classes, creating an even more semantically rich knowledge graph.
A dataset in Data Manager can consist of any number of resources, although we recommend a maximum of 100,000 per dataset.
Multiple languages are supported. The languages available to a dataset are controlled by the project setup.
Many features for datasets work exactly the same as for taxonomies and so in this section you may see links to the relevant section on taxonomies for more details.
When creating a new dataset you will be presented with a dialog box as below:
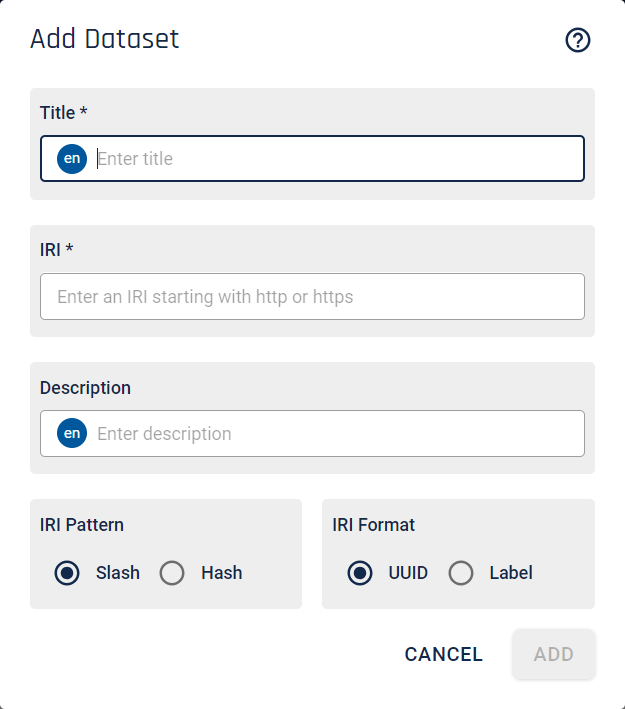
A new dataset requires various pieces of data to be completed. Enter a title for your dataset. The language for the title will be the default project language. Languages in Data Manager are generally indicated as follows, with a circle containing a BCP-47 language code.
A dataset needs an IRI (Internationalised Resource Identifier). For those not familiar with IRIs they are essentially the same as URIs, which are similar to URLs. IRIs can contain characters from Unicode that are not available to use in URIs. Note that codepoints in the RTL ranges currently need to be escaped.
The IRI for a dataset must be unique within all the data stored in a project. If the IRI you have entered is unique you will see a confirmatory tick.
IRIs for datasets tend to be in one of two forms - called slash or hash. Slash IRIs are those such as http://example.com/cars/bugattichiron whilst hash IRIs are those such as http://example.com/cars#bugattichiron. Whichever you pick this will generally mean the dataset IRI would be one of the following forms: http://example.com/cars or http://example.com/cars/ or http://example.com/cars#. There is no right or wrong decision whichever option you choose.
Each IRI for a resource within a dataset will be generated by the application. However, the form of those IRIs can be controlled in part by selecting either UUID or label forms. Both have their own benefits. UUIDs are free from any language implications and can also remain applicable if, say, the label needs to change. However, label forms tend to be more readable, at least in the default language. The examples above are of the label form.
Once a dataset is created there are further IRI options available. See the section Dataset detail for more information.
Finally, you can optionally add a description for your dataset.
Click to add the dataset. You will see your dataset added to the list similarly to the image below:
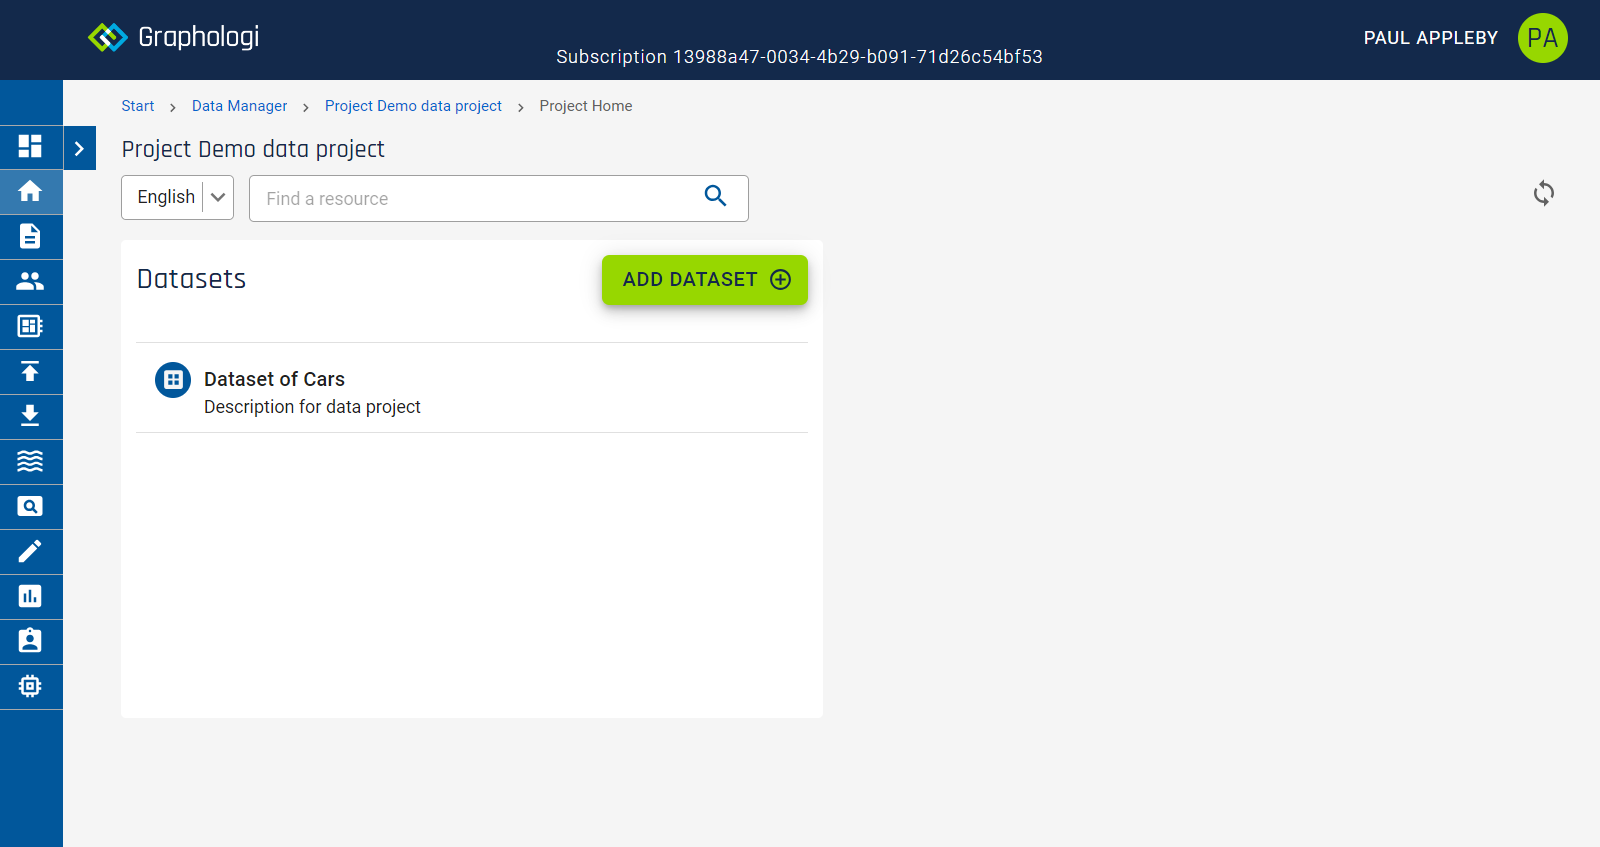
When a dataset is no longer needed you can delete it.
To delete a dataset click on the ![]() icon for it as in the image below.
icon for it as in the image below.
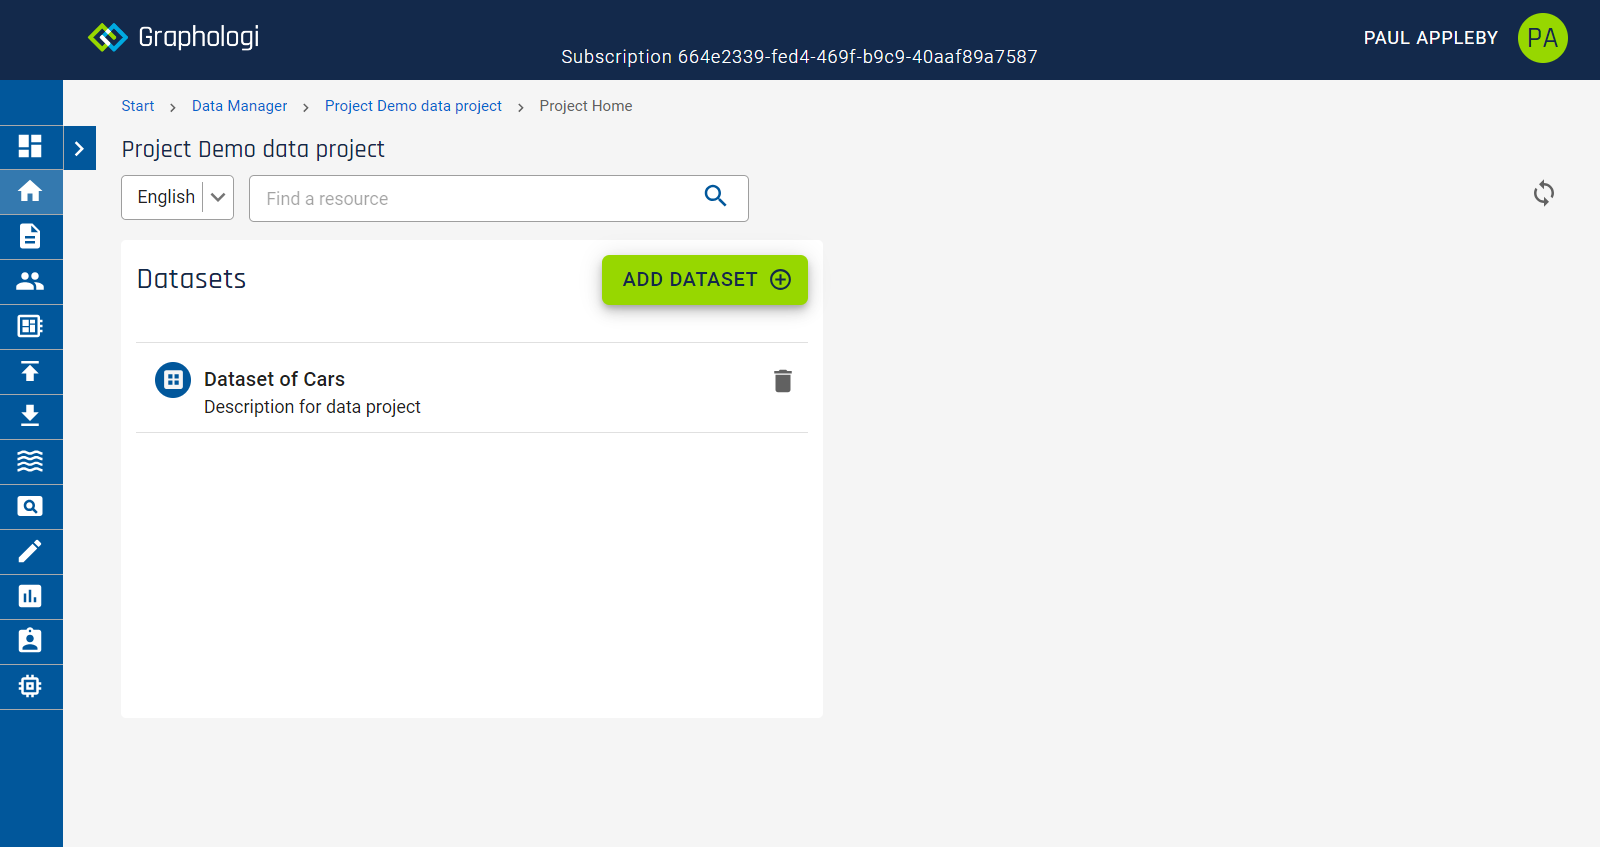
You will be presented with the following dialog.
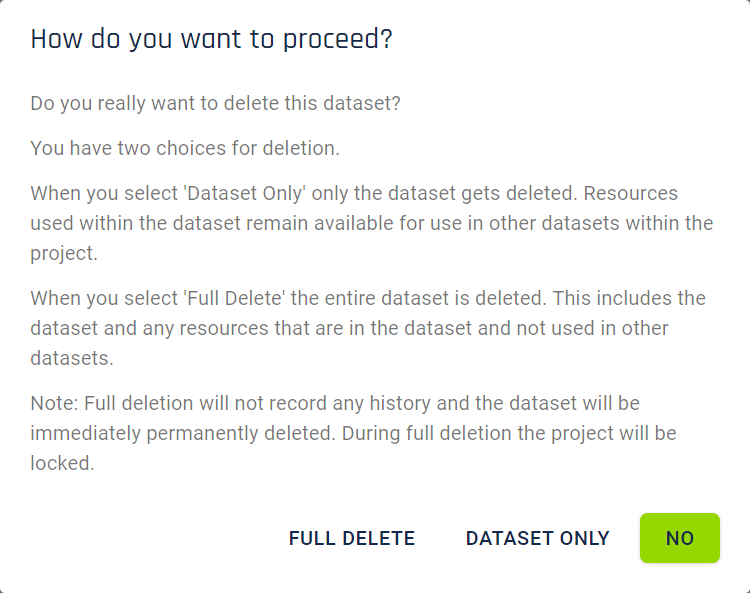
The 'Full Delete' option will delete the dataset resource and any resources that are not used by another dataset.
The 'Dataset Only' option will only delete the dataset resource. Any resources that are not used by another dataset will become floating resources.
Whilst deletion is happening the project will be locked to stop other activity by other users. This is necessary due to the possible interconnections between data. For very large datasets this process may take some time.
When you first create a dataset and start to edit it you will be presented with a screen as below:
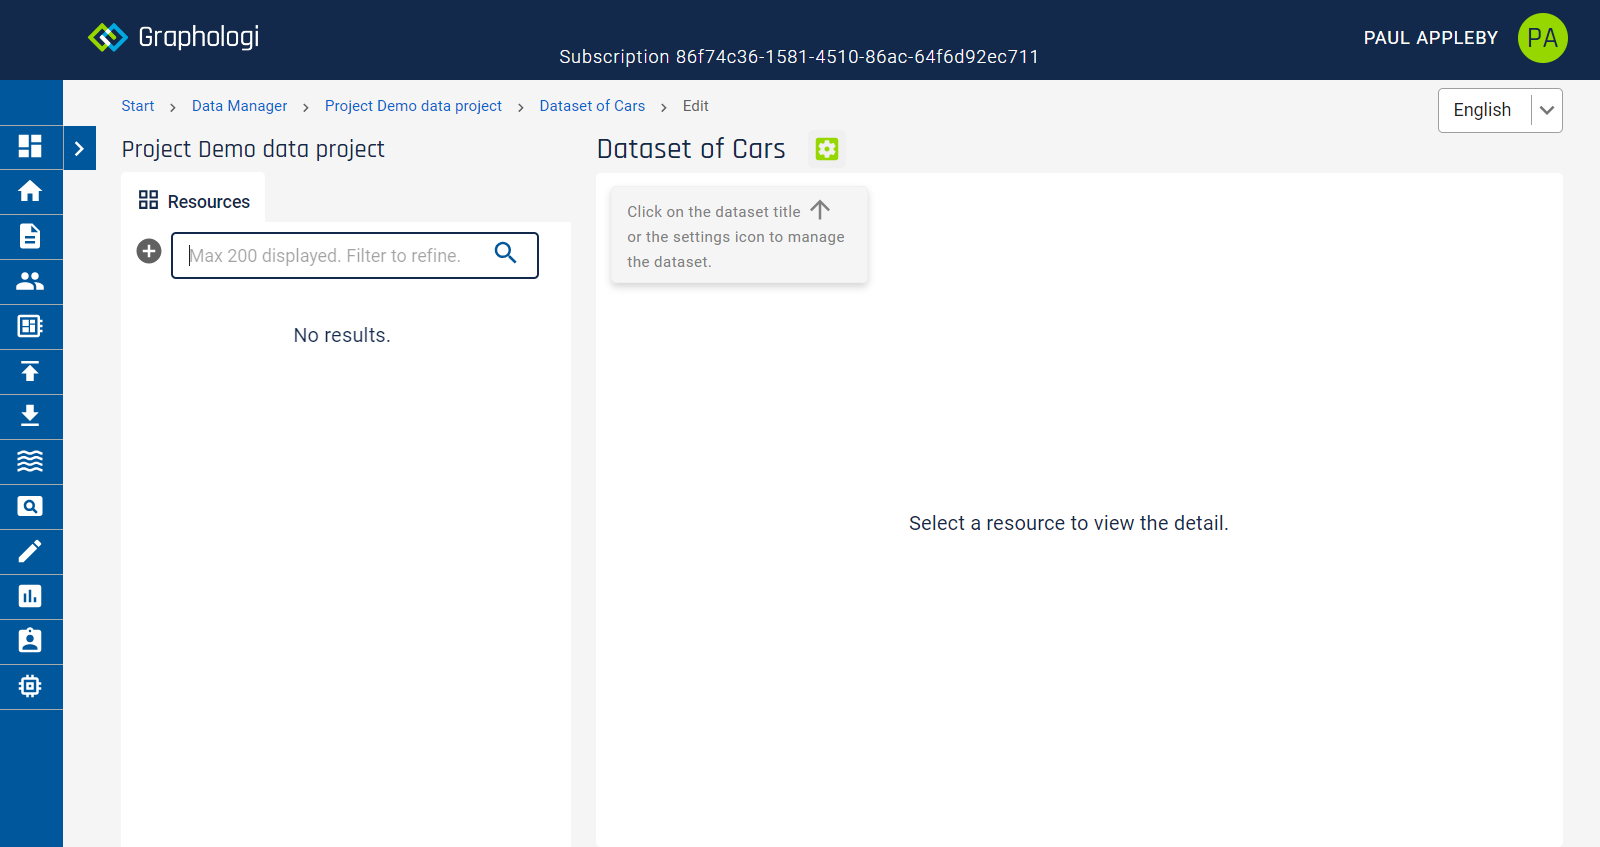
Resources shows a filtered set of the resources in the dataset.

For projects using multiple languages it can be useful to switch the viewing language. This can be done using the language selector at the top right of the screen.
This controls various aspects of the editor. The resource list will reflect the language, as will the search and for certain dialog boxes the language will default to the viewing language.
If text in the viewing language is not available the view will try and use the default project language. Where the viewing language is not available the screen will highlight items in orange to indicate this information is not available.
Please see the section Linked taxonomy projects in relation to taxonomies for more information.
Please see the section Linked data in relation to taxonomies for details.
When you click on the down arrow next to the dataset title the management view will be available in a similar way to the following image.
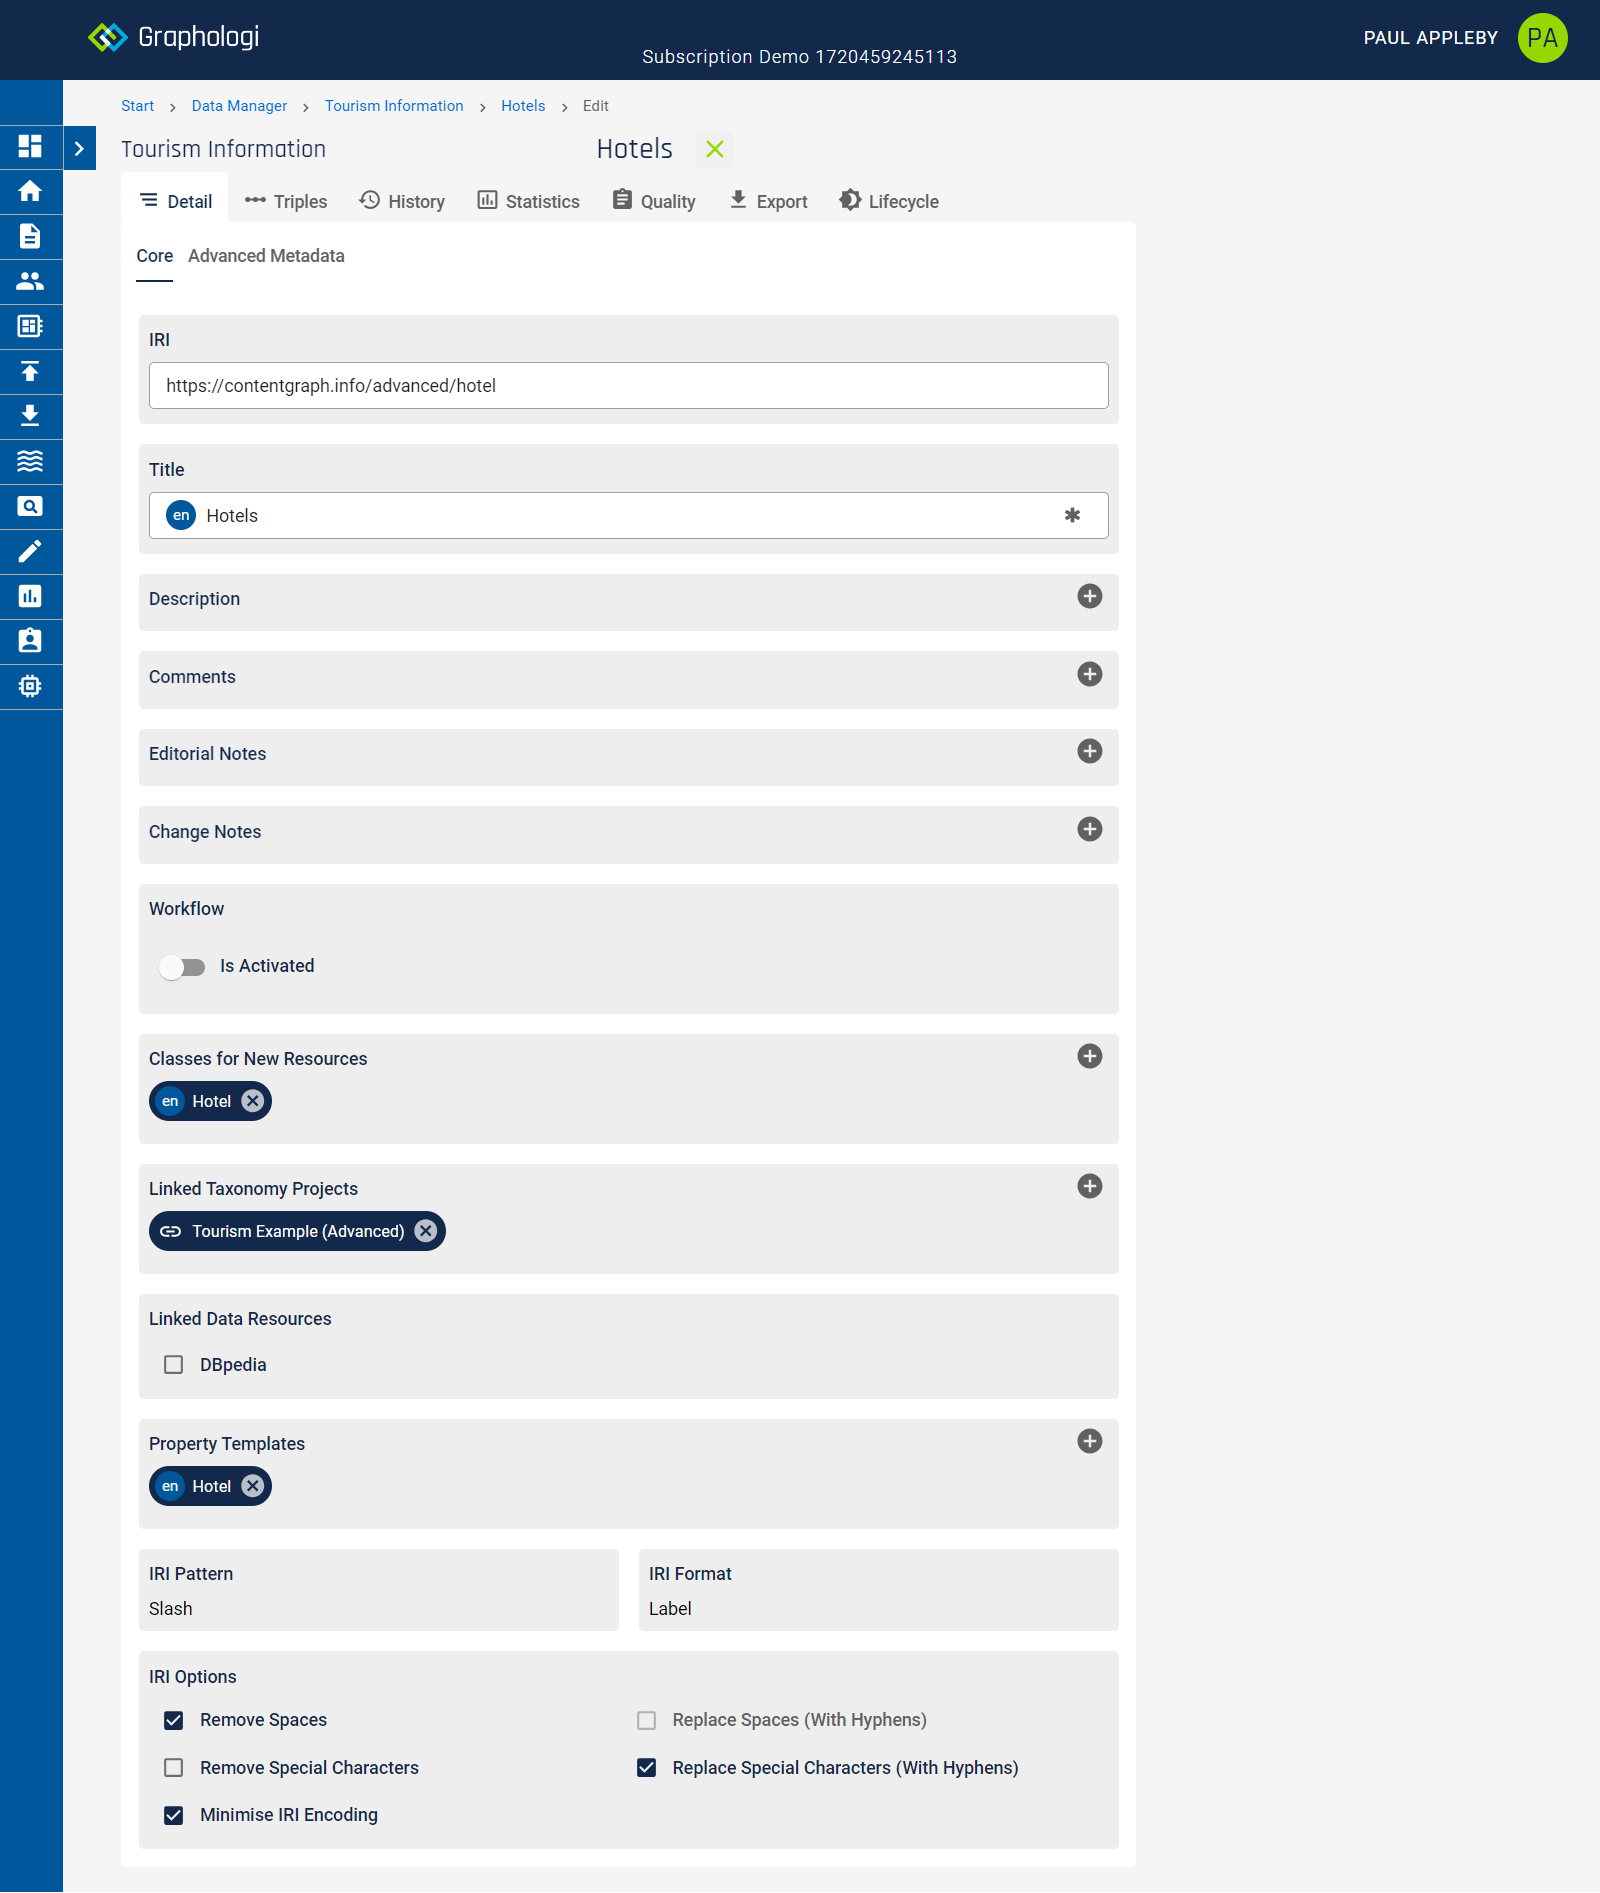
The various tabs allow you to do the following:
The options here are very similar to that for taxonomies. Please see the section Taxonomy detail for more information.
Display all of the triples that exist for the resource. Note that for imported data there may be additional data that shows up here that is not editable in the application. If there is data which is not editable there will be a ![]() icon for each row, allowing you to remove those triples.
icon for each row, allowing you to remove those triples.
This allows you to view all changes made to the dataset. (Note that history for each resource can also be viewed separately in the detail view for a resource.)
Within this view you can control the scope of history to show only changes to the dataset itself, or for all changes to resources related to the dataset.
For further details please see History in relation to taxonomies.
This displays resource counts for the dataset.
This runs a set of checks that cover various aspects of your data. Note that, in general, Graphologi will not permit actions that cause quality violations. However, the quality checks are there as a fallback to reinforce that.
It is possible to disable individual quality checks by clicking on the ![]() icon.
icon.
If you are using templates to enrich your datasets and those templates include constraints, such as cardinality constraints or regular expression matching, then you may want to run validation to check that resources are compliant with any applicable templates. Running validation checks all resources that are in the dataset.
Note that validation is only applied to resources.
Note that template patterns are validated using Javascript regexes when editing, whilst validation uses SPARQL based checking. For the most part these will give the same results. However, you should check that any regular expression is compatible with both Javascript and SPARQL.
Please note that this option is for exporting a particular component of a project. If you want to export an entire project please see the relevant section of the manual.
Exporting datasets is very similar to exporting taxonomies. Please see the section Export for more information.
What appears on the Lifecycle tab will depend upon whether workflow is activated or not. The 'Deprecated' tab will always appear. If workflow is activated additional tabs will be displayed. See Viewing concepts, labels or resources with particular statuses for more details.
When viewing a resource you will see a screen similar to that below.
There are a few notable things to point out.
To add a resource click on the ![]() icon on the left of the screen (or use the keyboard shortcut Alt+N). This will display the following dialog box:
icon on the left of the screen (or use the keyboard shortcut Alt+N). This will display the following dialog box:
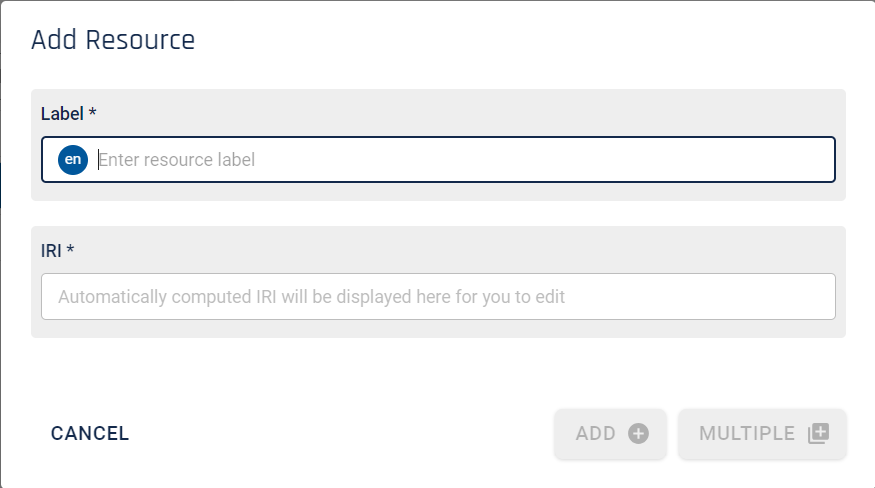
Enter a label. The language for the label will be the default project language. You can add additional labels in other languages, if configured, once the resource is created.
If you wish to edit the automatically generated IRI you can do so. The edited IRI must be unique within the project. Graphologi will not allow you to proceed until a unique IRI is entered.
To add the resource click . If you are entering a large amount of resources you can click (or use the keyboard shortcut Ctrl+Enter), which will add the resource and keep the dialog box open ready for you to add another resource.
The approach is similar to above but, as you type, suggested resources will appear similarly to the following image. If you have multiple datasets in your project you will have access to the resources in the other datasets when adding a resource. Further, you will also be able to make use of any free-floating resources within the project.
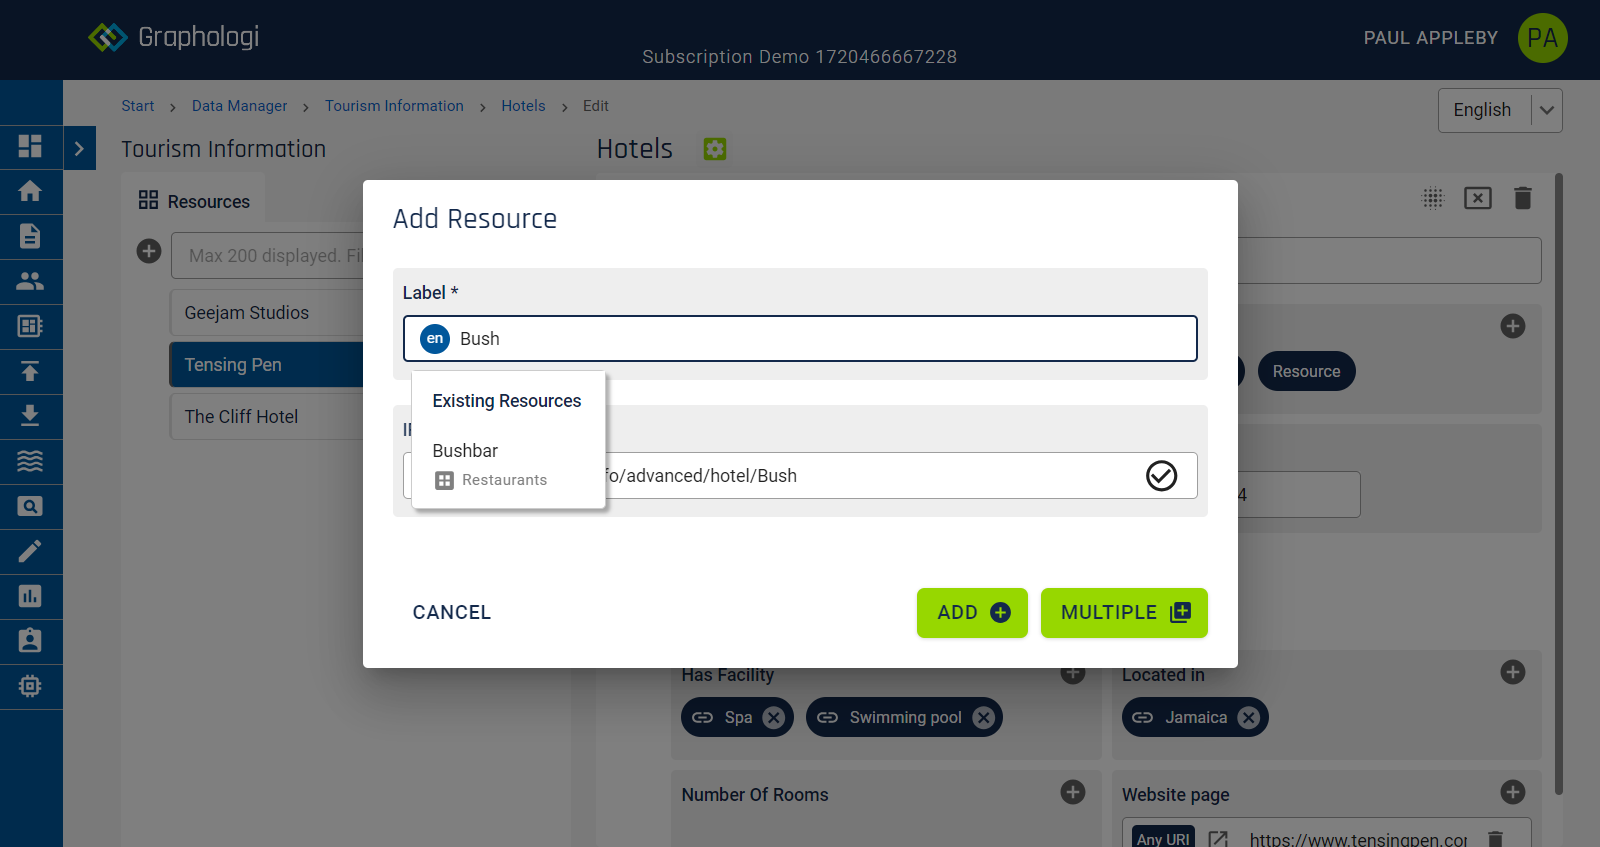
If you wish to use an existing resource click on it.
Even though suggestions may appear you can ignore them and create a new resource. There is the choice to reuse an existing resource (by clicking on it) or create a new resource by clicking .
Where a resource is reused from another dataset it will be added to the current dataset. This will mean that the resource is in two datasets.
It may be that over time certain resources become obsolete. However, if these resources have been used then their identifiers - IRIs - may need retaining. Deprecating a resource allows you to indicate that a resource should no longer be updated or used without removing it from a dataset.
To deprecate a resource click on the ![]() icon on the right of the screen.
icon on the right of the screen.
Deprecated resources can no longer be edited and new relationships to them can no longer be formed.
If you realise that a resource has been deprecated by mistake you can simply undeprecate it by clicking on the ![]() icon on the right of the screen.
icon on the right of the screen.
To delete a resource click on the ![]() icon on the right of the screen. Note that once a resource is deleted it cannot be reused.
icon on the right of the screen. Note that once a resource is deleted it cannot be reused.
To view the underlying triples for a resource click on the ![]() icon.
icon.
To view or download the details about the changes for a resource click on the ![]() icon.
icon.
Please see the relevant section in Vocabulary Manager for more details.
The Ontology Manager gives you the ability to create ontologies compliant with the OWL 2 W3 standard.
Graphologi is, for the most part, designed to work with OWL DL ontologies. However, there is an option to disable OWL DL mode and that will reveal some additional capabilities. Punning is also supported, but this is also an option that has to be enabled.
There are many levels of use of ontology, ranging from very simple to extremely large and complex. Therefore, by default, when creating ontologies in Graphologi it defaults to 'simple' view. To enable advanced features, such as restrictions, complex expressions, named individuals and custom datatypes, there is an advanced view that must be switched on in the ontology details screen.
Multiple languages are supported. The languages available to an ontology are controlled by the project setup.
To create an ontology you first need to create an ontology project as described in the section on projects.
A new ontology project will look similar to the following image.
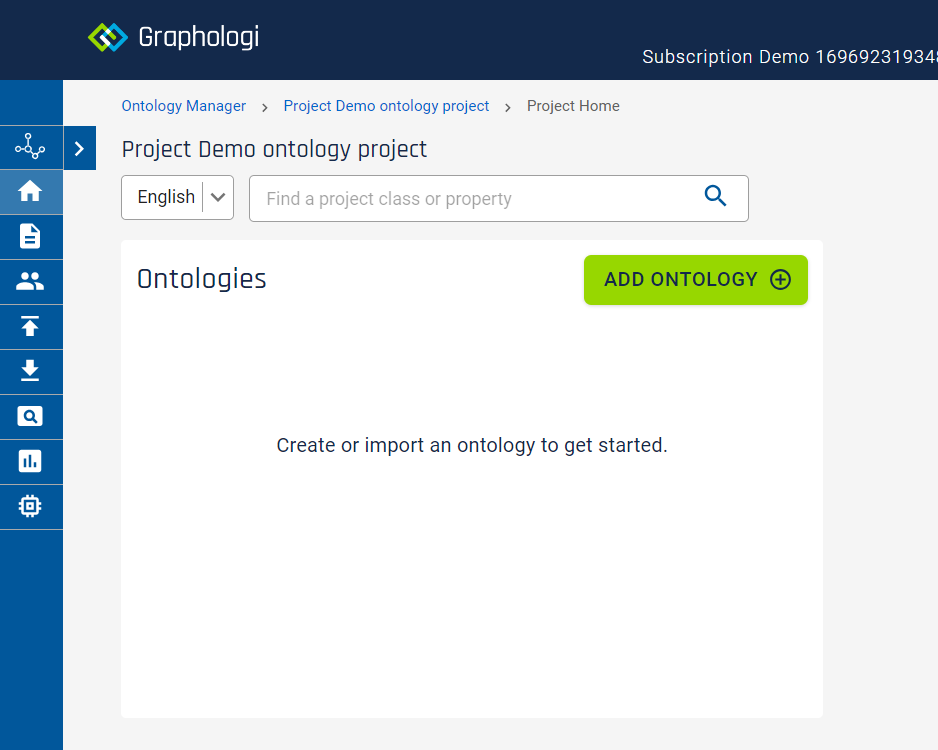
At this point you have two options - create an ontology within the application or import an existing ontology.
When creating a new ontology you will be presented with a dialog box as below:
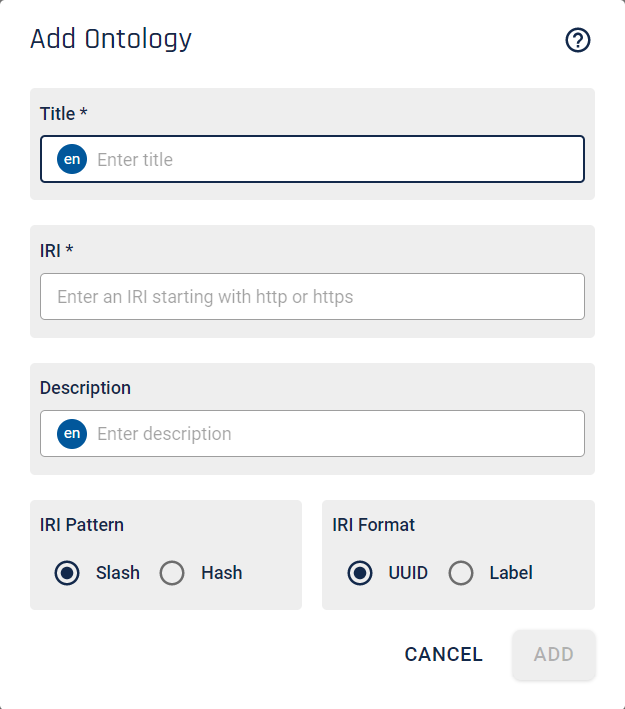
A new ontology requires various pieces of data to be completed. Enter a title for your ontology. The language for the title will be the default project language. Languages in Ontology Manager are generally indicated as follows, with a circle containing a BCP-47 language code.
An ontology needs an IRI (Internationalised Resource Identifier). For those not familiar with IRIs they are essentially the same as URIs, which are similar to URLs. IRIs can contain characters from Unicode that are not available to use in URIs. Note that codepoints in the RTL ranges currently need to be escaped.
The IRI for an ontology must be unique within all the data stored in a project. If the IRI you have entered is unique you will see a confirmatory tick.
IRIs for ontologies tend to be in one of two forms - called slash or hash. Slash IRIs are those such as http://example.com/cars/bugattichiron whilst hash IRIs are those such as http://example.com/cars#bugattichiron. Whichever you pick this will generally mean the ontology IRI would be one of the following forms: http://example.com/cars or http://example.com/cars/ or http://example.com/cars#. There is no right or wrong decision whichever option you choose.
Each IRI for a class or property will be generated by the application. However, the form of those IRIs can be controlled in part by selecting either UUID or label forms. Both have their own benefits. UUIDs are free from any language implications and can also remain applicable if, say, the label needs to change. However, label forms tend to be more readable, at least in the default language. The examples above are of the label form.
Once an ontology is created there are further IRI options available. See the section Detail for more details.
Finally, you can optionally add a description for your ontology.
Click to add the ontology. You will see your ontology added to the list similarly to the following image.
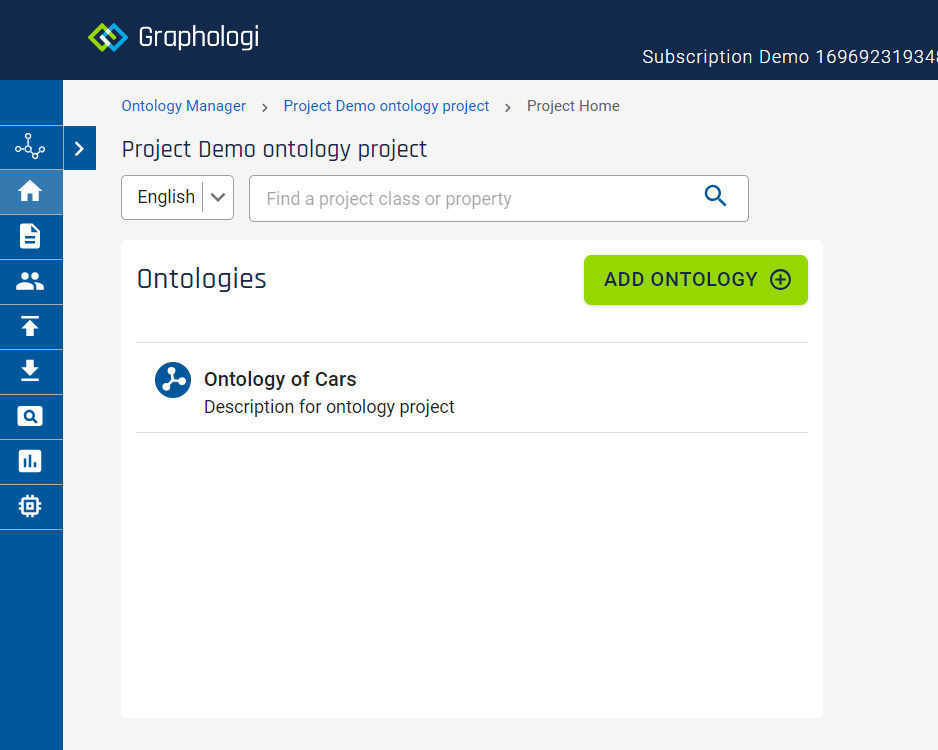
When an ontology is no longer needed you can delete it. This is not always quite as simple as it sounds from a data perspective. If an ontology has been used by other projects you need to consider the implications of deleting the ontology. The other projects will still work but any ontology classes or properties from the deleted ontology will be highlighted or disabled.
To delete an ontology hover over the entry and then click on the ![]() icon.
icon.
Note that, when you delete an ontology, all inbound links to it are also deleted.
When you first create an ontology and start to edit it you will be presented with a screen as below (which is the simple view):
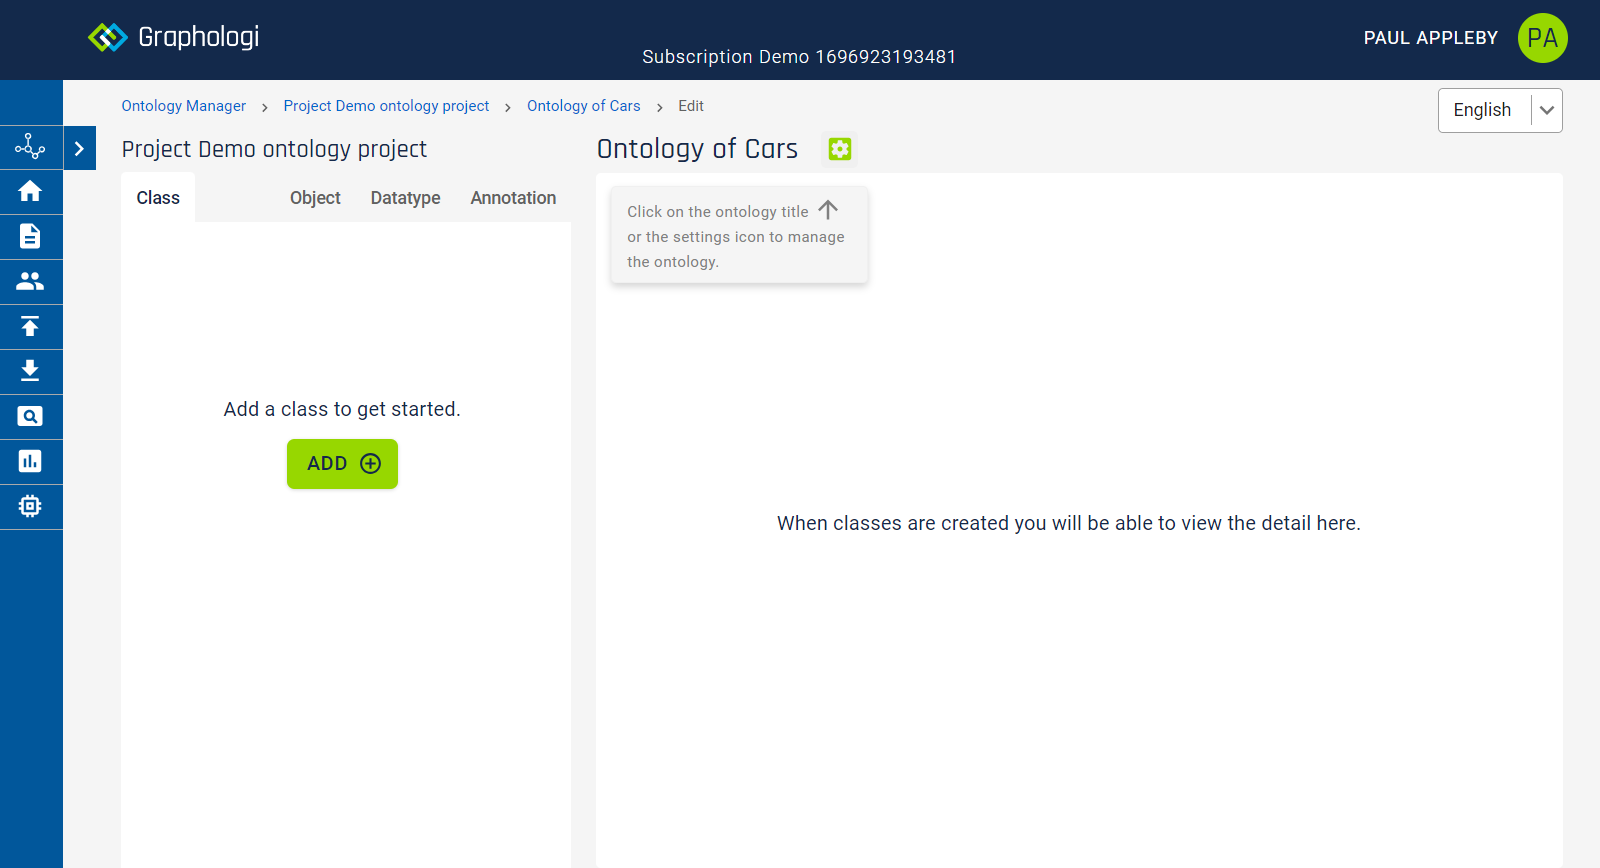
Let us start by explaining the various parts of the screen.
The class and property tree is displayed on the left of the screen. For a large ontology the tree may get very deep. An example of how a deep ontology looks is shown in the following image (note this is in advanced view mode).
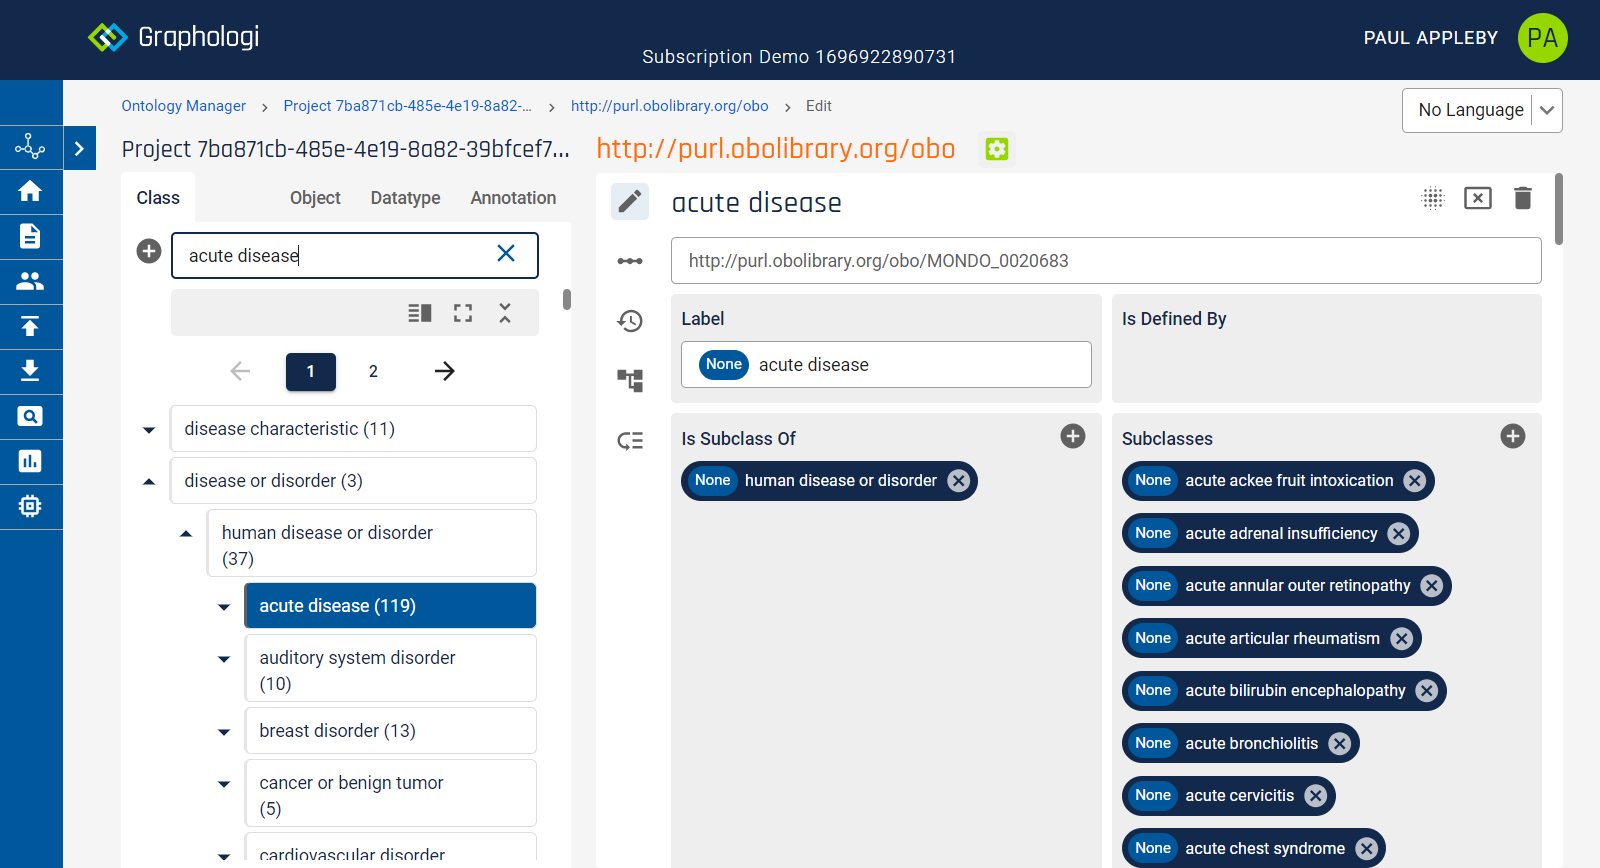
As ontologies get deep in terms of levels it can be difficult to remember the context of a node in the tree. To aid with understanding the context a summary of the hierarchy is shown when you hover over any node that is below a top node.
It may also be useful to adjust the display panels and there are various options to do this, which are accessed at the top of the tree.
If you have expanded the tree in multiple places and want to collapse it, you can do this by clicking on the ![]() icon.
icon.
For deep ontologies you may want to use more screen space to display the tree. The width can be altered by clicking on the ![]() icon. You can adjust the width up to three levels, after which the next click will return it to normal width.
icon. You can adjust the width up to three levels, after which the next click will return it to normal width.
Sometimes it is easier to work with just the tree in view to simplify the display. To do this click on the ![]() icon. To return to the normal view click the icon again.
icon. To return to the normal view click the icon again.
For situations where an ontology has a large number of classes or properties at any level in the tree Graphologi will start paging these parts of the tree to help keep the user interface responsive. You can navigate between the pages by using the page number or the previous and next page icons.
These tabs are Classes, Object Properties, Datatype Properties, Annotation Properties, Named Individuals and Datatypes.
Depending upon how an ontology is imported into Graphologi you may see panels for 'Document Source' or '(View) In Ontology'. The 'Document Source' will be relevant when document based import is used and a resource is referenced in more than one document. In this scenario a resource will be 'part of' all the ontologies in the documents in which it occurred and the '(View) In Ontology' panel shows which ontologies the resource can be found in. Clicking on the relevant ontology will take you to that resource in that ontology.
For projects using multiple languages it can be useful to switch the viewing language. This can be done using the language selector at the top right of the screen.
This controls various aspects of the editor. The hierarchy will reflect the language, as will the search and for certain dialog boxes the language will default to the viewing language.
If text in the viewing language is not available the view will try and use the default project language. Where the viewing language is not available the screen will highlight items in orange to indicate this information is not available.
When you click on the down arrow next to the ontology title the management view will be available in a similar way to the following image.
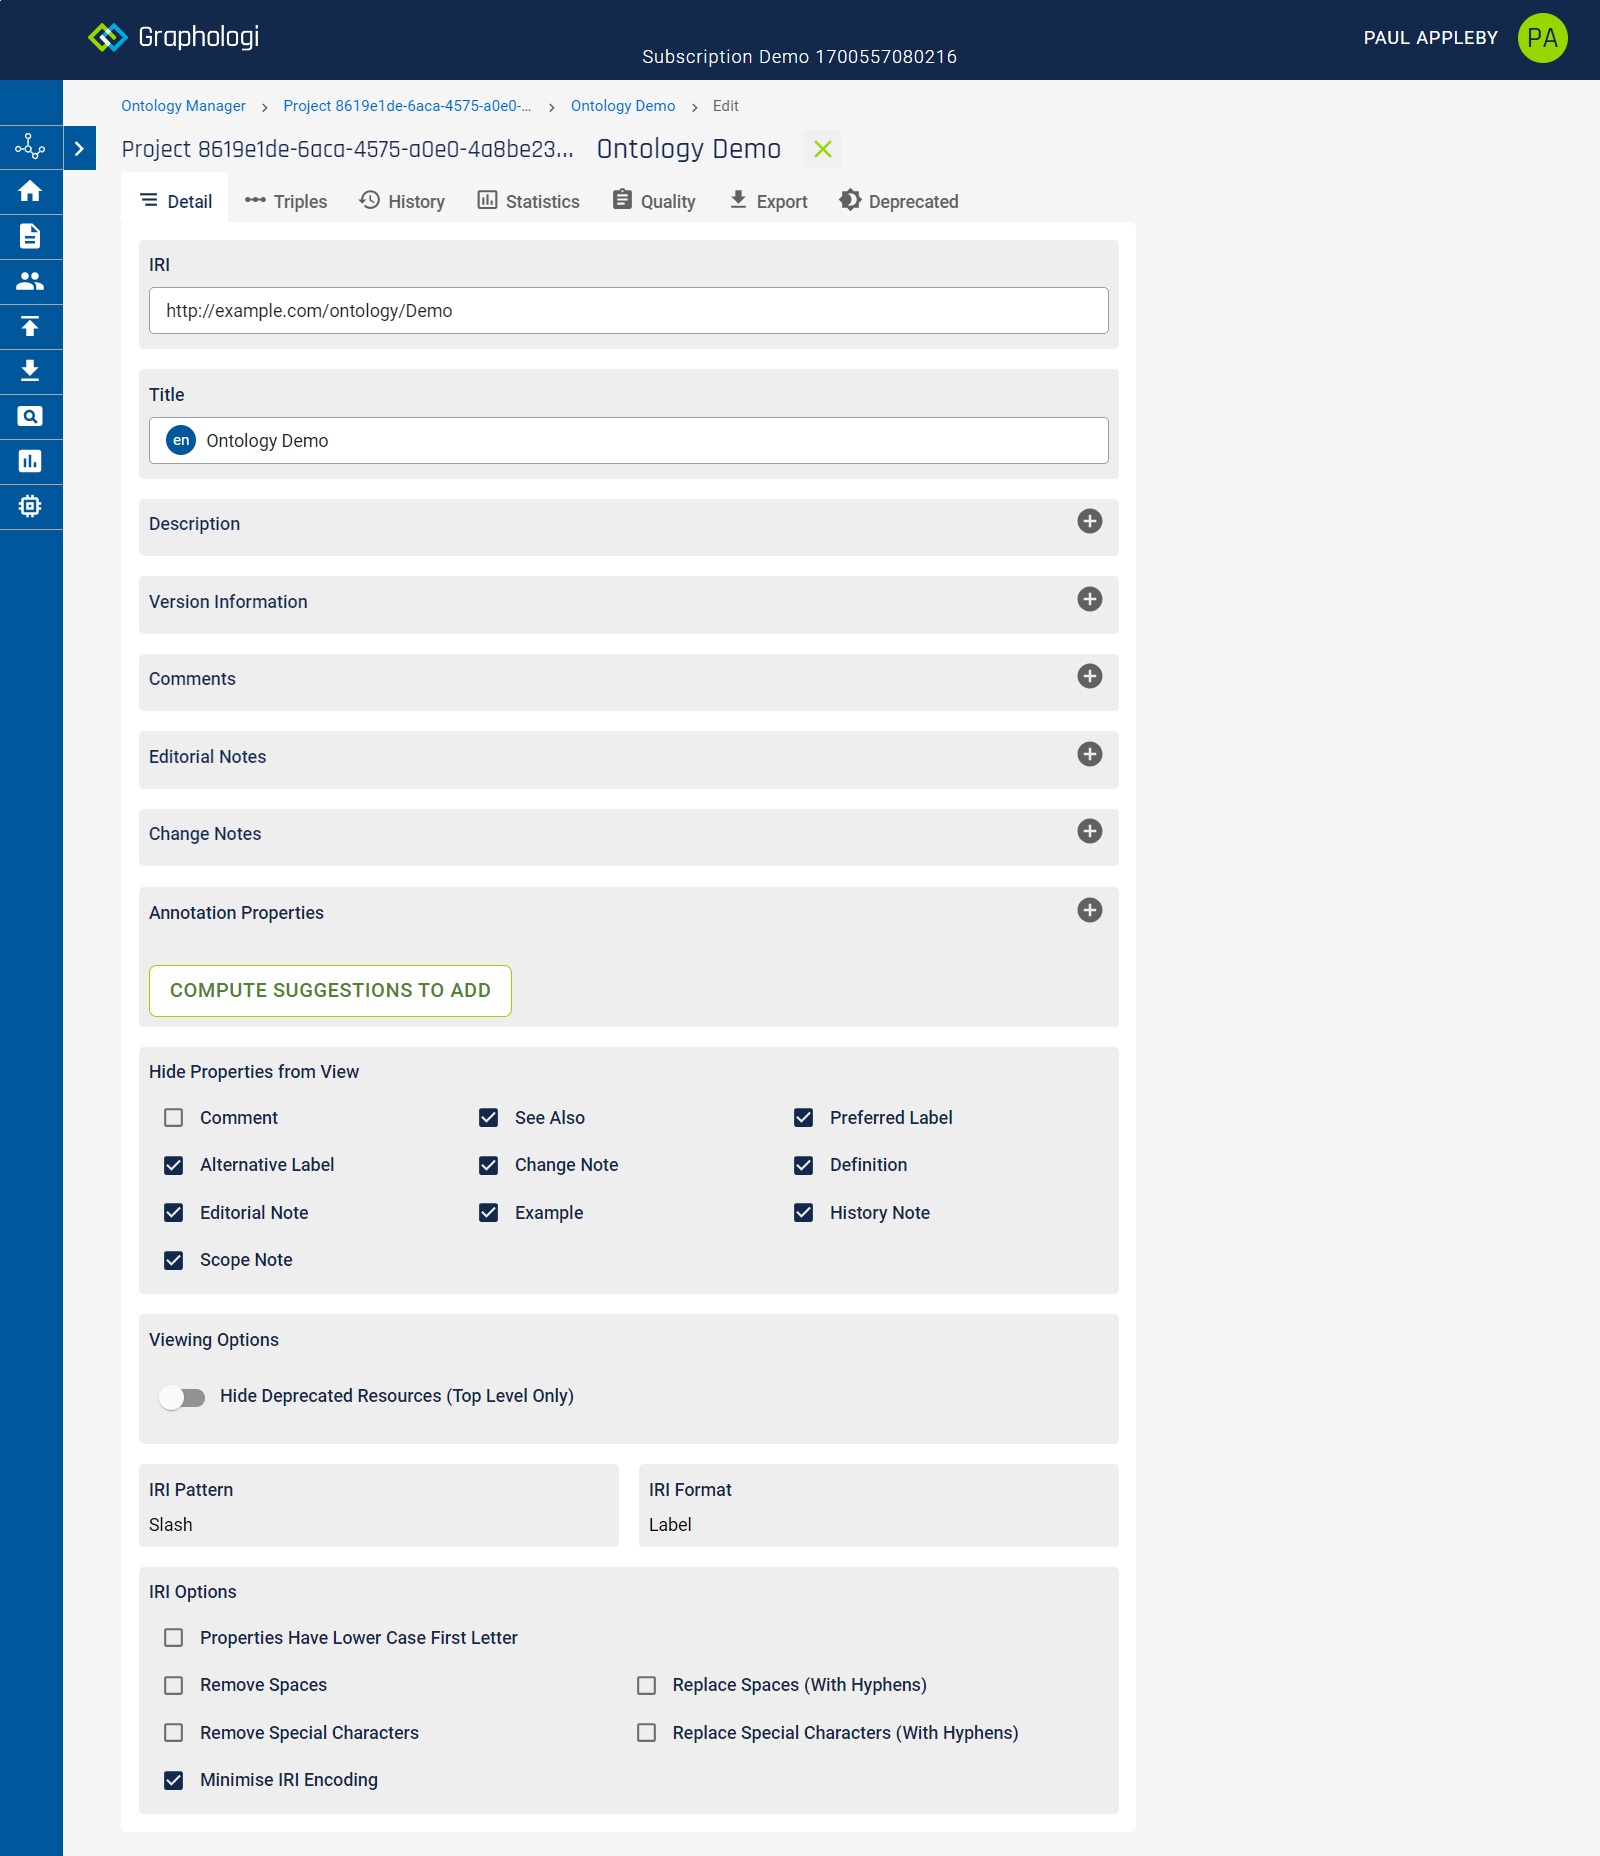
The various tabs allow you to do the following:
You can edit the title and description of the ontology. You can add additional titles and descriptions in any of the project languages. The title in the default language cannot be removed.
You can also add additional information, such as version information, comments and notes.
For more information on using annotation properties with an ontology please see Selecting annotation properties.
If you wish to display (or hide) additional properties, such as comments, see also, or SKOS annotations, you can control the display by checking or unchecking values in the 'Hide Properties from View' panel.
Some ontologies may have a lot of top level deprecated resources (e.g. OBO ontologies). This may lead to unwanted numbers of classes or properties being displayed and can slow down the display. You can hide top level deprecated resources by checking 'Hide Deprecated Resources (Top Level Only)' in the 'Viewing Options' panel. Note that for imported OBO ontologies this is set by default.
Be default Graphologi is in 'simple' view with OWL DL mode enabled for ontologies. You can enable advanced view, turn off OWL DL mode and enable punning in the 'Editing Options' panel.
Note the IRI of the ontology, the slash/hash pattern option and the IRI format option are fixed once an ontology is created and cannot be edited.
Graphologi will set the default IRI options for an ontology when you create it. However, sometimes you may want more control over the creation of IRIs.
In the 'IRI Options' panel you can adjust the following for label based IRIs:
Display all of the triples that exist for the resource. Note that for imported data there may be additional data that shows up here that is not editable in the application.
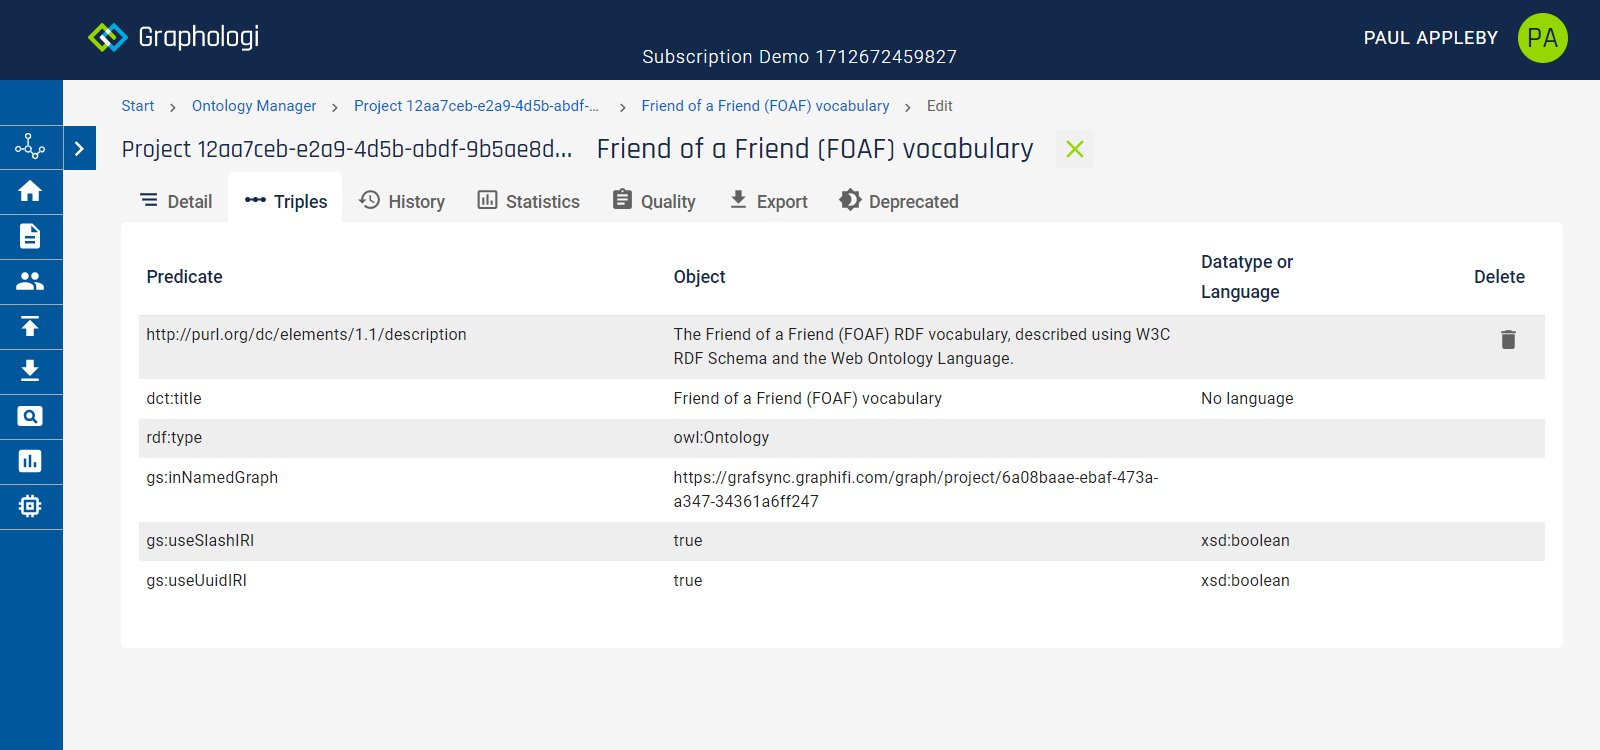
This allows you to view all changes made to the ontology. (Note that history for each class and property can also be viewed separately in the detail view for that resource.)
Within this view you can control the scope of history to show only changes to the ontology resource itself, or for all changes to resources related to the ontology.
You can refine the details of what is shown by a date range and by a user. To filter by date simply select the start and end dates that you wish to see using the 'Date Range' filter. To view history only for a particular user select that user.
The history view contains a lot of detail, which can make it difficult to view easily on smaller screens. You can reduce the number of columns displayed by clicking on the ![]() icon and selecting those columns that you wish to view.
icon and selecting those columns that you wish to view.
History can also be downloaded in either TSV or JSON format by clicking on the button and selecting the required format. The filters on date range and user also apply to any downloads.
This displays class, property, named individual and datatype counts. A typical example output is shown below.
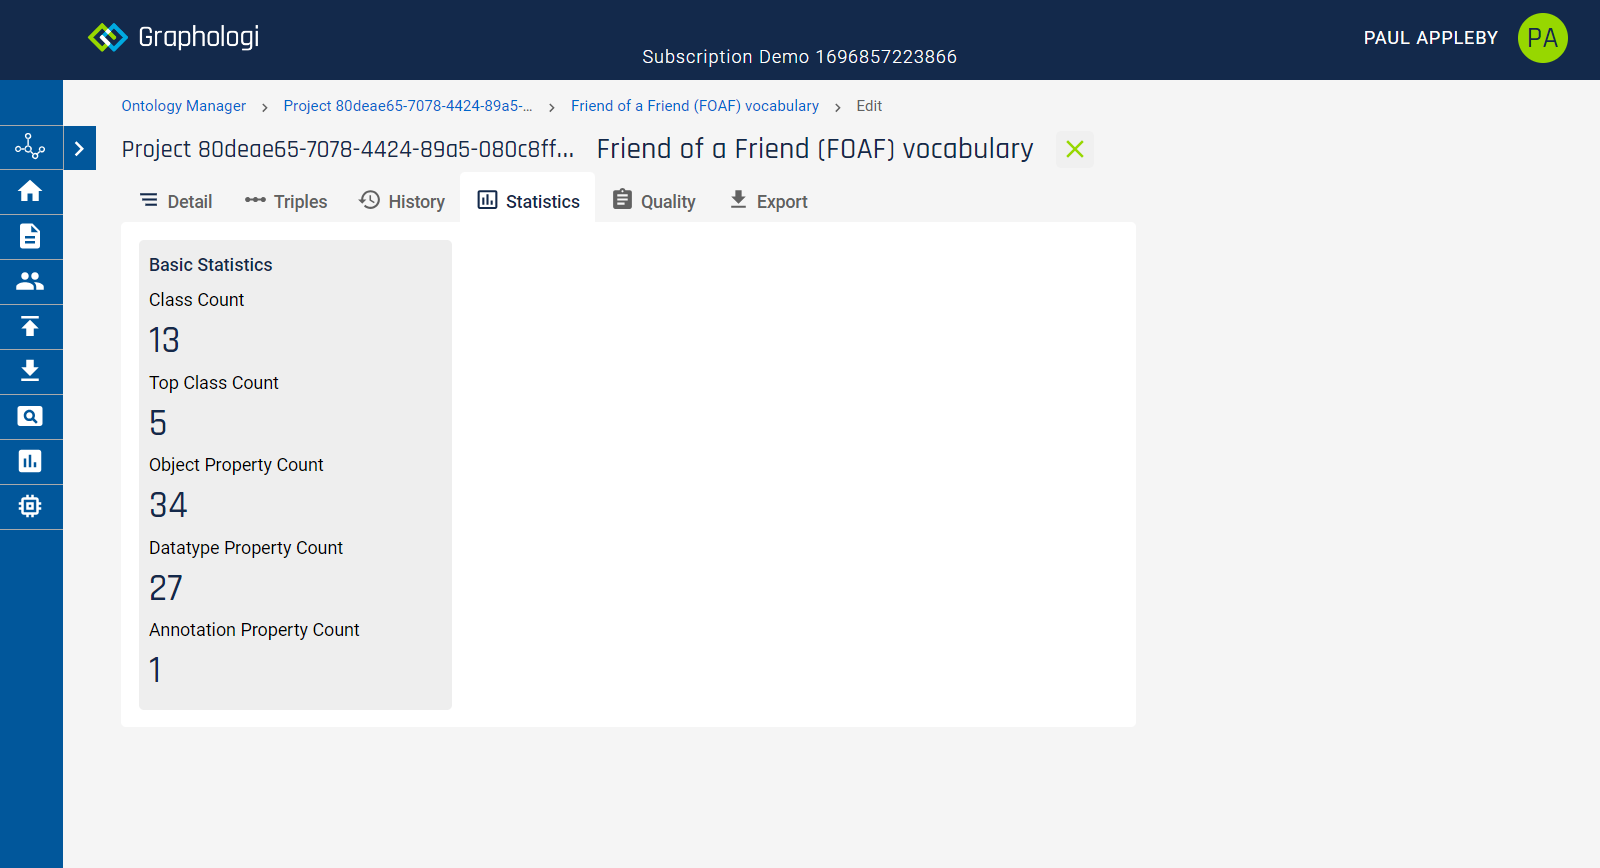
This runs a set of checks that cover various aspects that are generally accepted as not desirable in an ontology. Note that, in general, Graphologi will attempt to not permit actions that cause quality violations. However, the quality checks are there as a fallback to reinforce that.
Where there are quality issues they will be presented similarly to the following image.
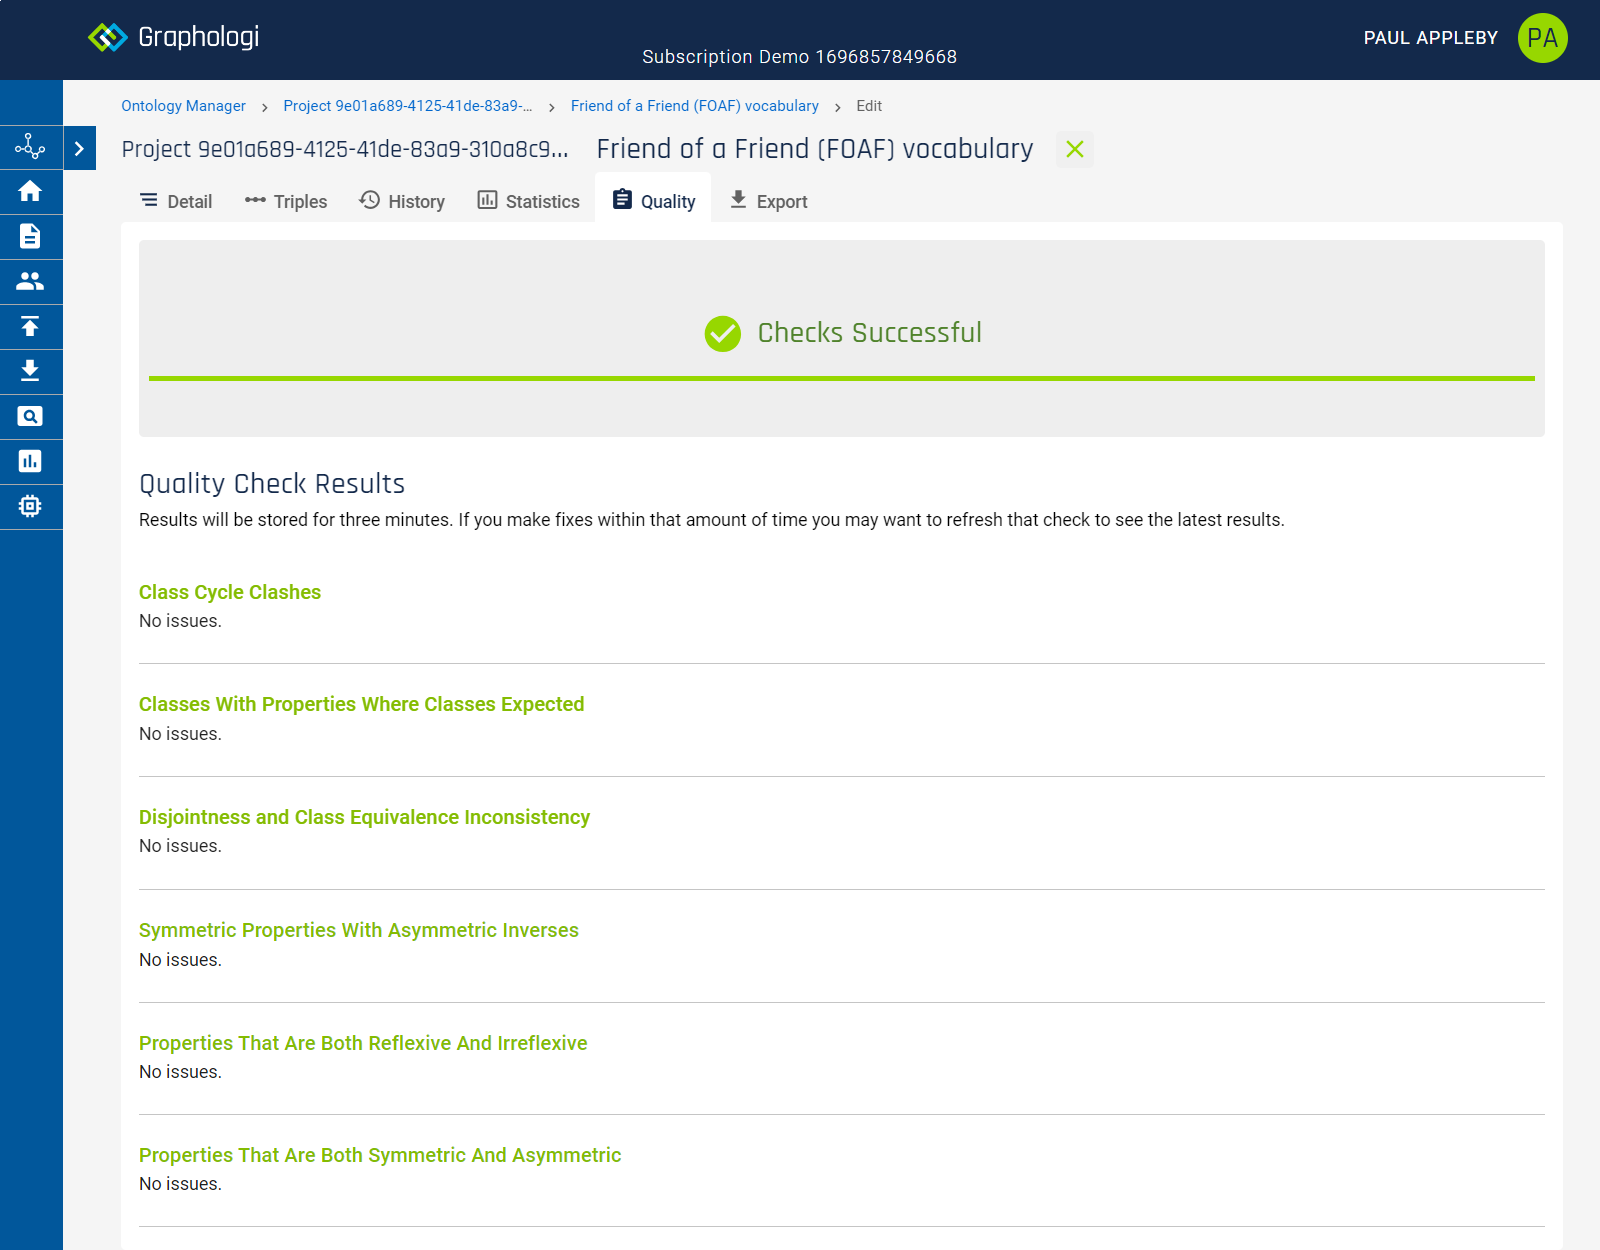
It is possible to disable individual quality checks by clicking on the ![]() icon.
icon.
Please note that this option is for exporting a particular component of a project. If you want to export an entire project please see the relevant section of the manual.
When exporting an ontology you can select from one of two choices. The first is to 'Download Data', which includes some system properties used by Graphologi to manage the ontology. This might include information that is useful to you, such as revision numbers.
If you want a clean export without any Graphologi specific data then select 'Clean Download'.
The export allows you to choose from various RDF serialisations.
This displays a list of all deprecated resources, which you can filter by label name, language and resource type. Note that links to resources will show in orange. You can click on a resource to go to the detailed view for it.
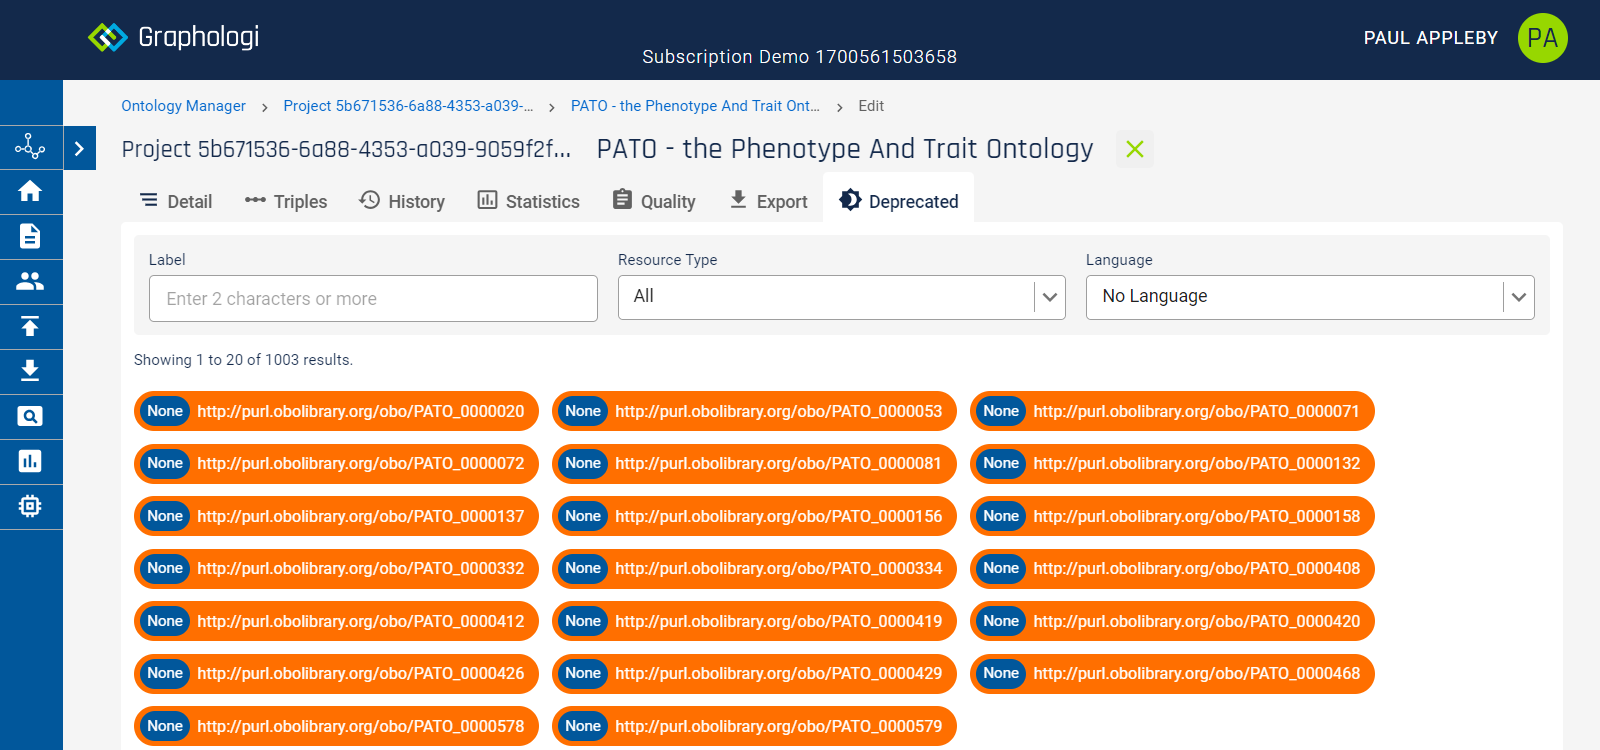
Within Ontology Manager a class is an OWL Class. When viewing a class you will see a screen similar to that below. If you are in advanced view you will see additional icons.
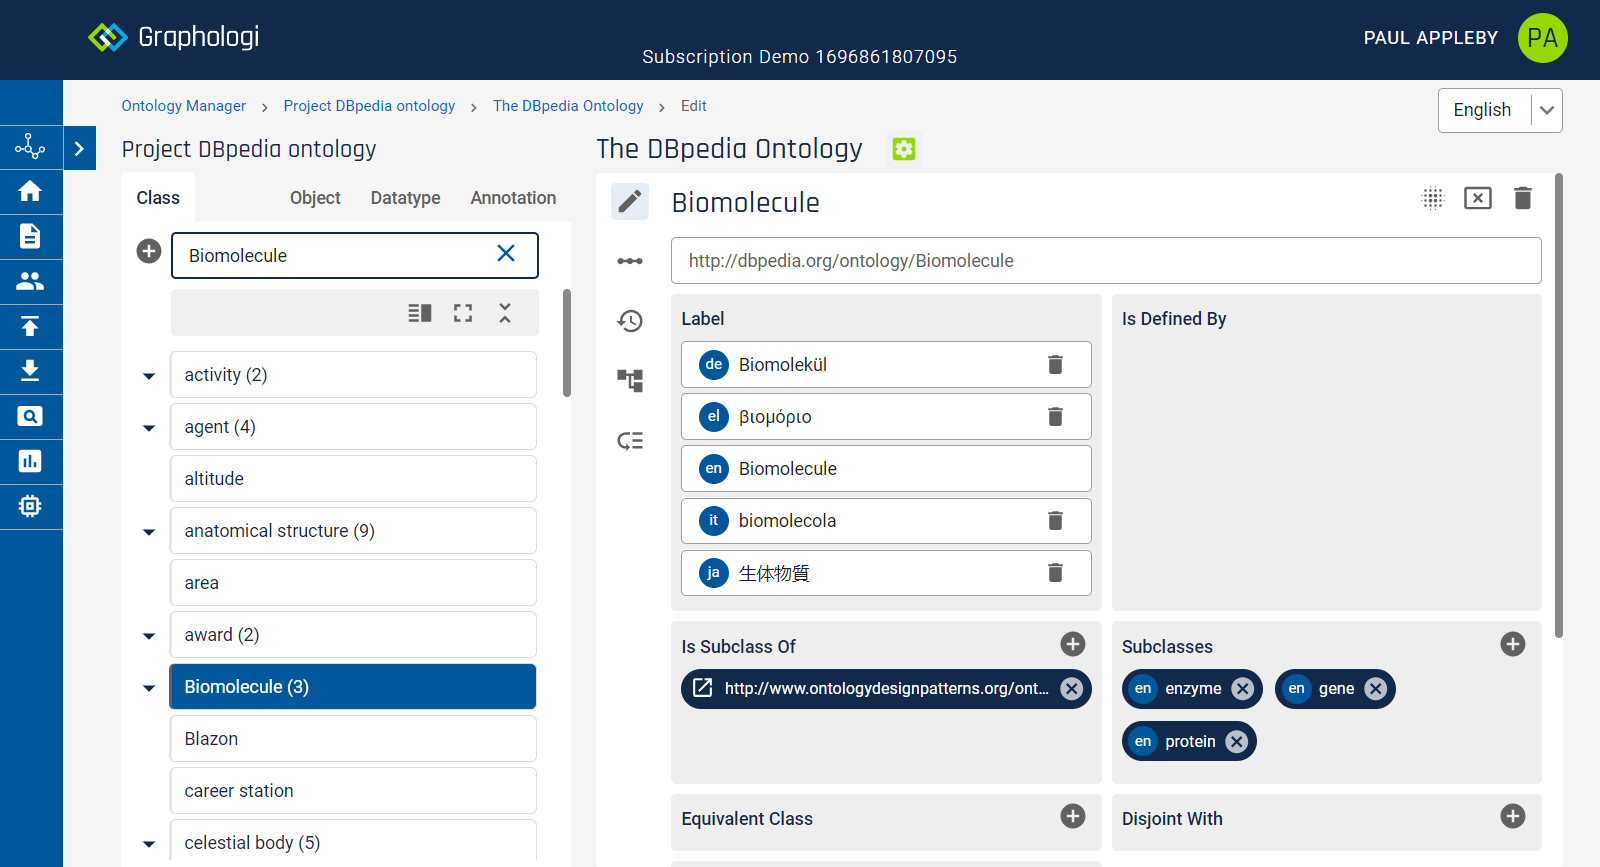
There are a few notable things to point out.
To add a top level class click on the ![]() icon on the left of the screen (or use the keyboard shortcut Alt+N). This will display the following dialog box:
icon on the left of the screen (or use the keyboard shortcut Alt+N). This will display the following dialog box:
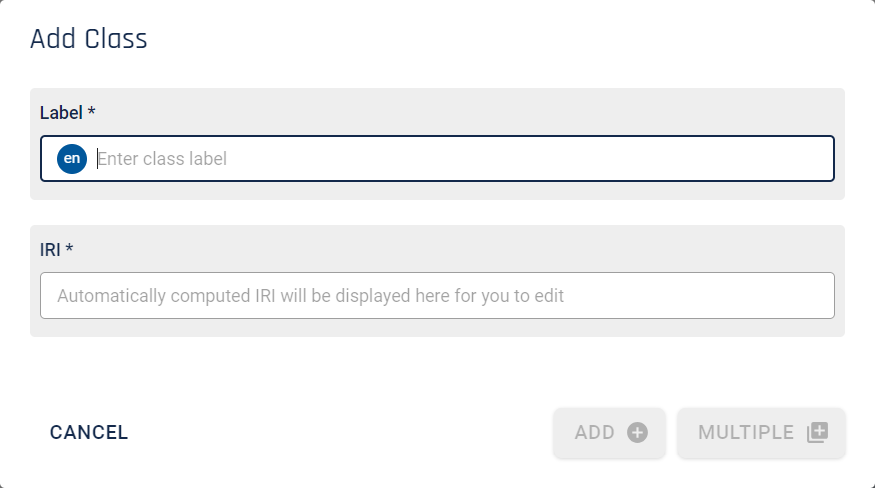
Enter a label. The language for the label will be the default project language. You can add additional labels in other languages, if configured, once the class is created.
If you wish to edit the automatically generated IRI for a class you can do so. The edited IRI must be unique within the project. Graphologi will not allow you to proceed until a unique IRI is entered.
To add the class click . If you are entering a large number of classes you can click (or use the keyboard shortcut Ctrl+Enter), which will add the button and keep the dialog box open ready for you to add another class.
Adding a subclass can be done in one of three ways. The first is by hovering over the class label in the hierarchy view. This will display icons for breaking a link to the ontology or superclass and adding a subclass as in the following image. Click on the ![]() icon. You will see the same dialog box as above.
icon. You will see the same dialog box as above.

Alternatively, you can drag classes from the hierarchy on to the 'Is Subclass Of' panel on the right of the screen.
Finally, you can add subclasses via the ![]() icon in the 'Is subclass of' panel or the 'Subclasses' panel, depending upon which direction the subclass relationship is in. This is shown in the following image.
icon in the 'Is subclass of' panel or the 'Subclasses' panel, depending upon which direction the subclass relationship is in. This is shown in the following image.
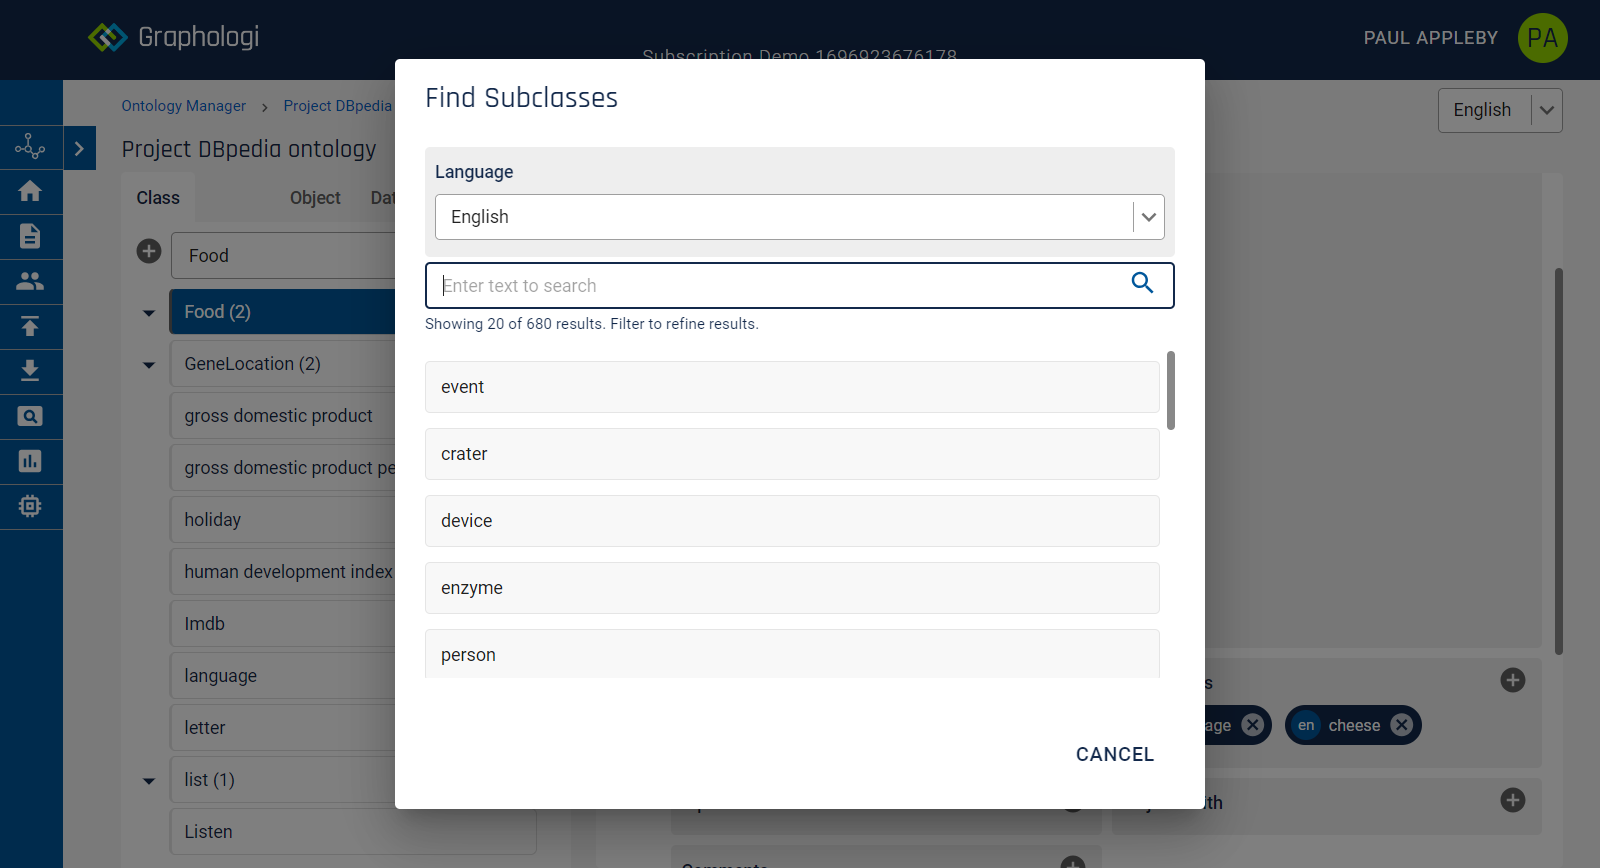
If you have multiple ontologies in your project you can include classes from any of those ontologies as a subclass.
You can also directly enter external IRIs for subclasses. Simply type in the IRI and if it is valid you can add it.
To remove a class, either at the top level or a lower level, click on the ![]() icon. Alternatively, for subclasses, you can click on the cross in a class's label in the appropriate panel on the right. Note that breaking the link does not delete the class, even if not used anywhere else. The class will still be available to use.
icon. Alternatively, for subclasses, you can click on the cross in a class's label in the appropriate panel on the right. Note that breaking the link does not delete the class, even if not used anywhere else. The class will still be available to use.
It may be that over time certain classes become obsolete. However, if these classes have been used then their identifiers - IRIs - may need retaining. Deprecating a class allows you to indicate that it should no longer be updated or used without actually removing it from an ontology.
To deprecate a class click on the ![]() icon on the right of the screen.
icon on the right of the screen.
Deprecated classes can no longer be edited and new relationships to them can no longer be formed.
If you realise that a class has been deprecated by mistake you can simply undeprecate it by clicking on the ![]() icon on the right of the screen.
icon on the right of the screen.
To delete a class click on the ![]() icon on the right of the screen.
icon on the right of the screen.
To change a label click into the text and start editing. If your label is acceptable, a ![]() icon will be shown on the right of the field. Click to confirm the change.
icon will be shown on the right of the field. Click to confirm the change.
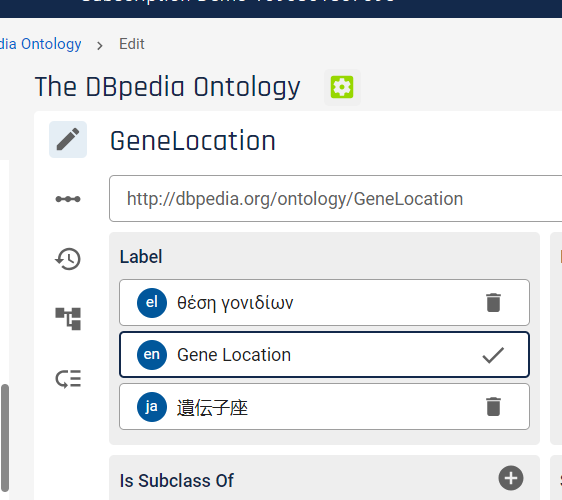
To abandon a change simply click away from the field.
If there is no is defined by value you can make a class defined by the ontology you are viewing by clicking on the ![]() icon in the 'Is Defined By' panel.
icon in the 'Is Defined By' panel.
You can define a class as disjoint with other classes. Click on the ![]() icon in the 'Disjoint With' panel.
icon in the 'Disjoint With' panel.
Adding a disjoint class can be done in two ways. You can drag classes from the hierarchy on to the 'Disjoint With' panel on the right of the screen. Alternatively, you can add classes via the ![]() icon in the 'Disjoint With' panel.
icon in the 'Disjoint With' panel.
Please note that although you can add disjoint classes Graphologi does not guarantee the consistency and checks will only catch issues in certain scenarios. We will look at adding additional consistency checks in future versions. We recommend running the quality checks as an additional validation if required.
You can also directly enter external IRIs for disjoint classes. Simply type in the IRI and if it is valid you can add it.
You can define a class as equivalent to other classes. Click on the ![]() icon in the 'Equivalent Class' panel.
icon in the 'Equivalent Class' panel.
Adding an equivalent class can be done in two ways. You can drag classes from the hierarchy on to the 'Equivalent Class' panel on the right of the screen. Alternatively, you can add classes via the ![]() icon in the 'Equivalent Class' panel.
icon in the 'Equivalent Class' panel.
You can also directly enter external IRIs for equivalent classes. Simply type in the IRI and if it is valid you can add it.
You can define a class as the disjoint union of other classes. Click on the ![]() icon in the 'Disjoint Union Of' panel.
icon in the 'Disjoint Union Of' panel.
You can add classes via the ![]() icon in the 'Disjoint Union Of' panel. Note that, for disjoint union of to be necessary, there should be at least two classes selected.
icon in the 'Disjoint Union Of' panel. Note that, for disjoint union of to be necessary, there should be at least two classes selected.
Punning is an advanced OWL idea where the same IRI can represent both a named individual and a class at the same time. OWL DL in OWL 2 supports this idea. However, it should be used with caution as it can potentially be confusing.
To set a named individual to be punned click the ![]() icon towards the top right of the screen.
icon towards the top right of the screen.
To use punning it needs to be turned on in the ontology details screen.
To view how a class fits into the hierarchical structure of the project click on the ![]() icon. This displays the paths down to a class as well as some statistics about the position of the class. For polyhierarchical class structures this can be very useful to see the different locations of a class.
icon. This displays the paths down to a class as well as some statistics about the position of the class. For polyhierarchical class structures this can be very useful to see the different locations of a class.

You can 'jump' to a particular location in the hierarchy on the left by clicking the corresponding chip in the positioning view.
It can be useful to see which properties are connected to a class via certain relationships. This is especially true for domain and range, which are relationships that are inbound to a class (i.e. from the property to the class). To view this information click on the ![]() icon.
icon.
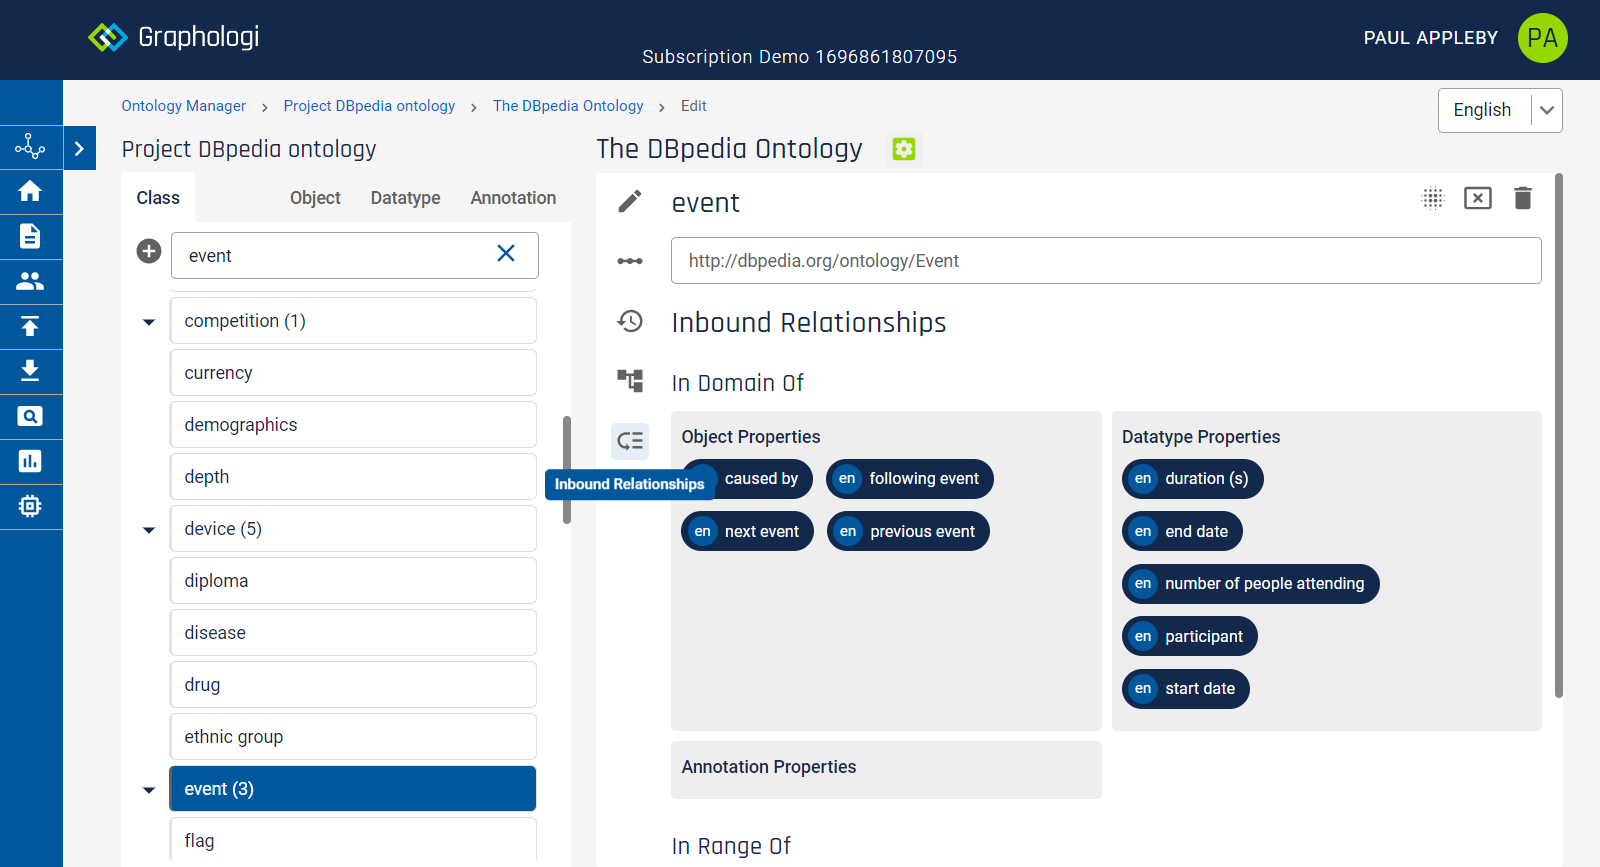
Similarly to a concept you can also view the underlying class triples or its history of changes by clicking on the appropriate icon.
There are a few notable things to point out.
To add a top level property select the appropriate property tab for the type of property you want to add click the ![]() icon on the left of the screen (or use the keyboard shortcut Alt+N). This will display the following dialog box:
icon on the left of the screen (or use the keyboard shortcut Alt+N). This will display the following dialog box:
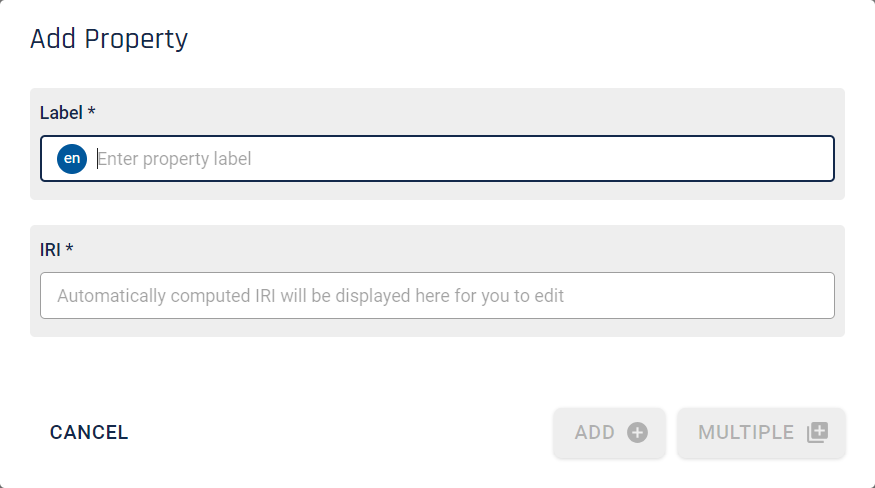
Enter a label. The language for the label will be the default project language. You can add additional labels in other languages, if configured, once the property is created.
If you wish to edit the automatically generated IRI for a property you can do so. The edited IRI must be unique within the project. Graphologi will not allow you to proceed until a unique IRI is entered.
To add the property click . If you are entering a large amount of properties you can click (or use the keyboard shortcut Ctrl+Enter), which will add the button and keep the dialog box open ready for you to add another property.
Object and datatype properties allow subproperties. Adding a subproperty can be done in one of two ways. The first is by hovering over the property label in the hierarchy view. This will display icons for breaking a link and adding a subproperty as in the following image. Click on the ![]() icon. You will see the same dialog box as above.
icon. You will see the same dialog box as above.
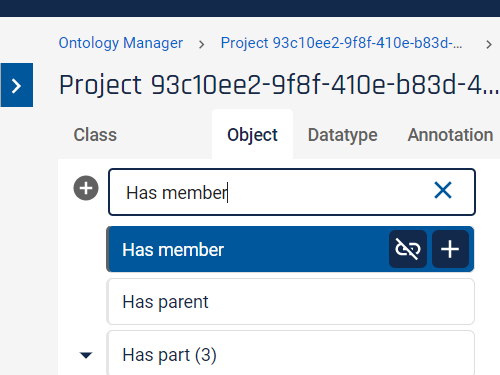
Alternatively you can drag properties from the hierarchy on to the 'Is Subproperty Of' or 'Subproperties' panel on the right of the screen, depending on which direction the subproperty relation holds.
If you have multiple ontologies in your project you can include properties from any of those ontologies as a subproperty.
To remove a property, either at the top level or a lower level, click on the ![]() icon. Alternatively, for subproperties you can click on the cross in a label in the 'Is Subproperty Of' panel. Note that breaking the link does not delete the property, even if not used anywhere else. The property will still be available to use.
icon. Alternatively, for subproperties you can click on the cross in a label in the 'Is Subproperty Of' panel. Note that breaking the link does not delete the property, even if not used anywhere else. The property will still be available to use.
It may be that over time certain properties become obsolete. However, if these properties have been used then their identifiers - IRIs - may need retaining. Deprecating a property allows you to indicate that it should no longer be updated or used without actually removing it from an ontology.
To deprecate a property click on the ![]() icon on the right of the screen.
icon on the right of the screen.
Deprecated properties can no longer be edited and new relationships to them can no longer be formed.
If you realise that a property has been deprecated by mistake you can simply undeprecate it by clicking on the ![]() icon on the right of the screen.
icon on the right of the screen.
To delete a property click on the ![]() icon on the right of the screen.
icon on the right of the screen.
Within Ontology Manager an object property is an OWL ObjectProperty.
If there is no is defined by value you can make a property defined by the ontology you are viewing by clicking on the ![]() icon in the 'Is Defined By' panel.
icon in the 'Is Defined By' panel.
To add an inverse click on the ![]() icon in the 'Inverses' panel. This will display a dialog box where you can start to type the label of the inverse property that you wish to add. A list of matching properties will be displayed. Click on the one that you want to add.
icon in the 'Inverses' panel. This will display a dialog box where you can start to type the label of the inverse property that you wish to add. A list of matching properties will be displayed. Click on the one that you want to add.
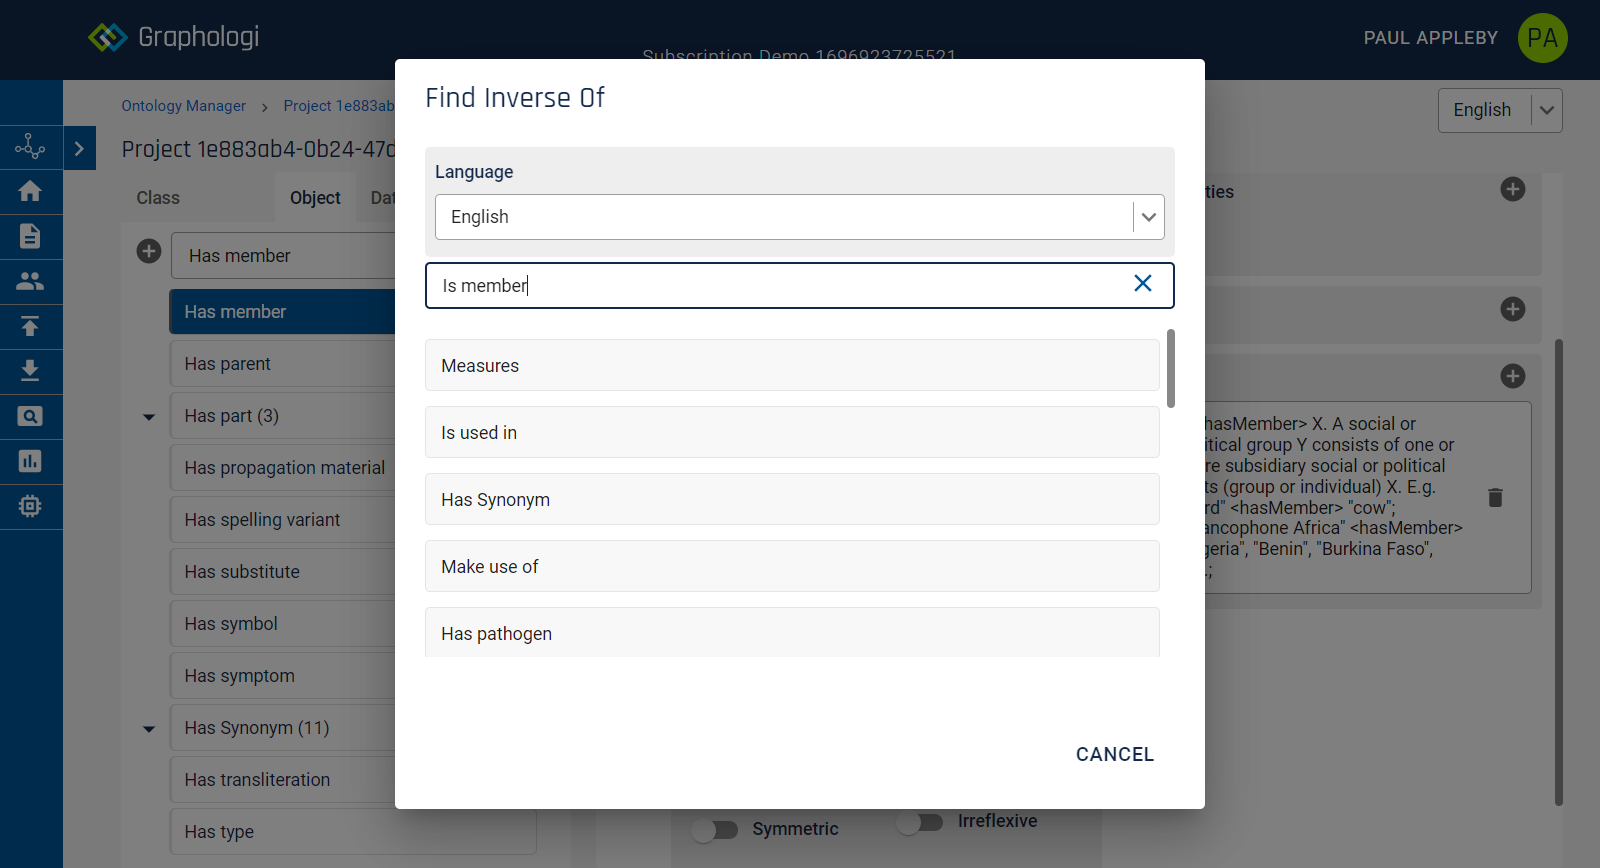
Note that Graphologi automatically computes inverse relationships. By adding the inverse statement to one object property the inverse property will also be given an inverse statement in the opposite direction. Also, by defining an inverse, whenever that property is used in Graphologi (i.e. on a concept) it will automatically compute the inverse in the other direction.
To add a domain or range click on the ![]() icon in the appropriate panel.
icon in the appropriate panel.
This will display a dialog box where you can start to type the label of the class that you want to add. A list of matching classes will be displayed. Click on the one that you want to add.
To add an equivalent property click on the ![]() icon in the 'Equivalent Property' panel.
icon in the 'Equivalent Property' panel.
This will display a dialog box where you can start to type the label of the property that you want to add. A list of matching properties will be displayed. Click on the one that you want to add.
To add a disjoint property click on the ![]() icon in the 'Disjoint With' panel.
icon in the 'Disjoint With' panel.
This will display a dialog box where you can start to type the label of the property that you want to add. A list of matching properties will be displayed. Click on the one that you want to add.
To add a chain click on the ![]() icon in the 'Property Chain Axiom' panel.
icon in the 'Property Chain Axiom' panel.
This will display a dialog box where you can start to type the label of the property that you want to add. A list of matching properties will be displayed. Click on the one that you want to add. For a chain to make sense there should be at least two properties in it.
Note that there Graphologi currently only allows a single property chain axiom.
To state that a property is functional select the Functional option in the 'Characteristics' panel. Functional properties can only have one value for the property. In an OWL ontology, where reasoning occurs, if there are multiple values they will be inferred to be the same value. However, in Graphologi, functional properties are used in taxonomies to constrain a property to only allow one value in the first place. Examples of functional properties would be 'has mother' or 'has place of birth', where it is definitely the case there can only be value for each.
If it is the case that a value of a property implies that the subject of the property is always the same resource then that is an Inverse Functional relationship. Select this option if that applies. Note that Graphologi does not put any constraint on reusing a value for an inverse functional property.
To state that a property is symmetric select the Symmetric option in the 'Characteristics' panel. Symmetric relationships work in both directions. For instance, if you have a property 'knows' then if Person A knows Person B it is intuitive that Person B knows Person A. By defining a property as symmetric, whenever that property is used in Graphologi (i.e. on a concept) it will automatically compute the result in both directions.
The opposite of symmetric is asymmetric. Choose the Asymmetric option if it is always that case that, if the property exists in one direction, then it should not exist in the other direction. For example 'has child' is a good example of an asymmetric property. Graphologi is aware of asymmetry when selecting values for concept properties.
Transitive properties are those where the chain of connections can be inferred to apply for all hops of that property. For instance 'has ancestor' is a good example of a transitive property. If A 'has ancestor' B and B 'has ancestor C' it is intuitive that A 'has ancestor' C. Note that Graphologi does not compute/display transitivity in the user interface.
If a relationship is such that the value always applies to the subject of the relationship that is a Reflexive relationship. Note that this does not stop a property taking other values too. Graphologi does not generate reflexive output.
If it is the case that the value of a relationship can never be the same as the subject that is an Irreflexive relationship. A good example would be 'has child' (you can never be your own child). By default Graphologi treats all properties as irreflexive.
Within Ontology Manager a datatype property is an OWL DatatypeProperty.
If there is no is defined by value you can make a property defined by the ontology you are viewing by clicking on the ![]() icon in the 'Is Defined By' panel.
icon in the 'Is Defined By' panel.
To add a domain click on the ![]() icon in the 'Domain' panel.
icon in the 'Domain' panel.
This will display a dialog box where you can start to type the label of the class that you want to add. A list of matching classes will be displayed. Click on the one that you want to add.
To add a range click on the ![]() icon in the 'Range' panel.
icon in the 'Range' panel.
This will display a dialog box where you can select from one of a fixed set of datatypes. Click on the one that you want to add.
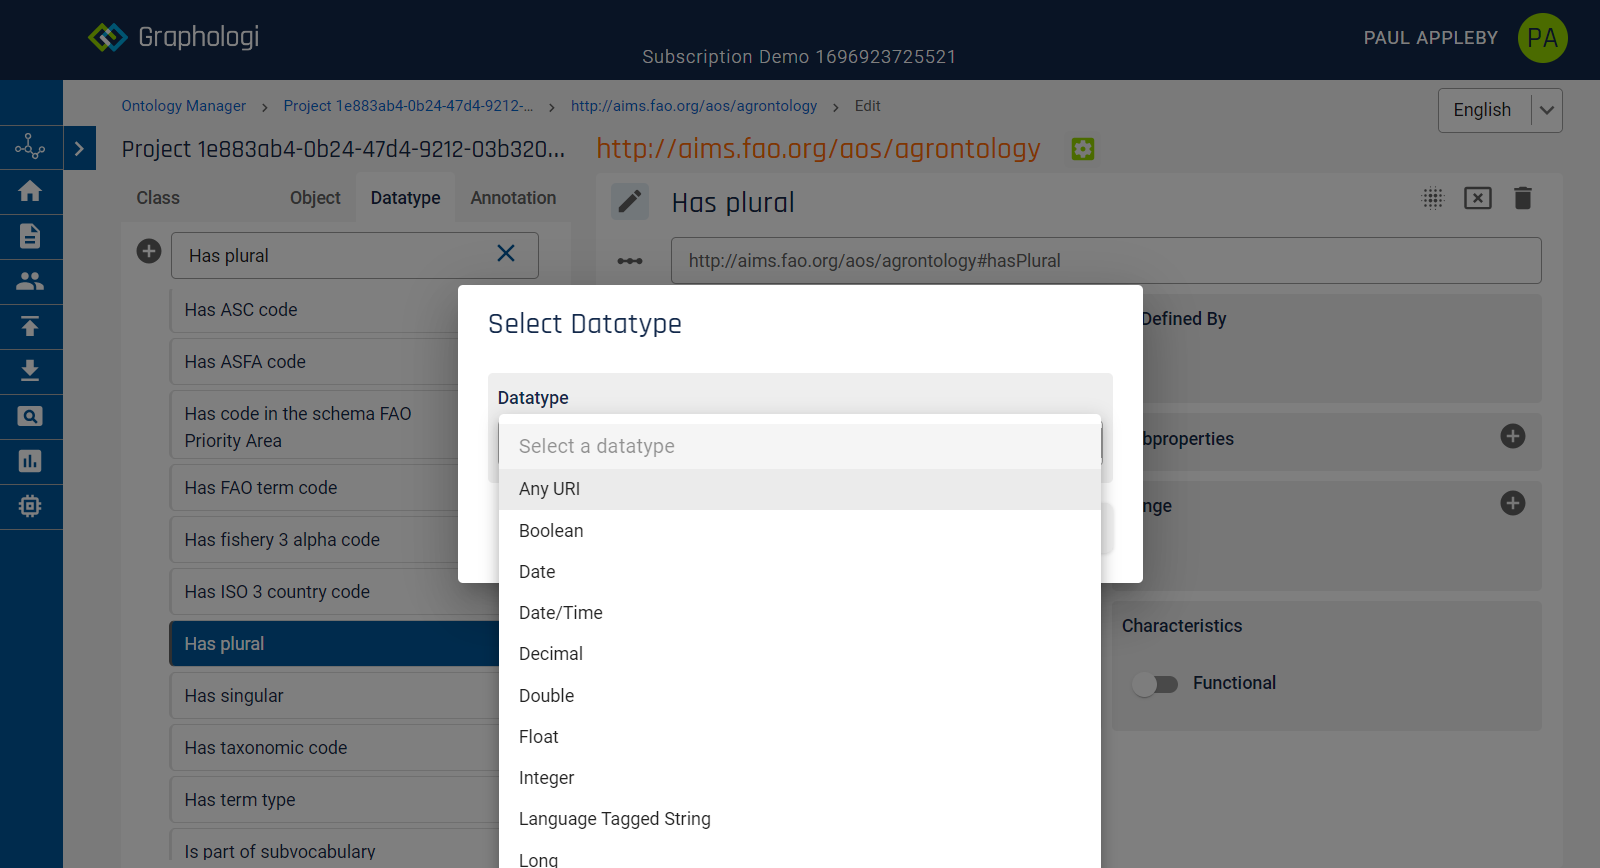
To add an equivalent property click on the ![]() icon in the appropriate panel.
icon in the appropriate panel.
This will display a dialog box where you can start to type the label of the property that you want to add. A list of matching properties will be displayed. Click on the one that you want to add.
To state that a property is functional select the Functional option in the 'Characteristics' panel. Functional properties can only have one value for the property. In an OWL ontology, where reasoning occurs, if there are multiple values they will be inferred to be the same value. However, in Graphologi, functional properties are used in taxonomies to constrain a property to only allow one value in the first place. Examples of functional properties would be 'date of birth' (as a date) or 'can fly' (as a boolean), where it is definitely the case there can only be value for each.
Within Ontology Manager an annotation property is an OWL AnnotationProperty.
If there is no is defined by value you can make a property defined by the ontology you are viewing by clicking on the ![]() icon in the 'Is Defined By' panel.
icon in the 'Is Defined By' panel.
To add a domain or range click on the ![]() icon in the appropriate box.
icon in the appropriate box.
This will display a dialog box where you can select from one of a fixed set of datatypes. Click on the one that you want to select.
To state that a property is functional select the Functional option in the 'Characteristics' panel. Functional properties can only have one value for the property. In an OWL ontology, where reasoning occurs, if there are multiple values they will be inferred to be the same value. However, in Graphologi, functional properties are used in taxonomies to constrain a property to only allow one value in the first place. An example of a functional property might be 'systemId', where the value is from a legacy system and was the unique identifier in that system.
Within Ontology Manager a named individual is an OWL Named Individual. Named Individuals are only available in 'Advanced View'.
There are a few notable things to point out.
To add a named indivdual click on the ![]() icon on the left of the screen (or use the keyboard shortcut Alt+N). This will display the following dialog box:
icon on the left of the screen (or use the keyboard shortcut Alt+N). This will display the following dialog box:
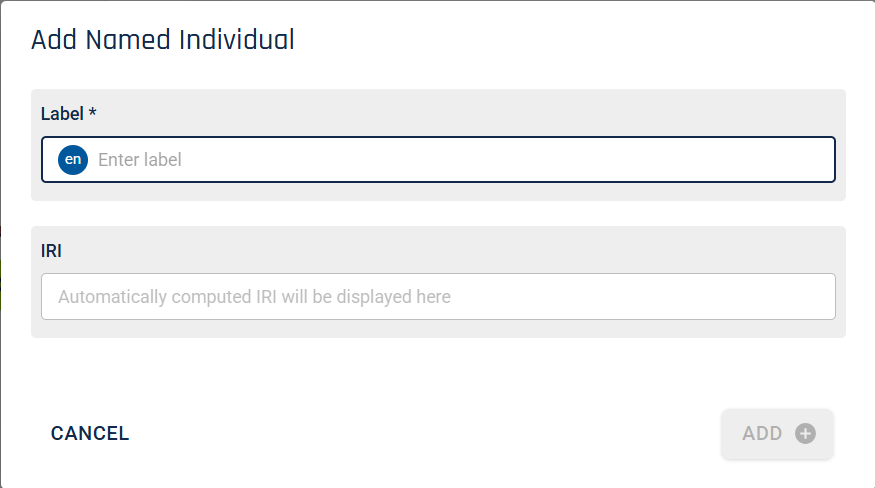
Enter a label. The language for the label will be the default project language. You can add additional labels in other languages, if configured, once the named individual is created.
If you wish to edit the automatically generated IRI for a named individual you can do so. The edited IRI must be unique within the project. Graphologi will not allow you to proceed until a unique IRI is entered.
To add the named individual click . If you are entering a large number of individuals you can click (or use the keyboard shortcut Ctrl+Enter), which will add the button and keep the dialog box open ready for you to add another one.
It may be that over time certain named individuals become obsolete. However, if these individuals have been used then their identifiers - IRIs - may need retaining. Deprecating an individual allows you to indicate that it should no longer be updated or used without actually removing it from an ontology.
To deprecate a named individual click on the ![]() icon on the right of the screen.
icon on the right of the screen.
Deprecated named individuals can no longer be edited and new relationships to them can no longer be formed.
If you realise that a named individual has been deprecated by mistake you can simply undeprecate it by clicking on the ![]() icon on the right of the screen.
icon on the right of the screen.
To delete a named individual click on the ![]() icon on the right of the screen.
icon on the right of the screen.
To change a label click into the text and start editing. If your label is acceptable, a ![]() icon will be shown on the right of the field. Click to confirm the change.
icon will be shown on the right of the field. Click to confirm the change.
To abandon a change simply click away from the field.
If there is no is defined by value you can make an individual defined by the ontology you are viewing by clicking on the ![]() icon in the 'Is Defined By' panel.
icon in the 'Is Defined By' panel.
You can define a class as disjoint with other classes. Click on the ![]() icon in the 'Disjoint With' panel.
icon in the 'Disjoint With' panel.
Adding a disjoint class can be done in two ways. You can drag classes from the hierarchy on to the 'Disjoint With' panel on the right of the screen. Alternatively, you can add classes via the ![]() icon in the 'Disjoint With' panel.
icon in the 'Disjoint With' panel.
Please note that although you can add disjoint classes Graphologi does not guarantee the consistency and checks will only catch issues in certain scenarios. We will look at adding additional consistency checks in future versions. We recommend running the quality checks as an additional validation if required.
You can also directly enter external IRIs for disjoint classes. Simply type in the IRI and if it is valid you can add it.
You can define a class as equivalent to other classes. Click on the ![]() icon in the 'Equivalent Class' panel.
icon in the 'Equivalent Class' panel.
Adding an equivalent class can be done in two ways. You can drag classes from the hierarchy on to the 'Equivalent Class' panel on the right of the screen. Alternatively, you can add classes via the ![]() icon in the 'Equivalent Class' panel.
icon in the 'Equivalent Class' panel.
You can also directly enter external IRIs for equivalent classes. Simply type in the IRI and if it is valid you can add it.
Punning is an advanced OWL idea where the same IRI can represent both a named individual and a class at the same time. OWL DL in OWL 2 supports this idea. However, it should be used with caution as it can potentially be confusing.
To set a named individual to be punned click the ![]() icon towards the top right of the screen.
icon towards the top right of the screen.
To use punning it needs to be turned on in the ontology details screen.
Named individuals can also have additional properties associated with them. This is managed through the 'Template Manager', which is available on the left side of the screen.
The 'Template Manager' works in the same way as in Vocabulary Manager and Data Manager. Global classes and properties can be specified and templates can be created, which can then be used on named individuals. Templates are assigned to ontologies in the ontology detail view.
For comprehensive details on how to use this capability see the section Template manager.
Within Ontology Manager it is possible to managed custom datatypes as part of an ontology. Datatypes are only available in 'Advanced View'.
There are a few notable things to point out.
To add a datatype click on the ![]() icon on the left of the screen (or use the keyboard shortcut Alt+N). This will display the following dialog box:
icon on the left of the screen (or use the keyboard shortcut Alt+N). This will display the following dialog box:
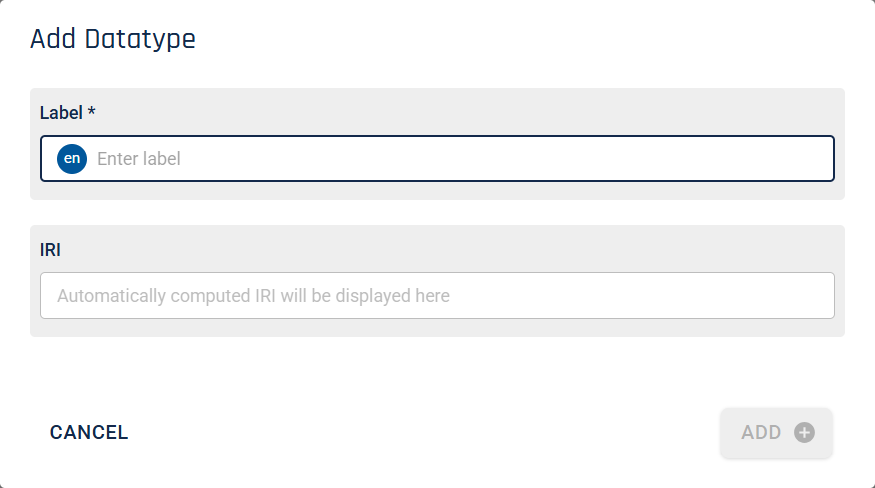
Enter a label. The language for the label will be the default project language. You can add additional labels in other languages, if configured, once the datatype is created.
If you wish to edit the automatically generated IRI for a datatype you can do so. The edited IRI must be unique within the project. Graphologi will not allow you to proceed until a unique IRI is entered.
To add the datatype click . If you are entering a large number of datatypes you can click (or use the keyboard shortcut Ctrl+Enter), which will add the button and keep the dialog box open ready for you to add another one.
It may be that over time certain datatypes become obsolete. However, if these datatypes have been used then their identifiers - IRIs - may need retaining. Deprecating a datatype allows you to indicate that it should no longer be updated or used without actually removing it from an ontology.
To deprecate a datatype click on the ![]() icon on the right of the screen.
icon on the right of the screen.
Deprecated datatypes can no longer be edited and new relationships to them can no longer be formed.
If you realise that a datatype has been deprecated by mistake you can simply undeprecate it by clicking on the ![]() icon on the right of the screen.
icon on the right of the screen.
To delete a datatype click on the ![]() icon on the right of the screen.
icon on the right of the screen.
To change a label click into the text and start editing. If your label is acceptable, a ![]() icon will be shown on the right of the field. Click to confirm the change.
icon will be shown on the right of the field. Click to confirm the change.
To abandon a change simply click away from the field.
If there is no is defined by value you can make a datatype defined by the ontology you are viewing by clicking on the ![]() icon in the 'Is Defined By' panel.
icon in the 'Is Defined By' panel.
You can define a datatype as equivalent to other classes and this is generally how datatype are utilised, by constructing a contrained equivalent. Click on the ![]() icon in the 'Equivalent Class' panel to do this.
icon in the 'Equivalent Class' panel to do this.
Within Ontology Manager certain features are only available in 'Advanced View'. You can activate this in the ontology details screen. The following are then available:
Graphologi does not enforce completing restrictions, complex expressions or data ranges. However, they should be completed to form a correct ontology. Incomplete structures will have a pale orange background. To aid in discovering incomplete structures you can run the quality checks for the ontology.
To add a restriction click on the ![]() icon in the required panel. This will activate the restriction builder, as shown in the following image:
icon in the required panel. This will activate the restriction builder, as shown in the following image:
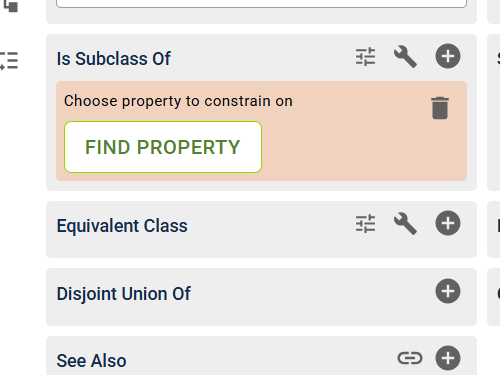
Click on 'Find Property' and select the propety on which you want the restriction to apply.
You will then be presented with additonal options, which will depend upon the type of property the restriction is on. Select the appropriate option and continue to build the restriction. Restrictions can be arbitrarily complex. An example of what you might see is shown in the following image:
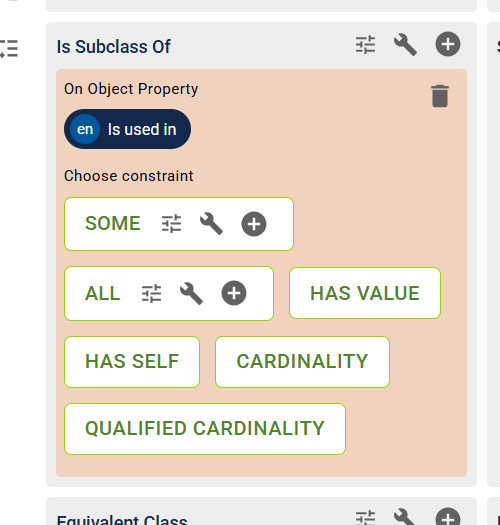
To add a restriction click on the ![]() icon in the required panel. This will activate the builder.
icon in the required panel. This will activate the builder.
You will then be presented with options, which will depend upon the context in which the expression is being built. Select the appropriate option and continue to build the structure.
Sometimes it can be useful to add additional information to classes, properties or named individuals. In ontologies this is done using annotation properties, which are themselves defined in ontologies. It is common for ontologies to use SKOS annotation properties and these are available as built-in annotations.
For annotation properties to display on classes and properties you need to select which you wish to use for a particular ontology. This is done in the ontology details page, which looks as in the following image.
For SKOS annotations to show simply uncheck the relevant properties in the 'Hide Properties From View' panel.
To add other annotations in the 'Annotation Properties' panel click on the ![]() icon. All annotation properties from any ontologies within the same project will be listed. Select those that you wish to use.
icon. All annotation properties from any ontologies within the same project will be listed. Select those that you wish to use.
If you wish to see the usage statistics of annotation properties defined in ontologies loaded within the project, you can click on the Compute Suggestions to Add button. This will compute statistics for each property and you can then choose whether to add them.
One selected the properties should appear on classes and properties. Note that the view is domain aware, so, if an annotation property has a domain that is not applicable, it will not display. You should see something similar to the following image. Note, if the values already exist they will appear once the properties are selected for the ontology.
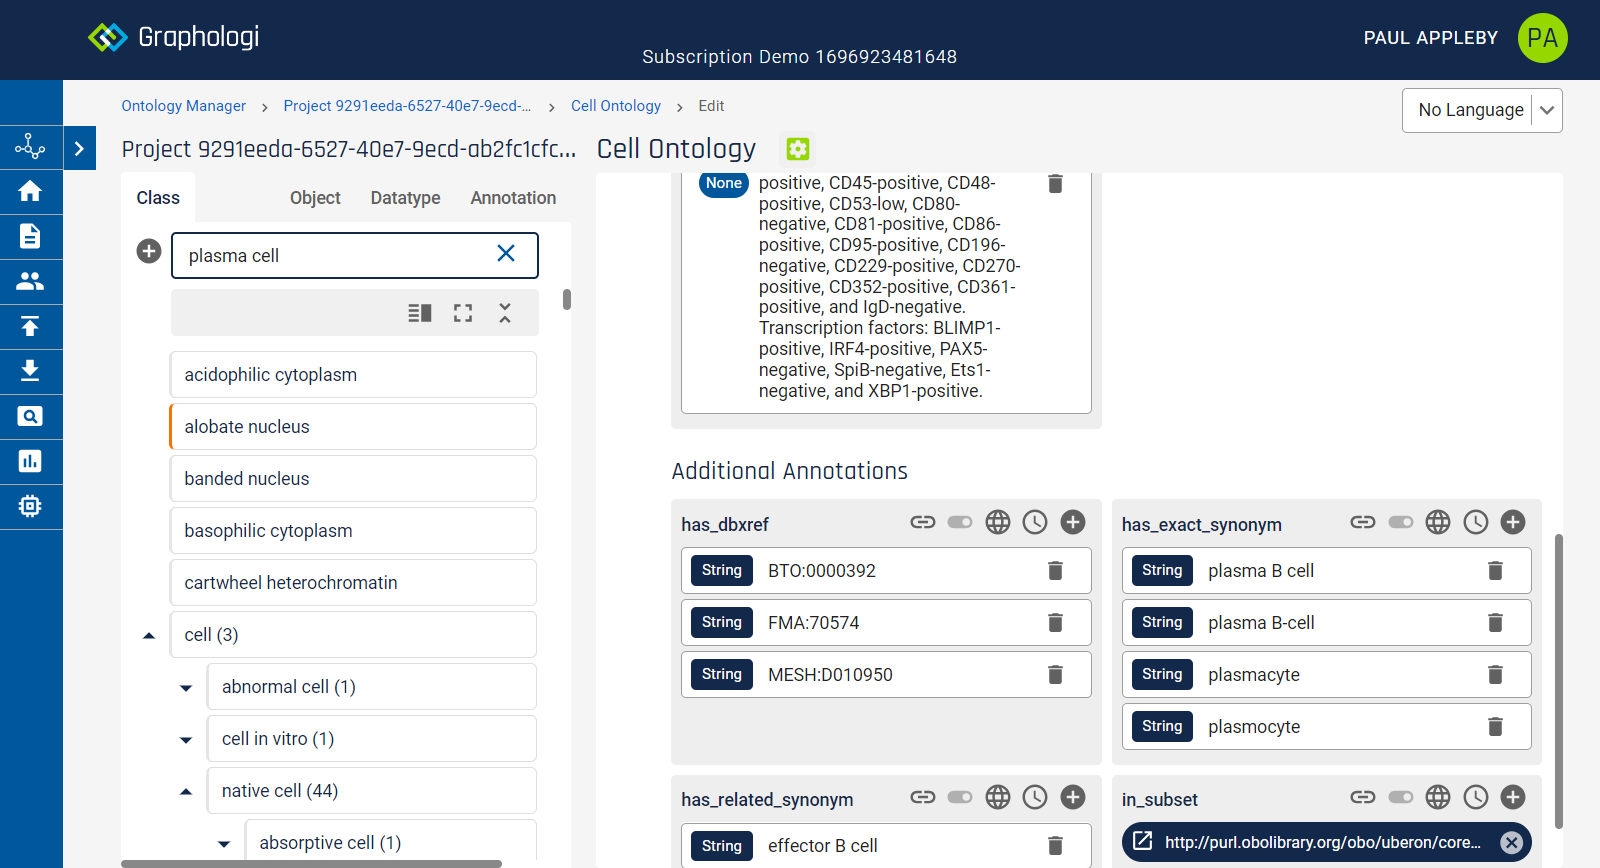
For SKOS annotations simply click on the ![]() icon and enter the value in the dialog.
icon and enter the value in the dialog.
For other annotations, depending upon whether an annotation property has a range or not, the controls to add values will differ. If a range is defined there will simply be an ![]() icon in that property panel and you will be restricted to adding values suitable for the defined range.
icon in that property panel and you will be restricted to adding values suitable for the defined range.
If a range is not defined you will see multiple icons for adding different types of data.
 icon allows you to add links to resources (including external resources by simply typing in the IRI you want to add).
 icon allows you to add a boolean value. Note you can only have true or false.
 icon allows you to add language tagged strings using the languages set up for the project.
 icon allows you to add date time values.
 icon is used to add all other datatypes. This will display a dialog from which you can select a particular datatype and enter a value.
Note that it is highly unusual for a property to contain a mix of datatypes, but because there is no range defined you do have that option.
There are situations where it is much simpler to see data in a visual manner. This is especially true when looking at connections across a graph, such as how properties and classes are related in an ontology. Graphologi provides a visualisation feature to help you understand how your data is connected.
Visualisation can be accessed for a class or property by clicking on the ![]() icon. This should display something like the following image:
icon. This should display something like the following image:
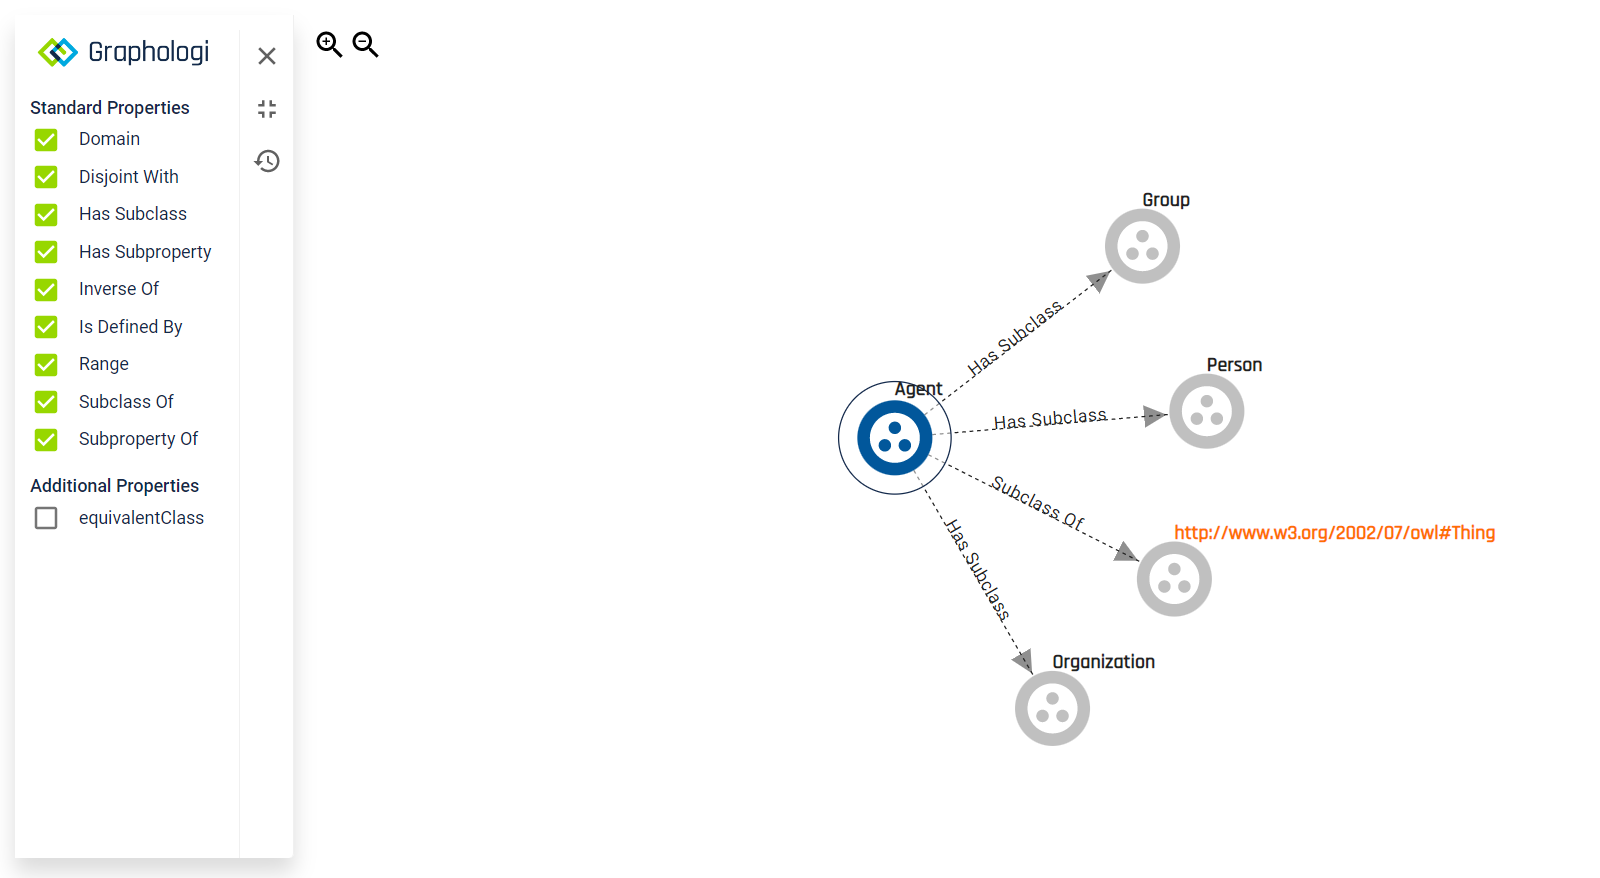
On the left are the ontology properties (the connections) that will be displayed by default. You can deselect those that you are not interested in, which can help simplify the image when there are many relationships. If there are additional relationships, those will be displayed below the standard properties.
You can zoom in to the visualisation by clicking on the ![]() icon and zoom out by clicking on the
icon and zoom out by clicking on the ![]() icon. Zoom in has four further levels from the default. Zoom out has just one level from the default. You can also drag the image around.
icon. Zoom in has four further levels from the default. Zoom out has just one level from the default. You can also drag the image around.
To hide the properties panel click on the ![]() icon. Click on it again to show the panel.
icon. Click on it again to show the panel.
To reset the visualisation click on the ![]() icon.
icon.
To expand the visualisation to include more concepts click on a concept that you would like to include. You can click it again to exclude it. The layout of the visualisation will manage itself to a certain degree. However, for complex data you may want to adjust it yourself. You can do this by dragging nodes around.
To add inbound links to a node use Ctrl+Click.
Note that there is a limit of 100 connections per relationship. Beyond this you will be notified that this is the case.
Graphologi is always being enhanced and support for OWL 2 continues to improve, focussing on those aspects that are most useful to most users. However, there are certain parts of OWL 2 that are not currently supported, or not fully supported:
Whilst the SKOS and SKOS-XL standards allow you to create standards compliant taxonomies they have limited ability to provide the richer semantics that many use cases and applications require. Those requirements generally need additional relationships and attributes to be added to concepts (and labels). This also applies to 'data' as well as taxonomies.
The way to achieve this is by using ontologies, managed in Graphologi, to enhance taxonomies or datasets. Ontologies can be simple for many use cases, but can also get very complex. For most scenarios relating to taxonomies and datasets the main requirement is often fairly simple and relates to using classes to 'classify' things, relationships to connect those things together with explicit semantics and attributes to add additional detail to things.
In Graphologi this configuration is done in the Template Manager. Under the covers 'templates' use SHACL where possible to provide additional standards compliance.
Graphologi also allows you to configure things so that you can use more than just plain text when using templates, e.g. multiline text, SVG, images, markdown, HTML or MathML.
When using ontologies with taxonomies or datasets, Graphologi automatically handles inverse, asymmetric and symmetric relationships, understands functional properties and disjointess, as well as being domain and range aware, plus understanding class hierarchies. So there is a lot going on in the background when using ontologies that is handled by Graphologi to make managing your data even easier.
The possibilities for creating rich connected data are endless and we look forward to seeing what you can achieve!
To access this feature click on the ![]() icon on the left of the screen.
icon on the left of the screen.
The Template Manager allows you to find and associate one or more ontology projects. Click on the button on the right of the screen. Start typing the name of the ontology project you are looking for and select it when it appears. The ontology project will be added similarly to the following image.
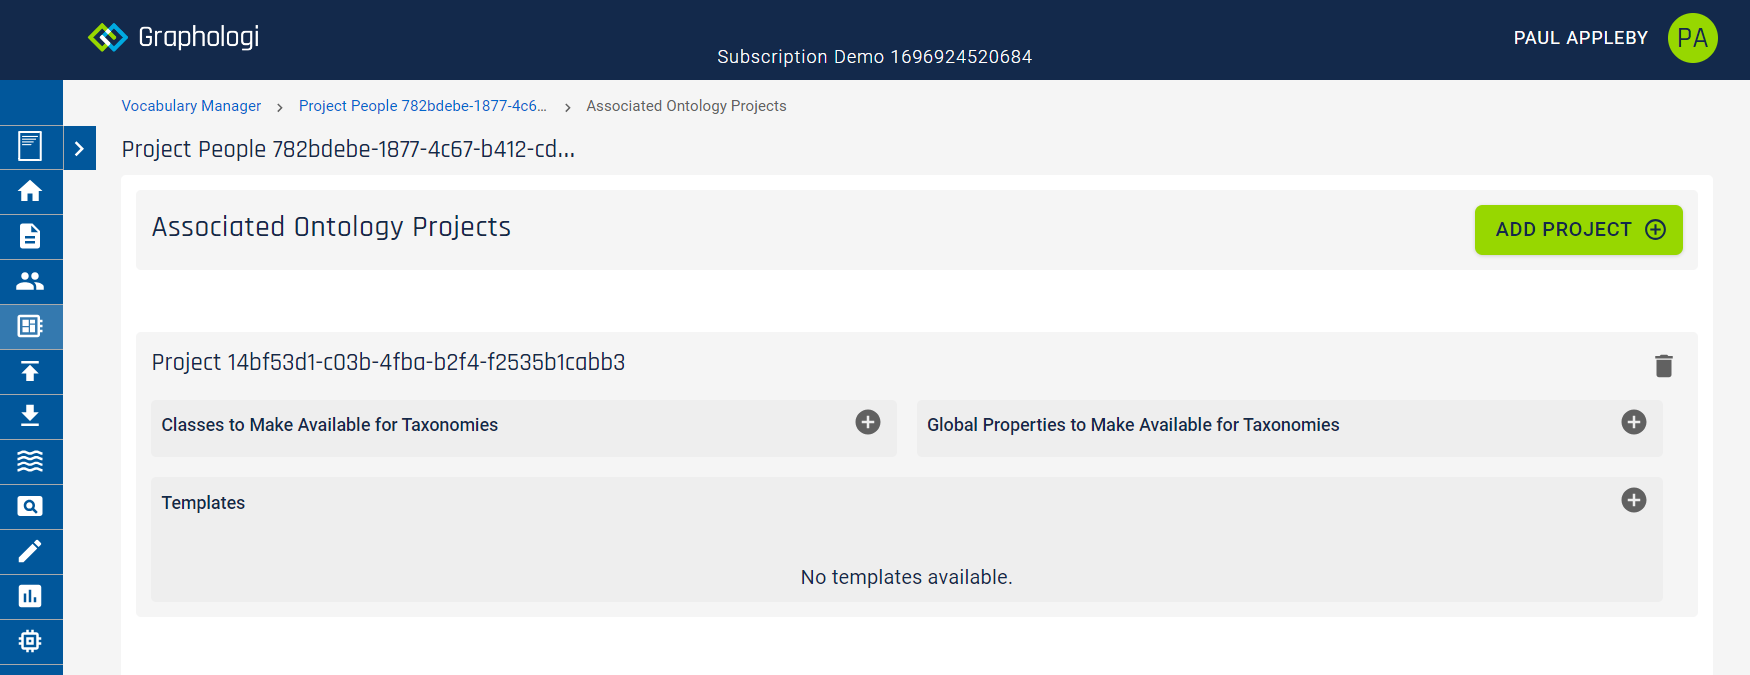
For each associated ontology project you can select the set of classes that you wish to make available in your project (often you will not need all of them).
You can also select which properties you want to be made available globally throughout your project.
Finally, you can create templates, which allow you to create sets of properties for use on concepts, labels, etc., giving you more control and allowing you to tune the user interface to only display appropriate properties. Each template can be associated with as many taxonomies or collections as required for taxonomy projects, or as many datasets as required for data projects.
We encourage users to create multiple templates, grouping small sets of properties that 'go together', e.g. latitude and longitude. This allows for more reuse of the templates and ensures consistency across taxonomies or datasets.
Also, you can have a property in more than one template, so if it needs to be configured differently for different uses, again, create multiple templates and configure that property accordingly in each template. As an example, there might be a 'destination' property that needs to select from different target taxonomies for its values in each place that it is used.
Note that, if you subsequently remove classes or properties, any concepts, labels or resources that have used them will still display the information.
To add classes click on the ![]() icon in the 'Classes to Make Available' panel. A dialog box will be displayed. This will look similar to the following image:
icon in the 'Classes to Make Available' panel. A dialog box will be displayed. This will look similar to the following image:
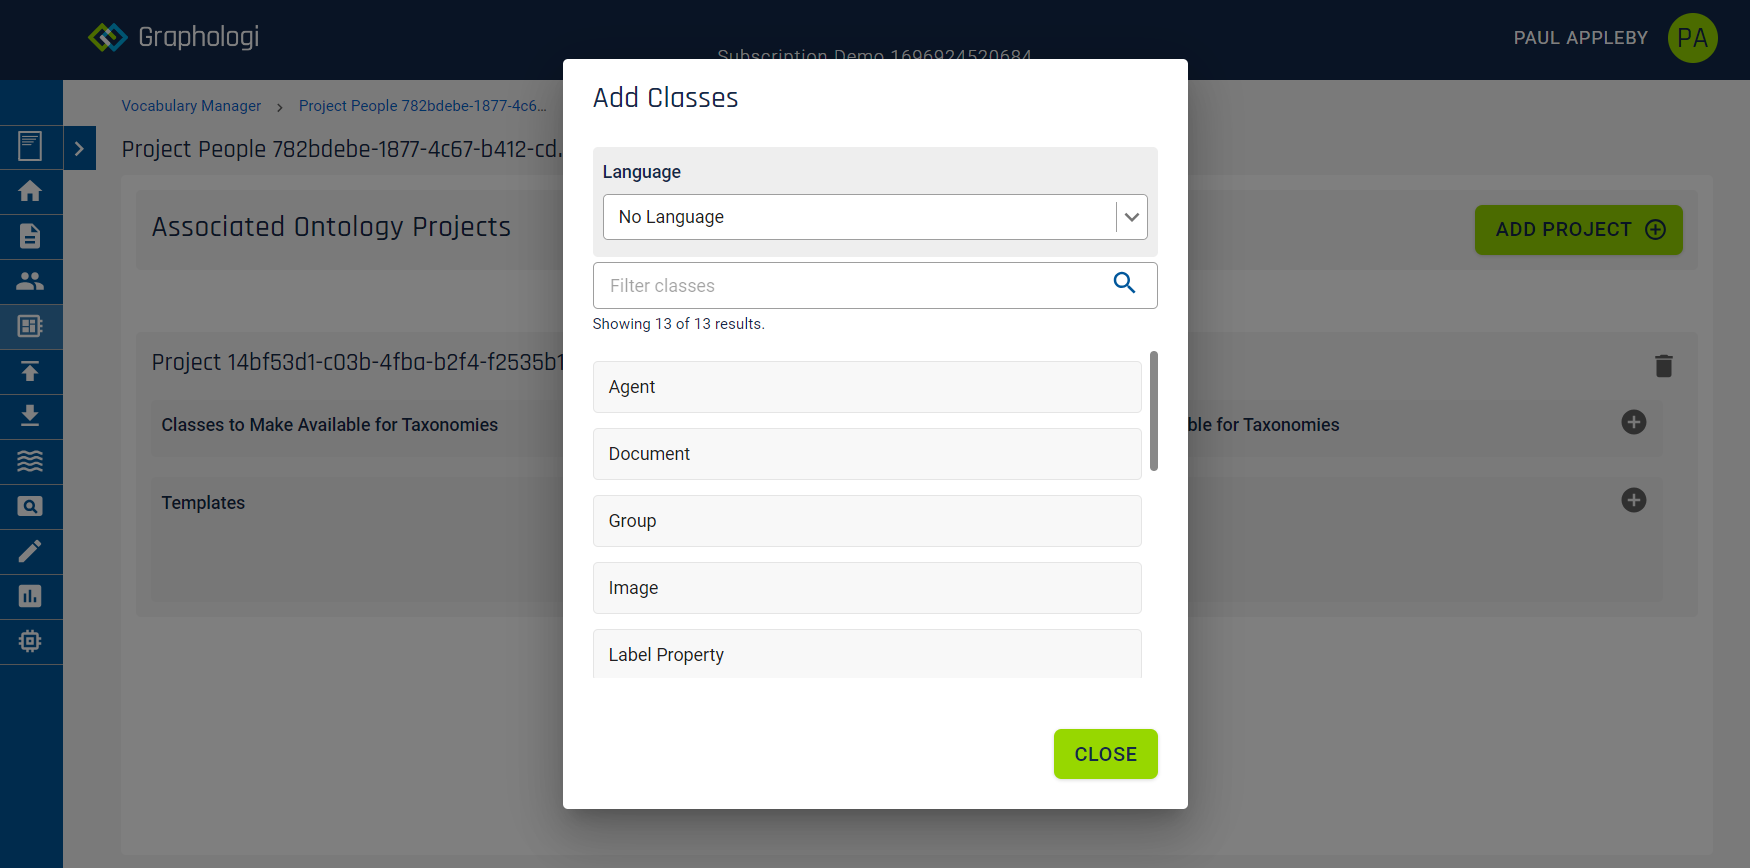
Note that, if the ontology you want to search uses a language other than the default for the taxonomy or data project, you may need to select the language from the list. This list reflects the languages available to the project.
Up to 100 classes will be listed. Select the classes that you want to add. To filter the list start typing the label of the class that you want to add.
To add properties of any type click on the ![]() icon in the 'Global Properties to Make Available' panel. A dialog box will be displayed. This will look similar to the following image.
icon in the 'Global Properties to Make Available' panel. A dialog box will be displayed. This will look similar to the following image.
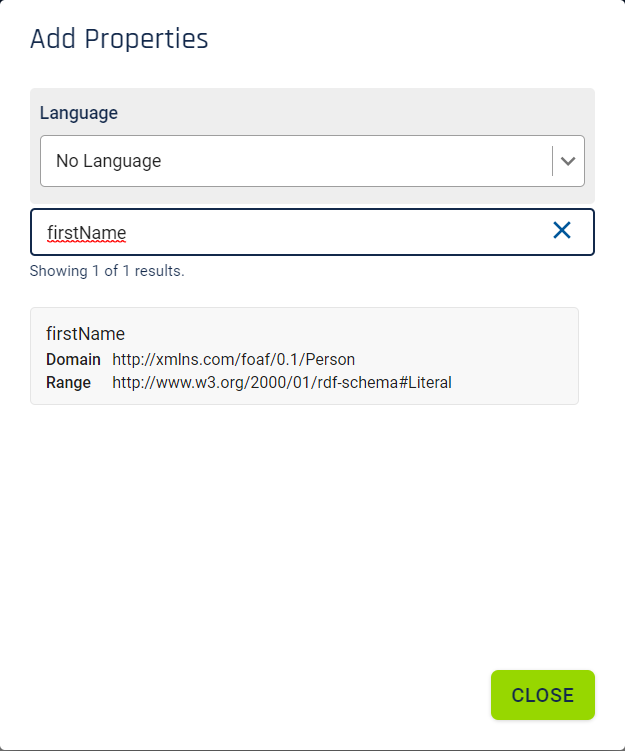
Up to 100 properties will be listed. Domain and range information for each property will also be listed, if available, to help you decide whether it is the property that you are looking for. Select the properties that you want to add. To filter the list start typing the label of the property that you want to add.
Note that, even for global properties, the domain will control what that property appears on. If a domain exists on the property the concept, label or resource must have that class in order for the property to appear.
If a property is both global and in a template and is computed to apply for display, the property will only appear under the global properties list. It will not be displayed more than once.
To add a template click on the ![]() icon in the templates panel. This will display a dialog box similar to the following image.
icon in the templates panel. This will display a dialog box similar to the following image.
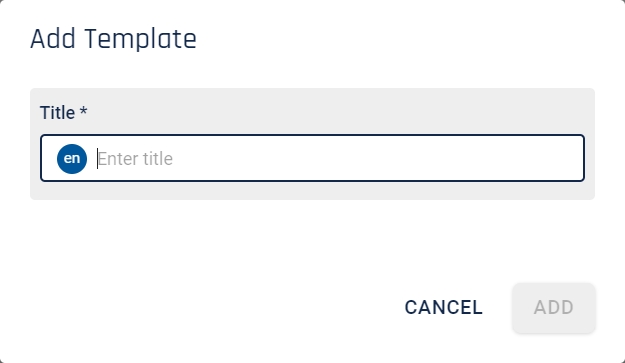
Enter the title for your template and click . This will add a template panel to the screen similar to the following image:
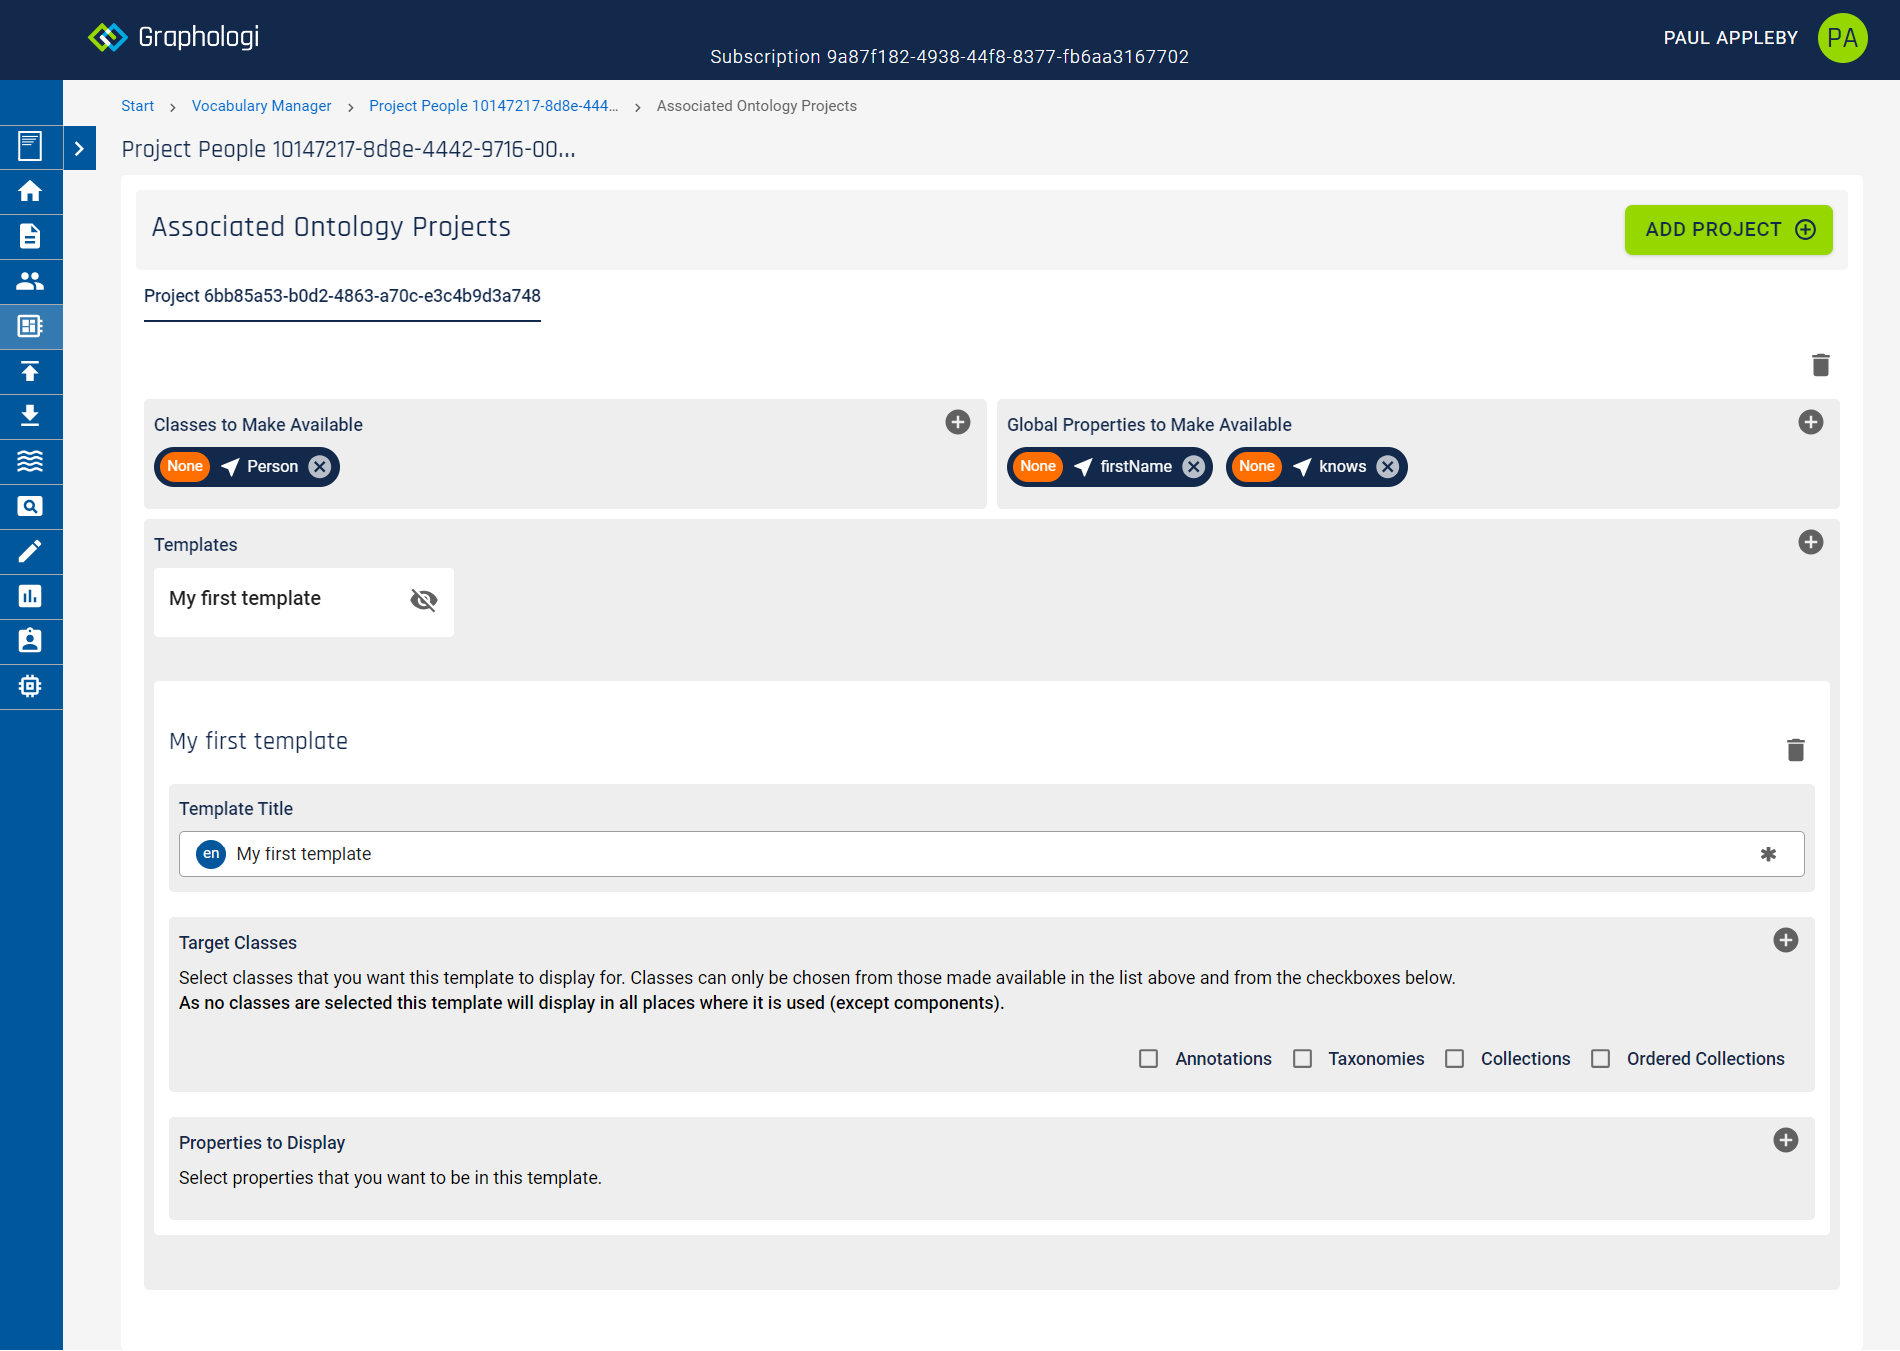
Each template allows you to select one or more classes for which the template should be used. If you do not choose any classes the template will apply to all concepts, labels or resources where it is used. For taxonomy projects, if the project has SKOS-XL enabled, you will have the option to check a box to use the template on SKOS-XL labels. You can also include taxonomies, collections, datasets and annotations as target classes by checking the appropriate boxes. For taxonomies, collections and datasets property templates will appear in the 'Advanced Metadata' submenu. If you check these boxes you can still select other classes.
You can then select the properties that you want to be associated with the template. Your templates should eventually look similar to the following image:
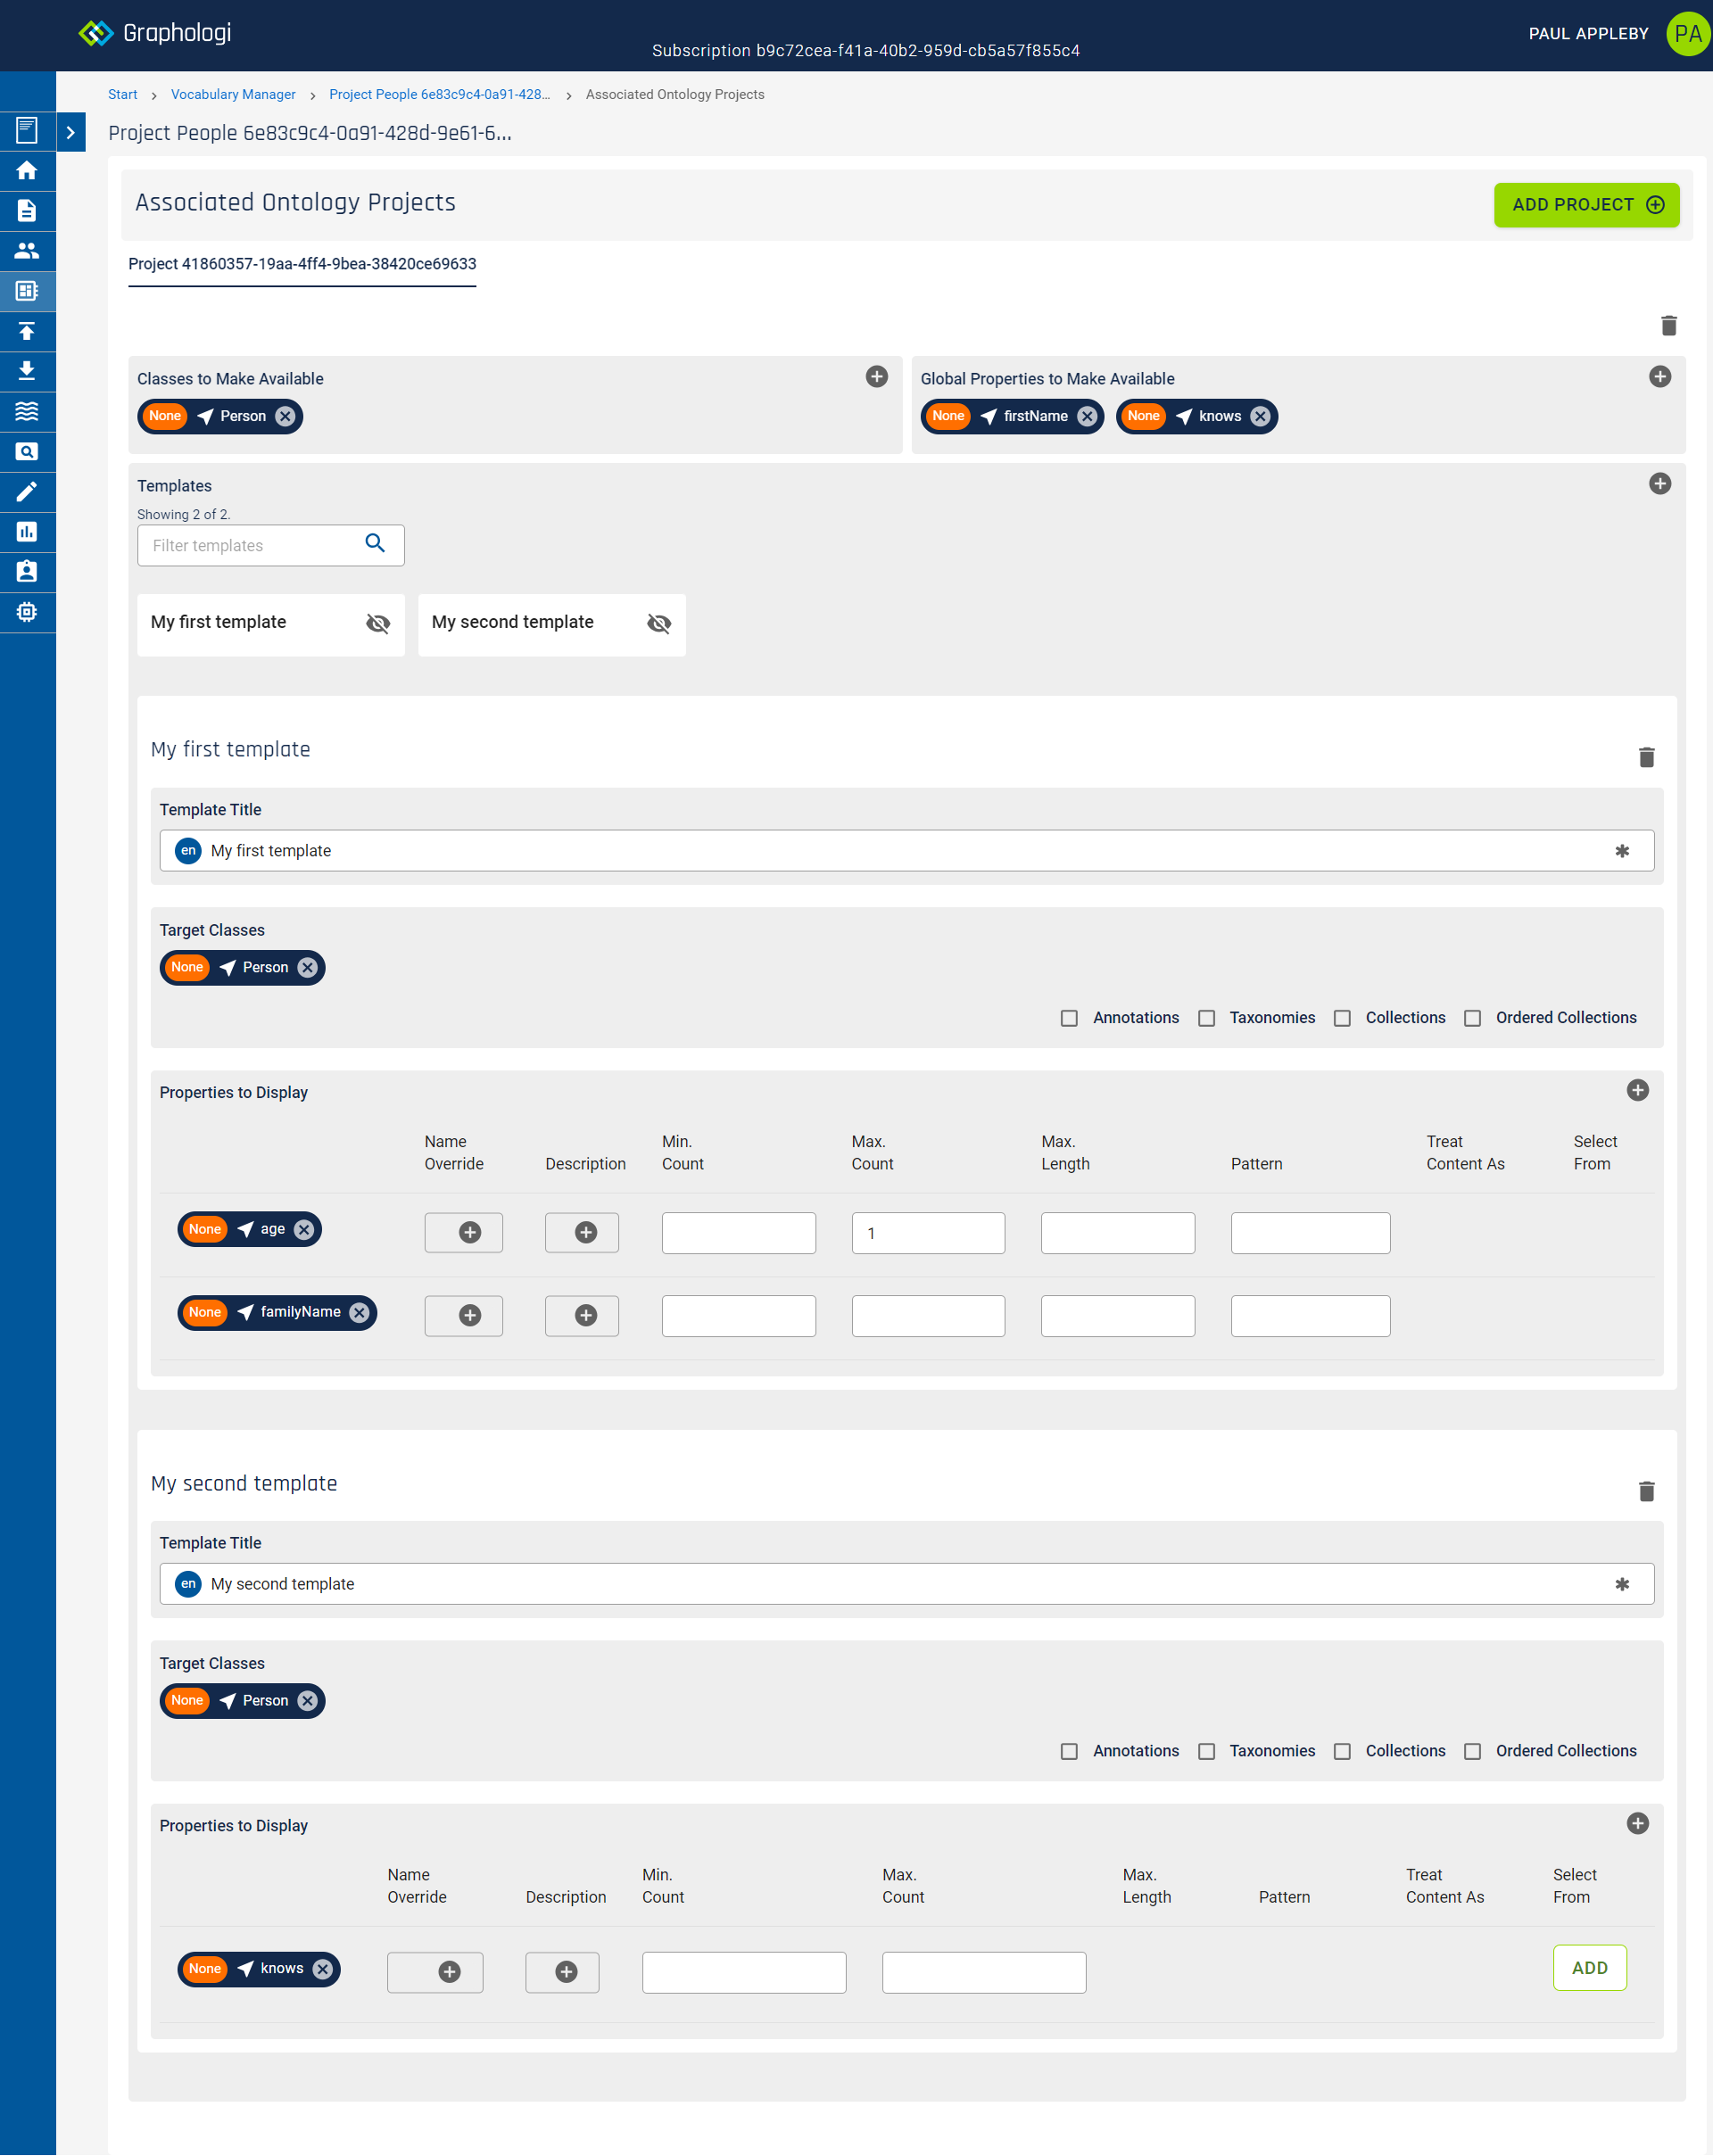
If you have more than one template you can filter them using the filter box. Additionally you can 'jump' to a particular template by clicking on the panel for it in the summary list at the top of the templates area. To scroll back to this area you can use Alt+t, or, alternatively, if you have jumped to a template, click on the icon in the bottom right of the screen.
Note that property selection is not constrained by the class selection, but you will see warnings if there is a disconnect between the two. This is not necessarily an error, which is why Graphologi does not stop you doing so, but in most situations it would be expected that the classes and domains would match up.
You can have as many templates as you want. A good approach may be to group together properties based on a particular purpose or group of users that might want to edit the properties.
Sometimes the default label from the ontology for a property isn't ideal or suitable. You can override the name that will be displayed by adding a value using the ![]() icon in the name placeholder. Similarly, it can be useful to give users a bit of information about what they are expected to do, or what the property is for, and you can do this by adding a description, again using the
icon in the name placeholder. Similarly, it can be useful to give users a bit of information about what they are expected to do, or what the property is for, and you can do this by adding a description, again using the ![]() icon in the description placeholder.
icon in the description placeholder.
It may be that you want to further restrict the use of properties used in templates. You can set various constraints and options:
For each constraint Graphologi will indicate if that constraint is not being met. Graphologi will limit the input for a property to ensure that it complies with the constraints.
Please note the following important points:
Graphologi uses certain aspects of an OWL ontology and interprets them for managing and using templates:
Configured ontology classes can be used on concepts, SKOS-XL labels or resources, whilst properties can be used on concepts, SKOS-XL labels, taxonomies, collections and datasets. The following image shows additional global properties being available for a label as an example.
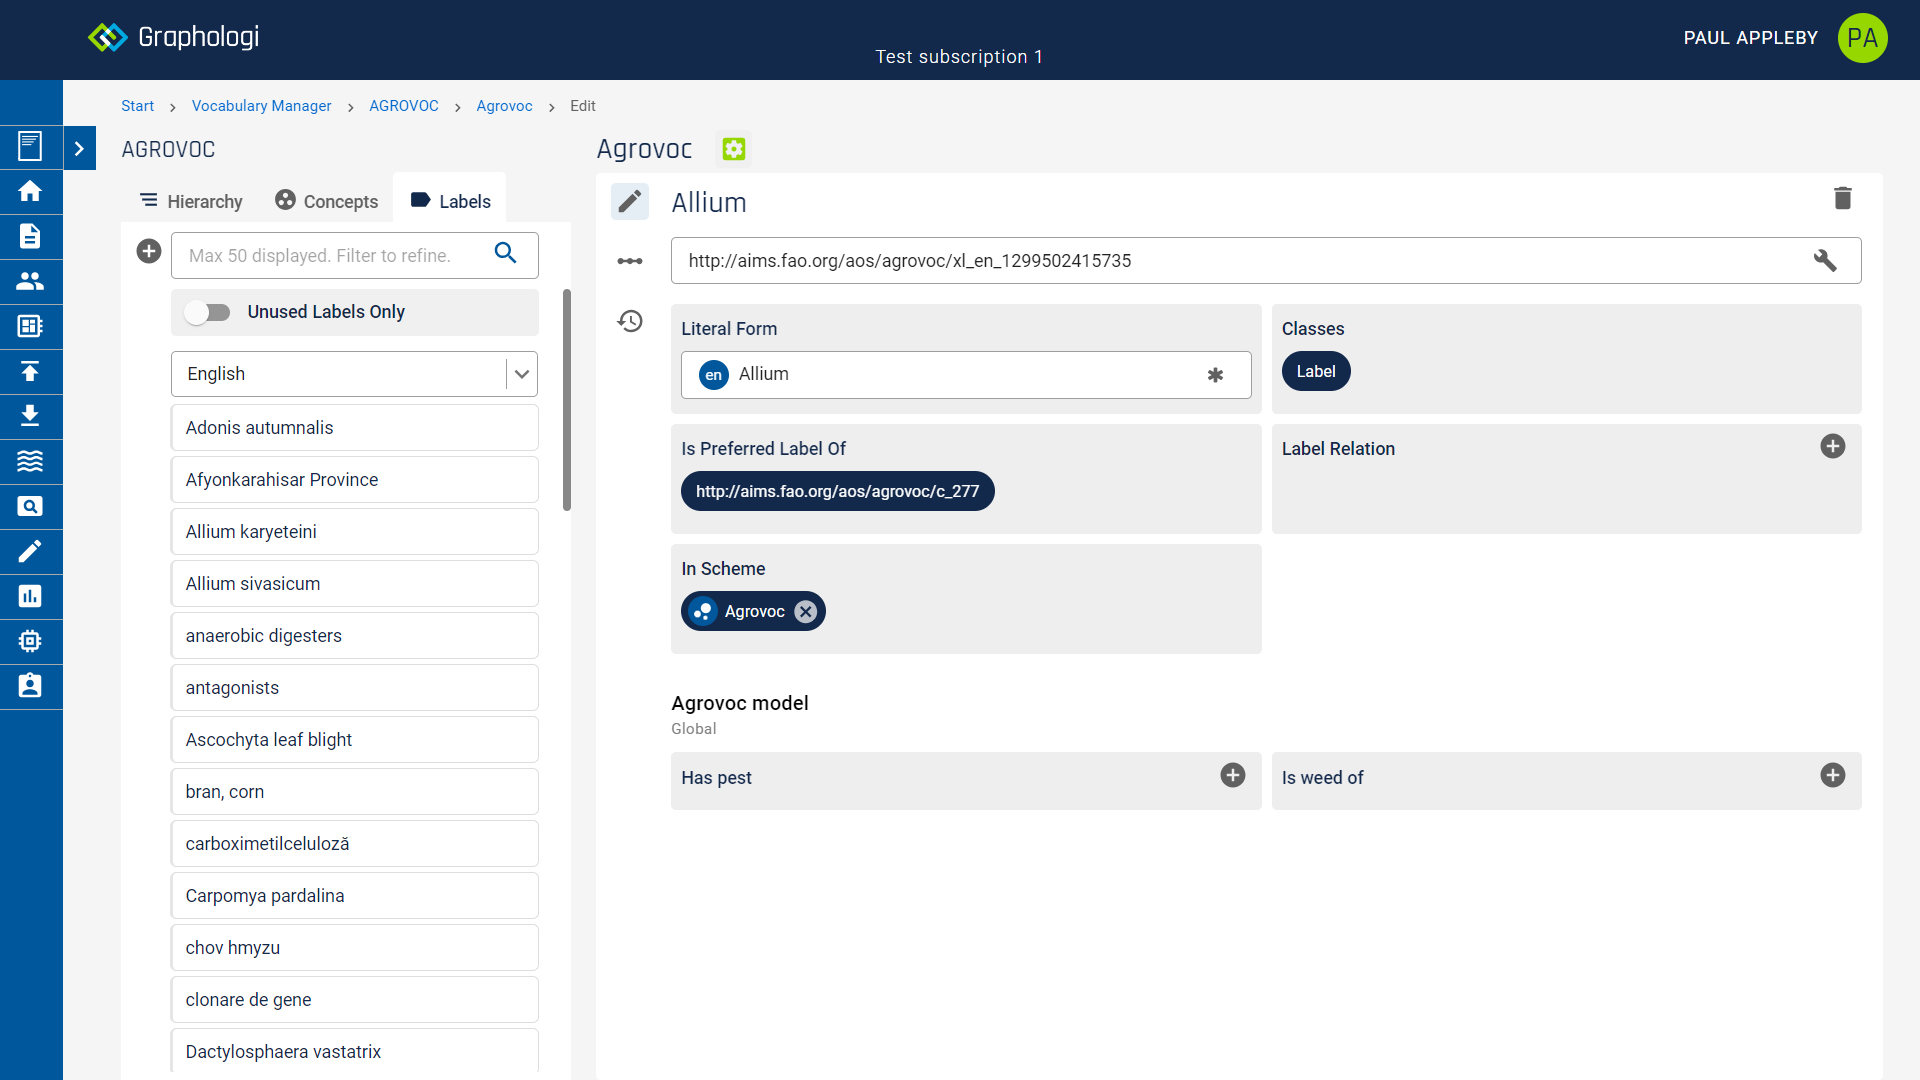
The screen will display any global properties first, then the properties applicable for templates. All properties for all applicable templates will be grouped together. If properties are in templates and also global they will only appear in the global list.
Templates can be assigned for taxonomies, collections and datasets. The approach is the same for each. To add a template go to the details page (by clicking on the down arrow next to the title of the taxonomy, collection or dataset). Scroll down to find the panel title 'Property Templates'. Click on the ![]() icon and select the templates that you wish to assign. Once selected it will look similar to the following image:
icon and select the templates that you wish to assign. Once selected it will look similar to the following image:

Annotations allow you to add additional information about the values added for properties. The technical term for this is called 'reification'. For example, let's say you have a concept 'England' and it has a property 'population' with a value of '60 million'. You can annotate this 'triple' of England->population->60 million. This can be very useful to record the provenance of where the information came from, or potentially the context in which it should be used.
Annotation is done using templates. You might want to create specific templates just for annotations.
To activate annotations for a taxonomy, collection or dataset click on the 'Is Activated' option in the 'Annotate' panel.
To add an ontology class click on the ![]() icon in the 'Classes' panel. This will display a dialog. If you are adding to a concept on which there are narrower concepts and you want the class to be added to those concepts as well check the 'Add Class to Narrower Concepts' option (but note this will only apply to concepts that are in the same scheme). Start typing the name of the class you want to add. A list of matching classes will be displayed. This will look similar to the image below.
icon in the 'Classes' panel. This will display a dialog. If you are adding to a concept on which there are narrower concepts and you want the class to be added to those concepts as well check the 'Add Class to Narrower Concepts' option (but note this will only apply to concepts that are in the same scheme). Start typing the name of the class you want to add. A list of matching classes will be displayed. This will look similar to the image below.
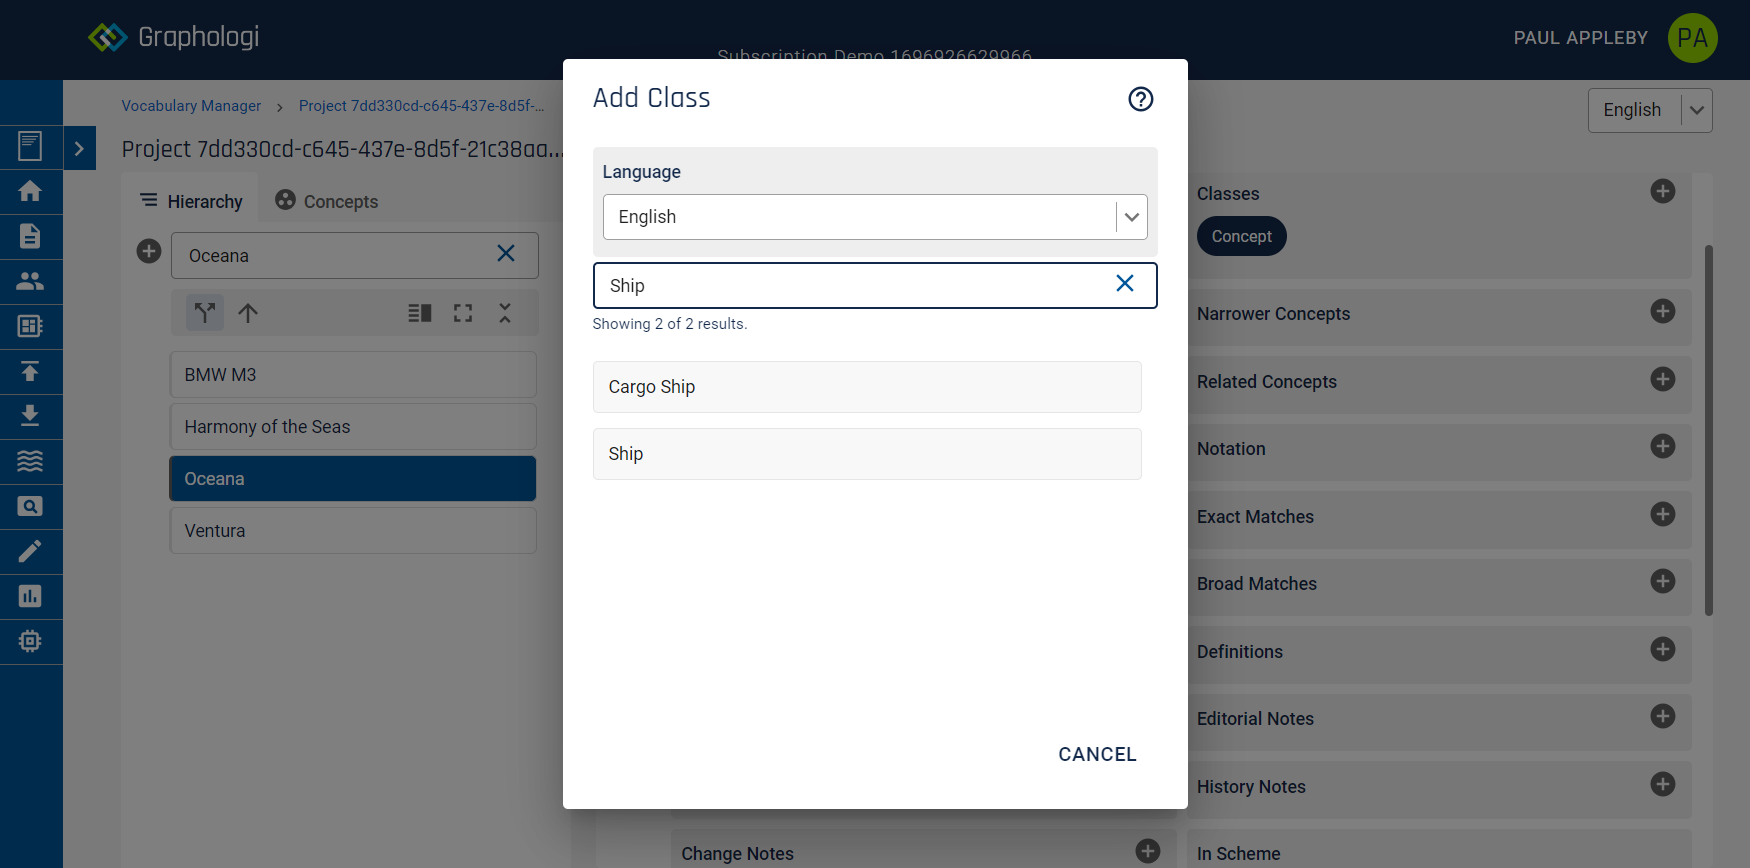
Select the class you want to add. The class will be added to the 'Classes' panel.
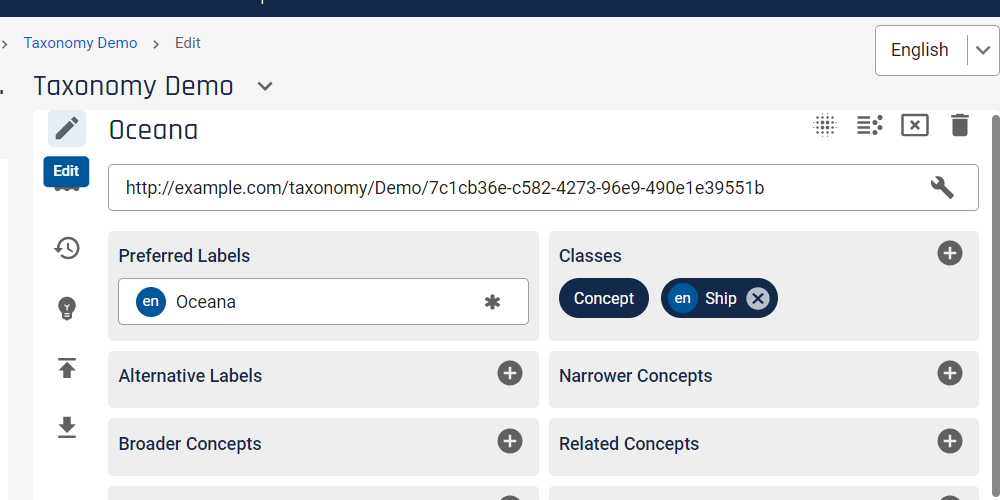
To add any default classes for a taxonomy to all concepts in the hierarchy of the taxonomy (that are in the scheme), or to all resources in a dataset, click on the ![]() icon on the home page for the taxonomy or dataset, located towards the right-hand side of the screen. This operation is a batch operation and may take a little time to run if there are a lot of items to process.
icon on the home page for the taxonomy or dataset, located towards the right-hand side of the screen. This operation is a batch operation and may take a little time to run if there are a lot of items to process.
For each ontology property configured for use and for which the concept, label or resource has the correct domain (if the ontology property has a defined domain), or, for properties that have no domain, will be listed in an area at the bottom of the details section for a concept, label, etc, similarly to the following image.
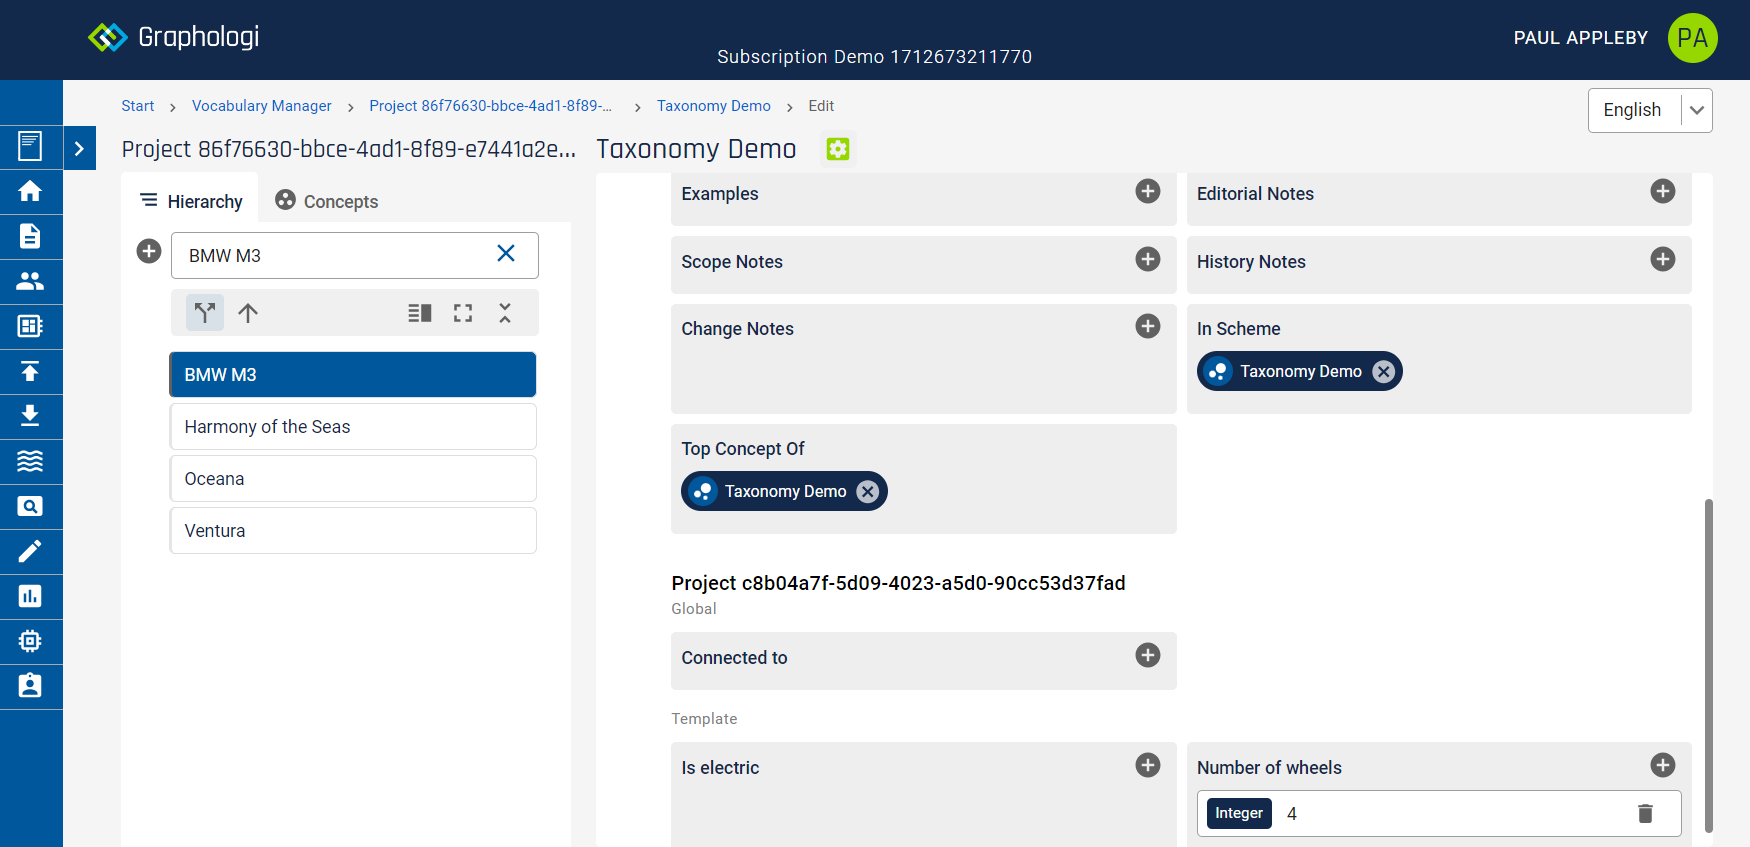
To add a value for a property click on the ![]() icon in the appropriate property panel. This will display a dialog similar to the following (if an integer range is defined on the property):
icon in the appropriate property panel. This will display a dialog similar to the following (if an integer range is defined on the property):

Enter a value and click .
For different range values different dialog boxes will be presented. The entered value must comply with the datatype. Where a property template indicates the text should be 'treated' in a particular way the dialog will be adjusted accordingly and the value rendered if the text is valid for that type. Note that, for markdown text, two newlines are required to display a linebreak.
Constraints on range also apply to object properties. That is, to make a relationship for an object property with a defined range, a concept must have the appropriate class associated with it.
To add a relationship for an object property click on the ![]() icon in the appropriate property panel. This will display a dialog box. Start typing the label for the item you wish to make the relationship to.
icon in the appropriate property panel. This will display a dialog box. Start typing the label for the item you wish to make the relationship to.
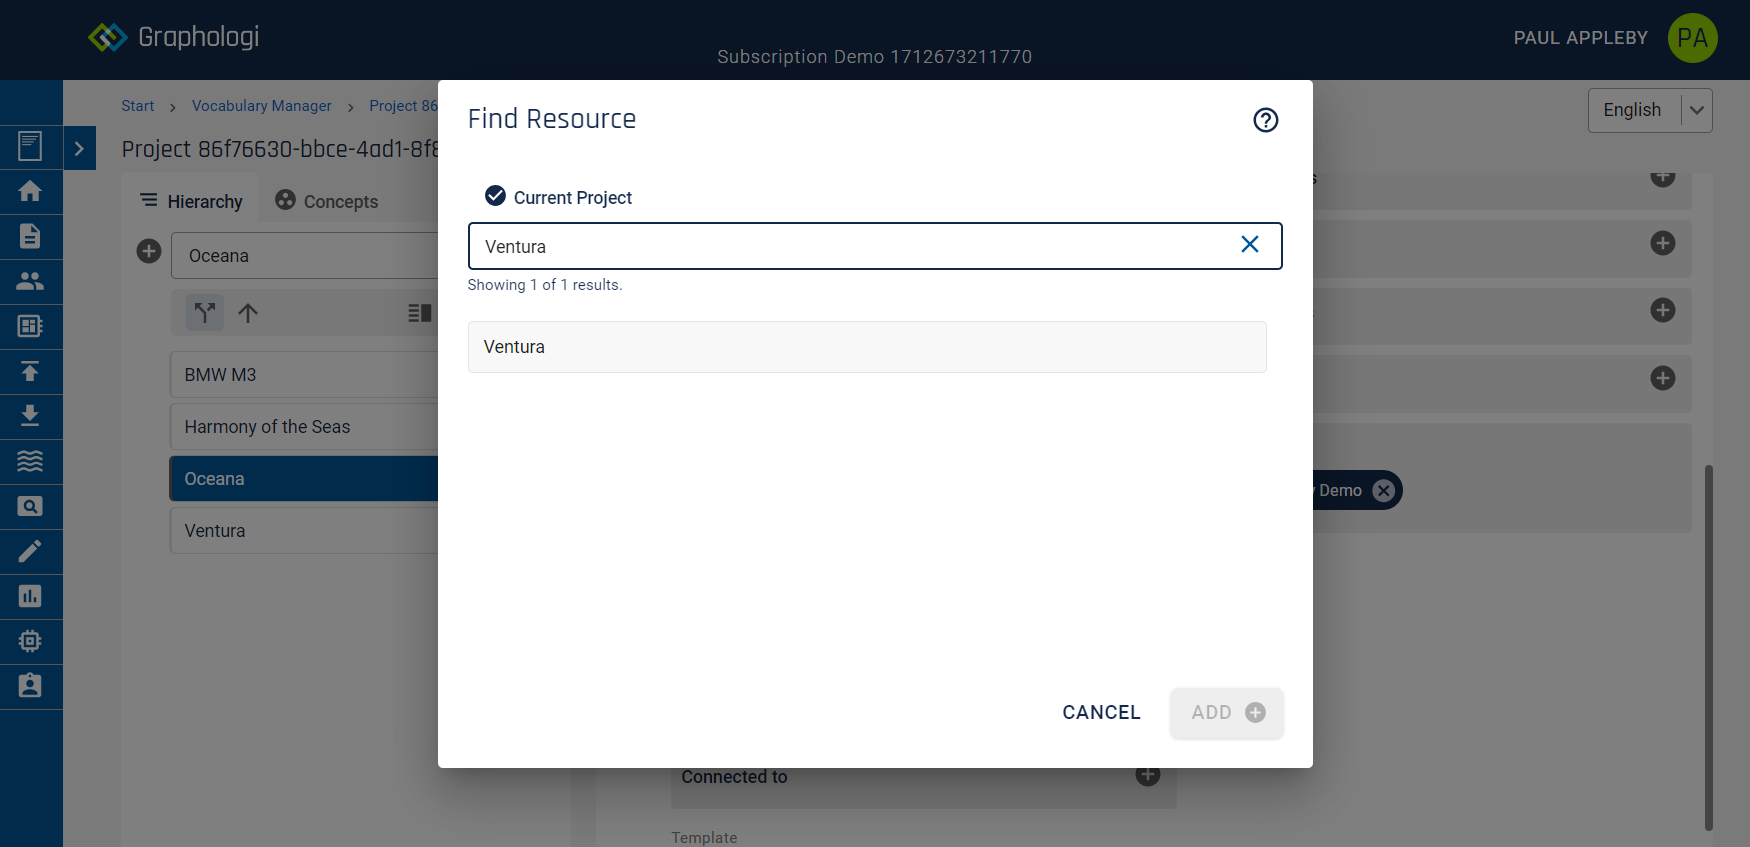
Select the desired value to add it. Once added it will display similarly to the image below:
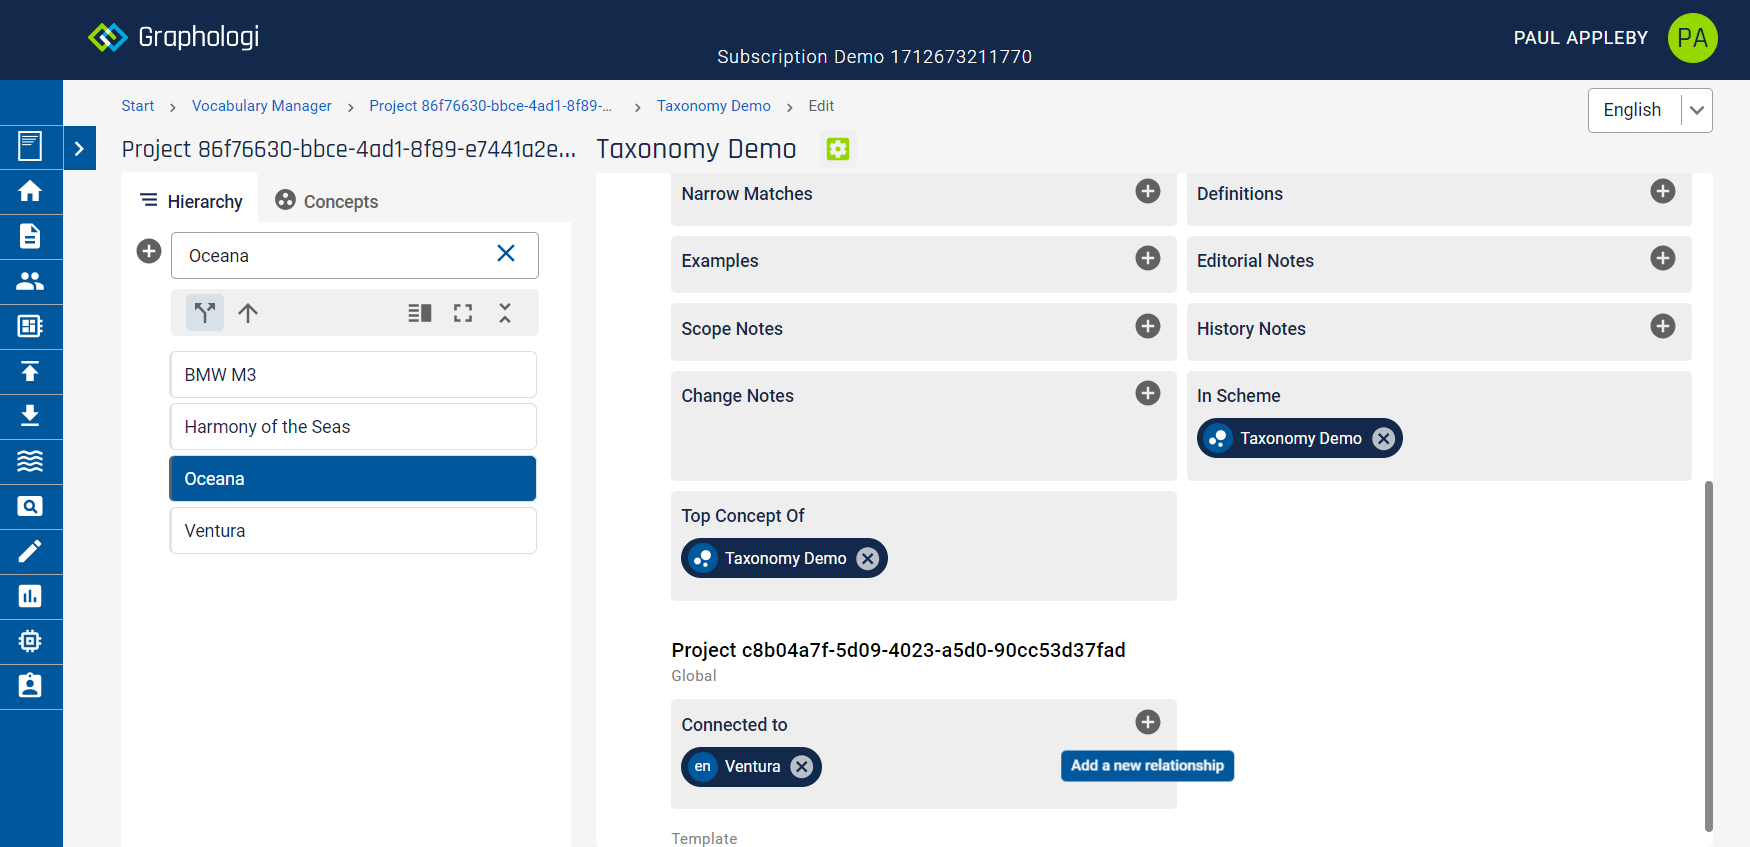
If annotations are activated an additional icon will be displayed to the left of a field or chip, as shown in the following image. A grey icon indicates no annotation exists for that value, a green icon indicates one does exist and an orange icon indicates the annotation is deprecated.
To add an annotation, or edit an existing one click on the icon. That will open a dialog box similar to the following image:
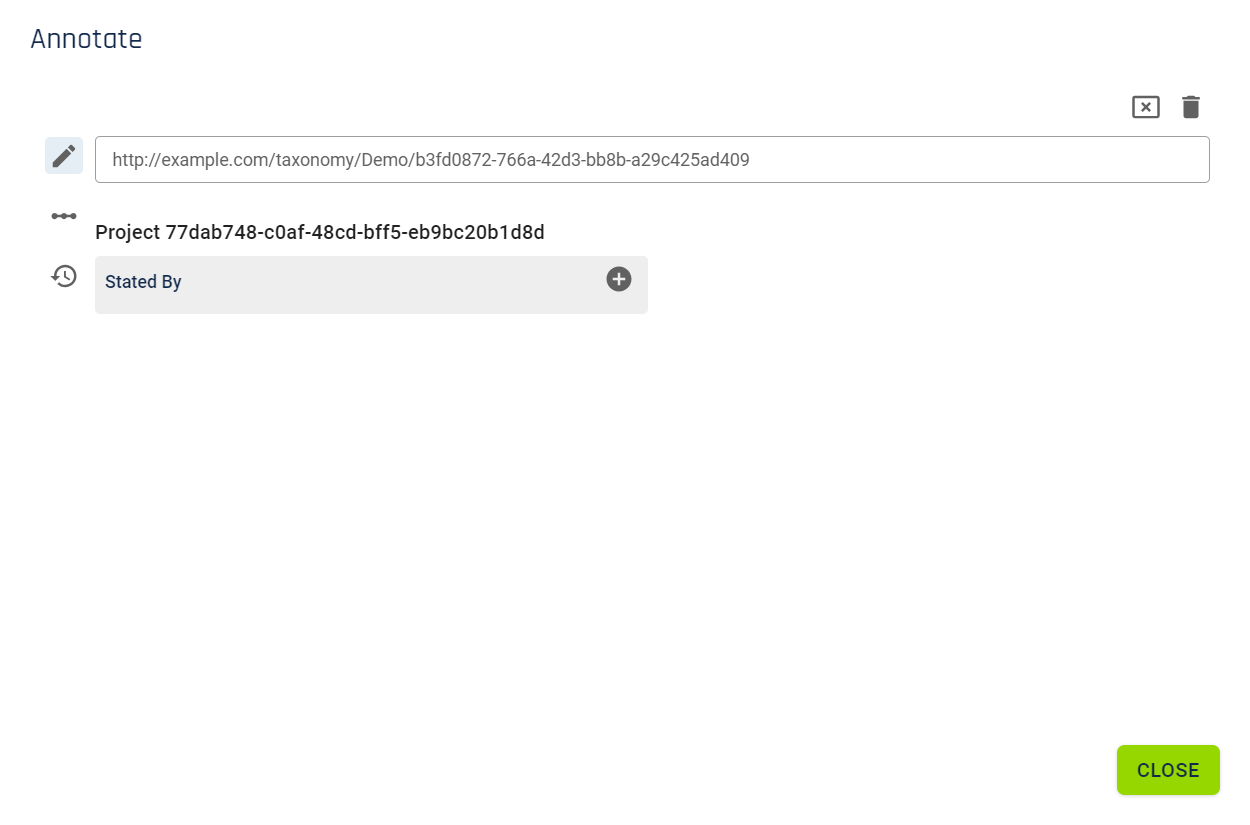
On this screen you can add data the same as elsewhere where templates are used. You also have access to the triples view and the history for the statement. You can also deprecate or delete the statement.
Note that IRI generation for statements is fixed. The IRIs will use the base IRI of the taxonomy or dataset and append a UUID to ensure uniqueness.
If a value is changed in a field or a relationship deleted then it is likely that the annotation will no longer be relevant. These annotations are not removed automatically. If you do wish to clean up disconnected annotations you can click on the ![]() icon on the home page for the taxonomy or dataset. Annotations that will be cleaned up are those where the subject of the annotation (the concept or resource) is still in the concept scheme or dataset.
icon on the home page for the taxonomy or dataset. Annotations that will be cleaned up are those where the subject of the annotation (the concept or resource) is still in the concept scheme or dataset.
Graphologi will automatically manage inverse and symmetric relationships. However, if you have created data before making a property symmetric, or adding an inverse, you may end up with situations where the information does not exist in both directions. Graphologi will handle edits to these relationships and it will not cause any errors.
However, you may want to consider synchronising the relationships for consistency. To do this click on the ![]() icon on the taxonomy or dataset home page, located towards the right-hand side of the screen. This operation is a batch operation and may take a little time to run.
icon on the taxonomy or dataset home page, located towards the right-hand side of the screen. This operation is a batch operation and may take a little time to run.
If the relationships in a taxonomy or datasets reference other taxonomies or datasets within the project you will need to run the synchronisation on each taxonomy or dataset.
Disjoint properties are those where two separate properties cannot have the same value. Asymmetric properties are those where, for example, if A hasParent B, it is not possible for B hasParent A to exist. Graphologi will apply both of these rules when users are searching for or adding values. However, note that, if two users take these actions at exactly the same time neither will be rejected, as it would be impossible to know which action to reject. For object properties you will see an on-screen warning when viewing the the concept, SKOS-XL label, or resource. Quality checks report on invalid use of disjoint and asymmetric properties.
To access this feature click on the ![]() icon on the left of the screen. This will display a screen similar to the following image.
icon on the left of the screen. This will display a screen similar to the following image.

Advanced search allows you to search across a project. Results will be displayed in a tabular format.
By default all components in the project are searched (i.e. taxonomies or datasets). If you wish to reduce the scope of the search to a particular taxonomy or dataset select it from the drop-down menu at the top of the screen.
You can also adjust the search language by selecting the appropriate language from the Language drop-down menu.
The results of any search will be displayed with the default columns showing. You can show additional columns (or hide displayed columns) by clicking on the ![]() icon on the right of the screen and selecting those you wish to add.
icon on the right of the screen and selecting those you wish to add.
You can adjust the number of results to show using the drop-down menu on the right of the screen.
You can switch into full screen mode by clicking on the ![]() icon.
icon.
You can filter the search results in one of two ways. For certain columns there is a 'Quick filter' option where you can enter text for that property. This will add the entered filter to the filters area of the screen, similar to the following image.
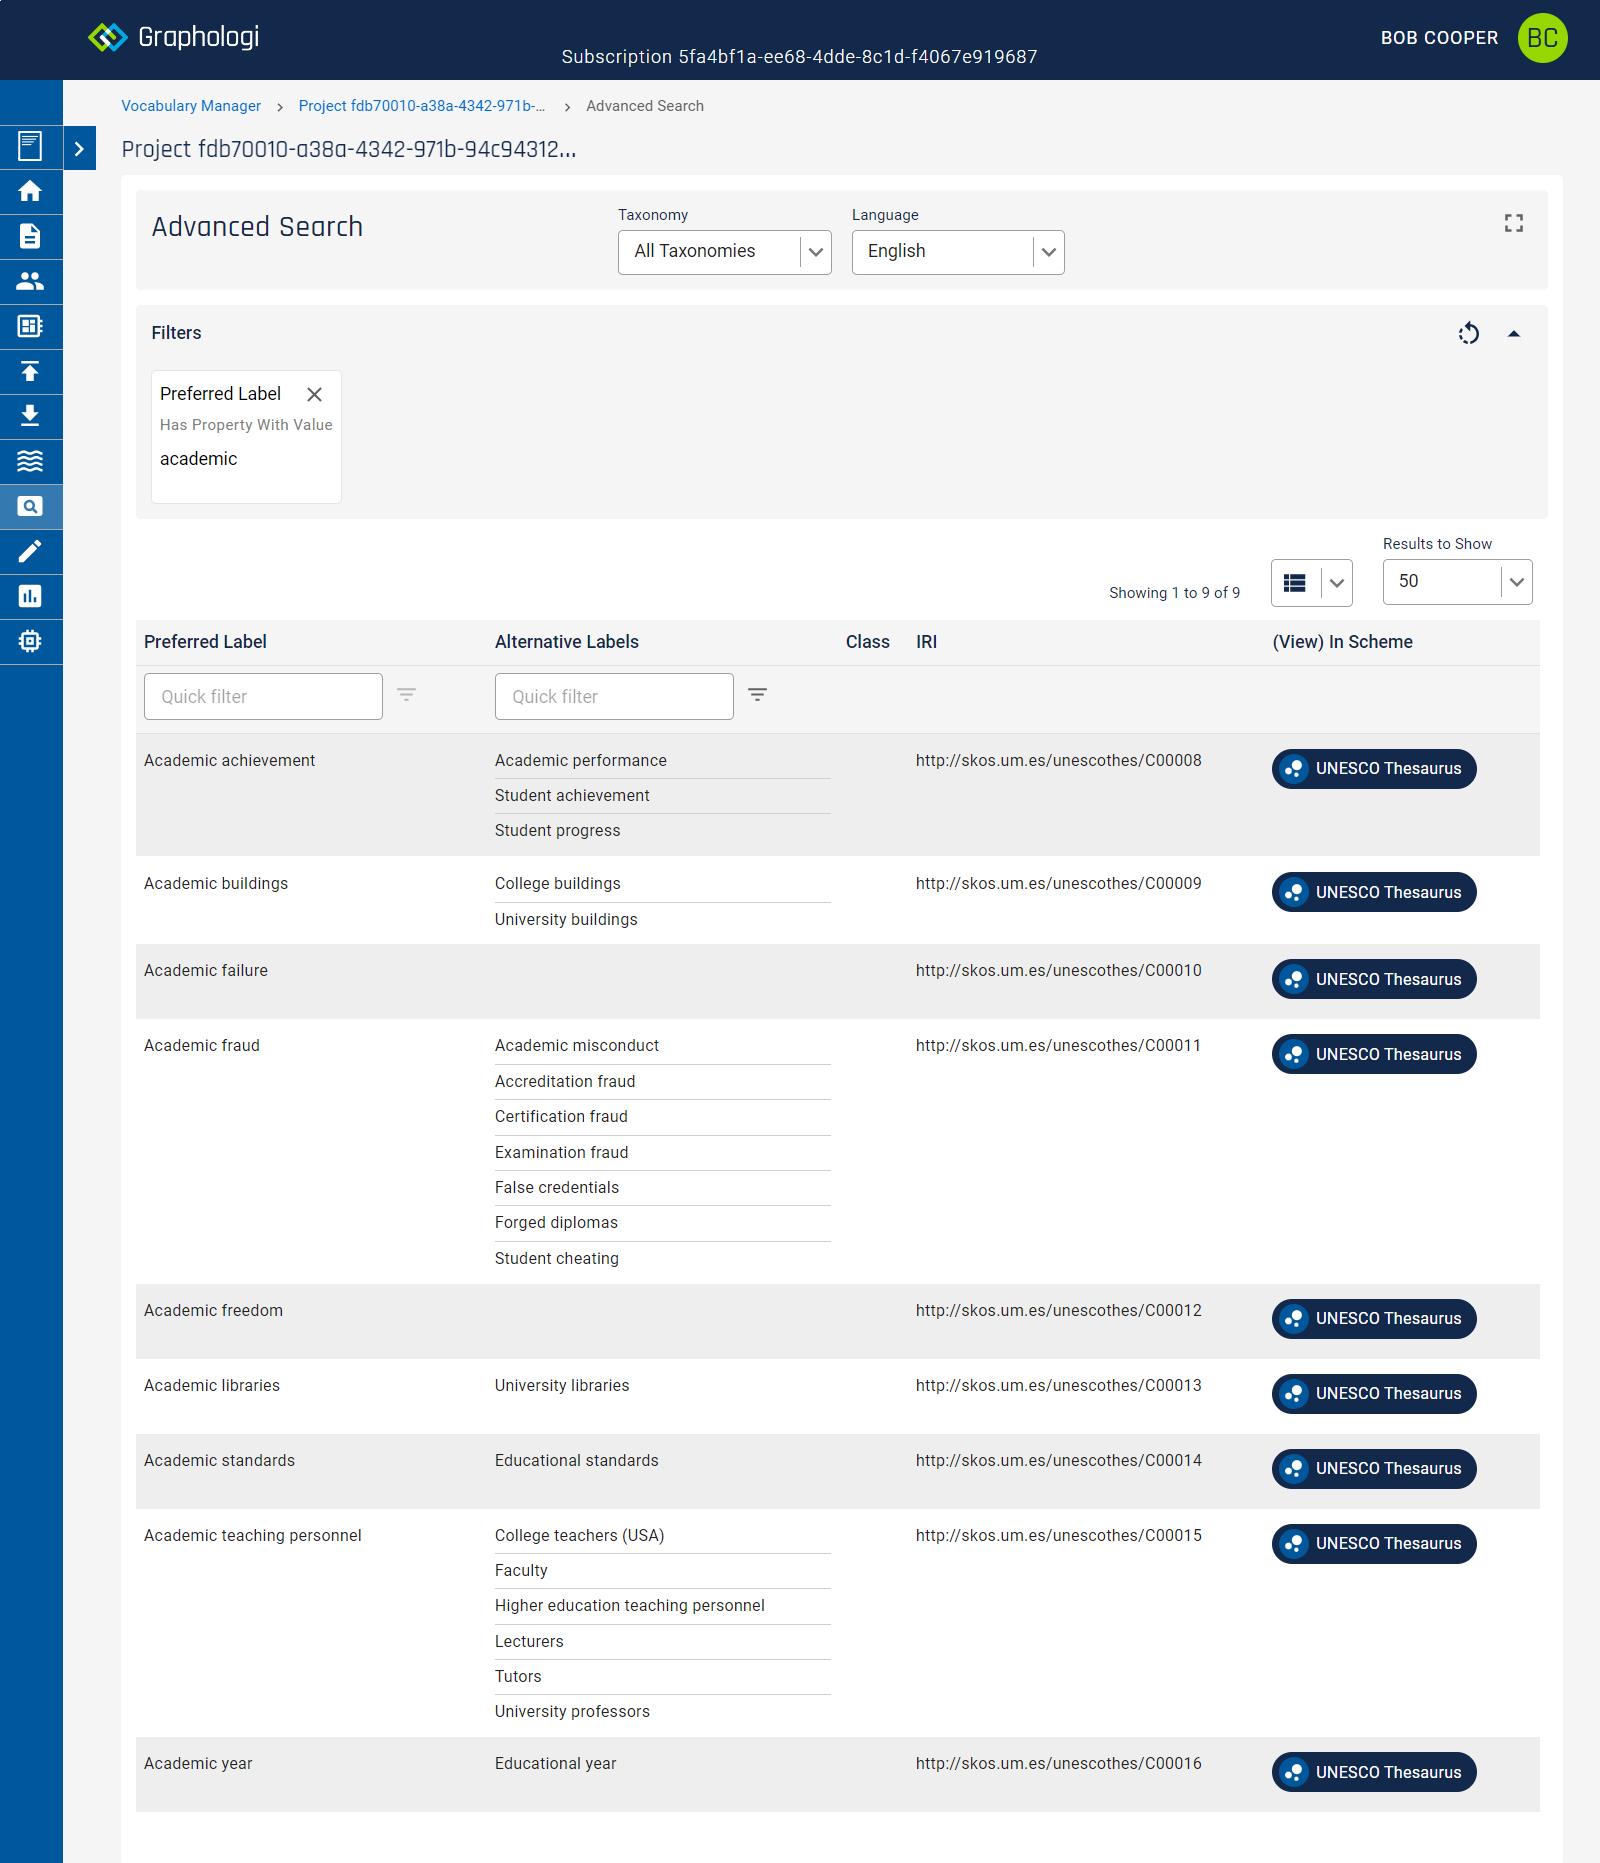
You can remove the filter by clicking on the ![]() icon. If you enter new text in the quick filter it will replace the filter for that property. You can remove all filters by clicking on the
icon. If you enter new text in the quick filter it will replace the filter for that property. You can remove all filters by clicking on the  icon. The filters area can be hidden by clicking on the
  icon.
icon.
If you require more control over filtering you can do so by clicking on the ![]() icon in the appropriate column. This will display a dialog box similar to the following image.
icon in the appropriate column. This will display a dialog box similar to the following image.
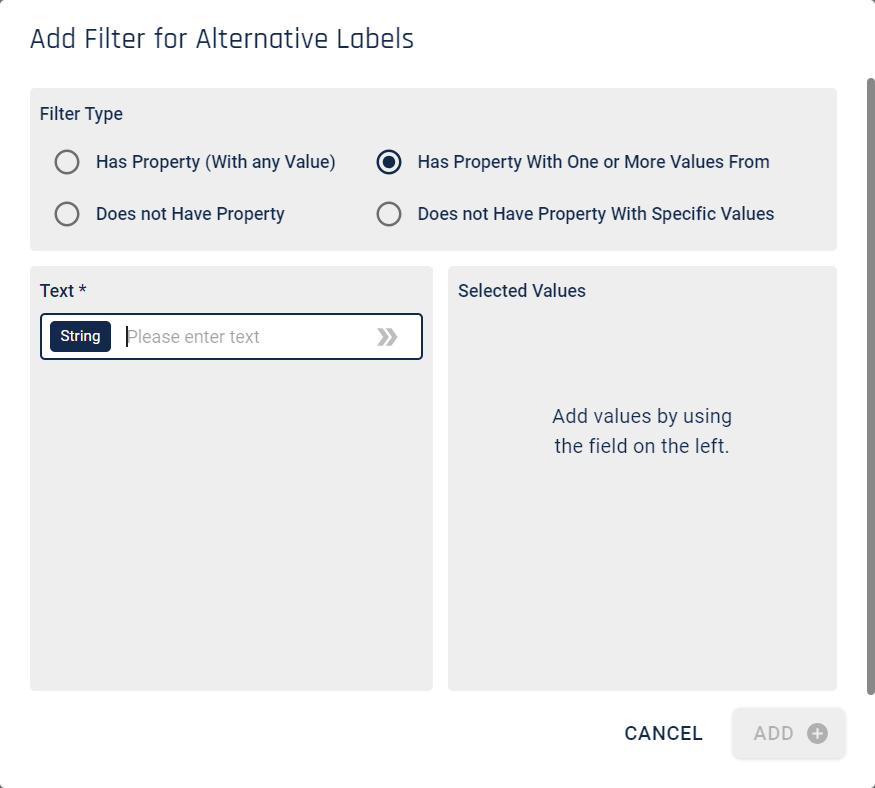
You can choose the type of filter that you want to apply. For applicable filter types you will then have the option to enter one or more values (up to a maximum of five). This will look similar to the following image.
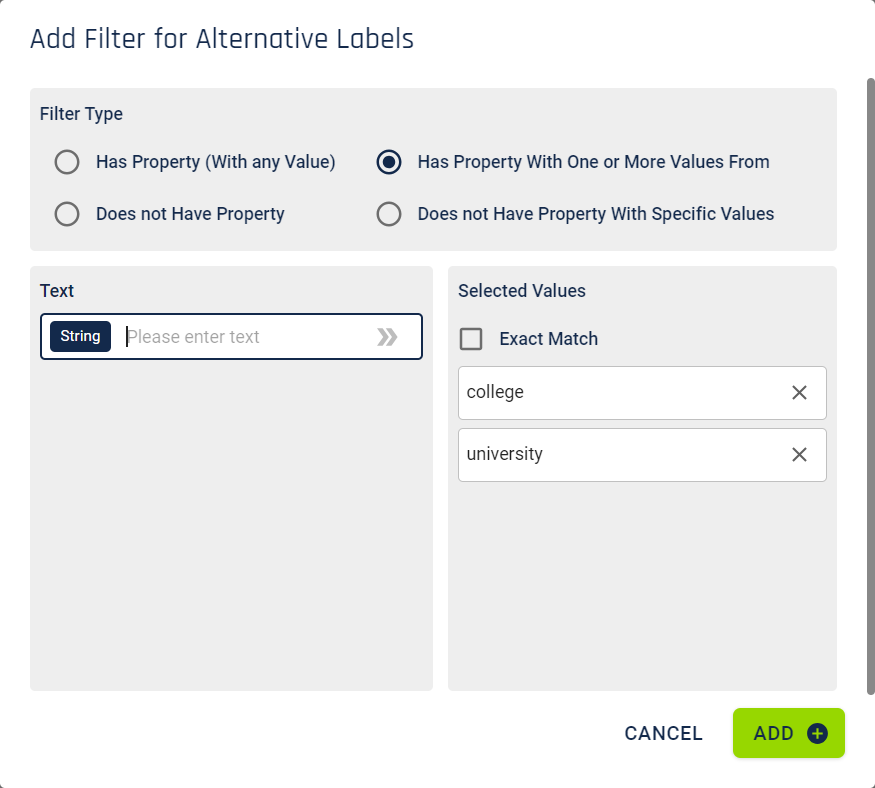
Multiple values implies that one or more of the values must match. For appropriate data types you can also select whether an exact match should be applied. If not then a partial match is used.
Click on the button to apply the filter. The filter will be displayed in the filters area similar to the following image.
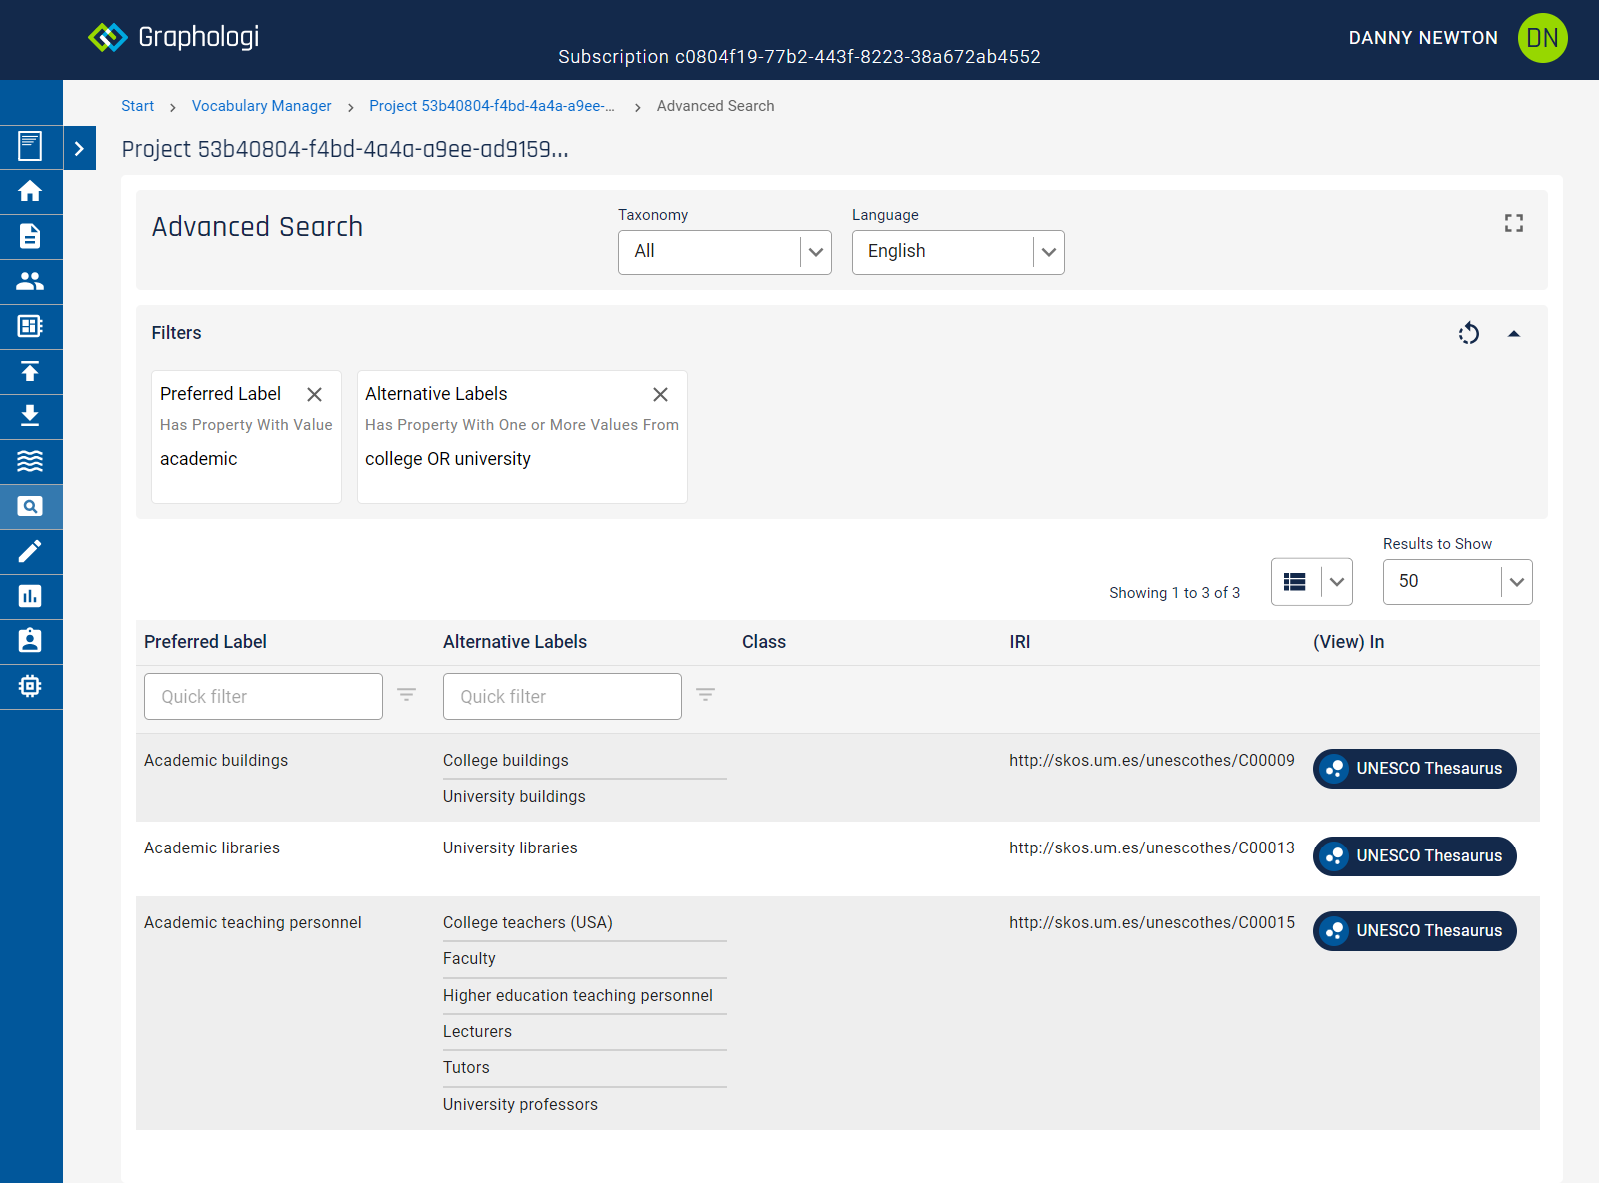
You can have up to five filters active at one time and only one filter can be applied per column.
To access this feature click on the ![]() icon on the left of the screen.
icon on the left of the screen.
Advanced search allows you to search across a project for classes and properties within ontologies. Results will be displayed in a tabular format. You can filter the search via label and, if configured, annotation properties, as well as resource type, language and ontology.
The label filter will list all annotation properties that are associated with an ontology once that is selected in the ontology filter.
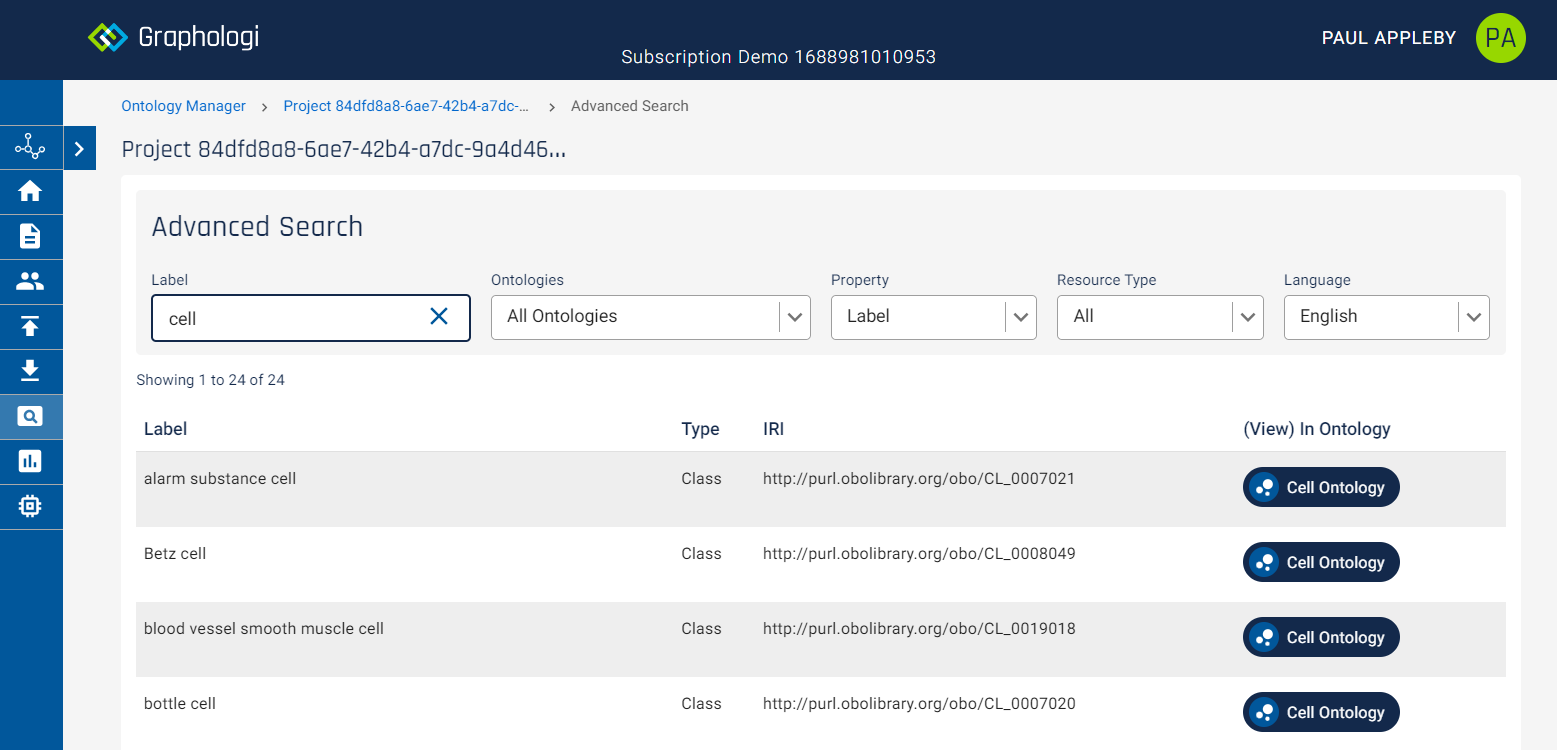
To access this feature click on the ![]() icon on the left of the screen. This will display a screen similar to the following image.
icon on the left of the screen. This will display a screen similar to the following image.
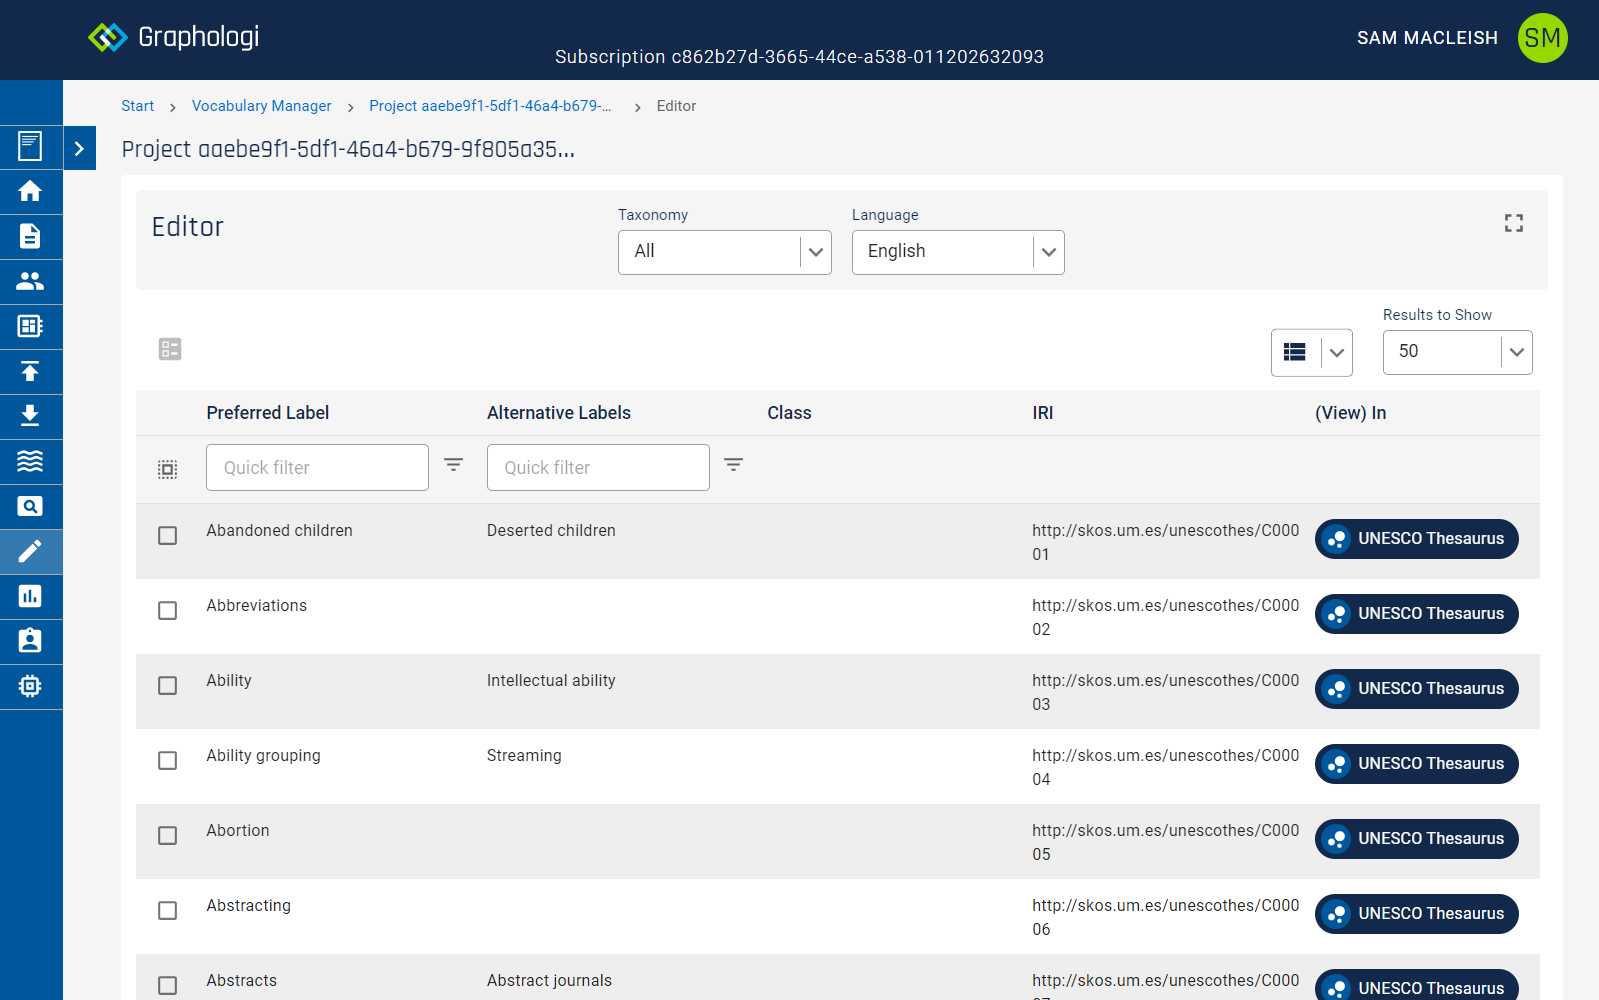
The editor allows you to do bulk editing operations on concepts or resources. The display looks similar to that for Advanced Search and all of the display options and filtering capabilities available there can also be used in the editor.
You need to select the items you want to bulk edit. To do this click on the checkboxes on the left of the screen. The 'Select All' checkbox will select all the items on the page of results being shown. You can select items from multiple results pages. The limit is 1000 items.
To make an edit click on the ![]() icon. This will display a dialog box similar to the following image.
icon. This will display a dialog box similar to the following image.
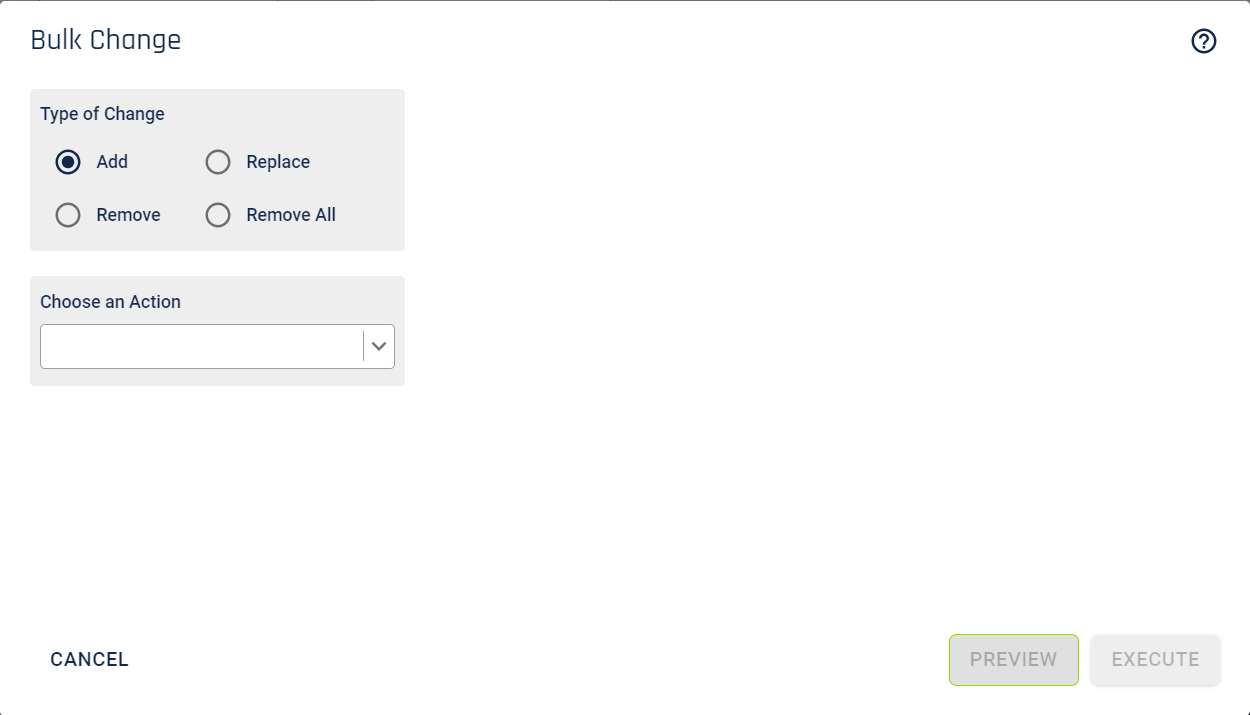
You can choose the type of edit that you want to apply. The options are add a value/relationship, remove a value/relationship, remove all values/relationships for a particular property and replace all values/relationships for a property with a new value.
Next, select an action from the drop-down list. Depending upon the action you may be presented with additional panels to select a property and/or to enter the data you want to apply. For example, in the following screenshot it shows adding a change note.
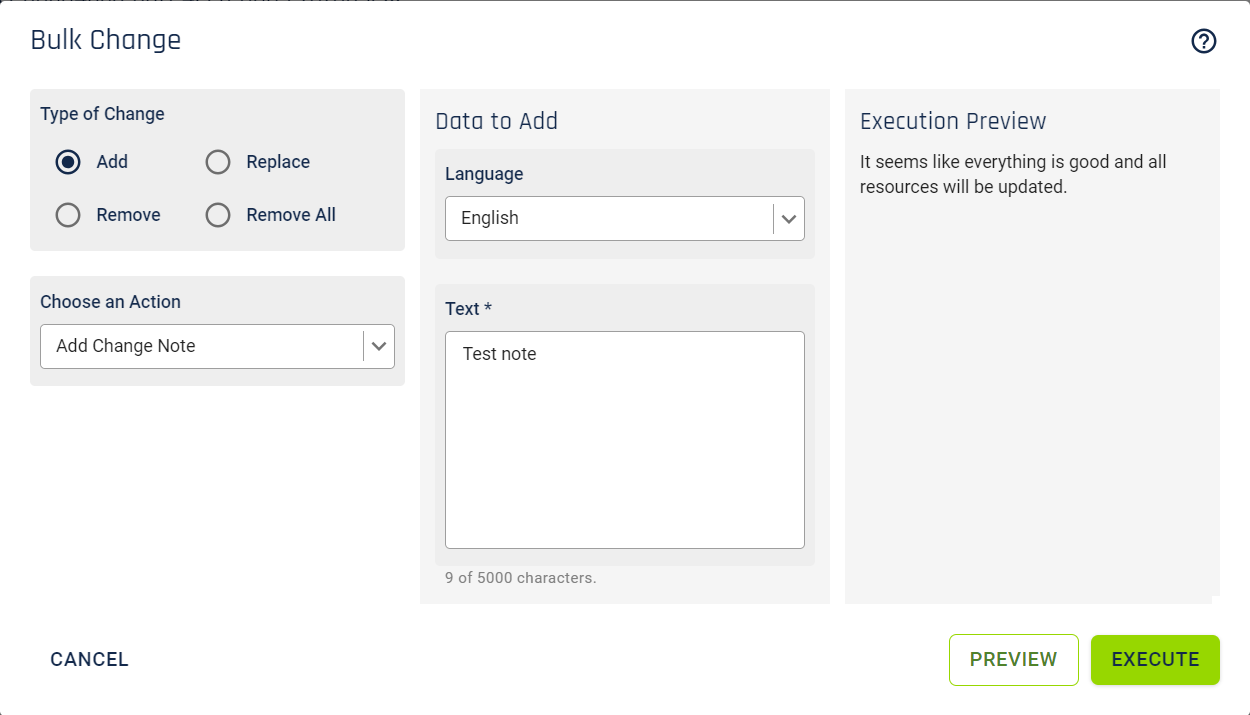
You can see a preview of what Graphologi will attempt to do by clicking on the button.
When you are happy with the settings click on the button. Bulk edits are batch operations so that means that the project will be locked whilst processing happens.
Please consider taking a snapshot before applying a bulk edit.
Governance is important in managing data and part of governance concerns the workflow around the lifecycle of creating and maintaining that data. Graphologi's workflow feature allows you to have control over the management of the state of taxonomies, ontologies, datasets and the tasks needed to update them.
There are various parts to workflow within Graphologi:
Workflow also combines with suggestions to provide a means for users to make suggestions for taxonomies. Please see the Suggestions section for more information.
In addition to this we would recommend taking at look at the following features in Graphologi, all of which can help with the lifecycle and governance of data.
Workflow can be activated per taxonomy, ontology, or dataset. This can be done at any time by checking 'Is Activated' in the workflow panel within the details screen, as shown in the following image. See the section Taxonomy detail for more information.

Workflow can be deactivated by unchecking the 'Is activated' box. If workflow is deactivated any workflow data is not removed, but will not be visible other than in triples view.
There are times when it can be useful to batch update the status of all concepts and/or labels in a taxonomy, or all resources in a dataset or ontology. For example, after import, or potentially when starting a new cycle of work. There are various batch operations that can be run depending upon the project type:
You can access the operations in the details section as shown in the following image.
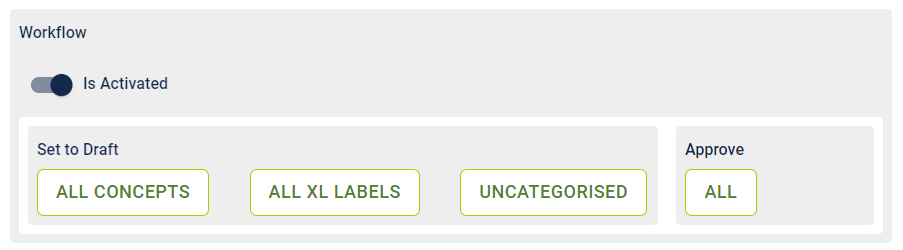
A key part of workflow is managing the status of concepts, labels and resources (from here forward assume everything applies everywhere).
When workflow is activated a workflow bar is made available, similar to the following image.

There are four possible states: 'uncategorised', 'draft', 'approved' or 'rejected'. Graphologi does not enforce any opinion of what these states mean - that is for you to decide.
If something is 'uncategorised' the first step is to set it to draft. This is done by clicking on the ![]() icon. Note that you can, if wanted, immediately set it to 'approved' or 'rejected' instead. To approve click on the
icon. Note that you can, if wanted, immediately set it to 'approved' or 'rejected' instead. To approve click on the ![]() icon. To reject click on the
icon. To reject click on the ![]() icon.
icon.
Approved concepts, labels or resources cannot be edited. Note that edits to other things may still update them - for example the use of inverse or symmetric relationships can do this. Rejected concepts, labels or resources are not treated in any special manner, but rejected concepts or resources would most likely either subsequently be marked as deprecated, or they would be deleted.
When something is in draft mode the workflow bar will look similar to the following image.

Things that are in a draft state can be assigned to a user to oversee any work to be done on them. To assign to a user click on the ![]() icon. This will display a dialog box similar to the following image.
icon. This will display a dialog box similar to the following image.
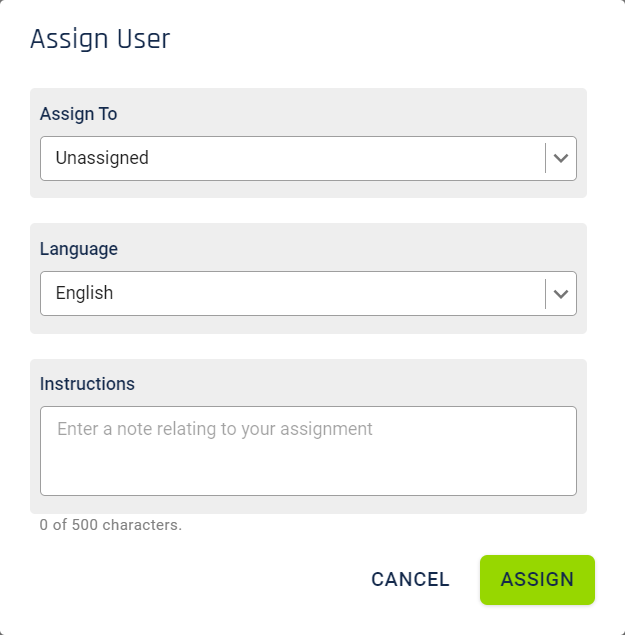
You may also see an option to Assign and Notify a user, which will send them an email with a link.
You can select from any user that has access to the project. If you leave it as 'Unassigned' then it is essentially available for anyone to pick up. Note that you need to make sure that any assigned users have the necessary permissions to complete their work.
You can include some instructions when assigning to let a user know what you expect them to do.
Click the button to make the assignment. Once a concept or resource is assigned the workflow bar will look similar to the following image.
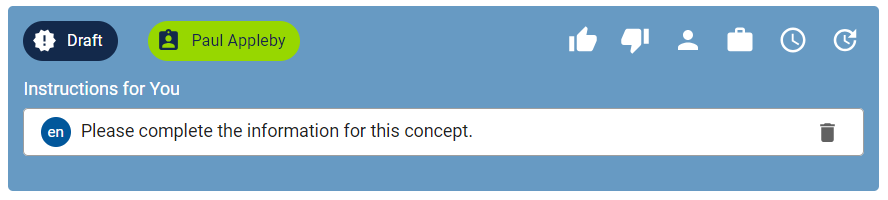
It may be that simply assigning a status provides the necessary control. However, if you need to go further and manage individual tasks for each concept, label or resource, you can do so using tasks. Example tasks might be asking somebody to add synonyms or creating a definition for a concept.
To view and create tasks click on the ![]() icon. This will display the Tasks area similar to the following image.
icon. This will display the Tasks area similar to the following image.
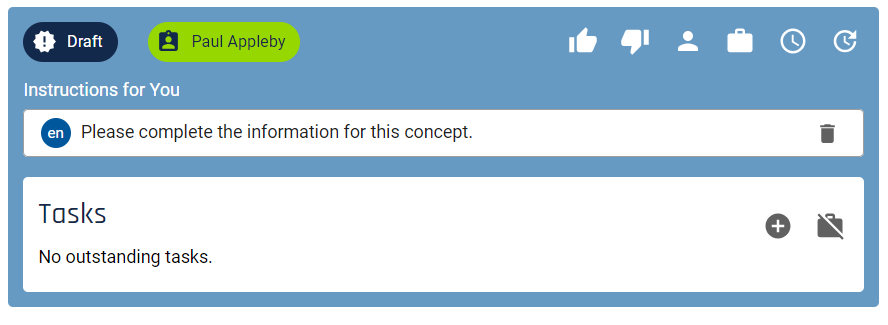
If you have permissions you will be able to create new tasks and, optionally, assign them to users. To add a task click on the ![]() icon in the Tasks area. This will display a dialog box similar to the following image.
icon in the Tasks area. This will display a dialog box similar to the following image.
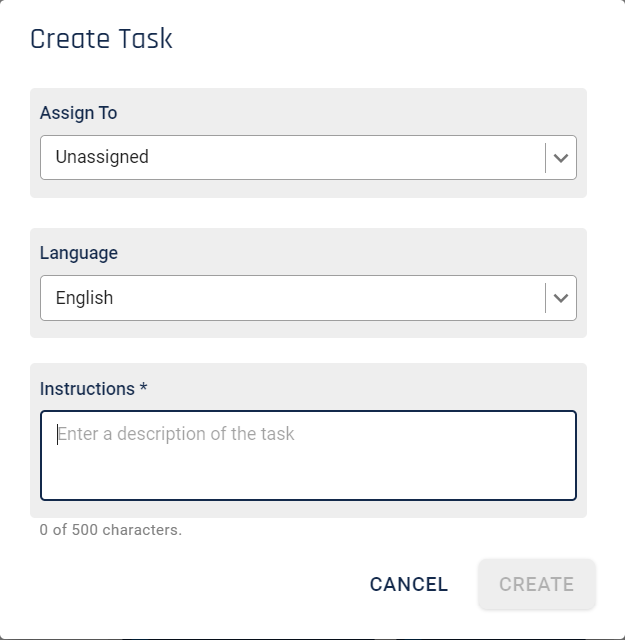
You may also see an option to Create and Notify a user, which will send them an email with a link.
Select a user to assign the task to if wanted. You can always assign a task later on. Enter a description of the task. Click the button to complete the creation of the task. The Tasks area will now look similar to the following image.
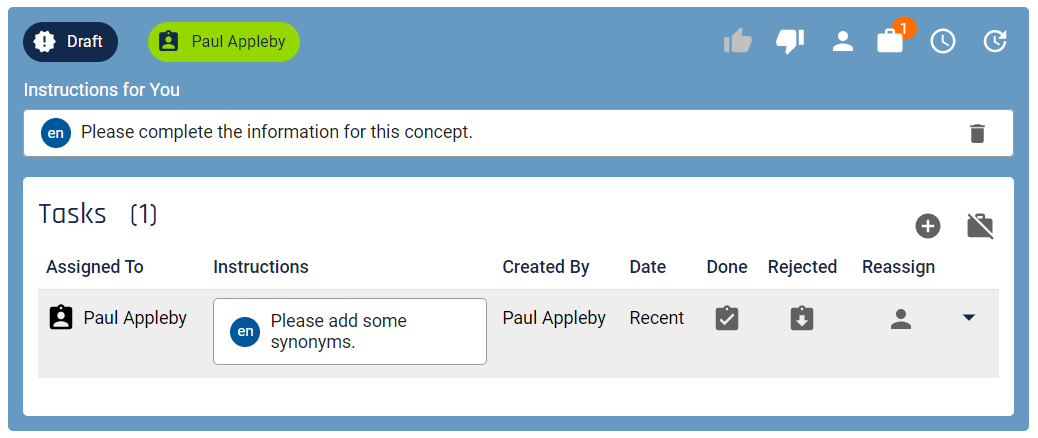
It is possible that there might need to be a discussion about the task. You can add and view comments for a task by clicking on the ![]() icon.
icon.
When a task is completed click on the ![]() icon. Alternatively, to reject a task click on the
icon. Alternatively, to reject a task click on the ![]() . If you want to reassign the task to another user click on the
. If you want to reassign the task to another user click on the ![]() icon, which will display a dialog box allowing you to select the appropriate user.
icon, which will display a dialog box allowing you to select the appropriate user.
If a task is assigned to a user only they can mark it as done or, alternatively, reject it, if they think the task is inappropriate for whatever reason.
Concepts, labels or resources with tasks can only be approved when all tasks are marked as done (or are rejected). These actions are available to anybody with permission to approve and reject (not just the assignee if there is one).
When something has been through the approval lifecycle more than once it might be useful to see a list of any previous tasks. You can view (and hide) these by clicking on the ![]() icon.
icon.
As part of the review process it might be useful to see what changes have been made to a concept, label or resource. A summary of the history since the last status change is available by clicking on the ![]() icon.
icon.
A summary of status changes for a concept, label or resource can be viewed by clicking on the ![]() icon.
icon.
It is possible to view a summary list of concepts, labels or resources in particular statuses using the 'Lifecycle' tab in the details section of the taxonomy or dataset. Within the lifecycle tab select the lifecycle state that you want to view - 'Deprecated', 'Uncategorised', 'Draft' or 'Rejected'. The view will be similar to the following image, which shows some uncategorised concepts
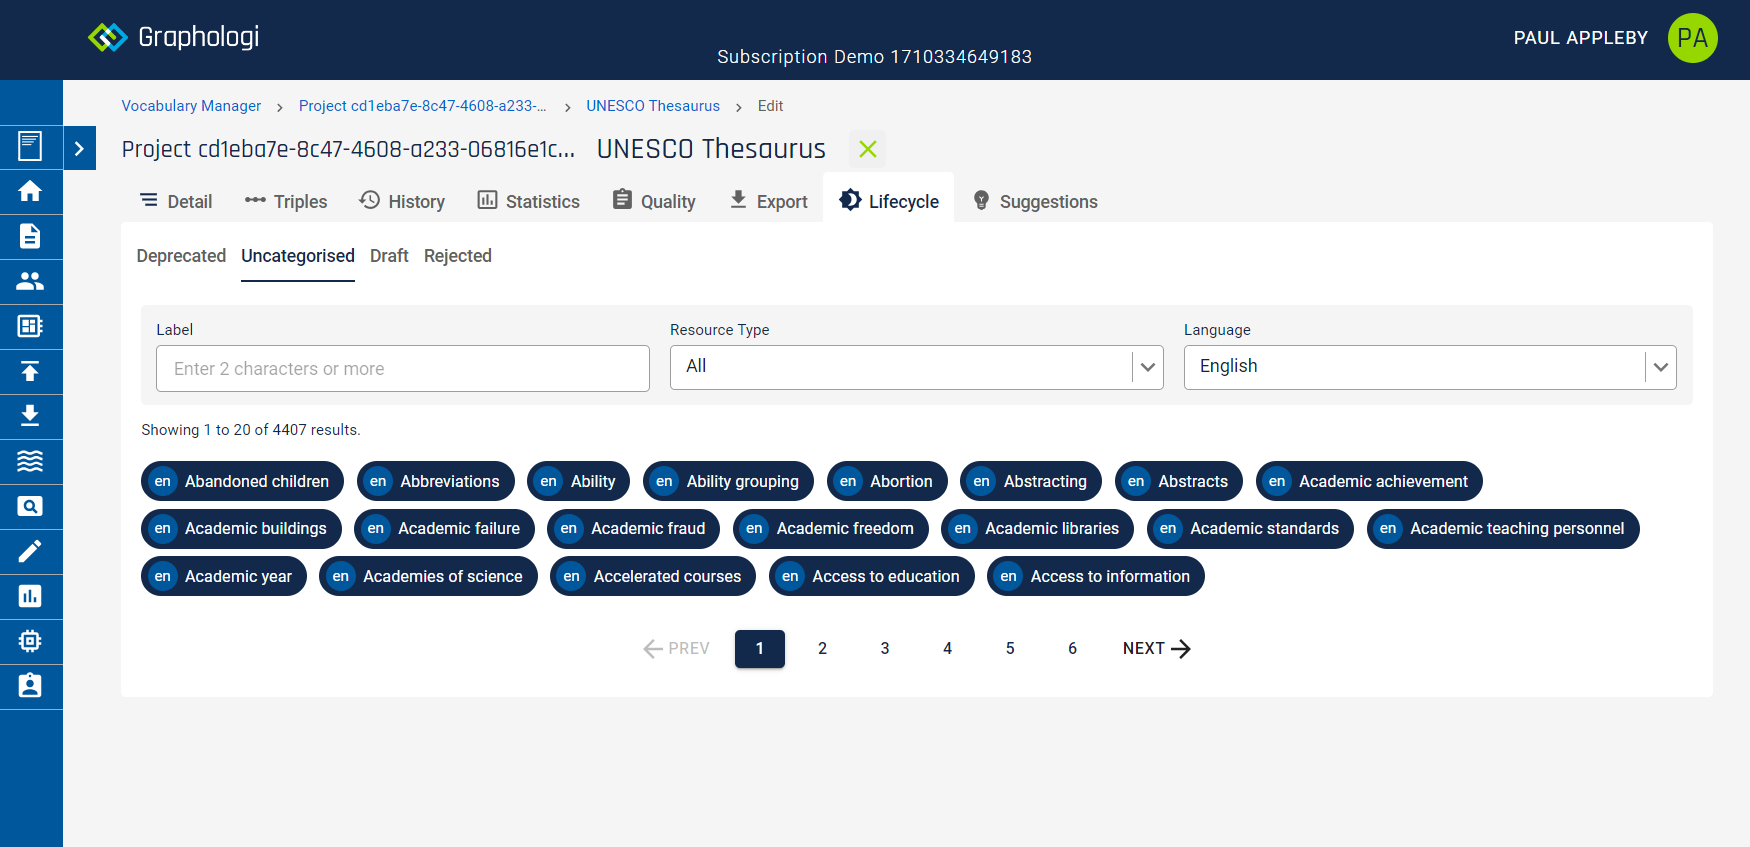
To keep track of work that is assigned to you and to view work assigned to others you can use the Jobs Manager. This can be accessed by clicking on the ![]() icon on the left of the screen. This will display a screen similar to the following image.
icon on the left of the screen. This will display a screen similar to the following image.
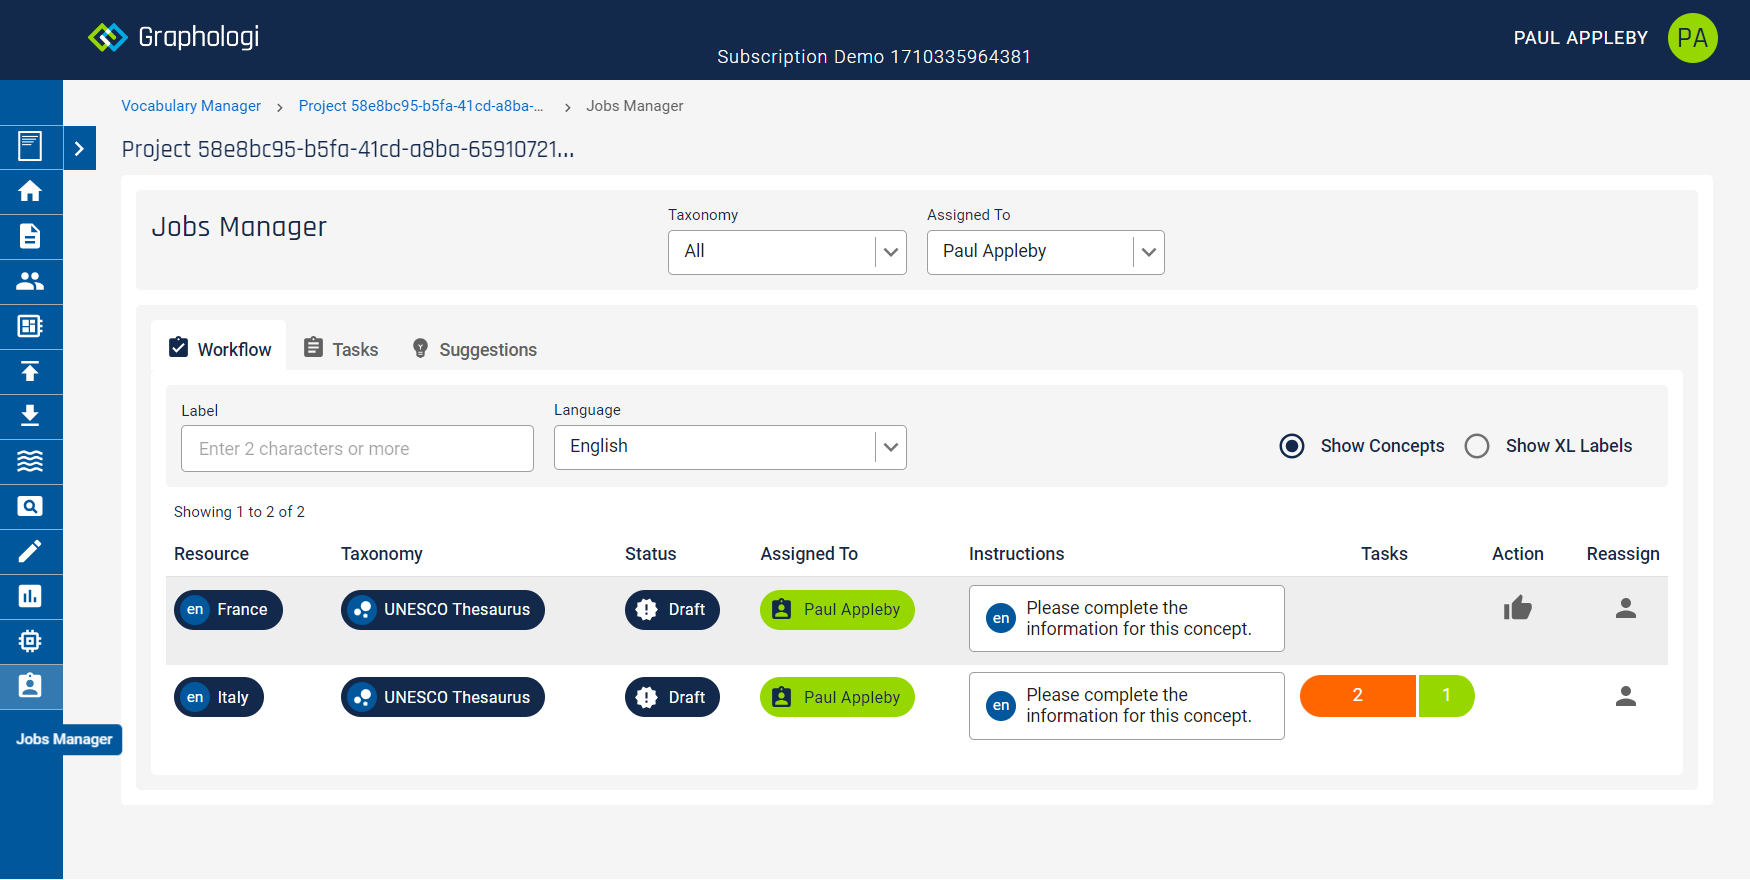
There are tabs for 'workflow', 'tasks' and, for taxonomy projects, 'suggestions'.
By default the view shows assignments for you across all taxonomies, ontologies or datasets within a project. You can filter the results using the filters at the top of the screen.
You can filter the view by using the available filters. You also have the option to approve a concept, label or resource if there are no outstanding tasks for it. If there are tasks these are displayed, with counts, as a coloured bar as shown in the screenshot above, where orange is outstanding tasks, green is completed and red is rejected. There is also the option to reassign a concept, label or resource to another user.
On the 'Tasks' tab any outstanding tasks are listed (those that are still pending), which will look similar to the following image.

You have the option to reassign tasks to other users.
Although suggestions are not directly connected to workflow being activated it is useful to be able to see which suggestions are assigned to users. Select the 'Suggestions' tab to do this. You should see a screen similar to the following image.
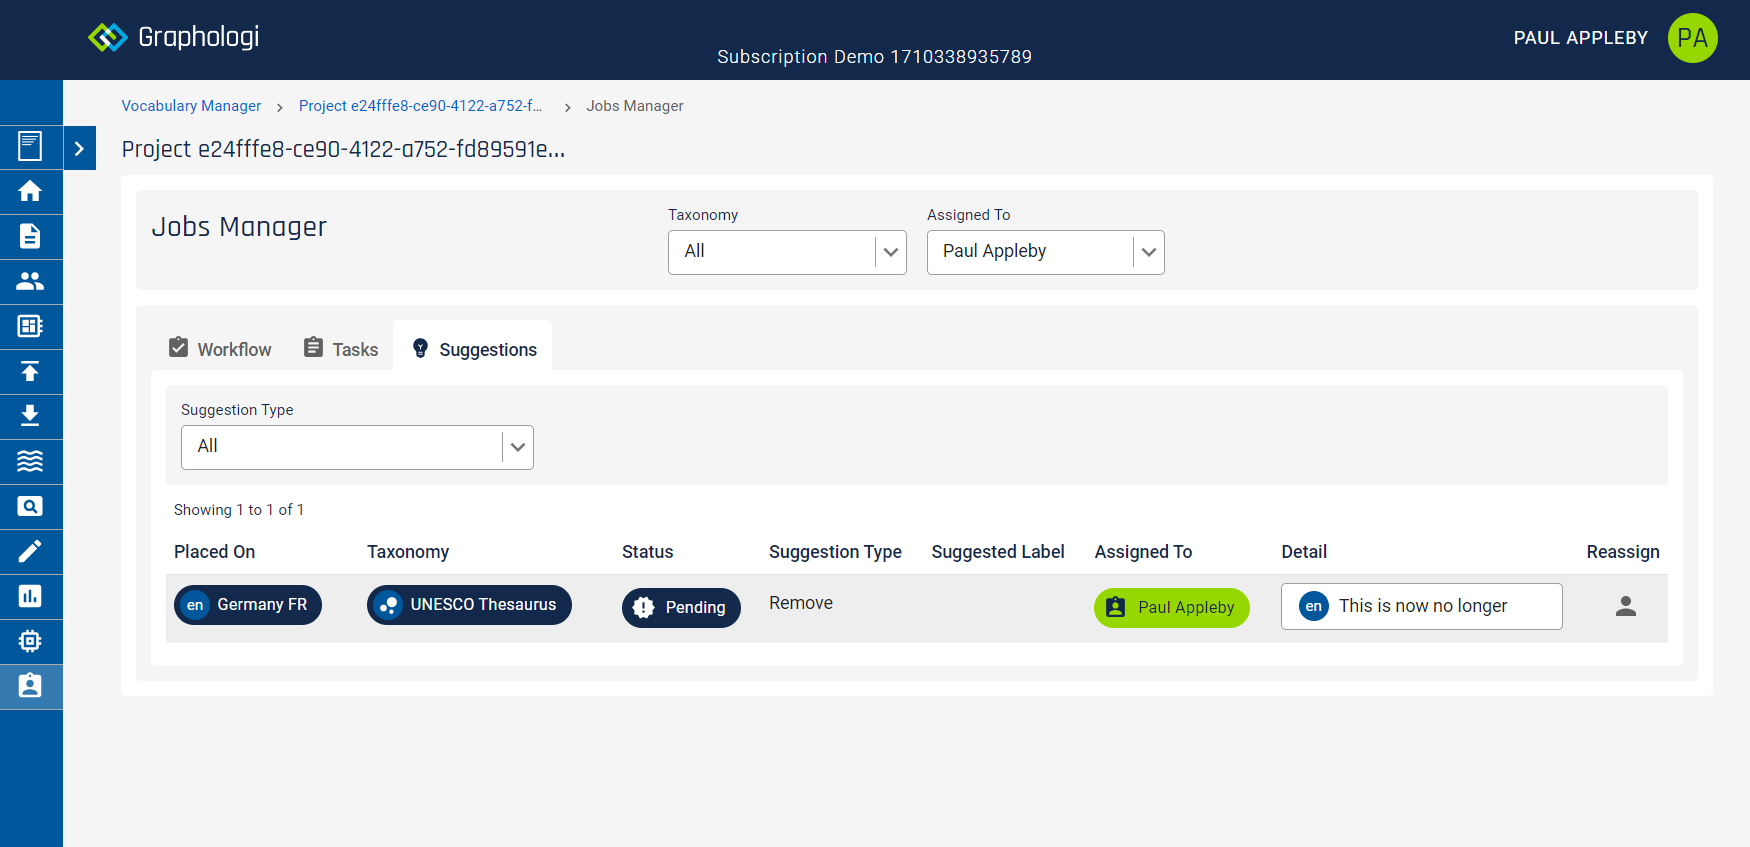
You have the option to reassign suggestions to other users.
Note that, in Jobs Manager, deprecation suggestions do not show up when accepted as deprecated concepts are not displayed.
There are some predefined reports available to help with analysing workflow. These will depend upon the project type. For taxonomy project they are:
For data and ontology projects there are similar reports for the first two bullet items above.
There are multiple entitlements available for workflow and you will need certain entitlements for particular actions.
| Entitlement | Description |
|---|---|
Activate workflow |
Allows a user to activate or deactivate workflow. |
Initialise workflow |
Allows a user to set a concept, SKOS-XL label or resource to a 'draft' status. |
Manage workflow |
Allows a user to set the status for workflow. |
Assign workflow |
Allows a user to assign concepts, labels or resources to users. |
Batch change workflow status |
Allows a user to execute batch workflow changes. |
Create task |
Allows a user to create tasks (and edit them). |
Edit task |
Allows a user to edit existing tasks. |
View task |
Allows a user to view tasks. |
Discuss |
Allows a user to add comments. |
View discussion |
Allows a user to view comments. |
There are additional entitlements available for suggestions. Note that the discussion entitlements above are also relevant for suggestions.
| Entitlement | Description |
|---|---|
Make suggestions |
Allows a user to make suggestions. |
View suggestions |
Allows a user to view suggestions. |
Manage suggestions |
Allows a user to accept or reject suggestions. Note in some subscriptions this may be called 'Manage suggestion workflow'. |
Reports will generally fall into one of two categories - those used for statistical reporting and those used for additional validation. All reports are created and managed in the same way.
For many organisations there are business rules that need to be adhered to for taxonomies, ontologies or data. Graphologi provides quality checks to ensure data conforms to built-in rules, such as the SKOS standard, but many organisations have needs over and above these constraints, such as limiting the length of preferred labels. Reports allow users to create custom outputs to provide the necessary information to do this. Reports are based on saved SPARQL queries and therefore have a powerful language underneath them to query the data. See the section Using SPARQL for more details.
Graphologi provides some project level predefined reports and you can create as many custom reports as you need. Note that reporting is only available in Premium subscriptions and above.
To access reporting click on the ![]() icon on the left. This will display a screen similar to the following image.
icon on the left. This will display a screen similar to the following image.
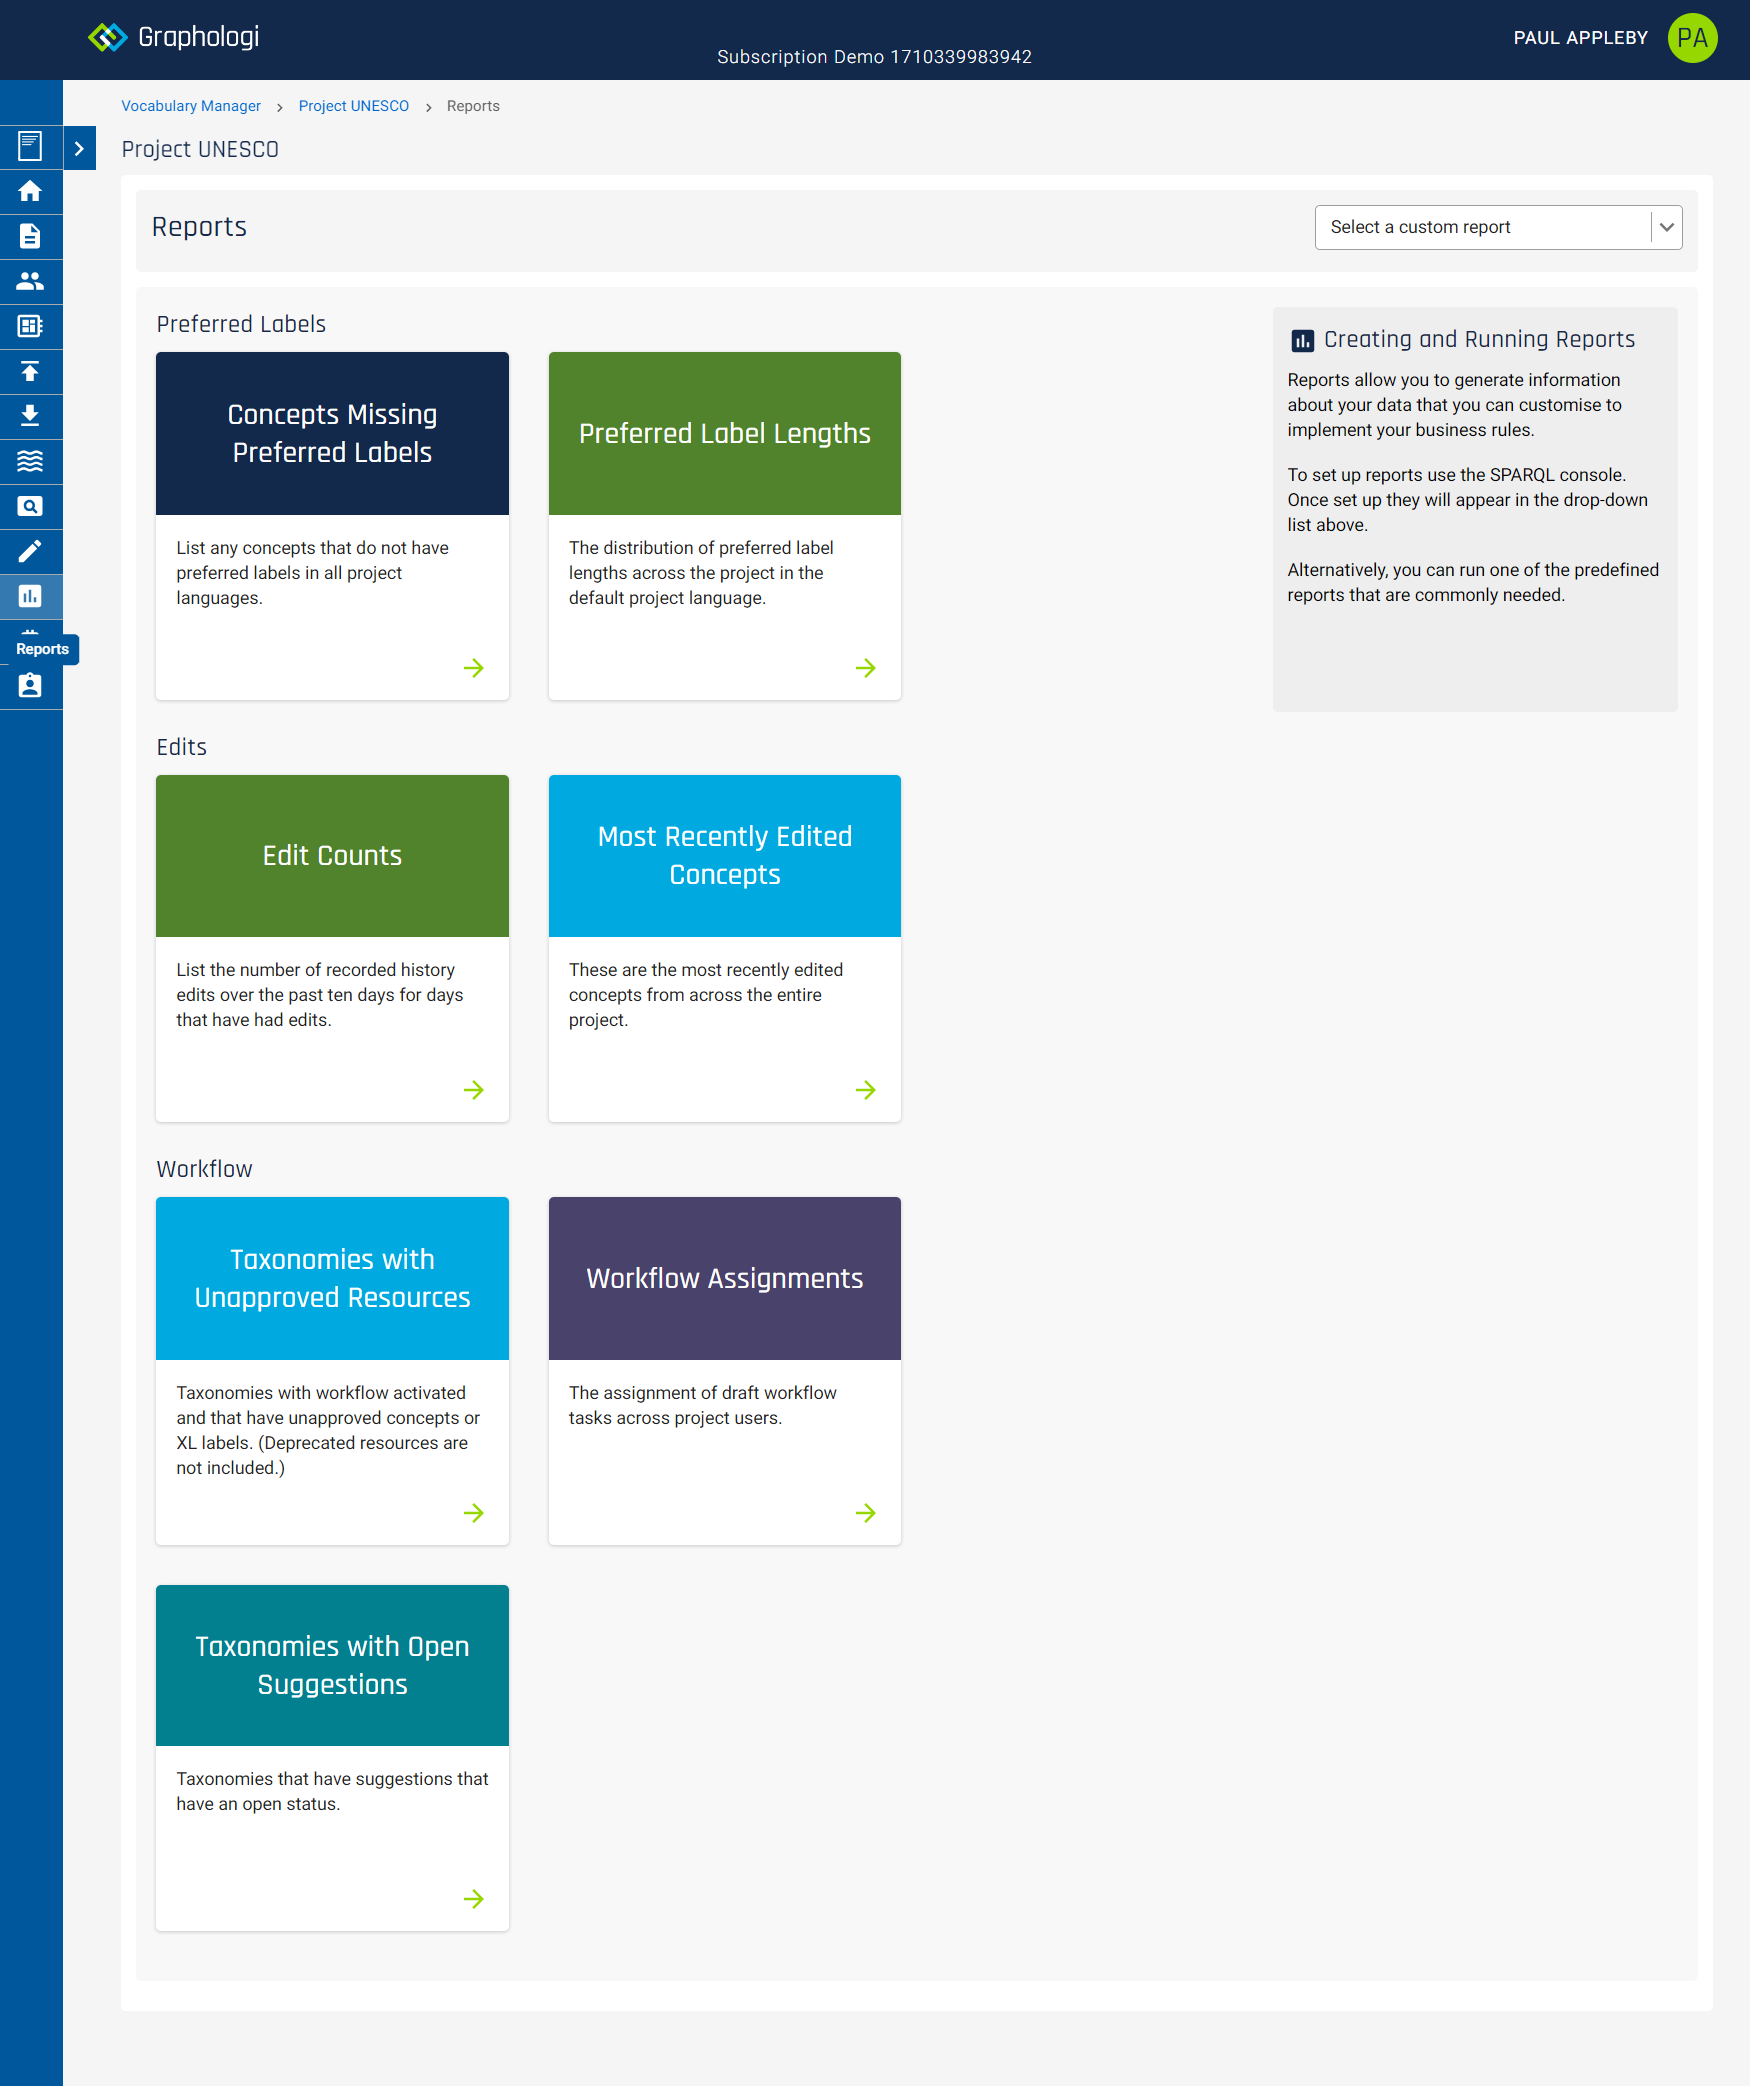
You will need the appropriate entitlement to access this part of the application, which is Can query project. To run parmeterised reports you will also need Can run saved query.
You can either run one of the predefined reports by clicking on the appropriate report card or, if set up, run a custom report by selecting it from the drop-down list on the right of the screen.
If the report is parameterised then there will be the opportunity to enter values as inputs to the report. The inputs will depend upon how the report is configured, but might be selecting a taxonomy, inputting a concept, or setting a date. One you have entered values you will be able to run the query. Note that paramters may be optional, in which case you can omit filling it in if desired.
The exact looks of each report will vary depending upon the data it presents. The image below is the output for one of the predefined reports.
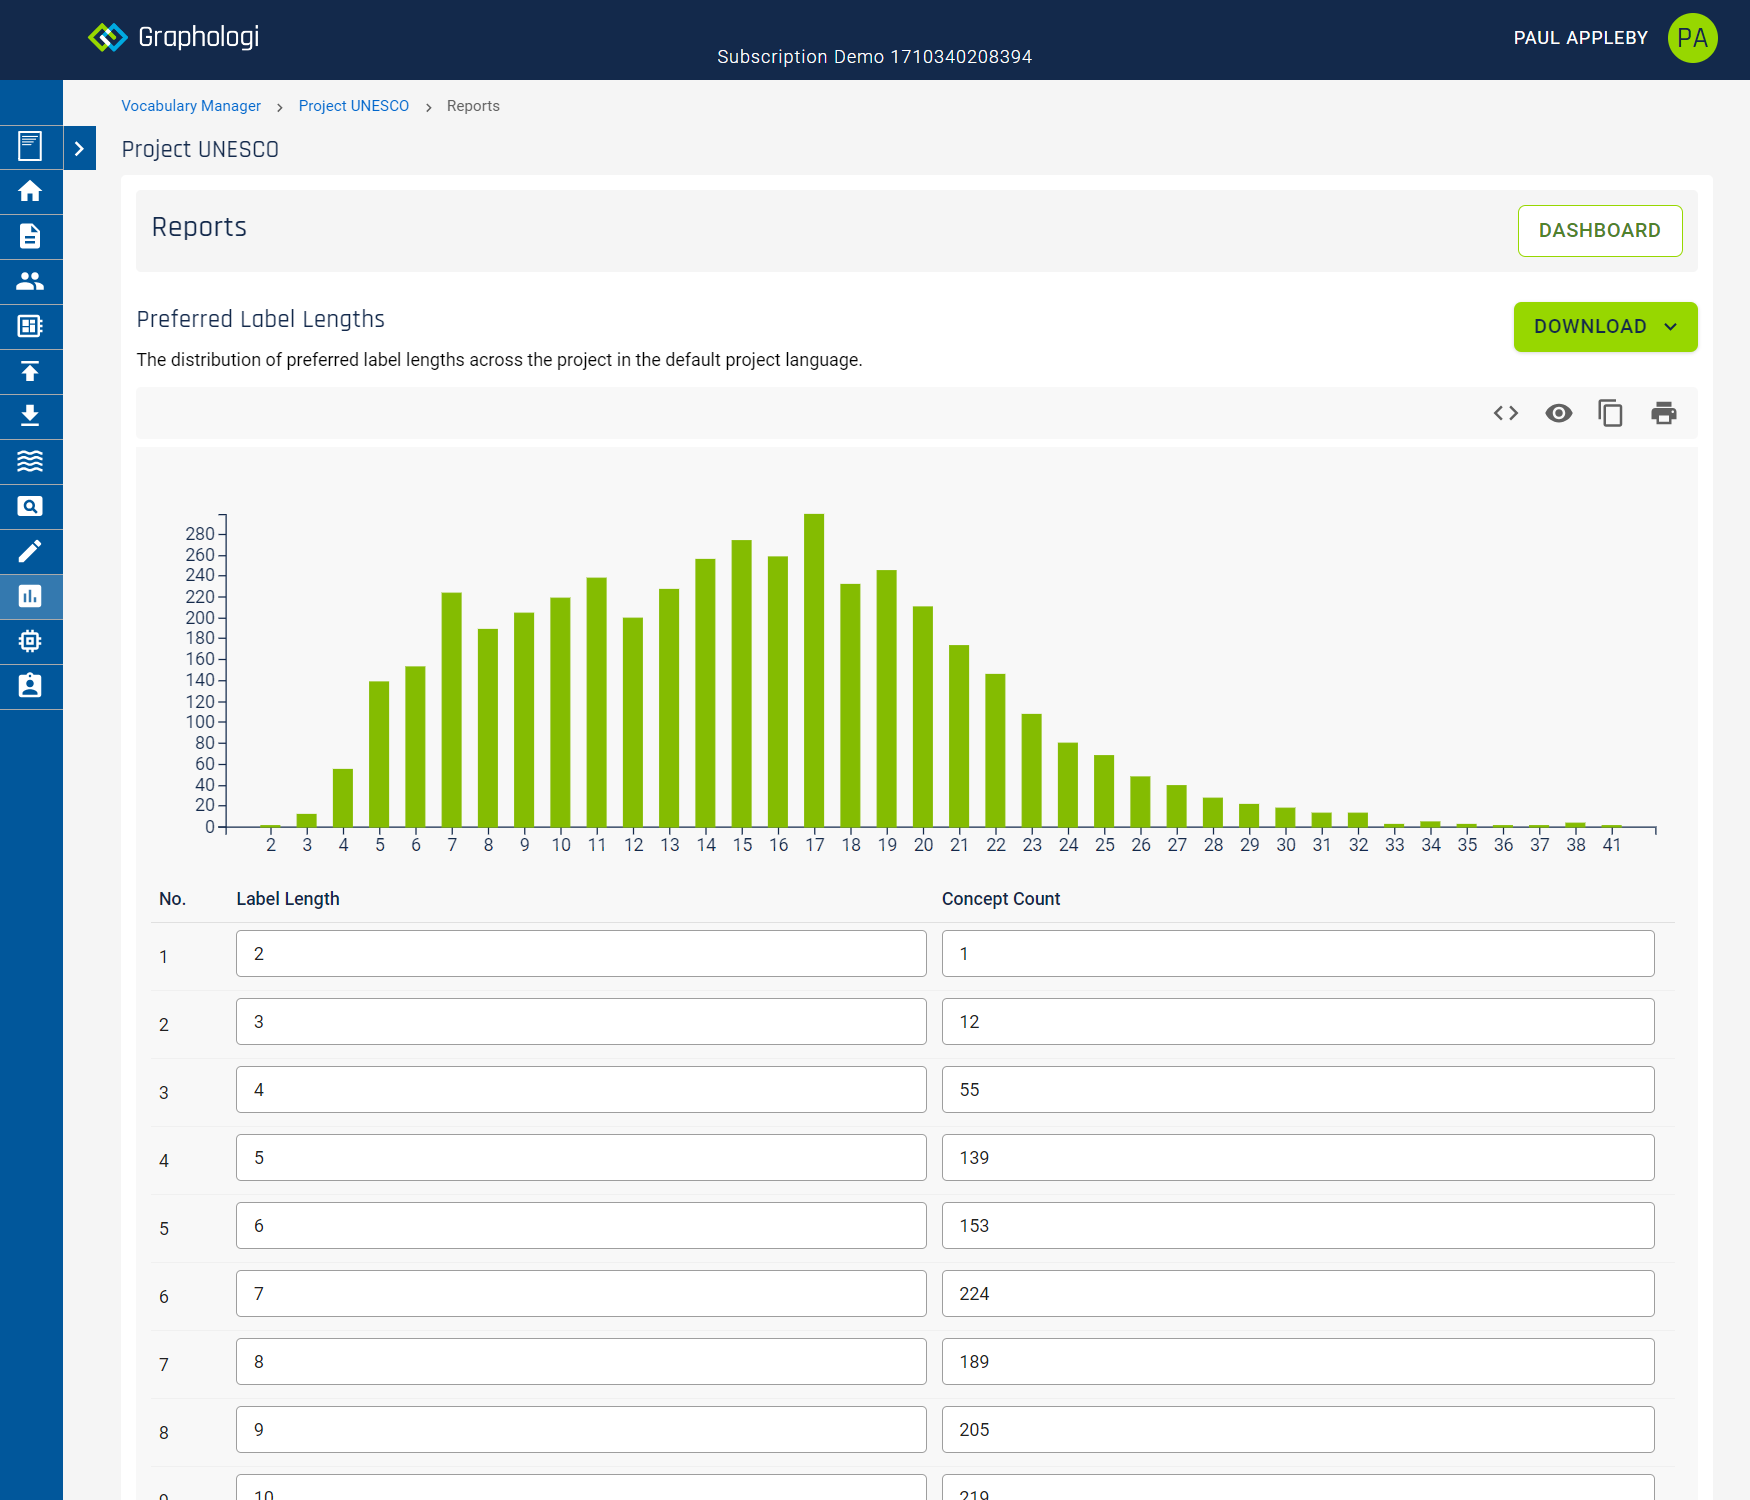
To view the SPARQL behind the report, click on the ![]() icon.
icon.
To view the datatypes for appropriate fields, click on the ![]() icon.
icon.
You can copy the reports results as TSV (tab separated values) by clicking on the ![]() icon. TSV text can be pasted into a spreadsheet application.
icon. TSV text can be pasted into a spreadsheet application.
You can print the report results by clicking on the ![]() icon.
icon.
Where reports include IRIs you can click on them. Graphologi will look for these IRIs within the project and present information according to whether they exist or not. If they do exist and can be linked to you will have the option to click through to that resource, or, if it is not within the project, to open the link in a new browser tab. Even if the link is within the project you can open it in a new tab by doing Ctrl+click.
You can also download the report results as a CSV, TSV (tab separated values), HTML or XLSX file. Click on the button and select the required option.
As part of the lifecycle of managing projects it can sometimes be useful to have previous versions of a project available to access and query. Whilst snapshots create backups of projects, versions are 'live' copies of a project created from a snapshot. Whilst snapshots may eventually be removed due to the limited number allowed per project, a version will exist for as long as you want it to.
To create versions for a project, the project must first be configured in the Snapshot manager. Please see the section on Project snapshots for more detail about snapshot management.
Note that versions are only available in Premium and above subscriptions.
To access or create versions click on the ![]() icon on the left. This will display a screen similar to the following image.
icon on the left. This will display a screen similar to the following image.
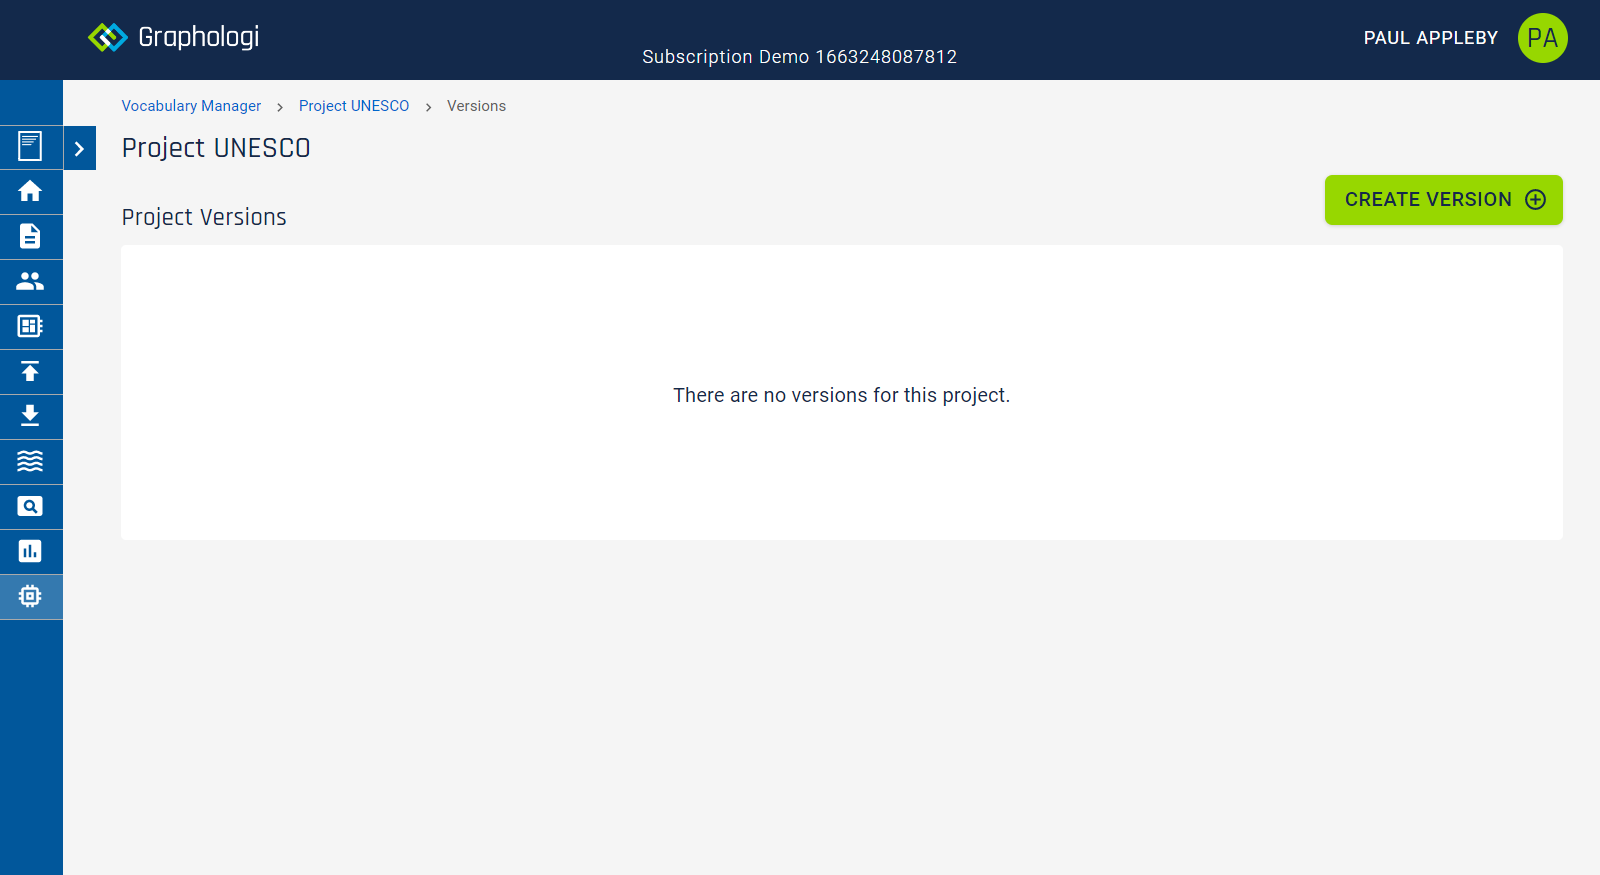
To create a version click on the button. You will need the appropriate entitlement to create versions, which is Manage snapshots.
This will display a dialog similar to the following image.
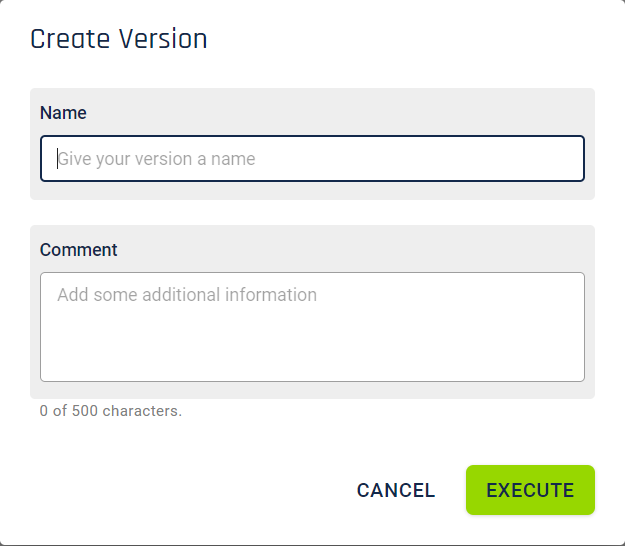
You can optionally enter a name and comment for your version.
To generate the version click on the button. It will take a small amount of time to process.
Versions will appear in the list in a similar way to the following image.
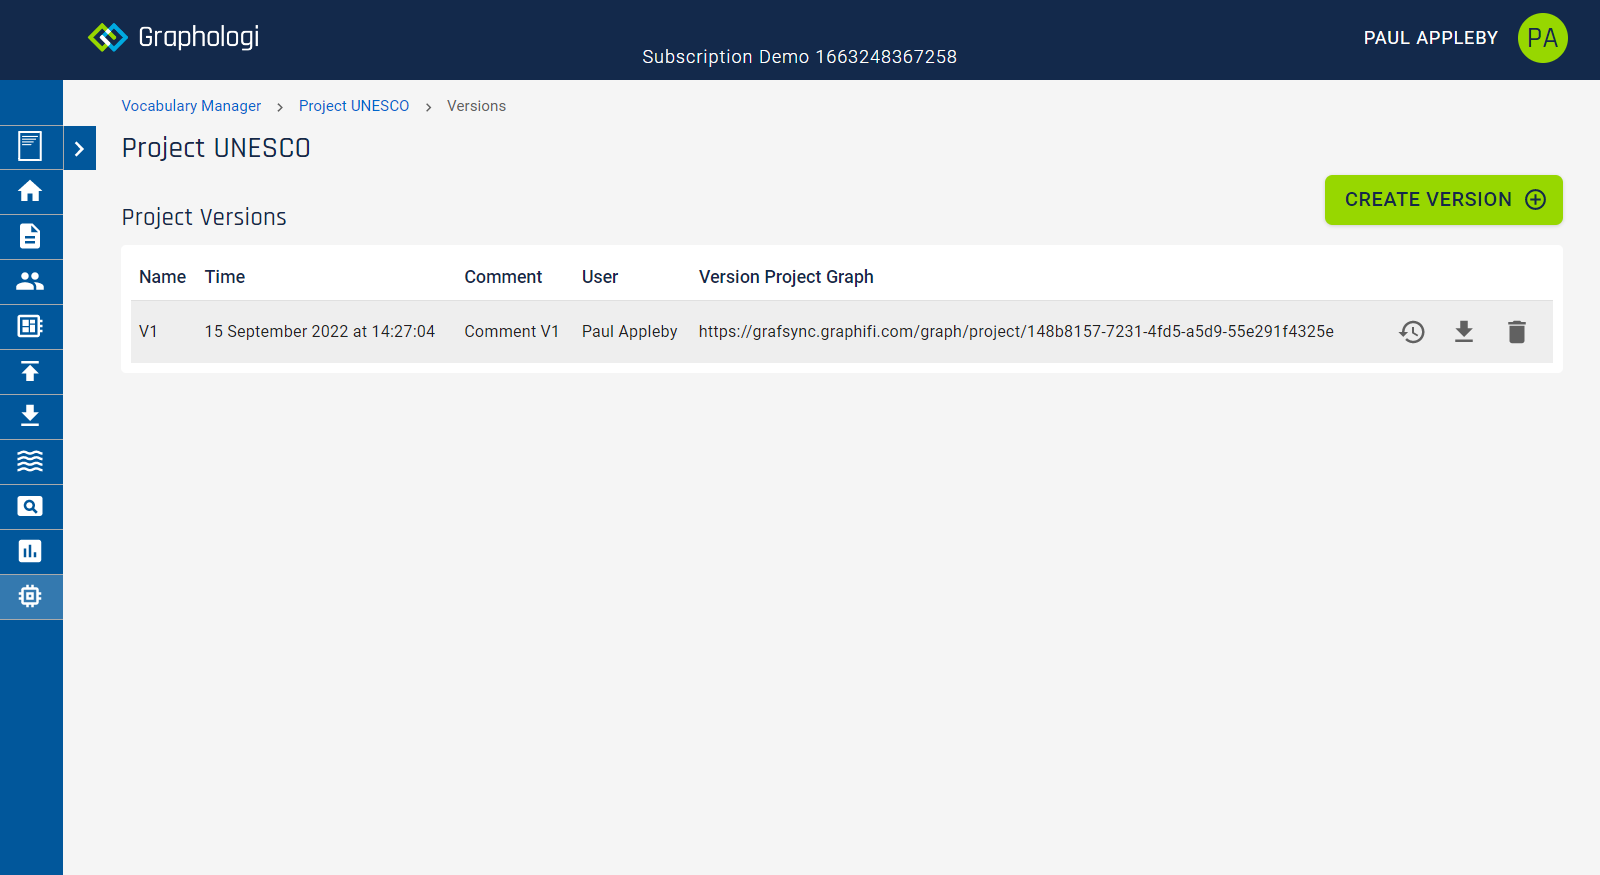
You can view the history for a version by clicking on the ![]() icon. For versions that are not the first version it is possible to select the option to show 'Only Changes in This Version', which will restrict the history to only show changes since the previous version.
icon. For versions that are not the first version it is possible to select the option to show 'Only Changes in This Version', which will restrict the history to only show changes since the previous version.
You can download a version (as a project) by clicking on the ![]() icon.
icon.
A version can be deleted by clicking on the ![]() icon. Whilst there is no project level limit for the number of versions, a subscription will have an overall limit across all projects.
icon. Whilst there is no project level limit for the number of versions, a subscription will have an overall limit across all projects.
Versions are NOT read only. Versions are simply special projects connected to the original project. All groups for a version will still be there as at the time of creating the version. Version projects only show in the versions screen within the Graphologi application.
Graph references within the version history will be to the original project graph. This ensures that the information stays the same for each version.
The IRI of the actual project resource in the version will change for each version to match the graph in which the version exists. All other information about the project resource remains the same.
To access this feature click on the ![]() icon on the left of the screen.
icon on the left of the screen.
Due to the nature of the SKOS specification concepts and SKOS-XL labels can exist without being associated with any particular SKOS concept scheme. This can present issues for managing those concepts and labels in this state (and it is perfectly possible to remove an 'in scheme' relationship in Graphologi, which would cause a concept or label to appear in this view).
Although there is no corresponding specification for datasets it is also possible to have resources that are not in a dataset but do exist.
Graphologi provides a view of the project that lists concepts and labels, or resources, that are free-floating. They are still available for use and searches will list them, allowing you to select and include them.
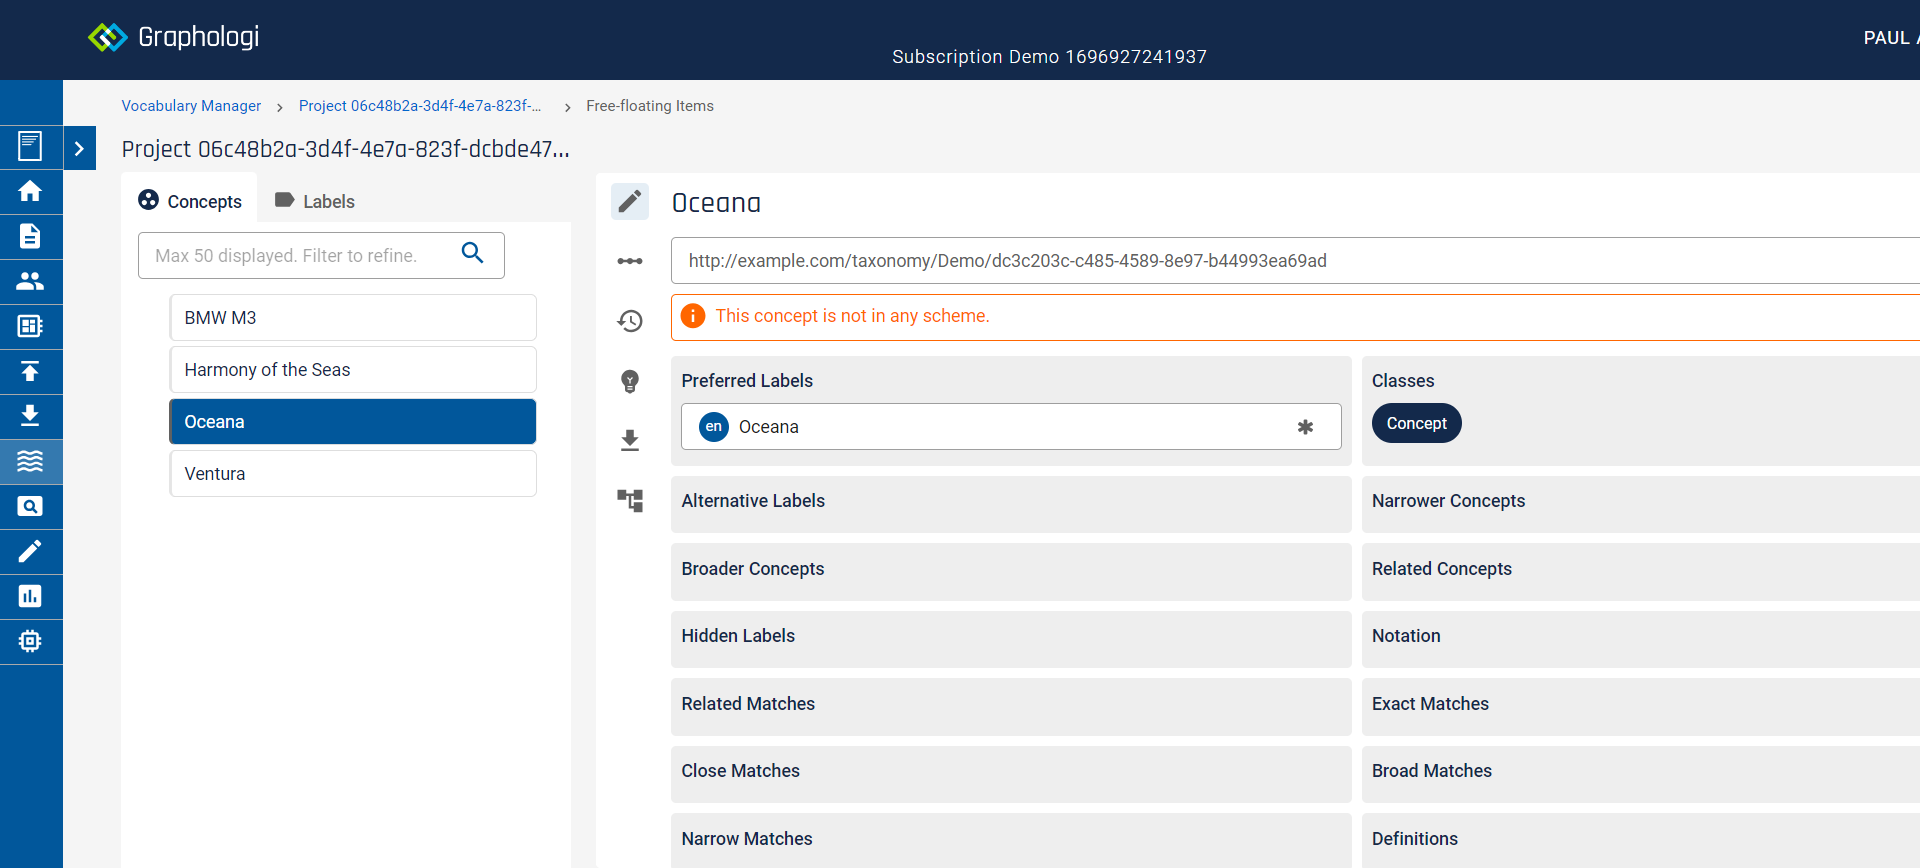
This view of a project is, for the most part, only for viewing purposes. The only edits you can make are to delete or deprecate (if you have permissions).
For taxonomy projects it may be that you want to get rid of any free floating concepts. You can do this through a purge on the project page. Note that this will remove all floating concepts and labels not used in taxonomies (a concept can be used in a taxonomy but not in the scheme) or in any collections.
The purge button is available on the project page as in the following image. Note that this may take some time and the project will be locked while the purge is happening.
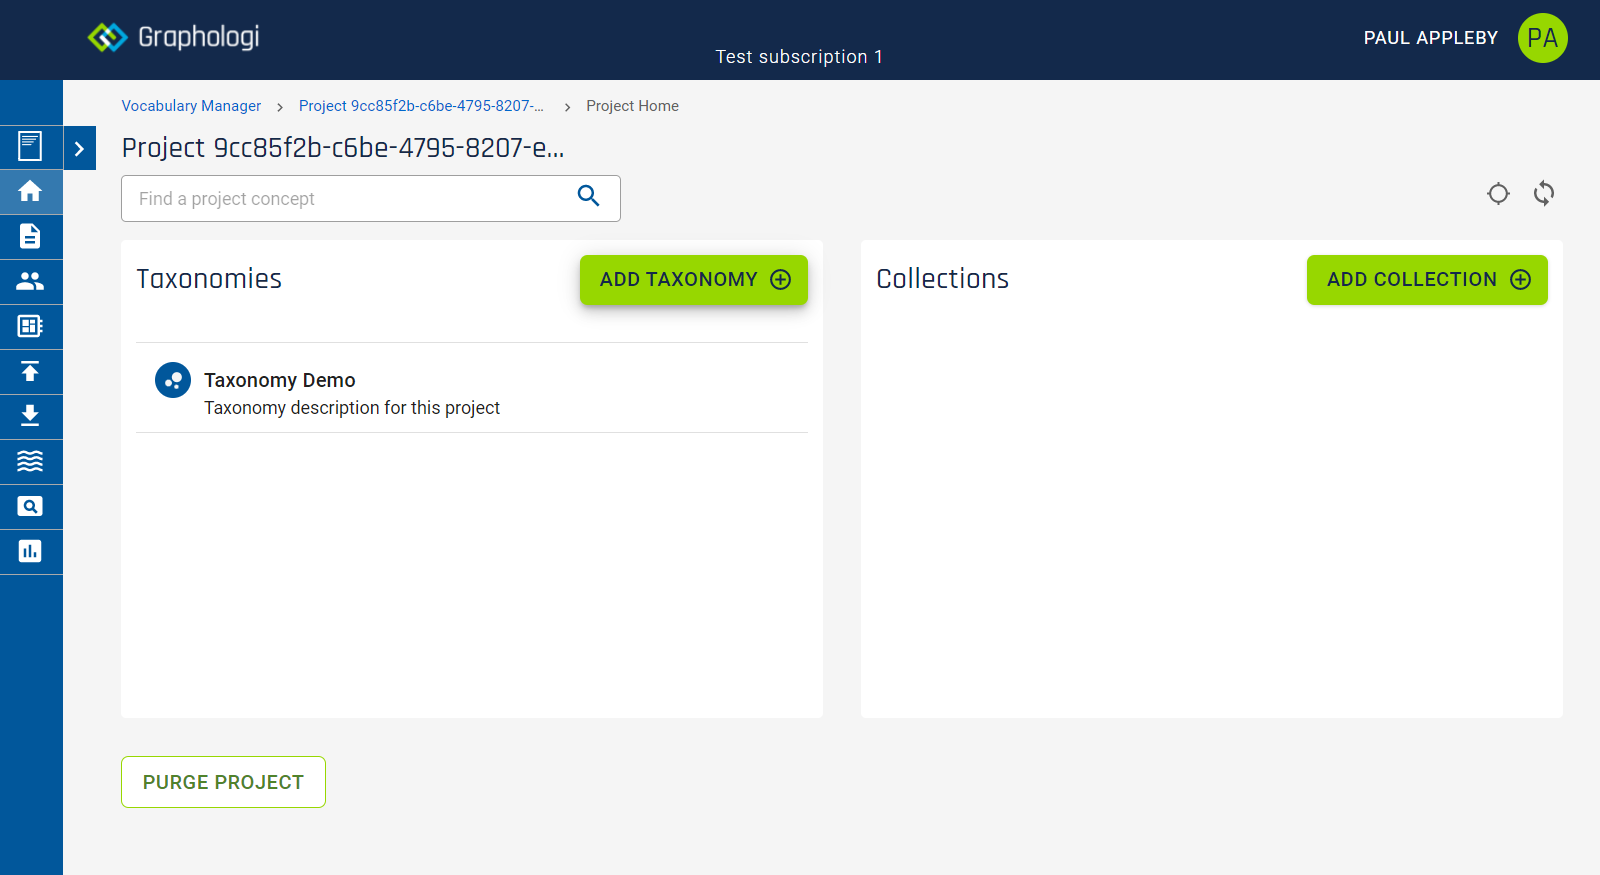
Almost all of Graphologi can be controlled via the keyboard. By using the Tab key (and Shift+Tab to move backwards), a user can move through all of the relevant parts of the UI. When an element in the UI has focus, a dashed or solid border will be displayed to indicate so. Additionally, keyboard actions will act upon that element. Using the Enter key will generally act the same as clicking on that element. There are also numerous shortcut keys, documented in the section below.
Graphologi is primarily designed for desktop use (not mobile devices). However, the screen is responsive and will adjust to different resolutions (within limits), allowing a user to utilise browser zoom capabilities to enlarge everything on screen if necessary.
Some common actions and major UI areas have shortcut keys. The shortcut keys for the UI areas allow a user to make the focus move to that area, avoiding a large amount of Tab key presses. The list below explains the shortcuts that are available (note that on a Mac the Alt key is the Option key):
We are always looking to improve the accessibility of Graphologi. If you have any suggestions or feedback please let us know.
If you find yourself moving between the Vocabulary Manager, Ontology Manager and Data Manager frequently you can make that easier by using the 'quick links'. These are at the top left of the screen before the breadcrumb trail and look like  . Once you have visited each of the applications its icon will be active, allowing you to jump to straight to where your last location in that application that was relevant.
The following gives a few ideas on how to make working with Graphologi even easier and more efficient.
| Term | Description | Example |
|---|---|---|
Chip |
Displays a link to a resource. In most situations these can be clicked on to go to that resource. Additionally, ctrl+click will often open the link in a new tab. |
|
Dialog (or Dialog box) |
An area of the screen that 'pops up' for entering, selecting or viewing data. An example is given below |
|
Field |
A box to enter or edit text. |
|
IRI |
A unique identifier for a resource. IRIs are the internationalised version of URIs. They look very similar to URLs. The IRI is pivotal within Graphologi in that underneath the covers everything is identified and connected together using IRIs. This is the basis of RDF. |
|
OWL |
The ontology language for the semantic web. See the primer for more details. |
|
RDF |
The Resource Description Framework. See the primer for more details. |
|
Sparql |
The query language for use with RDF data. See the specification for details. |
|
SKOS |
The W3C standard for taxonomies. See the specification for details. |
|
SKOS-XL |
The extension for labels to the W3C standard for taxonomies. See the specification for details. |
For the most part you will not need to worry about the internal models used within Graphologi. However, there are situations, such as querying with SPARQL, when it might be beneficial to have a little bit more knowledge. This section gives you information about how the internal data is structured.
For details on RDF, RDFS, SKOS, SKOS-XL and OWL please see the relevant specifications. Graphologi is fully standards compliant so the details in the specifications will apply when querying data within Graphologi.
There are two types of project within Graphologi - taxonomy and ontology. These have the following classes:
| Class IRI | Description |
|---|---|
https://grafsync.graphifi.com/schema/gs/TaxonomyProject |
A taxonomy project. |
https://grafsync.graphifi.com/schema/gs/DataProject |
A data project. |
https://grafsync.graphifi.com/schema/gs/OntologyProject |
An ontology project. |
There are some properties that are commonly used throughout Graphologi:
| Property IRI | Description |
|---|---|
http://purl.org/dc/terms/created |
The created date/time of a resource. This has a datatype of http://www.w3.org/2001/XMLSchema#dateTime. |
https://grafsync.graphifi.com/schema/gs/pendingDeletion |
If set to true indicates that the resource is scheduled to be removed. For a resource in this situation all links to it from other resources will have already been removed. |
The history model within Graphologi is designed so that each change made to data is recorded as an individual resource within the graph. Generally speaking, the only time you will need to use the history properties is to compute the latest time a resource is changed. For retrieving actual changes it may be easier to use the history API as the details of the change are returned in an easily processable form.
Each history entry has its own IRI using the pattern: https://grafsync.graphifi.com/graph/history/{uuid}
There are various properties that may be useful for discovering history resources:
| Property IRI | Description |
|---|---|
https://grafsync.graphifi.com/schema/gs/changedTime |
An ISO date time recording the time at which the edit has been recorded. |
https://grafsync.graphifi.com/schema/gs/changeOperation |
The type of change. The possible values are: "Noop", "Add", "Delete", "Update", "Replace", "InsertResource", "DeleteResource", "LDupdateList". Note that this is only available for changes from 1.20 onwards. |
https://grafsync.graphifi.com/schema/gs/changePredicate |
The predicate used in the change, if applicable. Note that this is only available for changes from 1.20 onwards. |
https://grafsync.graphifi.com/schema/gs/isHistoryOf |
The resource to which this history entry applies. |
| https://grafsync.graphifi.com/schema/gs/isRevision | The revision number of the resource. This is an incremental integer value. |
Graphologi uses a few additional internal properties for managing datasets. The following table details those properties which may be useful:
Datasets have a type of https://grafsync.graphifi.com/schema/gs/Dataset.
Resources have a type of https://grafsync.graphifi.com/schema/gs/Resource.
| Property IRI | Description |
|---|---|
https://grafsync.graphifi.com/schema/gs/inDataset |
Indicates that a resource is in a dataset. |
Annotations are RDF statements and have a type of http://www.w3.org/1999/02/22-rdf-syntax-ns#Statement.
Graphologi uses a few additional internal properties for managing ontologies, most of which simply control options such as hiding properties and are not particularly relevant to querying the data for most use cases. The following table details those properties which may be useful:
| Property IRI | Description |
|---|---|
https://grafsync.graphifi.com/schema/gs/visibility |
When ontologies are imported into Graphologi it tries to compute which of the resources in the file belong to an ontology. Ontology files frequently contain resources from namespaces different to that of the owl:Ontology definition. Graphologi will use rdfs:isDefinedBy for stating which ontology a resource belongs to internally. However, where this is not present in imported files, Graphologi computes and records the ontology to which a resource belongs and stores the IRI of that ontology using this property. |
The workflow model within Graphologi is very simple. There are a few properties that are stored on concepts and SKOS-XL labels and there are 'tasks', which can, optionally, be used to define things that users need to do.
Tasks have a type of https://grafsync.graphifi.com/schema/gs/Task. When created they automatically have a status of https://grafsync.graphifi.com/schema/gs/pending.
| Property IRI | Description |
|---|---|
https://grafsync.graphifi.com/schema/gs/activateWorkflow |
Indicates if workflow is activated on a concept scheme. This takes a boolean value. |
https://grafsync.graphifi.com/schema/gs/assignedNote |
Allows for instructions to be given to the assigned user. |
https://grafsync.graphifi.com/schema/gs/assignedUser |
A user assigned to a concept, SKOS-XL label or task. Each user has an IRI and it is that IRI which is used on this property. A user can find out their IRI in the 'My Details' area of Graphologi. |
https://grafsync.graphifi.com/schema/gs/hasTask |
Connects concept or SKOS-XL label to a task. When a concept or SKOS-XL label is approved or rejected any hasTask properties are removed from it automatically. However, the inverse property, isTaskFor, is not removed, allowing you to find all previous tasks that related to a concept or SKOS-XL label. |
https://grafsync.graphifi.com/schema/gs/isTaskFor |
Connects a task to a concept or SKOS-XL label. |
https://grafsync.graphifi.com/schema/gs/status |
Describes the status of a resource. In workflow terms, concepts and labels are (if categorised) in one of 'draft', 'accepted' or 'rejected' states. Tasks are in one of 'pending', 'accepted', or 'rejected'. |
The Graphologi API allows you to make requests to read data. This covers search, resources and the history of changes.
Calls to the Graphologi API must include an Authorization header with a value: Bearer {{token}}, where {{token}} is that returned by authentication. They should also include a Graphologi-Target header. The value you need to use for this is displayed in the API section of the dashboard at:
https://graphologi.graphifi.com/gs/dashboard/api
If an API call needs a project graph IRI the information for this can be found on the Project Information screen. See Project information for more details.
For each request set Content-Type and Accept (response format) headers as documented below.
We have put together some examples as a Postman collection and a corresponding Postman environment file, where you will need to set appropriate values.
Authenticate against the Graphologi API.
Content type:application/json
Response formats:application/json
Password of user.
Type: string
Format: String
Username of user.
Type: string
Format: String
Retrieve the JSON-LD context.
Response formats:application/ld+json
Merge RDF data onto a taxonomy.
This will merge data onto existing concepts. Note that this is a blocking operation and users will be suspended from editing whilst this upload is happening.
It is an asynchronous operation. You can get the status of the upload by doing a GET to {path}?subscription={subscription} where {path} is included in the original POST response. The response from the status request will include a transfer property which will have a value of true or false once the upload is finished. A value of true indicates a successful upload.
Note that there is a limit of 5000 triples per update.
Note that merges do not update the status of resources that have workflow activated.
Content type:This data should be sent as form data
Response formats:application/json
The file to merge.
Define the type of merge.
Type: string
Format: String
Values: {"situation":"FullMerge"}
Merge RDF data onto a dataset.
This will add additional data onto an existing dataset. Any additional datasets defined in the file will be removed.
Note that this is a blocking operation and users will be suspended from editing whilst this upload is happening.
It is an asynchronous operation. You can get the status of the upload by doing a GET to {path}?subscription={subscription} where {path} is included in the original POST response. The response from the status request will include a transfer property which will have a value of true or false once the upload is finished. A value of true indicates a successful upload.
Note that there is a limit of 5000 triples per update.
Note that this will not update the status of resources that have workflow activated.
Content type:This data should be sent as form data
Response formats:application/json
The IRI of the dataset to merge onto.
Type: string
Format: String
Values: {dataset1}
The file to merge.
Define the type of merge.
Type: string
Format: String
Values: {"situation":"AttachToDataset"}
The IRI of the dataset to merge onto.
Type: string
Format: String
Values: {dataset1}
Retrieve history for a resource.
Content type:application/json
Response formats:application/json | text/tab-separated-values
End date for history. The form of the date should be 'yyyy-mm-dd'.
Type: date
Format: String
The project graph IRI to use. This information is available on the Project Information screen for the project.
Type: string
Format: IRI
Resource to retrieve history for.
Type: string
Format: IRI
Indicates if any path should be reversed.
Type: boolean
Format: String
Number of history items to return.
Type: integer
Format: String
Offset into history items.
Type: integer
Format: String
SPARQL property to use to retrieve history for associated resources. For example to get all the resources in a concept scheme pass the concept scheme IRI in the iri property and http://www.w3.org/2004/02/skos/core#inScheme in the path property.
Type: string
Format: IRI
Start date for history. The form of the date should be 'yyyy-mm-dd'.
Type: date
Format: String
Subscription to use.
Type: string
Format: IRI
List of user IRIs to retrieve history for (max 5). If omitted all users are included.
Type: array
Format: IRI
Retrieve the first ten history items for a resource resource1 from project graph projectGraph between a start and end date.
{
    "subscription": "{{subscription}}",
    "iri": "{{resource1}}",
    "graph": "{{projectGraph}}",
    "startDate": "{{ISO date}}",
    "endDate":"{{ISO date}}",
    "maxItems": 10,
    "offset": 0
}
Retrieve the first ten history items for a concept scheme including resources in the scheme for scheme1 from project graph projectGraph between a start and end date. In this example the path is used to define which connected resources are required.
{
    "subscription": "{{subscription}}",
    "iri": "{{scheme1}}",
    "graph": "{{projectGraph}}",
    "startDate": "{{ISO date}}",
    "endDate":"{{ISO date}}",
    "path": "http://www.w3.org/2004/02/skos/core#inScheme",
    "maxItems": 10,
    "offset": 0
}Edits to resources.
Changes can be done for resources of the following types: concepts, concept schemes, SKOS-XL labels, resources, annotations, tasks and suggestions, and ontology classes and properties.
It is also possible to used this endpoint for actual deletion of resources of the following types: concepts, SKOS-XL labels, resources, annotations and projects.
Changes are done using the Graphologi patch format. This is very similar to using N-triples - see the examples below.
Note that carriage returns and tabs should be stripped as these are not permitted. Newlines are only permitted on certain properties and must be escaped correctly. To escape double quotes use the text: \\u0022
Note that the workflow status does not impact the ability to update resources - it is still possible to update.
The API will automatically handle any changes to inverse or symmetric properties and materialise (or remove) the relationship in the opposite direction.
Note that these are asynchronous endpoints. The status of the request can be found at /instance/status. If running a sequence of write operations we highly recommend ensuring that the previous request is complete as checks are performed on update requests, and, if there is a dependency on previous requests, you need to ensure that the previous request has completed.
Note that, even if an API call is successful, as it is asynchronous it is still subject to conflict resolution against other simultaneous requests.
Content type:application/json
Response formats:application/json
The action to be performed.
Type: string
Format: String
Values: Add | Delete | Update
The data to use to update the resource. This should be Graphologi patch format.
The graph in which the resource will be updated.
Type: string
Format: IRI
If updating a property from an associated ontology project you can include this property to explicitly state which graph it comes from. If you do not include it Graphologi will attempt to work out the appropriate graph and generally this will work unless there is any ambiguity.
Type: string
Format: IRI
Subscription to use.
Type: string
Format: IRI
The following operations are possible for 'built-in' properties - those defined by the standards and Graphologi. You can also update ontology properties associated with resources.
The actions are AUD - add, update and delete.
| Actions | Property IRI | Alias | Description |
|---|---|---|---|
AUD |
http://purl.org/dc/terms/title |
title |
A project title. Takes string literals or language tagged literals. |
AUD |
http://purl.org/dc/terms/description |
description |
A project description. Takes string literals or language tagged literals. |
| Actions | Property IRI | Alias | Description |
|---|---|---|---|
AD |
http://www.w3.org/2004/02/skos/core#hasTopConcept |
hasTopConcept |
This should be used to add or remove top concepts for a concept scheme. This takes an IRI. |
For concepts all of the main SKOS properties can be added or updated (bar narrower - use broader). To associate SKOS-XL labels with concepts you can use http://www.w3.org/2008/05/skos-xl#prefLabel, http://www.w3.org/2008/05/skos-xl#altLabel and http://www.w3.org/2008/05/skos-xl#hiddenLabel.
| Actions | Property IRI | Alias | Description |
|---|---|---|---|
AUD |
http://www.w3.org/2002/07/owl#deprecated |
deprecated |
Indicates if deprecated. Takes boolean literal values. |
AUD |
http://www.w3.org/2004/02/skos/core#altLabel |
altLabel |
Alternative labels. Takes string literals or language tagged literals. |
AD |
http://www.w3.org/2004/02/skos/core#broader |
broader |
Broader relationships. This takes an IRI. |
AD |
http://www.w3.org/2004/02/skos/core#broadMatch |
broadMatch |
Broader related concepts in other concept schemes. |
AUD |
http://www.w3.org/2004/02/skos/core#changeNote |
changeNote |
A change note. Takes string literals or language tagged literals. |
AD |
http://www.w3.org/2004/02/skos/core#closeMatch |
closeMatch |
Closely related concepts in other concept schemes. This takes an IRI. |
AUD |
http://www.w3.org/2004/02/skos/core#definition |
definition |
A definition. Takes string literals or language tagged literals. |
AUD |
http://www.w3.org/2004/02/skos/core#editorialNote |
editorialNote |
An editorial note. Takes string literals or language tagged literals. |
AD |
http://www.w3.org/2004/02/skos/core#exactMatch |
exactMatch |
Exact match concepts in other concept schemes. This takes an IRI. |
AUD |
http://www.w3.org/2004/02/skos/core#example |
example |
An example. Takes string literals or language tagged literals. |
AUD |
http://www.w3.org/2004/02/skos/core#hiddenLabel |
hiddenLabel |
Hidden labels. Takes string literals or language tagged literals. |
AUD |
http://www.w3.org/2004/02/skos/core#historyNote |
historyNote |
A history note. Takes string literals or language tagged literals. |
AD |
http://www.w3.org/2004/02/skos/core#inScheme |
inScheme |
Associate a concept with a scheme. This takes an IRI. |
AD |
http://www.w3.org/2004/02/skos/core#narrowMatch |
narrowMatch |
Narrower related concepts in other concept schemes. This takes an IRI. |
AUD |
http://www.w3.org/2004/02/skos/core#notation |
notation |
A notation. Takes string literals. |
AUD |
http://www.w3.org/2004/02/skos/core#prefLabel |
prefLabel |
Preferred labels. Takes string literals or language tagged literals. |
AD |
http://www.w3.org/2004/02/skos/core#related |
related |
Related concepts. These must be concepts in the same concept scheme. This takes an IRI. |
AD |
http://www.w3.org/2004/02/skos/core#relatedMatch |
relatedMatch |
Related concepts in other concept schemes. This takes an IRI. |
AUD |
http://www.w3.org/2004/02/skos/core#scopeNote |
scopeNote |
A scope note. Takes string literals or language tagged literals. |
AD |
http://www.w3.org/2004/02/skos/core#topConceptOf |
topConceptOf |
Make a concept a top concept of a concept scheme. This takes an IRI. |
AD |
http://www.w3.org/2008/05/skos-xl#prefLabel |
xlPrefLabel |
Link to an XL preferred label. This takes an IRI. |
AD |
http://www.w3.org/2008/05/skos-xl#altLabel |
xlAltLabel |
Link to an XL alternative label. This takes an IRI. |
AD |
http://www.w3.org/2008/05/skos-xl#hiddenLabel |
xlHiddenLabel |
Link to an XL hidden label. This takes an IRI. |
AUD |
https://grafsync.graphifi.com/schema/gs/assignedNote |
assignedNote |
Instructions for the assignee. Takes a string literal or language tagged literal. |
AUD |
https://grafsync.graphifi.com/schema/gs/assignedUser |
assignedUser |
The IRI of the user assigned to the concept. |
AU |
https://grafsync.graphifi.com/schema/gs/status |
status |
The status of the workflow for the concept. This takes an IRI. Permitted values are https://grafsync.graphifi.com/schema/gs/draft, https://grafsync.graphifi.com/schema/gs/accepted or https://grafsync.graphifi.com/schema/gs/rejected. |
By definition of the standard SKOS-XL labels can only have one literal form.
| Actions | Property IRI | Alias | Description |
|---|---|---|---|
AD |
http://www.w3.org/2004/02/skos/core#inScheme |
inScheme |
Associate a label with a scheme. Maximum cardinality is one. This takes an IRI. |
U |
http://www.w3.org/2008/05/skos-xl#literalForm |
literalForm |
The literal form of the XL label. Takes a string literal or language tagged literal. |
AUD |
https://grafsync.graphifi.com/schema/gs/assignedNote |
assignedNote |
Instructions for the assignee. Takes a string literal or language tagged literal. |
AUD |
https://grafsync.graphifi.com/schema/gs/assignedUser |
assignedUser |
The IRI of the user assigned to the label. |
AU |
https://grafsync.graphifi.com/schema/gs/status |
status |
The status of the workflow for the label. This takes an IRI. Permitted values are https://grafsync.graphifi.com/schema/gs/draft, https://grafsync.graphifi.com/schema/gs/accepted or https://grafsync.graphifi.com/schema/gs/rejected. |
| Actions | Property IRI | Alias | Description |
|---|---|---|---|
A |
https://grafsync.graphifi.com/schema/vm/suggestionSourceConcept |
suggestionSourceConcept |
Associate a suggestion with either a concept or concept scheme. This controls where it is displayed in Graphologi. This takes an IRI. |
AUD |
https://grafsync.graphifi.com/schema/gs/assignedUser |
assignedUser |
The IRI of the user assigned to the suggestion. |
U |
https://grafsync.graphifi.com/schema/gs/status |
status |
The status of the suggestion. This takes an IRI. This will automatically be set to https://grafsync.graphifi.com/schema/gs/pending on creation of a suggestion. The only permitted value is https://grafsync.graphifi.com/schema/gs/rejected. All suggestions must be accepted from within the Graphologi UI. |
| Actions | Property IRI | Alias | Description |
|---|---|---|---|
AUD |
http://www.w3.org/2002/07/owl#deprecated |
deprecated |
Indicates if deprecated. Takes boolean literal values. |
AD |
https://grafsync.graphifi.com/schema/gs/inDataset |
inDataset |
Associate a resource with a dataset. This takes an IRI. |
AUD |
http://www.w3.org/2000/01/rdf-schema#label |
label |
Labels. Takes string literals or language tagged literals. |
AUD |
https://grafsync.graphifi.com/schema/gs/assignedNote |
assignedNote |
Instructions for the assignee. Takes a string literal or language tagged literal. |
AUD |
https://grafsync.graphifi.com/schema/gs/assignedUser |
assignedUser |
The IRI of the user assigned to the resource. |
AU |
https://grafsync.graphifi.com/schema/gs/status |
status |
The status of the workflow for the resource. This takes an IRI. Permitted values are https://grafsync.graphifi.com/schema/gs/draft, https://grafsync.graphifi.com/schema/gs/accepted or https://grafsync.graphifi.com/schema/gs/rejected. |
| Actions | Property IRI | Alias | Description |
|---|---|---|---|
AUD |
http://www.w3.org/2002/07/owl#deprecated |
deprecated |
Indicates if deprecated. Takes boolean literal values. |
AUD |
http://www.w3.org/2000/01/rdf-schema#label |
label |
Labels. Takes string literals or language tagged literals. |
AD |
http://www.w3.org/2000/01/rdf-schema#subClassOf |
subClassOf |
A class that this is a subclass of. Only applicable for classes. |
AD |
http://www.w3.org/2000/01/rdf-schema#subPropertyOf |
subPropertyOf |
A property that this is a subproperty of. Only applicable for object and datatype properties. |
AUD |
https://grafsync.graphifi.com/schema/gs/assignedNote |
assignedNote |
Instructions for the assignee. Takes a string literal or language tagged literal. |
AUD |
https://grafsync.graphifi.com/schema/gs/assignedUser |
assignedUser |
The IRI of the user assigned to the class/property. |
AU |
https://grafsync.graphifi.com/schema/gs/status |
status |
The status of the workflow for the class/property. This takes an IRI. Permitted values are https://grafsync.graphifi.com/schema/gs/draft, https://grafsync.graphifi.com/schema/gs/accepted or https://grafsync.graphifi.com/schema/gs/rejected. |
| Actions | Property IRI | Alias | Description |
|---|---|---|---|
AUD |
http://www.w3.org/2002/07/owl#deprecated |
deprecated |
Indicates if deprecated. Takes boolean literal values. |
| Actions | Property IRI | Alias | Description |
|---|---|---|---|
AUD |
https://grafsync.graphifi.com/schema/gs/assignedUser |
assignedUser |
The IRI of the user assigned to the task. |
U |
https://grafsync.graphifi.com/schema/gs/status |
status |
The status of the task. This takes an IRI. A status of https://grafsync.graphifi.com/schema/gs/pending is automatically assigned on creation of a task. Permitted values are https://grafsync.graphifi.com/schema/gs/accepted or https://grafsync.graphifi.com/schema/gs/rejected. |
Adding or deleting an object property. The action should be changed accordingly.
{
    "subscription": "{{subscription}}",
    "data": "<{{subjectIRI}}> <{{propertyIRI}}> <{{objectIRI}}> .",
    "graph": "{{projectGraph}}",
    "action": "Add"
}
Adding or deleting a language literal property (with English language). The action should be changed accordingly.
{
    "subscription": "{{subscription}}",
    "data": "<{{subjectIRI}}> <{{propertyIRI}}> \"{{text}}\"@en .",
    "graph": "{{projectGraph}}",
    "action": "Delete"
}
Adding or deleting a typed literal property. The action should be changed accordingly.
{
    "subscription": "{{subscription}}",
    "data": "<{{subjectIRI}}> <{{propertyIRI}}> \"{{text}}\"^^<{{datatypeIRI}}> .",
    "graph": "{{projectGraph}}",
    "action": "Add"
}
Updating a property requires including a fourth value. The third value should be that to replace and the fourth that to replace with. This example shows updating a typed literal.
{
    "subscription": "{{subscription}}",
    "data": "<{{subjectIRI}}> <{{propertyIRI}}> \"{{existingText}}\"^^<{{datatypeIRI}}> \"{{updatedText}}\"^^<{{datatypeIRI}}> .",
    "graph": "{{projectGraph}}",
    "action": "Update"
}
Updating a property requires including a fourth value. The third value should be that to replace and the fourth that to replace with. This example shows updating a language tagged literal.
{
    "subscription": "{{subscription}}",
    "data": "<{{subjectIRI}}> <{{propertyIRI}}> \"{{existingText}}\"@{{langCode}} \"{{updatedText}}\"@{{langCode}} .",
    "graph": "{{projectGraph}}",
    "action": "Update"
}
Deleting a resource.
{
    "subscription": "{{subscription}}",
    "data": "<{{resourceIRI}}> .",
    "graph": "{{projectGraph}}",
    "action": "DeleteResource"
}Create resources.
Create resources for the following types: concepts, SKOS-XL labels, suggestions, dataset resources, annotations, tasks and discussions, and ontology classes and properties.
There are two different ways to include the data for a new resource - JSON (or to be precise a snippet of embedded JSON-LD), or as N-triples. Using JSON tends to be easier in most situations. Note that carriage returns and tabs should be stripped as these are not permitted. Newlines are only permitted on certain properties and must be escaped correctly.
Note that this is an asynchronous endpoint. The status of the request can be found at /instance/status. If running a sequence of write operations we highly recommend ensuring that the previous request is complete as checks are performed on create requests, and, if there is a dependency on previous requests, you need to ensure that the previous request has completed.
For certain types of resources the general pattern is to first create the resource, then use the update instance endpoint to attach the resource to other resources. For others the created resource is expected to be 'connected' to another resource at the time of creation, in which case any reverse relationship will be materialised.
Note that disjointness on object properties (i.e. broader, narrower, related, etc) is only checked on the resource being updated. SKOS rules are more restrictive than this.
Content type:application/json
Response formats:application/json
The data to use to create the resource. This can be a JSON-LD object or N-triples.
The graph into which the resource will be inserted.
Type: string
Format: IRI
Subscription to use.
Type: string
Format: IRI
Create a concept using JSON (with English and French preferred labels).
The following SKOS properties are allowed when creating a concept:
| IRI | Alias | Mandatory | Notes |
|---|---|---|---|
| https://grafsync.graphifi.com/schema/gs/assignedNote | assignedNote | false | Instructions for the assigned user. Takes string literals or language tagged literals. Only applicable if workflow activated. |
| https://grafsync.graphifi.com/schema/gs/assignedUser | assignedUser | false | The user IRI to assign the concept to. Only applicable if workflow activated. |
| https://grafsync.graphifi.com/schema/gs/status | status | false | The status of the concept. The only permitted value on resource creation is https://grafsync.graphifi.com/schema/gs/status. Only applicable if workflow activated. |
| http://www.w3.org/2004/02/skos/core#altLabel | altLabel | false | See SKOS specification. Takes string literals or language tagged literals |
| http://www.w3.org/2004/02/skos/core#changeNote | changeNote | false | See SKOS specification. Takes string literals or language tagged literals |
| http://www.w3.org/2004/02/skos/core#definition | definition | false | See SKOS specification. Takes string literals or language tagged literals. |
| http://www.w3.org/2004/02/skos/core#editorialNote | editorialNote | false | See SKOS specification. Takes string literals or language tagged literals. |
| http://www.w3.org/2004/02/skos/core#example | example | false | See SKOS specification. Takes string literals or language tagged literals. |
| http://www.w3.org/2004/02/skos/core#hiddenLabel | hiddenLabel | false | See SKOS specification. Takes string literals or language tagged literals. |
| http://www.w3.org/2004/02/skos/core#historyNote | historyNote | false | See SKOS specification. Takes string literals or language tagged literals. |
| http://www.w3.org/2004/02/skos/core#inScheme | inScheme | true | The taxonomy with which the concept should be associated. This takes an IRI. |
| http://www.w3.org/2004/02/skos/core#notation | notation | false | See SKOS specification. Takes string literals . |
| http://www.w3.org/2004/02/skos/core#prefLabel | prefLabel | false | See SKOS specification. Takes string literals or language tagged literals. |
| http://www.w3.org/2004/02/skos/core#scopeNote | scopeNote | false | See SKOS specification. Takes string literals or language tagged literals. |
The id property should be the IRI for the concept. This must be unique within the project.
Note that, if, in the extremely unlikely case that a concept is created with an IRI that does not exist at the time of the API request, but, by the time the call is actioned it does, the creation request will be a Noop (nothing will happen). This information will be available in the status request.
{
    "subscription": "{{subscription}}",
    "data": {
        "id": "{{conceptIRI}}",
        "type": "Concept",
        "inScheme": "{{scheme}}",
        "prefLabel": {
            "en": "{{labelEnglish}}",
            "fr": "{{labelFrench}}"
        }
    },
    "graph": "{{projectGraph}}"
}
Create an XL label using JSON.
The following SKOS properties are allowed when creating a label:
| IRI | Alias | Mandatory | Notes |
|---|---|---|---|
| https://grafsync.graphifi.com/schema/gs/assignedNote | assignedNote | false | Instructions for the assigned user. Takes string literals or language tagged literals. Only applicable if workflow activated. |
| https://grafsync.graphifi.com/schema/gs/assignedUser | assignedUser | false | The user IRI to assign the concept to. Only applicable if workflow activated. |
| https://grafsync.graphifi.com/schema/gs/status | status | false | The status of the concept. The only permitted value on resource creation is https://grafsync.graphifi.com/schema/gs/status. Only applicable if workflow activated. |
| http://www.w3.org/2004/02/skos/core#inScheme | inScheme | true | The taxonomy with which the label should be associated. |
| http://www.w3.org/2008/05/skos-xl#literalForm | literalForm | true | Only one literal form is permitted per label. Takes string literals or language tagged literals. |
The id property should be the IRI for the label. This must be unique within the project.
Note that, if, in the extremely unlikely case that a label is created with an IRI that does not exist at the time of the API request, but, by the time the call is actioned it does, the creation request will be a Noop (nothing will happen). This information will be available in the status request.
{
    "subscription": "{{subscription}}",
    "data": {
        "id": "{{labelIRI}}",
        "type": "Label",
        "inScheme": "{{scheme}}",
        "literalForm": {"en": "{{labelEnglish}}"}
    },
    "graph": "{{projectGraph}}"
}
Create a suggestion for a new concept using JSON with an autogenerated IRI.
The following properties are allowed when creating a suggestion for a new concept:
| IRI | Alias | Mandatory | Notes |
|---|---|---|---|
| https://grafsync.graphifi.com/schema/gs/defaultClass | defaultClass | false | Class IRIs to add to the concept as well as skos:Concept. |
| https://grafsync.graphifi.com/schema/gs/useXL | useXL | false | Indicates if the label for the concept should be created as a SKOS-XL Label. Takes values of true or false. |
| https://grafsync.graphifi.com/schema/gs/assignedUser | assignedUser | false | The user IRI to assign the suggestion to. |
| https://grafsync.graphifi.com/schema/vm/suggestionInsertIRI | suggestionInsertIRI | true | The IRI that will be used to create the new concept. |
| https://grafsync.graphifi.com/schema/vm/suggestionLabelInsertIRI | suggestionLabelInsertIRI | false | The IRI that will be used to create the new SKOS-XL Label if created as such. |
| https://grafsync.graphifi.com/schema/vm/suggestionParentConcept | suggestionParentConcept | false | The parent concept to which to attach any new concept as a narrower concept. |
| http://www.w3.org/2000/01/rdf-schema#comment | comment | false | Details about the suggestion. Takes string literals or language tagged literals. |
| http://www.w3.org/2004/02/skos/core#inScheme | inScheme | true | The taxonomy with which the suggestion should be associated. |
| http://www.w3.org/2004/02/skos/core#prefLabel | prefLabel | true | The preferred label to use for the concept. Takes string literals or language tagged literals. Any literal should be in the default project language. |
Suggestions are automatically given a status of https://grafsync.graphifi.com/schema/gs/pending on creation.
By including the type property this tells the API you want to autogenerate an IRI for a resource of this type. In this instance do not include the type in the data object.
Note that, if, in the extremely unlikely case that a suggestion is 'accepted' via a PATCH to the status of a suggestion and the checks at the time of the API request do not find an IRI conflict, but, by the time the call is actioned the same IRI does exist, then the suggestion will become a rejection.
{
    "subscription": "{{subscription}}",
    "type": "https://grafsync.graphifi.com/schema/vm/NewConceptSuggestion",
    "data": {
        "inScheme": "{{scheme}}",
        "suggestionInsertIRI": "{{conceptIRI}}",
        "comment": {"en": "{{commentEnglish}}"},
        "prefLabel": {"en": "{{labelEnglish}}"}
    },
    "graph": "{{projectGraph}}"
}
Create a suggestion for a preferred label using JSON with an autogenerated IRI.
The following properties are allowed when creating a suggestion for a new preferred label:
| IRI | Alias | Mandatory | Notes |
|---|---|---|---|
| https://grafsync.graphifi.com/schema/gs/useXL | useXL | false | Indicates if the label for the concept should be created as a SKOS-XL Label. Takes values of true or false. |
| https://grafsync.graphifi.com/schema/gs/assignedUser | assignedUser | false | The user IRI to assign the suggestion to. |
| https://grafsync.graphifi.com/schema/vm/suggestionLabelInsertIRI | suggestionLabelInsertIRI | false | The IRI that will be used to create the new SKOS-XL Label if created as such. |
| https://grafsync.graphifi.com/schema/vm/suggestionSourceConcept | suggestionSourceoncept | false | The concept to which to add the preferred label. |
| http://www.w3.org/2000/01/rdf-schema#comment | comment | false | Details about the suggestion. Takes string literals or language tagged literals. |
| http://www.w3.org/2004/02/skos/core#inScheme | inScheme | true | The taxonomy with which the suggestion should be associated. |
| http://www.w3.org/2004/02/skos/core#prefLabel | prefLabel | true | The preferred label to use. Takes string literals or language tagged literals. Any literal should be in the default project language. |
Suggestions are automatically given a status of https://grafsync.graphifi.com/schema/gs/pending on creation.
By including the type property this tells the API you want to autogenerate an IRI for a resource of this type. In this instance do not include the type in the data object.
Note that, if, in the extremely unlikely case that a suggestion is 'accepted' via a PATCH to the status of a suggestion and the checks at the time of the API request do not find an IRI conflict, but, by the time the call is actioned the same IRI does exist, then the suggestion will become a rejection.
{
    "subscription": "{{subscription}}",
    "type": "https://grafsync.graphifi.com/schema/vm/LabelSuggestion",
    "data": {
        "inScheme": "{{scheme}}",
        "suggestionSourceConcept": "{{sourceConceptIRI}}",
        "comment": {"en": "{{commentEnglish}}"},
        "prefLabel": {"en": "{{labelEnglish}}"}
    },
    "graph": "{{projectGraph}}"
}
Create a suggestion for an alternative label using JSON with an autogenerated IRI.
The following properties are allowed when creating a suggestion for a new alternative label:
| IRI | Alias | Mandatory | Notes |
|---|---|---|---|
| https://grafsync.graphifi.com/schema/gs/useXL | useXL | false | Indicates if the label for the concept should be created as a SKOS-XL Label. Takes values of true or false. |
| https://grafsync.graphifi.com/schema/gs/assignedUser | assignedUser | false | The user IRI to assign the suggestion to. |
| https://grafsync.graphifi.com/schema/vm/suggestionLabelInsertIRI | suggestionLabelInsertIRI | false | The IRI that will be used to create the new SKOS-XL Label if created as such. |
| https://grafsync.graphifi.com/schema/vm/suggestionSourceConcept | suggestionSourceoncept | false | The concept to which to add the preferred label. |
| http://www.w3.org/2000/01/rdf-schema#comment | comment | false | Details about the suggestion. Takes string literals or language tagged literals. |
| http://www.w3.org/2004/02/skos/core#inScheme | inScheme | true | The taxonomy with which the suggestion should be associated. |
| http://www.w3.org/2004/02/skos/core#altLabel | altLabel | true | The alternative label to use. Takes string literals or language tagged literals. Any literal should be in the default project language. |
Suggestions are automatically given a status of https://grafsync.graphifi.com/schema/gs/pending on creation.
By including the type property this tells the API you want to autogenerate an IRI for a resource of this type. In this instance do not include the type in the data object.
Note that, if, in the extremely unlikely case that a suggestion is 'accepted' via a PATCH to the status of a suggestion and the checks at the time of the API request do not find an IRI conflict, but, by the time the call is actioned the same IRI does exist, then the suggestion will become a rejection.
{
    "subscription": "{{subscription}}",
    "type": "https://grafsync.graphifi.com/schema/vm/SynonymSuggestion",
    "data": {
        "inScheme": "{{scheme}}",
        "suggestionSourceConcept": "{{sourceConceptIRI}}",
        "comment": {"en": "{{commentEnglish}}"},
        "altLabel": {"en": "{{labelEnglish}}"}
    },
    "graph": "{{projectGraph}}"
}
Create a statement (annotation) using JSON.
The following properties are allowed when creating an annotation:
| IRI | Alias | Mandatory | Notes |
|---|---|---|---|
| http://www.w3.org/1999/02/22-rdf-syntax-ns#subject | rdfSubject | true | The subject of the statement. |
| http://www.w3.org/1999/02/22-rdf-syntax-ns#predicate | rdfPredicate | true | The predicate of the statement. |
| http://www.w3.org/1999/02/22-rdf-syntax-ns#object | rdfObject | true | The object of the statement. |
The object value might be a literal or an object - both can be annotated.
{
    "subscription": "{{subscription}}",
    "data": {
        "type": "Statement",
        "rdfSubject": "{{subjectIRI}}",
        "rdfPredicate": "{{predicateIRI}}",
        "rdfObject": {"en": "{{text}}"}
    },
    "graph": "{{projectGraph}}"
}
Create a task using JSON with an autogenerated IRI.
The following properties are allowed when creating a task:
| IRI | Alias | Mandatory | Notes |
|---|---|---|---|
| https://grafsync.graphifi.com/schema/gs/isTaskFor | isTaskFor | true | The IRI of the concept that this is a task for. Graphologi will automatically materialise the inverse property, hasTask, on the task or suggestion. |
| https://grafsync.graphifi.com/schema/gs/assignedNote | assignedNote | true | A note detailing the task. Takes string literals or language tagged literals. |
| https://grafsync.graphifi.com/schema/gs/assignedUser | assignedUser | false | The user IRI to assign the suggestion to. |
Tasks are automatically given a status of https://grafsync.graphifi.com/schema/gs/pending on creation.
By including the type property this tells the API you want to autogenerate an IRI for a resource of this type. In this instance do not include the type in the data object.
{
    "subscription": "{{subscription}}",
    "type": "https://grafsync.graphifi.com/schema/gs/Task",
    "data": {
        "isTaskFor": "{{concept}}",
        "assignedUser": "{{userIRI}}",
        "assignedNote": {"en": "{{noteEnglish}}"}
    },
    "graph": "{{projectGraph}}"
}
Create a discussion using JSON with an autogenerated IRI. Discussions allow for comments to be added to tasks and suggestions within Graphologi's UI.
The following properties are allowed when creating a discussion:
| IRI | Alias | Mandatory | Notes |
|---|---|---|---|
| https://grafsync.graphifi.com/schema/gs/isDiscussionOf | isDiscussionOf | true | The IRI of the task or suggestion that this is a discussion of. Graphologi will automatically materialise the inverse property, hasDiscussion, on the concept. |
By including the type property this tells the API you want to autogenerate an IRI for a resource of this type. In this instance do not include the type in the data object.
{
    "subscription": "{{subscription}}",
    "type": "https://grafsync.graphifi.com/schema/gs/Discussion",
    "data": {
        "isDiscussionOf": "{{resourceIRI}}"
    },
    "graph": "{{projectGraph}}"
}
Create an ontology class/property using JSON.
The following properties are allowed when creating a class or property for an ontology:
| IRI | Alias | Mandatory | Notes |
|---|---|---|---|
| https://grafsync.graphifi.com/schema/gs/assignedNote | assignedNote | false | Instructions for the assigned user. Takes string literals or language tagged literals. Only applicable if workflow activated. |
| https://grafsync.graphifi.com/schema/gs/assignedUser | assignedUser | false | The user IRI to assign the class/property to. |
| https://grafsync.graphifi.com/schema/gs/status | status | false | The status of the resource. The only permitted value on resource creation is https://grafsync.graphifi.com/schema/gs/status. Only applicable if workflow activated. |
| http://www.w3.org/2000/01/rdf-schema#isDefinedBy | isDefinedBy | true | The ontology with which the class/property should be associated. |
| http://www.w3.org/2000/01/rdf-schema#label | label | true | The label to use for the class/property. Takes string literals or language tagged literals. Any literal should be in the default project language. |
| http://www.w3.org/2000/01/rdf-schema#subClassOf | subClassOf | false | A class in the same ontology that this is a subclass of. Omit this for a 'top level' class. Ony applicable for classes. |
| http://www.w3.org/2000/01/rdf-schema#subPropertyOf | subPropertyOf | false | A property in the same ontology that this is a subproperty of. Omit this for a 'top level' proeprty. Only applicable for object and datatype properties. |
Note that the aliases for the types are: OwlClass, ObjectProperty, DatatypeProperty and AnnotationProperty.
{
    "subscription": "{{subscription}}",
    "data": {
        "type": "OwlClass",
        "label": {"en": "MyClass"}
    },
    "graph": "{{projectGraph}}"
}Get the status of an API write request.
Note that, if the API call is for a resource that the user does not have permission to read, the response will be empty.
The response will include a status property. If the value is 'Processed' the request is complete.
Content type:application/json
Response formats:application/json
The message to check. This value is the id property in the response from an API call to /instance.
Type: string
Format: IRI
Subscription to use.
Type: string
Format: IRI
Get the status of an API write request.
{
    "subscription": "{{subscription}}",
    "id": "{{messageID}}"
}Execute a saved SPARQL query.
To access this endpoint the 'Can run saved query' entitlement is required. This is a project level entitlement.
Content type:application/json
Response formats:application/n-triples | application/rdf+xml | text/turtle | application/sparql-results+json
The graph of the project to use.
Type: string
Format: IRI
Parameter inputs to the query. There may be one or more depending upon the set up of the saved query. Parameters may also be optional.
Object
A parameter to supply. The actual name will be maintained in the saved query within Graphologi. Please see your administrators for details about the parameters required. All values should be strings.
Type: string
Format: String
The IRI of the saved query.
Type: string
Format: IRI
Subscription to use.
Type: string
Format: IRI
All requests follow the same payload pattern, as shown in the following example.
{
    "subscription": "{{subscription}}",
    "graph": "{{projectGraph}}",
    "savedQuery": "{{savedQuery}}"
}Retrieve resources from the system.
All resources are in named graphs, with each project having its own graph. The maximum is 5000 resources.
Content type:application/json
Response formats:application/ld+json
Controls whether authorisation information is included in response (the capabilities a user has for the resource). Generally you would want to set this to false.
Type: boolean
Format: String
Languages to return in the results using BCP-47 codes. If not specified all languages are returned. If you only require a particular set of languages, using this property can dramatically reduce the response size and improve performance.
Type: string
Format: String
Type: array
Format: String
Predicates to include in results. Keeping this list to the minimum required will improve performance.
Type: array
Format: IRI
A list of resources to retrieve. Note that, if a user does not have permissions, or the resource does not exist, then no error is given - only valid resources with permission to read them will be returned.
Object
The graph from which to retrieve resources. If the resources are project resources the information on the graph IRI is available on the Project Information screen for the project.
Type: array
Format: IRI
IRI of resource to retrieve.
Type: array
Format: IRI
Subscription to use.
Type: string
Format: IRI
A basic example to retrieve two resources, resource1 and resource2 from the graph projectGraph in subscription subscription
{
    "subscription": "{{subscription}}",
    "resources": [
        {
            "graph": "{{projectGraph}}",
            "iri": [
                "{{resource1}}",
                "{{resource2}}"
            ]
        }
    ]
}
This example removes any authorisation information from responses and filters language values to English (en). This will improve performance.
{
    "subscription": "{{subscription}}",
    "resources": [
        {
            "graph": "{{projectGraph}}",
            "iri": [
                "{{resource1}}",
                "{{resource2}}"
            ]
        }
    ],
    "includeAuth": false,
    "language": "en"
}
This example filters responses to only include preferred label properties (as well as default properties in every response). This will help improve performance.
{
    "subscription": "{{subscription}}",
    "resources": [
        {
            "graph": "{{projectGraph}}",
            "iri": [
                "{{resource1}}",
                "{{resource2}}"
            ]
        }
    ],
    "includeAuth": false,
    "predicates": ["http://www.w3.org/2004/02/skos/core#prefLabel"]
}Search a subscription.
Content type:application/json
Response formats:application/ld+json
List of entailments to apply when searching for results. Currently only property chains as defined in B.3.4. Notes of the SKOS specification are available.
Type: array
Format: String
Values: PropertyChain
List of IRIs to exclude from results.
Type: array
Format: IRI
The graphs to use for the search. If no graphs are specified all graphs in the subscription are searched. If the resources are project resources the information on the graph IRI is available on the Project Information screen for the project.
Type: array
Format: IRI
Language to return in the results. If not specified all languages are returned. If you only require a single language, using this property can dramatically reduce the response size and improve performance.
Type: string
Format: String
Controls whether the number of results is counted or not. Set to false to improve performance.
Type: boolean
Format: String
Page number of results to return.
Type: integer
Format: String
Number of results to return (max 400) in a single page. The default is 20.
Type: integer
Format: String
Predicates to include in results. Keeping this list to the minimum required will improve performance.
Type: array
Format: IRI
Details of the search. Items are ANDed together. If there is a predicate property but no corresponding value property the search will return resources that have the property with any value, but there must be a value.
Object
If true only strings matching exactly will be found.
Type: boolean
Format: String
Indicates to the search that the property should be treated as a text property, allowing you to search object properties as text. Note that, if this is used on non-compliant search using a non-indexed literal property, you will receive a 400 error.
Type: boolean
Format: String
Predicates to search.
Note that only a limited set of literal predicates are specially indexed to enable faster searching: rdfs:label, skos:prefLabel, skos:altLabel, skos:hiddenLabel, skosxl:literalForm and dc:title. This does not mean you are limited to searching just these properties. If you wish to search other literal properties you can do this by adding 'searchMode': 'Compliant' to your search payload. This will force a SPARQL compliant search, but please be aware that, without the benefit of indexing, searches for these properties may be less performant.
Type: string
Format: IRI
Type: array
Format: IRI
Value to search for. Note that, if you provide a value to an object property that is not a valid URI you will receive a 400 response.
Type: string
Format: String
Type: string
Format: IRI
Type: array
Format: IRI
IRIs of predicates to use for sorting (max 2).
Type: array
Format: IRI
The order in which to sort results if ordering is applied.
Type: string
Format: String
Values: Ascending | Descending
Subscription to use.
Type: string
Format: IRI
Search for things in a scheme with a preferred label containing 'tes' using a non-exact match. The noCount property will give faster results if counting is not required. The language property will filter responses to only include English language labels. The predicate property will filter the response to only include the preferred label.
{
    "subscription": "{{subscription}}",
    "search": [
        {
            "predicate": "http://www.w3.org/2004/02/skos/core#inScheme"
        },
        {
            "predicate": "http://www.w3.org/2004/02/skos/core#prefLabel",
            "value": "tes",
            "isExactMatch": false
        }
    ],
    "noCount": true,
    "language": "en",
    "predicates": [
        "http://www.w3.org/2004/02/skos/core#prefLabel"
    ]
}
Where projects are SKOS-XL enabled it can be very useful to use entailment to find concepts that have a preferred label that is 'entailed' through the SKOS property chain rule for literal forms on SKOS-XL labels. To do this include the entailment property as in this example.
{
    "subscription": "{{subscription}}",
    "search": [
        {
            "predicate": "http://www.w3.org/2004/02/skos/core#inScheme"
        },
        {
            "predicate": "http://www.w3.org/2004/02/skos/core#prefLabel",
            "value": "tes",
            "isExactMatch": false
        }
    ],
    "pageSize": 10,
    "noCount": true,
    "language": "en",
    "entailment": [
        "propertyChain"
    ],
    "predicates": [
        "http://www.w3.org/2004/02/skos/core#prefLabel"
    ]
}
Where possible searches will be faster if restricted to a particular project graph. To do this use the graph property.
{
    "subscription": "{{subscription}}",
    "search": [
        {
            "predicate": "http://www.w3.org/2004/02/skos/core#inScheme"
        },
        {
            "predicate": "http://www.w3.org/2004/02/skos/core#prefLabel",
            "value": "tes",
            "isExactMatch": false
        }
    ],
    "graph": ["{{projectGraph}}"],
    "predicates": [
        "http://www.w3.org/2004/02/skos/core#prefLabel"
    ]
}Take a snapshot of a project.
Note that there is a minimum delay between snapshots.
Content type:application/json
Response formats:application/json
A comment about the snapshot.
Type: string
Format: String
Indicates whether to create a version from the snapshot. Note that this is only permitted on certain subscription types.
Type: boolean
Format: String
A name for the snapshot.
Type: string
Format: String
The snapshot configuration to use. A list of snapshot configurations can be retrieved by the snapshotconfiguration endpoint.
Type: string
Format: IRI
Subscription to use.
Type: string
Format: IRI
To create a snapshot using a particular snapshot configuration and create a version from that snapshot.
{
    "subscription": "{{subscription}}",
    "snapshotConfiguration": "{{snapshot configuration IRI}}",
    "name": "{{Name for snapshot}}",
    "comment": "{{Comment for snapshot}}",
    "isVersion": true
}Get a list of snapshot configurations.
Response formats:application/ld+json
Query subscription with SPARQL.
Permitted query types are ASK, DESCRIBE and SELECT.
Note that the acceptable format of the response will depend upon the query type.
You can include up to five named graphs.
There is a timeout on the endpoint, the value of which depends upon the subscription type.
Content type:application/x-www-form-urlencoded
Response formats:application/n-triples | application/rdf+xml | text/turtle | application/sparql-results+json
The named graph to query.
Type: string
Format: IRI
SPARQL query.
Export a data project.
Note that there is a 500MB limit for formats other than application/n-triples.
Content type:application/json
Response formats:application/ld+json | application/rdf+xml | application/n-triples | text/turtle
If applicable, directs the API to embed a JSON-LD context in the response. Note this can bloat the response considerably, so unless processing the output as RDF it is best to omit this.
Type: boolean
Format: String
The graph of the project to use.
Type: string
Format: IRI
Project to export.
Type: string
Format: IRI
Subscription to use.
Type: string
Format: IRI
To export a data project with IRI project1 use the following payload.
{
    "subscription": "{{subscription}}",
    "graph": "{{projectGraph}}",
    "iri": "{{project1}}"
}Export a dataset.
Note that there is a 500MB limit for formats other than application/n-triples.
Content type:application/json
Response formats:application/ld+json | application/rdf+xml | application/n-triples | text/turtle
If applicable, directs the API to embed a JSON-LD context in the response. Note this can bloat the response considerably, so unless processing the output as RDF it is best to omit this.
Type: boolean
Format: String
The graph of the project to use.
Type: string
Format: IRI
Dataset to export.
Type: string
Format: IRI
Subscription to use.
Type: string
Format: IRI
To export a dataset with IRI dataset1 use the following payload.
{
    "subscription": "{{subscription}}",
    "graph": "{{projectGraph}}",
    "iri": "{{dataset1}}"
}Get statistics for a dataset.
Content type:application/json
Response formats:application/ld+json | application/rdf+xml | application/n-triples | text/turtle
The graph of the project to use.
Type: string
Format: IRI
Dataset to get statistics for.
Type: string
Format: IRI
Subscription to use.
Type: string
Format: IRI
To get statistics for a dataset with IRI dataset1 use the following payload.
{
    "subscription": "{{subscription}}",
    "graph": "{{projectGraph}}",
    "iri": "{{dataset1}}"
}Export an ontology.
Note that there is a 500MB limit for formats other than application/n-triples.
Content type:application/json
Response formats:application/ld+json | application/rdf+xml | text/turtle
If applicable, directs the API to embed a JSON-LD context in the response. Note this can bloat the response considerably so unless processing the output as RDF it is best to omit this.
Type: boolean
Format: String
The graph of the project to use.
Type: string
Format: IRI
Ontology to export.
Type: string
Format: IRI
Subscription to use.
Type: string
Format: IRI
To export an ontology with IRI ontology1 use the following payload.
{
    "subscription": "{{subscription}}",
    "graph": "{{projectGraph}}",
    "iri": "{{ontology1}}"
}Export an ontology project.
Note that there is a 500MB limit for formats other than application/n-triples.
Content type:application/json
Response formats:application/ld+json | application/rdf+xml | application/n-triples | text/turtle
If applicable, directs the API to embed a JSON-LD context in the response. Note this can bloat the response considerably, so unless processing the output as RDF it is best to omit this.
Type: boolean
Format: String
The graph of the project to use.
Type: string
Format: IRI
Project to export.
Type: string
Format: IRI
Subscription to use.
Type: string
Format: IRI
To export an ontology project with IRI project1 use the following payload.
{
    "subscription": "{{subscription}}",
    "graph": "{{projectGraph}}",
    "iri": "{{project1}}"
}Get statistics for an ontology.
Content type:application/json
Response formats:application/ld+json | application/rdf+xml | application/n-triples | text/turtle
The graph of the project to use.
Type: string
Format: IRI
Ontology to get statistics for.
Type: string
Format: IRI
Subscription to use.
Type: string
Format: IRI
To get statistics for an ontology with IRI ontology1 use the following payload.
{
    "subscription": "{{subscription}}",
    "graph": "{{projectGraph}}",
    "iri": "{{ontology1}}"
}Export a taxonomy.
Note that this endpoint replaces view/export which is now deprecated.
Note that there is a 500MB limit for formats other than application/n-triples.
Content type:application/json
Response formats:application/ld+json | application/rdf+xml | application/n-triples | text/turtle
If applicable, directs the API to embed a JSON-LD context in the response. Note this can bloat the response considerably, so unless processing the output as RDF it is best to omit this.
Type: boolean
Format: String
The graph of the project to use.
Type: string
Format: IRI
Taxonomy (concept scheme) to export.
Type: string
Format: IRI
Use the value includeXL to include any SKOS-XL labels in the output.
Type: array
Format: String
Values: includeXL
Subscription to use.
Type: string
Format: IRI
To export a taxonomy with IRI scheme1 use the following payload.
{
    "subscription": "{{subscription}}",
    "graph": "{{projectGraph}}",
    "iri": "{{scheme1}}"
}Export a taxonomy project.
Note that there is a 500MB limit for formats other than application/n-triples.
Content type:application/json
Response formats:application/ld+json | application/rdf+xml | application/n-triples | text/turtle
If applicable, directs the API to embed a JSON-LD context in the response. Note this can bloat the response considerably, so unless processing the output as RDF it is best to omit this.
Type: boolean
Format: String
The graph of the project to use.
Type: string
Format: IRI
Project to export.
Type: string
Format: IRI
Subscription to use.
Type: string
Format: IRI
To export a taxonomy project with IRI project1 use the following payload.
{
    "subscription": "{{subscription}}",
    "graph": "{{projectGraph}}",
    "iri": "{{project1}}"
}Get statistics for a taxonomy.
Note that this endpoint replaces view/statistics which is now deprecated.
Content type:application/json
Response formats:application/ld+json | application/rdf+xml | application/n-triples | text/turtle
The graph of the project to use.
Type: string
Format: IRI
Taxonomy to get statistics for.
Type: string
Format: IRI
Subscription to use.
Type: string
Format: IRI
To get statistics for a taxonomy with IRI scheme1 use the following payload.
{
    "subscription": "{{subscription}}",
    "graph": "{{projectGraph}}",
    "iri": "{{scheme1}}"
}